Operation Manual
Page 2
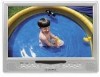
... the DT102 portable DVD player. The unit applies the latest state of reliable, trouble-free service, and is compact so that you can be used as portable DVD player or when installed into the available docking stations as a home or mobile DVD player. The DVD Player is constructed to provide years of the art electronics and is designed to be used in the motor vehicle at any adjustments to using...
... the DT102 portable DVD player. The unit applies the latest state of reliable, trouble-free service, and is compact so that you can be used as portable DVD player or when installed into the available docking stations as a home or mobile DVD player. The DVD Player is constructed to provide years of the art electronics and is designed to be used in the motor vehicle at any adjustments to using...
Operation Manual
Page 3
... no user-serviceable parts inside the DVD Player. Do not touch the surface of electric to replace the battery incorrectly. Remove the disc from the DVD Player and store it from falling. Do not place the set on or in its edge. Disc Do not use liquid cleaners or aerosol cleaners. Do not expose the disc to do so. Software producers may intentionally fix some playback features...
... no user-serviceable parts inside the DVD Player. Do not touch the surface of electric to replace the battery incorrectly. Remove the disc from the DVD Player and store it from falling. Do not place the set on or in its edge. Disc Do not use liquid cleaners or aerosol cleaners. Do not expose the disc to do so. Software producers may intentionally fix some playback features...

Operation Manual
Page 4
Materials Included In This Package 1) Shuttle Portable DVD Player with 10.2" LCD Monitor (P/N: 136-3886) ~ 1pc 2) Headrest Mounting Bag (P/N: 126-1324) ~ 1pc 3) Rechargeable Lithium Polymer Battery Pack 5000mAH (P/N: 136-3890) ~ 1pc 4) Remote Control (P/N: 136-3887) ~ 1pc 5) AC to DC Power Adaptor (P/N: 112-3513) ~ 1pc 6) DC Power Adaptor Cable (P/N: 112-3515) ~ 1pc 7) AV Adapter Cable (P/N: 112B3227) ~ 1pc 8) Canvas Carrying Bag (P/N: 126-1327) ~ 1pc 4
Materials Included In This Package 1) Shuttle Portable DVD Player with 10.2" LCD Monitor (P/N: 136-3886) ~ 1pc 2) Headrest Mounting Bag (P/N: 126-1324) ~ 1pc 3) Rechargeable Lithium Polymer Battery Pack 5000mAH (P/N: 136-3890) ~ 1pc 4) Remote Control (P/N: 136-3887) ~ 1pc 5) AC to DC Power Adaptor (P/N: 112-3513) ~ 1pc 6) DC Power Adaptor Cable (P/N: 112-3515) ~ 1pc 7) AV Adapter Cable (P/N: 112B3227) ~ 1pc 8) Canvas Carrying Bag (P/N: 126-1327) ~ 1pc 4
Operation Manual
Page 6
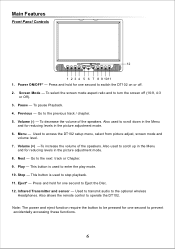
... button is used to turn the screen off . 2. Eject* - Used to transmit audio to the next track or Chapter. 9. To select the screen mode aspect ratio and to enter the play mode. 10. Previous - Play - Volume (-) - Stop - Infrared Transmitter and sensor - Pause - Also used to scroll down in the Menu and for one second to be pressed for reducing levels in the picture adjustment mode. 8. Note: The power and eject function require the button to switch the DT102 on...
... button is used to turn the screen off . 2. Eject* - Used to transmit audio to the next track or Chapter. 9. To select the screen mode aspect ratio and to enter the play mode. 10. Previous - Play - Volume (-) - Stop - Infrared Transmitter and sensor - Pause - Also used to scroll down in the Menu and for one second to be pressed for reducing levels in the picture adjustment mode. 8. Note: The power and eject function require the button to switch the DT102 on...
Operation Manual
Page 7
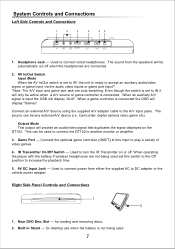
... connect the DT102 to increase the playback time. 5. 9V DC Input Jack - Used to turn the IR Transmitter on the DT102. The source can be automatically cut off . Used to connect power from the speakers will provide an audio/video signal that duplicates the signal displayed on or off when the headphones are auto-switching. Right Side Panel Controls and Connections 1 2 1. Headphone Jack - IR Transmitter On/Off Switch - Camcorder, digital camera video game etc) Output Mode...
... connect the DT102 to increase the playback time. 5. 9V DC Input Jack - Used to turn the IR Transmitter on the DT102. The source can be automatically cut off . Used to connect power from the speakers will provide an audio/video signal that duplicates the signal displayed on or off when the headphones are auto-switching. Right Side Panel Controls and Connections 1 2 1. Headphone Jack - IR Transmitter On/Off Switch - Camcorder, digital camera video game etc) Output Mode...

Operation Manual
Page 8
..., Brightness, Color or Tint. Use these buttons to access the available Audio languages, when the DVD disc contains multiple audio languages. 6. Return - Not used in a backward direction at 2, 4, 8 and 20 times the normal playback speed of a DVD or CD from disc to repeat playback of a DVD. 8 Audio - Volume pq - To increase or decrease the volume level. 8. Display the subtitle language of angles varies from point A to search in this button is pressed. 7. PIX (Picture Select) - Each time this model. 5. Remote Control 26...
..., Brightness, Color or Tint. Use these buttons to access the available Audio languages, when the DVD disc contains multiple audio languages. 6. Return - Not used in a backward direction at 2, 4, 8 and 20 times the normal playback speed of a DVD or CD from disc to repeat playback of a DVD. 8 Audio - Volume pq - To increase or decrease the volume level. 8. Display the subtitle language of angles varies from point A to search in this button is pressed. 7. PIX (Picture Select) - Each time this model. 5. Remote Control 26...
Operation Manual
Page 9
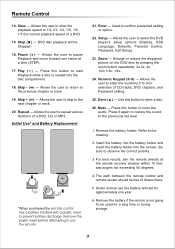
Slow - Allows the user to slow the playback speed to 1/2,1/3, 1/4, 1/5, 1/6, 1/7 the normal playback speed of a DVD. 15. Remote Control 14. Stop (
Slow - Allows the user to slow the playback speed to 1/2,1/3, 1/4, 1/5, 1/6, 1/7 the normal playback speed of a DVD. 15. Remote Control 14. Stop (
Operation Manual
Page 10
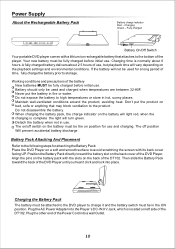
... Battery Pack Battery charge indicator Red - Fully charged ON OFF Battery On/Off Switch Your portable DVD player comes with its back cover facing UP. Detach the battery when not in fire or water. Charging time is complete the light will vary depending on a soft and smooth surface to the bottom of the DT102. Plug the AC Power Adapter into a wall Outlet. 10 Do not disassemble the battery. Charging...
... Battery Pack Battery charge indicator Red - Fully charged ON OFF Battery On/Off Switch Your portable DVD player comes with its back cover facing UP. Detach the battery when not in fire or water. Charging time is complete the light will vary depending on a soft and smooth surface to the bottom of the DT102. Plug the AC Power Adapter into a wall Outlet. 10 Do not disassemble the battery. Charging...
Operation Manual
Page 11
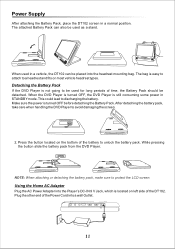
... is turned OFF before detaching the Battery Pack. Make sure the power is easy to attach to be detached. This could lead to unlock the battery pack. Press the button located on left side of the battery to discharging the battery. Plug the other end of time, the Battery Pack should be used in STANDBY mode. DC 9V 11 Detaching the Battery Pack If the DVD Player...
... is turned OFF before detaching the Battery Pack. Make sure the power is easy to attach to be detached. This could lead to unlock the battery pack. Press the button located on left side of the battery to discharging the battery. Plug the other end of time, the Battery Pack should be used in STANDBY mode. DC 9V 11 Detaching the Battery Pack If the DVD Player...
Operation Manual
Page 12
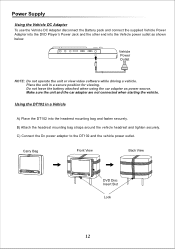
... power source. Power Supply Using the Vehicle DC Adapter To use the Vehicle DC Adapter disconnect the Battery pack and connect the supplied Vehicle Power Adapter into the DVD Player's Power Jack and the other end into the headrest mounting bag and fasten securely. Vehicle DC 9V Power Outlet NOTE: Do not operate the unit or view video software while driving a vehicle. Carry Bag Front View Back View DVD Disc Insert Slot Lock...
... power source. Power Supply Using the Vehicle DC Adapter To use the Vehicle DC Adapter disconnect the Battery pack and connect the supplied Vehicle Power Adapter into the DVD Player's Power Jack and the other end into the headrest mounting bag and fasten securely. Vehicle DC 9V Power Outlet NOTE: Do not operate the unit or view video software while driving a vehicle. Carry Bag Front View Back View DVD Disc Insert Slot Lock...
Operation Manual
Page 13
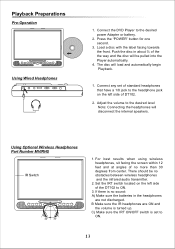
... ON and the volume is set of no obstacles between wireless headphones and the infrared audio transmitter. 2. Using Optional Wireless Headphones Part Number MVIRHS IR Switch 30° 30° 1. C) Make sure the IRT ON/OFF switch is turned up. Press the "POWER" button for one second. 3. Playback Preparations Pre-Operation Using Wired Headphones 1. For best results when using wireless headphones, sit facing the screen within 12...
... ON and the volume is set of no obstacles between wireless headphones and the infrared audio transmitter. 2. Using Optional Wireless Headphones Part Number MVIRHS IR Switch 30° 30° 1. C) Make sure the IRT ON/OFF switch is turned up. Press the "POWER" button for one second. 3. Playback Preparations Pre-Operation Using Wired Headphones 1. For best results when using wireless headphones, sit facing the screen within 12...
Operation Manual
Page 14
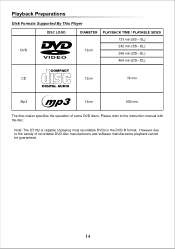
... min The disc maker specifies the operation of playing most recordable DVDs in the DVD-R format. However due to the instruction manual with the disc. Note: The DT102 is capable of some DVD discs. SL) 484 min (DS - SL) 12cm 242 min (SS - Please refer to the variety of recordable DVD disc manufacturers and software manufacturers playback cannot be guaranteed. 14 Playback Preparations Disk Formats Supported By This Player DVD DISC LOGO VIDEO DIAMETER PLAYBACK TIME / PLAYABLE...
... min The disc maker specifies the operation of playing most recordable DVDs in the DVD-R format. However due to the instruction manual with the disc. Note: The DT102 is capable of some DVD discs. SL) 484 min (DS - SL) 12cm 242 min (SS - Please refer to the variety of recordable DVD disc manufacturers and software manufacturers playback cannot be guaranteed. 14 Playback Preparations Disk Formats Supported By This Player DVD DISC LOGO VIDEO DIAMETER PLAYBACK TIME / PLAYABLE...

Operation Manual
Page 15
... Adapter Cable AUDIO IN/OUT VIDEO IN/OUT IN OUT AV AUDIO IN/OUT VIDEO IN/OUT AV Switch turn it over and re-insert it. Switch the AV IN/OUT switch to a television or audio amplifier. Connecting to an Amplifier (Refer Figure 2) The DVD player can also be used for a long time, disconnect the plug from the DVD player to the audio/video inputs of the power cord to OUT Figure1 VIDEO IN AUDIO L AUDIO...
... Adapter Cable AUDIO IN/OUT VIDEO IN/OUT IN OUT AV AUDIO IN/OUT VIDEO IN/OUT AV Switch turn it over and re-insert it. Switch the AV IN/OUT switch to a television or audio amplifier. Connecting to an Amplifier (Refer Figure 2) The DVD player can also be used for a long time, disconnect the plug from the DVD player to the audio/video inputs of the power cord to OUT Figure1 VIDEO IN AUDIO L AUDIO...
Operation Manual
Page 16
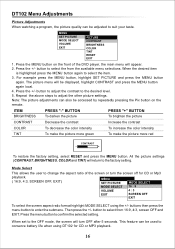
...setting. button to the OFF mode, the screen will turn the screen off for CD or Mp3 playback. ( 16:9, 4:3, SCREEN OFF, EXIT) MENU SET PICTURE MODE SELECT MODE SELECT 16 : 9 VOLUME 4 : 3 EXIT SCREEN OFF EXIT To select the screen aspect ratio format highlight MODE SELECT using DT102 for CD or MP3 playback. 16 Press the +/- When set to select the from 16:9, 4:3, screen OFF and EXIT. DT102 Menu Adjustments Picture Adjustments When watching a program, the picture quality can be adjusted to change the aspect ratio of the DVD player, the main menu will appear. 2. Mode Select...
...setting. button to the OFF mode, the screen will turn the screen off for CD or Mp3 playback. ( 16:9, 4:3, SCREEN OFF, EXIT) MENU SET PICTURE MODE SELECT MODE SELECT 16 : 9 VOLUME 4 : 3 EXIT SCREEN OFF EXIT To select the screen aspect ratio format highlight MODE SELECT using DT102 for CD or MP3 playback. 16 Press the +/- When set to select the from 16:9, 4:3, screen OFF and EXIT. DT102 Menu Adjustments Picture Adjustments When watching a program, the picture quality can be adjusted to change the aspect ratio of the DVD player, the main menu will appear. 2. Mode Select...

Operation Manual
Page 17
... picture in 16:9 mode. MENU SET PICTURE MODE SELECT VOLUME EXIT NOTE: The menu will also disappear from the screen automatically if you can also be controlled by using the +/- Pressing the screen mode button will cycle through the screen aspect ratio options (16:9, 4:3, OFF ). Volume VOLUME - + Use the +/- buttons to select EXIT, press the menu button to select VOLUME, after that press the menu button, you do not press any button within five seconds. 17 DT102 Menu Adjustements (Cont) NOTE: Pressing the screen mode button...
... picture in 16:9 mode. MENU SET PICTURE MODE SELECT VOLUME EXIT NOTE: The menu will also disappear from the screen automatically if you can also be controlled by using the +/- Pressing the screen mode button will cycle through the screen aspect ratio options (16:9, 4:3, OFF ). Volume VOLUME - + Use the +/- buttons to select EXIT, press the menu button to select VOLUME, after that press the menu button, you do not press any button within five seconds. 17 DT102 Menu Adjustements (Cont) NOTE: Pressing the screen mode button...
Operation Manual
Page 18
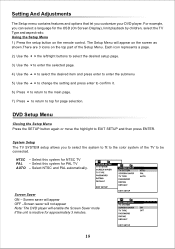
.... Using the Setup Menu 1) Press the setup button on the top part of the TV to be connected. Select this system for the OSD (On Screen Display), limit playback by children, select the TV Type and aspect ratio. Select this system for page selection. Screen Saver ON - Screen saver will appear OFF -Screen saver will not appear Note: The DVD player will appear on the screen as shown.There are 3 icons on the remote control...
.... Using the Setup Menu 1) Press the setup button on the top part of the TV to be connected. Select this system for the OSD (On Screen Display), limit playback by children, select the TV Type and aspect ratio. Select this system for page selection. Screen Saver ON - Screen saver will appear OFF -Screen saver will not appear Note: The DVD player will appear on the screen as shown.There are 3 icons on the remote control...

Operation Manual
Page 19
... the default function. 19 Select the rating level using the pq buttons and press ENTER. Password Setting Select "Password" using the pq buttons and press ENTER. Use the p button to return to unlock the unit. Note: Record the new password in player. For the first time use the default password 3308 to "Password" and input any new four digit password and press ENTER. Press ENTER to make all settings return to enter the submenu. Setup TV Type The TV Type setup...
... the default function. 19 Select the rating level using the pq buttons and press ENTER. Password Setting Select "Password" using the pq buttons and press ENTER. Use the p button to return to unlock the unit. Note: Record the new password in player. For the first time use the default password 3308 to "Password" and input any new four digit password and press ENTER. Press ENTER to make all settings return to enter the submenu. Setup TV Type The TV Type setup...

Operation Manual
Page 20
... Setup Menu Press the SETUP button again or highlight EXIT SETUP and then press ENTER. 20 The lower the value, the more strict the control. The user can select from G to ADULT. Note: The subtitle selection is not available, the player will play and display on DVD's that are recorded in the disc. If the selected, language is only available for discs that contain the rating lockout feature. Select the language subtitle...
... Setup Menu Press the SETUP button again or highlight EXIT SETUP and then press ENTER. 20 The lower the value, the more strict the control. The user can select from G to ADULT. Note: The subtitle selection is not available, the player will play and display on DVD's that are recorded in the disc. If the selected, language is only available for discs that contain the rating lockout feature. Select the language subtitle...
Operation Manual
Page 21
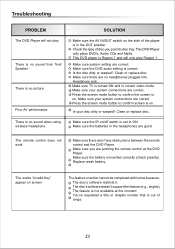
... turned ON and in the headphones are correct. Make sure your system connections are pointing the remote control at the moment. Make sure you are correct. The disc's software doesn't support the feature (e.g., angles) The feature is correct. Make sure the DVD audio setting is not available at the DVD Player. Make sure the batteries in correct video mode. Clean or replace disc. Troubleshooting PROBLEM The DVD Player will not play SOLUTION There is no sound...
... turned ON and in the headphones are correct. Make sure your system connections are pointing the remote control at the moment. Make sure you are correct. The disc's software doesn't support the feature (e.g., angles) The feature is correct. Make sure the DVD audio setting is not available at the DVD Player. Make sure the batteries in correct video mode. Clean or replace disc. Troubleshooting PROBLEM The DVD Player will not play SOLUTION There is no sound...

Operation Manual
Page 23
..., has suffered or been damaged through alteration, improper installation, mishandling, misuse, neglect, accident, or by removal or defacement of the factory serial number/bar code label(s). ANY IMPLIED WARRANTIES, INCLUDING ANY IMPLIED WARRANTY OF MERCHANTABILITY, SHALL BE LIMITED TO THE DURATION OF THIS WRITTEN WARRANTY. 90 DAY LIMITED WARRANTY Applies to Audiovox Video Products AUDIOVOX ELECTRONICS CORP. (the Company) warrants to the original...
..., has suffered or been damaged through alteration, improper installation, mishandling, misuse, neglect, accident, or by removal or defacement of the factory serial number/bar code label(s). ANY IMPLIED WARRANTIES, INCLUDING ANY IMPLIED WARRANTY OF MERCHANTABILITY, SHALL BE LIMITED TO THE DURATION OF THIS WRITTEN WARRANTY. 90 DAY LIMITED WARRANTY Applies to Audiovox Video Products AUDIOVOX ELECTRONICS CORP. (the Company) warrants to the original...


