
User Manual
Page 1
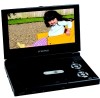
D1988 PORTABLE 9" LCD MONITOR AND DVD PLAYER WITH BUILT-IN BATTERY
D1988 PORTABLE 9" LCD MONITOR AND DVD PLAYER WITH BUILT-IN BATTERY
User Manual
Page 4
... cards and USB memory devices. A. The main features include a 9" wide Screen (16:9 Aspect Ratio) Liquid Crystal Display (LCD) monitor and a DVD player. Installation Ensure that you in this manual. 3. Keep the unit away from a cold to a warm location, moisture may result in hotels, offices or.... Caution Do not push objects of reliable, trouble-free service and is compact so that the 9" portable DVD player is constructed to a warm location, wait for choosing the D1988 portable DVD player. The unit is used in 1 card reader and a USB port. Do not place anything heavy on...
... cards and USB memory devices. A. The main features include a 9" wide Screen (16:9 Aspect Ratio) Liquid Crystal Display (LCD) monitor and a DVD player. Installation Ensure that you in this manual. 3. Keep the unit away from a cold to a warm location, moisture may result in hotels, offices or.... Caution Do not push objects of reliable, trouble-free service and is compact so that the 9" portable DVD player is constructed to a warm location, wait for choosing the D1988 portable DVD player. The unit is used in 1 card reader and a USB port. Do not place anything heavy on...
User Manual
Page 5
... unit in its edge. or block the slots and openings with the discs. 5 Keep the unit away from the center out with water for the DVD player. Disc Do not use irregularly shaped discs such as heart or star-shaped discs as fire, candle etc. Handle the disc by wiping the disc... model in good condition to prevent personal injury or property damage. 4.Disassembly Do not attempt to malfunction. The AC power cord supplies power to the DVD player or the battery.
... unit in its edge. or block the slots and openings with the discs. 5 Keep the unit away from the center out with water for the DVD player. Disc Do not use irregularly shaped discs such as heart or star-shaped discs as fire, candle etc. Handle the disc by wiping the disc... model in good condition to prevent personal injury or property damage. 4.Disassembly Do not attempt to malfunction. The AC power cord supplies power to the DVD player or the battery.
User Manual
Page 6
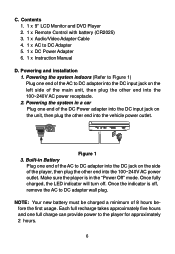
...NOTE: Your new battery must be charged a minimum of the DC Power adapter into the DC input jack on the left side of the player, then plug the other end into the 100~240V AC power receptacle. 2. Built-in a car Plug one full charge can provide power ...of the AC to DC adapter wall plug. Contents 1. 1 x 9'' LCD Monitor and DVD Player 2. 1 x Remote Control with battery (CR2025) 3. 1 x Audio/Video Adapter Cable 4. 1 x AC to the player for approximately 2 hours. 6 Make sure the player is off . Powering and installation 1. Each full recharge takes approximately five hours and one ...
...NOTE: Your new battery must be charged a minimum of the DC Power adapter into the DC input jack on the left side of the player, then plug the other end into the 100~240V AC power receptacle. 2. Built-in a car Plug one full charge can provide power ...of the AC to DC adapter wall plug. Contents 1. 1 x 9'' LCD Monitor and DVD Player 2. 1 x Remote Control with battery (CR2025) 3. 1 x Audio/Video Adapter Cable 4. 1 x AC to the player for approximately 2 hours. 6 Make sure the player is off . Powering and installation 1. Each full recharge takes approximately five hours and one ...
User Manual
Page 8
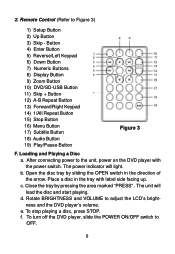
...load the disc and start playing. Remote Control (Refer to adjust the LCD's brightness and the DVD player's volume. To turn off the DVD player, slide the POWER ON/OFF switch to the unit, power on the DVD player with label side facing up. Button 4) Enter Button 5) Reverse/Left Keypad 6) Down Button ...7) Numeric Buttons 8) Display Button 9) Zoom Button 10) DVD/SD-USB Button 11) Skip + Button 12) A-B Repeat Button 13) Forward/Right Keypad 14...
...load the disc and start playing. Remote Control (Refer to adjust the LCD's brightness and the DVD player's volume. To turn off the DVD player, slide the POWER ON/OFF switch to the unit, power on the DVD player with label side facing up. Button 4) Enter Button 5) Reverse/Left Keypad 6) Down Button ...7) Numeric Buttons 8) Display Button 9) Zoom Button 10) DVD/SD-USB Button 11) Skip + Button 12) A-B Repeat Button 13) Forward/Right Keypad 14...
User Manual
Page 9
... it on /off AUDIO Select the audio language SETUP Display the setup menu to the next chapter, track or scene during play . WIDE On the DVD player only: change between wide screen and 4:3 picture aspect ratio. 9 PREVIOUS Go back to the previous chapter, track or scene during play back FORWARD Scan forward...
... it on /off AUDIO Select the audio language SETUP Display the setup menu to the next chapter, track or scene during play . WIDE On the DVD player only: change between wide screen and 4:3 picture aspect ratio. 9 PREVIOUS Go back to the previous chapter, track or scene during play back FORWARD Scan forward...

User Manual
Page 19
... and connect the other end to the AUDIO INPUT jacks on your Camcorder or other end to the "Out" position. 3. b. Connect one end of the DVD player ( Refer to Figure 4) a. L. NOT INCLUDED NOT INCLUDED Figure 4 2. Simply plug in the headphones to either Headphone 1 jack* or Headphone 2 jack on ...the right side of the audio/video cable's black (1/8" plug) plug into the unit's DVD AV jack and connect the other DVD using the AV adapter cable (white = left audio channel, red = right audio channel, yellow = video). Set the AV In/Out ...
... and connect the other end to the AUDIO INPUT jacks on your Camcorder or other end to the "Out" position. 3. b. Connect one end of the DVD player ( Refer to Figure 4) a. L. NOT INCLUDED NOT INCLUDED Figure 4 2. Simply plug in the headphones to either Headphone 1 jack* or Headphone 2 jack on ...the right side of the audio/video cable's black (1/8" plug) plug into the unit's DVD AV jack and connect the other DVD using the AV adapter cable (white = left audio channel, red = right audio channel, yellow = video). Set the AV In/Out ...

User Manual
Page 23
SCREEN SAVER Display *ON: enables screen saver *OFF: disables screen saver (off) *NOTE: The DVD player will not return to the last position on the disc. *OFF: The unit will enter the Screen Saver mode after approximately five minutes if the same image remains on the disc. 23 d). Select " Last Memory" by using the DOWN button. LAST MEMORY Screen Display *ON: The unit will return to the last position on the screen. Select 'SCREEN SAVER' using the DOWN button. c).
SCREEN SAVER Display *ON: enables screen saver *OFF: disables screen saver (off) *NOTE: The DVD player will not return to the last position on the disc. *OFF: The unit will enter the Screen Saver mode after approximately five minutes if the same image remains on the disc. 23 d). Select " Last Memory" by using the DOWN button. LAST MEMORY Screen Display *ON: The unit will return to the last position on the screen. Select 'SCREEN SAVER' using the DOWN button. c).
User Manual
Page 29
.... Rechargeable Built-in Li-polymer Design and Specifications are subject to first use The player utilizes a set of long-life Li-polymer batteries to the DVD player. 29 NOTE: When the DVD player is fully or only partially discharged. This means the Li-polymer batteries do not ...have "Memory Effect" and thus can be recharged safely regardless of degradation. Specifications Compatible DISC: DVD/CD/MP3 Signal system: NTSC ...
.... Rechargeable Built-in Li-polymer Design and Specifications are subject to first use The player utilizes a set of long-life Li-polymer batteries to the DVD player. 29 NOTE: When the DVD player is fully or only partially discharged. This means the Li-polymer batteries do not ...have "Memory Effect" and thus can be recharged safely regardless of degradation. Specifications Compatible DISC: DVD/CD/MP3 Signal system: NTSC ...
User Manual
Page 30
...battery or not) in the OFF position. 30 Each full recharge takes approximately five-hours and one full charge can provide power to the player for long time. During recharge, the red indicator will degrade when environmental temperatures drop below 50oF (10oC) or exceed 95oF (35oC). ... To charge the battery, please connect the power jack directly into the DVD player and leave the POWER switch in order to maximize battery life. 2. Please remove battery from the player and store it properly if the player is fully discharged, immediately recharge (regardless of the unit will turn off...
...battery or not) in the OFF position. 30 Each full recharge takes approximately five-hours and one full charge can provide power to the player for long time. During recharge, the red indicator will degrade when environmental temperatures drop below 50oF (10oC) or exceed 95oF (35oC). ... To charge the battery, please connect the power jack directly into the DVD player and leave the POWER switch in order to maximize battery life. 2. Please remove battery from the player and store it properly if the player is fully discharged, immediately recharge (regardless of the unit will turn off...
User Manual
Page 32
... be played in the remote are coded by region. This DVD is Region Number 1. Clean it. • Condensation has formed. DVDs with the label side facing up. • Check the type of disc you put into disc tray. Allow player to dry out. 32 Troubleshooting (Cont) PROBLEM IR sensor ...inoperative SOLUTION • Verify that the remote sensor eye is not obstructed. This DVD only plays digital video...
... be played in the remote are coded by region. This DVD is Region Number 1. Clean it. • Condensation has formed. DVDs with the label side facing up. • Check the type of disc you put into disc tray. Allow player to dry out. 32 Troubleshooting (Cont) PROBLEM IR sensor ...inoperative SOLUTION • Verify that the remote sensor eye is not obstructed. This DVD only plays digital video...


