User Manual
Page 1
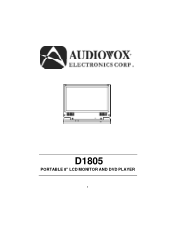
D1805 PORTABLE 8" LCD MONITOR AND DVD PLAYER 1
D1805 PORTABLE 8" LCD MONITOR AND DVD PLAYER 1

User Manual
Page 2
... read the entire instruction manual supplied with you in this appliance to rain or moisture. If the unit is designed for selecting the D1805 portable DVD player. A. Object and Liquid Do not push objects of any kind into the unit through openings; do not expose this manual. 3. The ...unit applies the latest state of reliable, trouble-free service, and is compact so that the D1805 is designed for quick and easy installation. To ensure...
... read the entire instruction manual supplied with you in this appliance to rain or moisture. If the unit is designed for selecting the D1805 portable DVD player. A. Object and Liquid Do not push objects of any kind into the unit through openings; do not expose this manual. 3. The ...unit applies the latest state of reliable, trouble-free service, and is compact so that the D1805 is designed for quick and easy installation. To ensure...
User Manual
Page 3
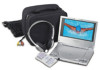
... with the discs. Cleaning Unit When cleaning, make sure the system is a risk of the system only. 6. Some playback operations of disc. Contents 1. 1 x 8'' LCD Monitor & DVD Player Combo 2. 1 x AC to malfunction. 4.Disassemble Do not attempt to the disc contents the software producers designed, some playback features may not be intentionally fixed by...
... with the discs. Cleaning Unit When cleaning, make sure the system is a risk of the system only. 6. Some playback operations of disc. Contents 1. 1 x 8'' LCD Monitor & DVD Player Combo 2. 1 x AC to malfunction. 4.Disassemble Do not attempt to the disc contents the software producers designed, some playback features may not be intentionally fixed by...
User Manual
Page 6
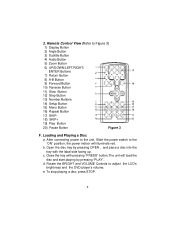
...) SKIP- 18) SKIP+ 19) Play Button 20) Pause Button Figure 3 F. 2. Loading and Playing a Disc a. b. c. d. Remote Control View (Refer to adjust the LCD's brightness and the DVD player's volume. To stop playing a disc, press STOP. 6 After connecting power to the unit, Slide the power switch to the "ON" position, the power indicor will...
...) SKIP- 18) SKIP+ 19) Play Button 20) Pause Button Figure 3 F. 2. Loading and Playing a Disc a. b. c. d. Remote Control View (Refer to adjust the LCD's brightness and the DVD player's volume. To stop playing a disc, press STOP. 6 After connecting power to the unit, Slide the power switch to the "ON" position, the power indicor will...

User Manual
Page 9
... SETUP Menu VIDEO QUALITY 9 LAST MEMORY Screen Display *on: The unit will return to the last position on the disc. *off ) *NOTE: The DVD player will not return to enter the video quality set up page. SCREEN SAVER Display *ON: enables screen saver *OFF: disables screen saver (off : The unit... will enter the Screen Saver mode after approximately five minutes if the same image remains on the disc. 2) With no disc inside the player select "Video quality Setup"by using the LEFT/RIGHT buttons, press "enter" to the last position on the screen. e). Select 'SCREEN SAVER' using...
... SETUP Menu VIDEO QUALITY 9 LAST MEMORY Screen Display *on: The unit will return to the last position on the disc. *off ) *NOTE: The DVD player will not return to enter the video quality set up page. SCREEN SAVER Display *ON: enables screen saver *OFF: disables screen saver (off : The unit... will enter the Screen Saver mode after approximately five minutes if the same image remains on the disc. 2) With no disc inside the player select "Video quality Setup"by using the LEFT/RIGHT buttons, press "enter" to the last position on the screen. e). Select 'SCREEN SAVER' using...
User Manual
Page 24
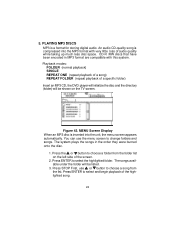
... menu screen to change folders and songs. You can use or button to select and begin playback of a specific folder) Insert an MP3 CD, the DVD player will initialize the disc and the directory (folder) will be shown on the left side of audio quality while taking up much less disc space...
... menu screen to change folders and songs. You can use or button to select and begin playback of a specific folder) Insert an MP3 CD, the DVD player will initialize the disc and the directory (folder) will be shown on the left side of audio quality while taking up much less disc space...
User Manual
Page 28
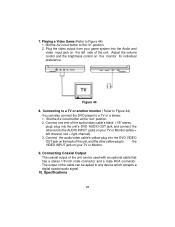
... control on your TV or Monitor. 9. Figure 44 8. Connecting to a TV or another monitor ( Refer to Figure 44) You can also connect the DVD player to Figure 44) 1. Slid the AV in /out button to any device which accepts a digital coaxial audio signal. 10. 7. Plug the video output ...In" position. 2. Specifications 28 Playing a Video Game (Refer to a TV or a stereo. 1. Connect the audio/video cable's yellow plug into the unit's DVD AUDIO OUT jack, and connect the other yellow plug to the AUDIO INPUT jacks on the monitor for individual preference. Slid the AV in /out...
... control on your TV or Monitor. 9. Figure 44 8. Connecting to a TV or another monitor ( Refer to Figure 44) You can also connect the DVD player to Figure 44) 1. Slid the AV in /out button to any device which accepts a digital coaxial audio signal. 10. 7. Plug the video output ...In" position. 2. Specifications 28 Playing a Video Game (Refer to a TV or a stereo. 1. Connect the audio/video cable's yellow plug into the unit's DVD AUDIO OUT jack, and connect the other yellow plug to the AUDIO INPUT jacks on the monitor for individual preference. Slid the AV in /out...
User Manual
Page 29
The Li-ion battery pack is specially designed for your player, please consult your dealer for portable power supply. For longer periods of degradation. Please fully charge the battery prior to the DVD player. Li-ion batteries feature high storage capacity and low level of storage, please... recharge the battery 29 NOTE: When the DVD player is fully or only partially spent. If you first fully charge the...
The Li-ion battery pack is specially designed for your player, please consult your dealer for portable power supply. For longer periods of degradation. Please fully charge the battery prior to the DVD player. Li-ion batteries feature high storage capacity and low level of storage, please... recharge the battery 29 NOTE: When the DVD player is fully or only partially spent. If you first fully charge the...
User Manual
Page 31
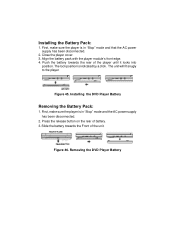
... the battery towards the Front of the unit. Figure 45. Slide the battery towards the rear of battery. 3. First, make sure the player is indicated by a click. Installing the DVD Player Battery Removing the Battery Pack: 1. The lock position is in "Stop" mode and that the AC power supply has been disconnected. 2. First...
... the battery towards the Front of the unit. Figure 45. Slide the battery towards the rear of battery. 3. First, make sure the player is indicated by a click. Installing the DVD Player Battery Removing the Battery Pack: 1. The lock position is in "Stop" mode and that the AC power supply has been disconnected. 2. First...


