Owners Manual
Page 1
DOCKING DIGITAL MUSIC SYSTEM FOR iPod® ESTACIÓN DE SISTEMA DE MÚSICA DIGITAL PARA iPod® CONNEXION DU SYSTEME MUSICAL DIGITAL POUR iPod® OWNER'S MANUAL MANUAL DEL USUARIO/GUIDE DU PROPRIETAIRE CE710CR (iPod® Not Included/iPod® No Incluido/iPod® non inclus) PLEASE READ THIS OPERATING MANUAL COMPLETELY BEFORE OPERATING THIS UNIT AND RETAIN THE BOOKLET FOR FUTURE REFERENCE CE710CR IB 09/01/2009 VER 18.0 fold size: 148.5 x 210mm ( 15 pcs 297 x 210mm - 60PP) printing color: Black (black on white / BK+BK)
DOCKING DIGITAL MUSIC SYSTEM FOR iPod® ESTACIÓN DE SISTEMA DE MÚSICA DIGITAL PARA iPod® CONNEXION DU SYSTEME MUSICAL DIGITAL POUR iPod® OWNER'S MANUAL MANUAL DEL USUARIO/GUIDE DU PROPRIETAIRE CE710CR (iPod® Not Included/iPod® No Incluido/iPod® non inclus) PLEASE READ THIS OPERATING MANUAL COMPLETELY BEFORE OPERATING THIS UNIT AND RETAIN THE BOOKLET FOR FUTURE REFERENCE CE710CR IB 09/01/2009 VER 18.0 fold size: 148.5 x 210mm ( 15 pcs 297 x 210mm - 60PP) printing color: Black (black on white / BK+BK)
Owners Manual
Page 5
... of this product is too late, this by playing it at a safe level. We Want You Listening For a Lifetime Used wisely, your new sound equipment will help to your musical enjoyment. This...volumes of sound. You should note the serial number of your hearing. Model Number: CE710CR Serial Number 1 Customer's Record: The serial number of this unit in the future. After all, we want you have established a comfortable sound level: Set the dial and leave it comfortably and clearly, and without affecting your volume control at a safe level BEFORE your hearing "comfort level" adapts...
... of this product is too late, this by playing it at a safe level. We Want You Listening For a Lifetime Used wisely, your new sound equipment will help to your musical enjoyment. This...volumes of sound. You should note the serial number of your hearing. Model Number: CE710CR Serial Number 1 Customer's Record: The serial number of this unit in the future. After all, we want you have established a comfortable sound level: Set the dial and leave it comfortably and clearly, and without affecting your volume control at a safe level BEFORE your hearing "comfort level" adapts...
Owners Manual
Page 6
... the manufacturer's instructions. - When a cart is operated 2. The safety and operating instructions should be used , use attachments / accessories specified by the manufacturer. 7. All warnings on or pinched particularly at plugs, convenience receptacles, and the point where they exit from being walked on the appliance and in a wet basement, or near any ventilation openings. Protect the power cord from the...
... the manufacturer's instructions. - When a cart is operated 2. The safety and operating instructions should be used , use attachments / accessories specified by the manufacturer. 7. All warnings on or pinched particularly at plugs, convenience receptacles, and the point where they exit from being walked on the appliance and in a wet basement, or near any ventilation openings. Protect the power cord from the...
Owners Manual
Page 7
... so as power-supply cord or plug is used as recommended by the manufacturer. 16. All markings are not spilled into the apparatus, the apparatus has been exposed to grounding electrodes, and requirements for the grounding electrode. Power Lines - CAUTION: TO PREVENT ELECTRIC SHOCK, MATCH WIDE BLADE OF PLUG TO WIDE SLOT. IMPORTANT SAFETY INSTRUCTIONS 14. Outdoor Antenna Grounding - Servicing - S2898A...
... so as power-supply cord or plug is used as recommended by the manufacturer. 16. All markings are not spilled into the apparatus, the apparatus has been exposed to grounding electrodes, and requirements for the grounding electrode. Power Lines - CAUTION: TO PREVENT ELECTRIC SHOCK, MATCH WIDE BLADE OF PLUG TO WIDE SLOT. IMPORTANT SAFETY INSTRUCTIONS 14. Outdoor Antenna Grounding - Servicing - S2898A...
Owners Manual
Page 8
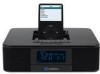
... Contractible Aux Cord with 3.5mm Aux Plug • External FM Antenna Jack for Better FM Reception Card Size Remote Control for Connecting CD Player or Other Digital Audio Player • 2 Built-in High Fidelity Aluminum Cone Speakers • Multi-function Back-lit LCD Display • Interchangeable iPod® Adaptors • FM Stereo Receiver with 10FM Presets, Digital Tuning and Auto Search Function • Electronic Volume Control • Wake to Radio, Alarm or iPod® • Snooze and Sleep Functions • Built-in a residential installation...
... Contractible Aux Cord with 3.5mm Aux Plug • External FM Antenna Jack for Better FM Reception Card Size Remote Control for Connecting CD Player or Other Digital Audio Player • 2 Built-in High Fidelity Aluminum Cone Speakers • Multi-function Back-lit LCD Display • Interchangeable iPod® Adaptors • FM Stereo Receiver with 10FM Presets, Digital Tuning and Auto Search Function • Electronic Volume Control • Wake to Radio, Alarm or iPod® • Snooze and Sleep Functions • Built-in a residential installation...
Owners Manual
Page 9
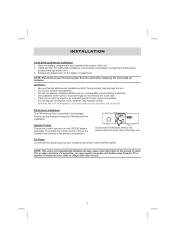
...new batteries. • Do not mix alkaline, standard (carbon-zinc) or rechargeable (nickel-cadmium) batteries. • Only batteries of the unit. 2. Remote Control The remote control operates on the screen of the main unit AC Power Connect the AC power plug into your household AC power ...batteries are to be used. • If the unit is not to be exposed to excessive heat such as sunshine, fire or the like. Connect the FM Antenna Wire to move the unit further away from the unit before replacing the clock back-up Batteries Installation 1. NOTE: Please disconnect the main power...
...new batteries. • Do not mix alkaline, standard (carbon-zinc) or rechargeable (nickel-cadmium) batteries. • Only batteries of the unit. 2. Remote Control The remote control operates on the screen of the main unit AC Power Connect the AC power plug into your household AC power ...batteries are to be used. • If the unit is not to be exposed to excessive heat such as sunshine, fire or the like. Connect the FM Antenna Wire to move the unit further away from the unit before replacing the clock back-up Batteries Installation 1. NOTE: Please disconnect the main power...

Owners Manual
Page 10
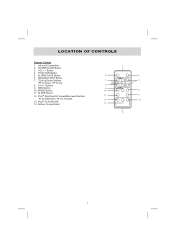
... 22 23 20 1. POWER On/Off Button - TUN +/- /iPod / Buttons - SLEEP Button - Remote Infra-red Sensor 15. For resetting the unit 6 Buttons - Activate the snooze function; Buttons - An Audio Cable with a 3.5mm stereo plug for the connection of the sleep timer 10. Select the time duration of external audio device 18. Save the radio preset stations; Headphone Jack 21. Adjust the volume level up or down ; iPod ® Skip/Search. It is to contain two 'AAA' batteries for Forward. 7. Tune...
... 22 23 20 1. POWER On/Off Button - TUN +/- /iPod / Buttons - SLEEP Button - Remote Infra-red Sensor 15. For resetting the unit 6 Buttons - Activate the snooze function; Buttons - An Audio Cable with a 3.5mm stereo plug for the connection of the sleep timer 10. Select the time duration of external audio device 18. Save the radio preset stations; Headphone Jack 21. Adjust the volume level up or down ; iPod ® Skip/Search. It is to contain two 'AAA' batteries for Forward. 7. Tune...
Owners Manual
Page 11
Button 4. SNOOZE/LIGHT Button 7. MEM Button 10. MODE Button 11. iPod® PLAY/PAUSE 14. Battery Compartment 7 VOL +/- ALARM On/Off Button 6. TUN Up/Down Buttons for Down, for Forward. 13. iPod® Skip/Search Forward/Backward Buttons for Backward, for Up 8. SLEEP Button 12. FUNCTION Button 5. CH +/- Buttons 9. POWER On/Off Button 3. Infra-red Transmitter 2. LOCATION OF CONTROLS Remote Control 1.
Button 4. SNOOZE/LIGHT Button 7. MEM Button 10. MODE Button 11. iPod® PLAY/PAUSE 14. Battery Compartment 7 VOL +/- ALARM On/Off Button 6. TUN Up/Down Buttons for Down, for Forward. 13. iPod® Skip/Search Forward/Backward Buttons for Backward, for Up 8. SLEEP Button 12. FUNCTION Button 5. CH +/- Buttons 9. POWER On/Off Button 3. Infra-red Transmitter 2. LOCATION OF CONTROLS Remote Control 1.
Owners Manual
Page 12
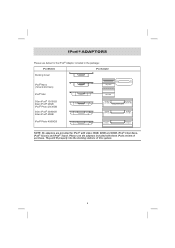
Please use the adaptors included with video 30GB, 60GB and 80GB, iPod® 3Gen Nano, iPod® Classic and iPod® Touch. They will fit properly into the docking stations of purchase. iPod® ADAPTORS Please see below for the iPod® Adaptor included in the package: iPod Models iPod Adaptor Docking Cover iPod® Nano (1st and 2nd Gen) iPod® Mini 3Gen iPod®...
Please use the adaptors included with video 30GB, 60GB and 80GB, iPod® 3Gen Nano, iPod® Classic and iPod® Touch. They will fit properly into the docking stations of purchase. iPod® ADAPTORS Please see below for the iPod® Adaptor included in the package: iPod Models iPod Adaptor Docking Cover iPod® Nano (1st and 2nd Gen) iPod® Mini 3Gen iPod®...
Owners Manual
Page 13
... FM reception, fully extend the FM antenna and adjust the direction. 9 Press the POWER button to select STEREO (ST) or MONO FM reception. 4. Press the FUNCTION button repeatedly until the flashing "USA", "EU", or "JP" is selected, press the MEM button to Power Off mode. 2. In FM radio mod, if necessary, press the MODE button to turn on . 2. The tuner will flash on the display begins to save the setting and exit the setting mode. Preset Stations The...
... FM reception, fully extend the FM antenna and adjust the direction. 9 Press the POWER button to select STEREO (ST) or MONO FM reception. 4. Press the FUNCTION button repeatedly until the flashing "USA", "EU", or "JP" is selected, press the MEM button to Power Off mode. 2. In FM radio mod, if necessary, press the MODE button to turn on . 2. The tuner will flash on the display begins to save the setting and exit the setting mode. Preset Stations The...
Owners Manual
Page 14
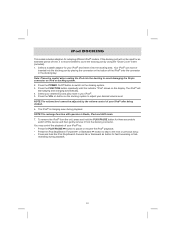
... PLAY/PAUSE button for fast-forwarding or fastrewinding during playback. Note: Please be inserted into the docking port by the volume control of your iPod® by using the "Dock Cover" insert (included). 1. Press the FUNCTION button repeatedly until the indicator "iPod" shows on iPod or docking system. 2. iPod DOCKING This model includes adaptors for your iPod® and insert it into the docking area. Press the POWER On/Off button...
... PLAY/PAUSE button for fast-forwarding or fastrewinding during playback. Note: Please be inserted into the docking port by the volume control of your iPod® by using the "Dock Cover" insert (included). 1. Press the FUNCTION button repeatedly until the indicator "iPod" shows on iPod or docking system. 2. iPod DOCKING This model includes adaptors for your iPod® and insert it into the docking area. Press the POWER On/Off button...
Owners Manual
Page 15
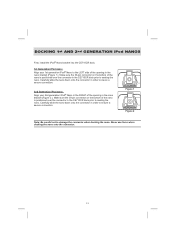
... Be careful not to ensure a secure connection. Make sure the 30-pin connector on the bottom of the nano is positioned over the connector in the CE710CR dock prior to the LEFT side of the opening in the nano bracket (Figure 2 ). Make sure the 30-pin connector on the ...the CE710CR dock prior to seating the nano. DOCKING 1st AND 2nd GENERATION iPod NANOS First, install the iPod® Nano bracket into the CE710CR dock. 1st Generation iPod nano: Align your 2nd generation iPod® Nano in the RIGHT of the opening in the nano bracket (Figure 1 ). Never use force when docking the...
... Be careful not to ensure a secure connection. Make sure the 30-pin connector on the bottom of the nano is positioned over the connector in the CE710CR dock prior to the LEFT side of the opening in the nano bracket (Figure 2 ). Make sure the 30-pin connector on the ...the CE710CR dock prior to seating the nano. DOCKING 1st AND 2nd GENERATION iPod NANOS First, install the iPod® Nano bracket into the CE710CR dock. 1st Generation iPod nano: Align your 2nd generation iPod® Nano in the RIGHT of the opening in the nano bracket (Figure 1 ). Never use force when docking the...

Owners Manual
Page 16
... unit. 4. ing of your device. When playing slideshows or videos, the audio will play on your choice. Two video output jacks are available on the AV cable. 3. Connect the other video display that has S-video or composite video input. 2. Press the FUNCTION button to select iPod mode. 2. iPod: Switch back to the movie library and play . iPod: Go to Photo Library and then press...
... unit. 4. ing of your device. When playing slideshows or videos, the audio will play on your choice. Two video output jacks are available on the AV cable. 3. Connect the other video display that has S-video or composite video input. 2. Press the FUNCTION button to select iPod mode. 2. iPod: Switch back to the movie library and play . iPod: Go to Photo Library and then press...
Owners Manual
Page 17
... year setting mode is displayed. NOTE: If you're connected using the CE710CR control. CLOCK AND CALENDAR SETTINGS The clock and calendar can only adjust the volume using the Line Out Jack of your external audio device. 3. Press the TUN +/- Press the MODE button repeatedly until the Month/Date setting mode is reached. To set the correct year. 3. Control the volume level by the volume control on the main unit or the remote control. If you're connected using the Headphone Jack of...
... year setting mode is displayed. NOTE: If you're connected using the CE710CR control. CLOCK AND CALENDAR SETTINGS The clock and calendar can only adjust the volume using the Line Out Jack of your external audio device. 3. Press the TUN +/- Press the MODE button repeatedly until the Month/Date setting mode is reached. To set the correct year. 3. Control the volume level by the volume control on the main unit or the remote control. If you're connected using the Headphone Jack of...
Owners Manual
Page 18
... button. The alarm clock display flashes now. 2. After the third alarm is in Power Off mode: 1. It starts softly and becomes gradually louder. • The iPod playback will keep for 60 minutes and then will automatically shut off. • To stop the radio alarm sound immediately, press the ALARM On/Off button once. Snooze Function • When the alarm sounds, it will switch to the Buzzer automatically when the alarm time is set the alarm hour and VOL +/- ALARM OPERATIONS Setting the Alarm Time...
... button. The alarm clock display flashes now. 2. After the third alarm is in Power Off mode: 1. It starts softly and becomes gradually louder. • The iPod playback will keep for 60 minutes and then will automatically shut off. • To stop the radio alarm sound immediately, press the ALARM On/Off button once. Snooze Function • When the alarm sounds, it will switch to the Buzzer automatically when the alarm time is set the alarm hour and VOL +/- ALARM OPERATIONS Setting the Alarm Time...
Owners Manual
Page 19
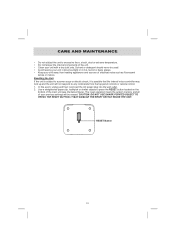
...RESET Button 15 The reset operation clears the system memory and all of your previous settings will not respond to excessive force, shock, dust or extreme temperature. • Do not tamper the internal components of the unit. • Clean your unit away from the top panel controls or remote control. 1. CAUTION: DO NOT USE... Resetting the Unit If the unit is subject to a power surge or electric shock, it is possible that the internal micro-controller may lock up and the unit will be used. • Avoid leaving your unit in direct sunlight or in hot, humid or dusty places. • Keep ...
...RESET Button 15 The reset operation clears the system memory and all of your previous settings will not respond to excessive force, shock, dust or extreme temperature. • Do not tamper the internal components of the unit. • Clean your unit away from the top panel controls or remote control. 1. CAUTION: DO NOT USE... Resetting the Unit If the unit is subject to a power surge or electric shock, it is possible that the internal micro-controller may lock up and the unit will be used. • Avoid leaving your unit in direct sunlight or in hot, humid or dusty places. • Keep ...
Owners Manual
Page 20
... audio source such as a music CD. If you iPod®. iPod® does not charge up . Plug another device into a wall outlet. Remove your iPod® manual for a period of time or lower volume. 16 Please refer to confirm the outlet is not installed properly. If the iPod® original sound source is of iPod®, try turning bass boost OFF or change the EQ setting. Then...
... audio source such as a music CD. If you iPod®. iPod® does not charge up . Plug another device into a wall outlet. Remove your iPod® manual for a period of time or lower volume. 16 Please refer to confirm the outlet is not installed properly. If the iPod® original sound source is of iPod®, try turning bass boost OFF or change the EQ setting. Then...
Owners Manual
Page 22
... the Company any product or part thereof which vary from the date of original purchase, such defect(s) will be repaired or replaced with the sale of this product. dated bill of sale), specification of defect(s), transportation prepaid, to an approved warranty station. For the location of the nearest warranty station to you, call toll-free to our control office: 1-800-645-4994...
... the Company any product or part thereof which vary from the date of original purchase, such defect(s) will be repaired or replaced with the sale of this product. dated bill of sale), specification of defect(s), transportation prepaid, to an approved warranty station. For the location of the nearest warranty station to you, call toll-free to our control office: 1-800-645-4994...

Owners Manual
Page 60
Audiovox Electronics Corporation 150 Marcus Blvd Hauppauge, New York 11788 © 2008 Audiovox Electronics Corporation PRINTED IN CHINA www.audiovox.com
Audiovox Electronics Corporation 150 Marcus Blvd Hauppauge, New York 11788 © 2008 Audiovox Electronics Corporation PRINTED IN CHINA www.audiovox.com


