
User Manual
Page 2
DO NOT OPEN. Important Safety Instructions 1. Install in any way, such as power-supply cord or plug is subject to the following two conditions: (1) this device may not cause harmful interference and (2) this apparatus near any interference received, including interference that unauthorized changes or modifications to operate it. FCC Information FCC Regulations state that may void the user's authority to this apparatus during lightning...
DO NOT OPEN. Important Safety Instructions 1. Install in any way, such as power-supply cord or plug is subject to the following two conditions: (1) this device may not cause harmful interference and (2) this apparatus near any interference received, including interference that unauthorized changes or modifications to operate it. FCC Information FCC Regulations state that may void the user's authority to this apparatus during lightning...

User Manual
Page 3
...-pin dock connector • An auxiliary input allows for the connection of any digital music player or other audio source to the speaker system • A compact infrared remote control lets you need great sound and refined design: • Provides two placement options: standing up or wall-mounted • Plays any iPod with your iPod and HD display-its component video outputs preserve the quality of purchase. You can also use the AR5100 as...
...-pin dock connector • An auxiliary input allows for the connection of any digital music player or other audio source to the speaker system • A compact infrared remote control lets you need great sound and refined design: • Provides two placement options: standing up or wall-mounted • Plays any iPod with your iPod and HD display-its component video outputs preserve the quality of purchase. You can also use the AR5100 as...

User Manual
Page 4
Introduction Unpack The first thing to do is unpack the AR5100 package and make sure it includes all of the following contents: Legs for table placement AR5100 main unit AC adapter Also: • Adapter inserts • Screws and anchors for wall mounting • Remote control 4
Introduction Unpack The first thing to do is unpack the AR5100 package and make sure it includes all of the following contents: Legs for table placement AR5100 main unit AC adapter Also: • Adapter inserts • Screws and anchors for wall mounting • Remote control 4

User Manual
Page 5
...mounting the unit on drywall. The back of the AR5100 as shown. 2. Position one of the legs over one of the recessed areas on a flat surface. Setting Up Once you've found where you'd like to put the AR5100, you have two placement options: Stand it up: The AR5100 comes with removable legs for table placement 1. The AR5100... is ready to place upright on the wall: The AR5100 package comes with...
...mounting the unit on drywall. The back of the AR5100 as shown. 2. Position one of the legs over one of the recessed areas on a flat surface. Setting Up Once you've found where you'd like to put the AR5100, you have two placement options: Stand it up: The AR5100 comes with removable legs for table placement 1. The AR5100... is ready to place upright on the wall: The AR5100 package comes with...

User Manual
Page 6
The mounting screws should be at eye level. Mark two holes 10.25" apart. Screw the mounting screws into the anchors until about 1/2" is left exposed. 6. Find a good location on the mounting screws as shown. 6 Drill holes for the AR5100. Setting Up Mounting the AR5100 to put it up where you plan to a wall 1. Place the anchors. 5. Make sure they're level. 3. Hang the AR5100 on your wall for the anchors where you want to mount it, hold it . 2. To make sure the unit fits where you marked. 4.
The mounting screws should be at eye level. Mark two holes 10.25" apart. Screw the mounting screws into the anchors until about 1/2" is left exposed. 6. Find a good location on the mounting screws as shown. 6 Drill holes for the AR5100. Setting Up Mounting the AR5100 to put it up where you plan to a wall 1. Place the anchors. 5. Make sure they're level. 3. Hang the AR5100 on your wall for the anchors where you want to mount it, hold it . 2. To make sure the unit fits where you marked. 4.
User Manual
Page 7
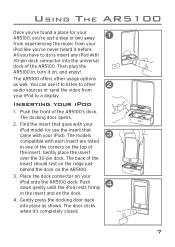
... opens. 2. Place the dock connector on the AR5100. 3. You can use the insert that goes with your 4 iPod onto the AR5100 dock. The door clicks when it on, and enjoy! Find the insert that came with each insert are listed in one of the AR5100. The back of the insert should rest on the ridge just behind the dock on your iPod model...
... opens. 2. Place the dock connector on the AR5100. 3. You can use the insert that goes with your 4 iPod onto the AR5100 dock. The door clicks when it on, and enjoy! Find the insert that came with each insert are listed in one of the AR5100. The back of the insert should rest on the ridge just behind the dock on your iPod model...

User Manual
Page 8
... on your docked iPod. (Play/Pause) Starts and pauses playback on your docked iPod. (Skip forward)Goes to the following track in the current playlist on the bottom of the AR5100. Also brings a docked iPod out of sleep mode when the AR5100 turns on the front panel of the AR5100. 2. Plug the power adapter into the power adapter jack on your docked iPod. 8 Press the (power) key on . Front Panel Keys (Power) Turns the AR5100 on...
... on your docked iPod. (Play/Pause) Starts and pauses playback on your docked iPod. (Skip forward)Goes to the following track in the current playlist on the bottom of the AR5100. Also brings a docked iPod out of sleep mode when the AR5100 turns on the front panel of the AR5100. 2. Plug the power adapter into the power adapter jack on your docked iPod. 8 Press the (power) key on . Front Panel Keys (Power) Turns the AR5100 on...

User Manual
Page 9
... in the remote control may be changed at any time when the remote control's effectiveness has diminished. 9 Also brings a docked iPod out of sleep mode when the AR5100 turns on. (Play/Pause) Starts and pauses playback on your docked iPod. Usually this will only be used to adjust the volume level, mute, and power functions for the AR5100. (Power) Turns the AR5100 on your docked iPod. (Mute) Lowers the AR5100 volume to its minimum level. (Skip back...
... in the remote control may be changed at any time when the remote control's effectiveness has diminished. 9 Also brings a docked iPod out of sleep mode when the AR5100 turns on. (Play/Pause) Starts and pauses playback on your docked iPod. Usually this will only be used to adjust the volume level, mute, and power functions for the AR5100. (Power) Turns the AR5100 on your docked iPod. (Mute) Lowers the AR5100 volume to its minimum level. (Skip back...
User Manual
Page 10
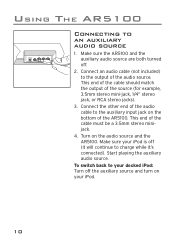
... output of the cable must be a 3.5mm stereo minijack. 4. Using The AR5100 Connecting to the output of the AR5100. Connect the other end of the audio cable to the auxiliary input jack on the audio source and the AR5100. Turn on the bottom of the audio source. Make sure the AR5100 and the auxiliary audio source are both turned off (it 's connected). To switch back to charge while it will continue to your docked iPod: Turn...
... output of the cable must be a 3.5mm stereo minijack. 4. Using The AR5100 Connecting to the output of the AR5100. Connect the other end of the audio cable to the auxiliary input jack on the audio source and the AR5100. Turn on the bottom of the audio source. Make sure the AR5100 and the auxiliary audio source are both turned off (it 's connected). To switch back to charge while it will continue to your docked iPod: Turn...

User Manual
Page 11
... AR5100 dock to a jack of the AR5100. Make sure you match the color of each plug to change these settings. You might need to the Pb (blue) jack on your iPod and play it. Connect the composite video cable to remove the iPod from the AR5100. 5. Then connect the other end of the component video cable to the composite video input on the AR5100. Note: You can also use a composite video cable to connect the AR5100...
... AR5100 dock to a jack of the AR5100. Make sure you match the color of each plug to change these settings. You might need to the Pb (blue) jack on your iPod and play it. Connect the composite video cable to remove the iPod from the AR5100. 5. Then connect the other end of the component video cable to the composite video input on the AR5100. Note: You can also use a composite video cable to connect the AR5100...

User Manual
Page 12
... audio cables are using the appropriate insert for the model of iPod you through some of the more common problems associated with the installation and/or operation of a docking system for any obstructing debris. Press the power button on the AR5100 front panel if the front panel is no sound, remove the iPod from the docking port, turn the AR5100 back on . iPod Does Not Connect to • Speaker System • • Remove iPod...
... audio cables are using the appropriate insert for the model of iPod you through some of the more common problems associated with the installation and/or operation of a docking system for any obstructing debris. Press the power button on the AR5100 front panel if the front panel is no sound, remove the iPod from the docking port, turn the AR5100 back on . iPod Does Not Connect to • Speaker System • • Remove iPod...

User Manual
Page 13
... pointing the remote control directly at the front panel of the speaker system's main unit. • Remove the remote control's battery to verify that the remote signal is a clear path between the remote control and the speaker system, and make sure the remote control operates the other speaker system functions (volume, power). If not inserted properly, realign the battery to fit securely into docking port and establish a secure connection. • Turn the AR5100 back on...
... pointing the remote control directly at the front panel of the speaker system's main unit. • Remove the remote control's battery to verify that the remote signal is a clear path between the remote control and the speaker system, and make sure the remote control operates the other speaker system functions (volume, power). If not inserted properly, realign the battery to fit securely into docking port and establish a secure connection. • Turn the AR5100 back on...

User Manual
Page 14
... unit. Use a soft and dry lint-free cloth to wipe away dust from the wall outlet. IMPORTANT! Additional Information Video Does Not Display On My TV • Make sure the component video cable is securely connected to the video settings on your video display. Product specifications Model: AR5100 15W RMS/channel, 2-way system 13mm horn-loaded tweeters 76mm Neodymium mid-bass drivers with your iPod for more information.
... unit. Use a soft and dry lint-free cloth to wipe away dust from the wall outlet. IMPORTANT! Additional Information Video Does Not Display On My TV • Make sure the component video cable is securely connected to the video settings on your video display. Product specifications Model: AR5100 15W RMS/channel, 2-way system 13mm horn-loaded tweeters 76mm Neodymium mid-bass drivers with your iPod for more information.
User Manual
Page 15
... bill of sale), specification of the product. This Warranty is authorized to assume for the Company any liability other express warranties or liabilities. Additional Information 12 Month Limited Warranty Audiovox Electronics Corporation (the "Company") warrants to the original retail purchaser of this product that should this product or any part thereof, under normal use and conditions...
... bill of sale), specification of the product. This Warranty is authorized to assume for the Company any liability other express warranties or liabilities. Additional Information 12 Month Limited Warranty Audiovox Electronics Corporation (the "Company") warrants to the original retail purchaser of this product that should this product or any part thereof, under normal use and conditions...

User Manual
Page 16
...operation of Apple Inc. and other brands and product names are trademarks or registered trademarks of Apple Inc., registered in the U.S. "Works with safety and regulatory standards. iPhone is not responsible for iPod" means that an electronic accessory has been designed to connect specifically to iPhone... with iPhone" means that an electronic accessory has been designed to connect specifically to iPod and has been certified by the developer to meet Apple performance standards. iPod is a trademark of their respective owners. © 2008 Audiovox Accessories Corporation...
...operation of Apple Inc. and other brands and product names are trademarks or registered trademarks of Apple Inc., registered in the U.S. "Works with safety and regulatory standards. iPhone is not responsible for iPod" means that an electronic accessory has been designed to connect specifically to iPhone... with iPhone" means that an electronic accessory has been designed to connect specifically to iPod and has been certified by the developer to meet Apple performance standards. iPod is a trademark of their respective owners. © 2008 Audiovox Accessories Corporation...


