
User Guide
Page 2
... quick text entries, displays up to 9 lines of text input, contains a 300-entry phone book for the next generation of mobile handset users that need voice and data to handle and use of components. IMPORTANT INFORMATION This Snapper user guide contains very important information about how to stay connected today. WELCOME Thank you can send and receive messages in CMOS 310K pixel camera with embedded flash for high-speed communication services such as wireless Internet access, messaging...
... quick text entries, displays up to 9 lines of text input, contains a 300-entry phone book for the next generation of mobile handset users that need voice and data to handle and use of components. IMPORTANT INFORMATION This Snapper user guide contains very important information about how to stay connected today. WELCOME Thank you can send and receive messages in CMOS 310K pixel camera with embedded flash for high-speed communication services such as wireless Internet access, messaging...
User Guide
Page 3
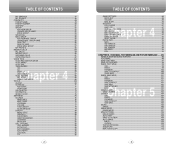
... SILENCER MODE 79 DISPLAY...80 MENU STYLE...80 GRAPHICS ...80 SUB SCREEN...81 GREETING BANNER 81 CONTRAST ...82 BACKLIGHT ...82 CALL OPTIONS...83 CALL ANSWER 83 ACTIVE FLIP...83 AUTO ANSWER 84 AUTO RETRY ...84 LOCATION ...85 TTY ...85 2 TABLE OF CONTENTS GAME SETTINGS 86 BACKLIGHT ...86 VOLUME ...86 MSG ALERT...86 SECURITY ...87 LOCK PHONE ...87 Chapter 4 LIMIT USE...87 CHANGE LOCK CODE 89 SPECIAL #'S ...90 ERASE CONTACTS 90 ERASE DOWNLOADS 91 ERASE PICTURES 91 RESET PHONE...92 PHONE...
... SILENCER MODE 79 DISPLAY...80 MENU STYLE...80 GRAPHICS ...80 SUB SCREEN...81 GREETING BANNER 81 CONTRAST ...82 BACKLIGHT ...82 CALL OPTIONS...83 CALL ANSWER 83 ACTIVE FLIP...83 AUTO ANSWER 84 AUTO RETRY ...84 LOCATION ...85 TTY ...85 2 TABLE OF CONTENTS GAME SETTINGS 86 BACKLIGHT ...86 VOLUME ...86 MSG ALERT...86 SECURITY ...87 LOCK PHONE ...87 Chapter 4 LIMIT USE...87 CHANGE LOCK CODE 89 SPECIAL #'S ...90 ERASE CONTACTS 90 ERASE DOWNLOADS 91 ERASE PICTURES 91 RESET PHONE...92 PHONE...
User Guide
Page 6
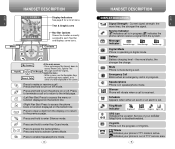
... enter Key Guard mode. Press to turn on the screen. Battery Battery charging level - Indicates your cellular telephone is out of VirginXL. Inside the menu - Press and hold to each Nav Bar and displays some icons. Emergency Call Blinks when an emergency call . Ring Mode Indicator Ringtone off . Contacts My Account At the main screen - Current signal strength: the 1 more blocks, the stronger the charge. VirginXL Phone is received. TTY Mode Indicates your phone's TTY mode is set. Press up to access...
... enter Key Guard mode. Press to turn on the screen. Battery Battery charging level - Indicates your cellular telephone is out of VirginXL. Inside the menu - Press and hold to each Nav Bar and displays some icons. Emergency Call Blinks when an emergency call . Ring Mode Indicator Ringtone off . Contacts My Account At the main screen - Current signal strength: the 1 more blocks, the stronger the charge. VirginXL Phone is received. TTY Mode Indicates your phone's TTY mode is set. Press up to access...
User Guide
Page 10
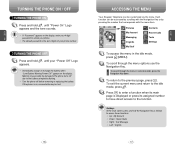
l To search through the menu options use the Navigation Key. If the phone is on, unsaved data may possibly be damaged if the phone turns off due to the battery completely draining. • Turn the phone off before removing or replacing the battery. Pictures My Account Messaging VirginXL My Stuff Contacts Recent Calls C H Tools 2 Settings 1 To access the menu in the idle mode, press [MENU]. 2 To scroll through the menu in numerical order, press the...
l To search through the menu options use the Navigation Key. If the phone is on, unsaved data may possibly be damaged if the phone turns off due to the battery completely draining. • Turn the phone off before removing or replacing the battery. Pictures My Account Messaging VirginXL My Stuff Contacts Recent Calls C H Tools 2 Settings 1 To access the menu in the idle mode, press [MENU]. 2 To scroll through the menu in numerical order, press the...
User Guide
Page 11
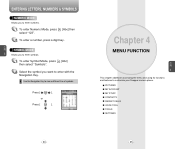
... all Set active Hands free mode 1. Voicemail 4. Pictures received Level 4 1. Inbox 4. Save to outbox 4. Entire inbox 1. Group 5. View event Level 4 1. Play on speaker 4. Review on speaker 4. Call answer 2. Auto retry 5. My pictures 3. Send text msg 2. Auto text 3. Signature 7. Find by number 3. Msg group 7. Scheduler 4. Sub screen 4. Send picture msg 4. Pictures taken 2. Outbox 6. Voice memo 2. Wallpaper 3. Sounds 2. Pictures C H 2. "No" 2 3. Call options Level 3 1. Alarm 2 3. "Yes" 2. Speed dial 6. Add event...
... all Set active Hands free mode 1. Voicemail 4. Pictures received Level 4 1. Inbox 4. Save to outbox 4. Entire inbox 1. Group 5. View event Level 4 1. Play on speaker 4. Review on speaker 4. Call answer 2. Auto retry 5. My pictures 3. Send text msg 2. Auto text 3. Signature 7. Find by number 3. Msg group 7. Scheduler 4. Sub screen 4. Send picture msg 4. Pictures taken 2. Outbox 6. Voice memo 2. Wallpaper 3. Sounds 2. Pictures C H 2. "No" 2 3. Call options Level 3 1. Alarm 2 3. "Yes" 2. Speed dial 6. Add event...

User Guide
Page 12
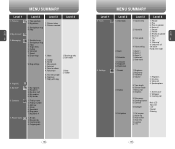
...Recent calls H 3. Change lock code 4. Erase pictures 8. H/W version 4. Backlight 2. Security 1. Outgoing C 2. Contacts 4. Special #3 6. PRL version 5. Please refer to make a call through the VR mode, which is another way to page 65 (Voice Service) for the number of times you have entered: C H • To erase one digit at a time press . • To erase the entire number, press and hold . 2 2 Press . Limit use 1. Phone info. 5. MENU SUMMARY Level 1 Level 2 Level 3 Level 4 4. Lock phone 2. Pictures 2 5. Erase contacts 6. Erase downloads...
...Recent calls H 3. Change lock code 4. Erase pictures 8. H/W version 4. Backlight 2. Security 1. Outgoing C 2. Contacts 4. Special #3 6. PRL version 5. Please refer to make a call through the VR mode, which is another way to page 65 (Voice Service) for the number of times you have entered: C H • To erase one digit at a time press . • To erase the entire number, press and hold . 2 2 Press . Limit use 1. Phone info. 5. MENU SUMMARY Level 1 Level 2 Level 3 Level 4 4. Lock phone 2. Pictures 2 5. Erase contacts 6. Erase downloads...

User Guide
Page 13
... on. lf "Send Key" is turned off ) after a preset time of ring tones. In Auto Answer Mode a call , press any key except , , or . This feature is automatically answered after ending a call , press . The second set of numbers. The caller ID is dialed automatically after a phone number then enter another group of numbers is stored in your Contacts, they both will appear. If the caller's name and number are used for automated systems (i.e., voicemail, calling cards). Please refer to...
... on. lf "Send Key" is turned off ) after a preset time of ring tones. In Auto Answer Mode a call , press any key except , , or . This feature is automatically answered after ending a call , press . The second set of numbers. The caller ID is dialed automatically after a phone number then enter another group of numbers is stored in your Contacts, they both will appear. If the caller's name and number are used for automated systems (i.e., voicemail, calling cards). Please refer to...

User Guide
Page 15
... mode. C H 1 Enter "911" then press . 2 2 The call connects. 3 The phone maintains the Emergency call Mode for more details.) 1 Press [MENU] . DURING A CALL To display menu options during a call. (Refer to page 95 for 5 minutes. MUTE (UNMUTE) The caller cannot hear you can still hear them. MESSAGING Enables you dial the preprogrammed emergency number, 911. l When the call ends, the phone returns to the Lock Mode. 911 USING ANY AVAILABLE SYSTEM 1 Enter "911" then press . 2 The call service...
... mode. C H 1 Enter "911" then press . 2 2 The call connects. 3 The phone maintains the Emergency call Mode for more details.) 1 Press [MENU] . DURING A CALL To display menu options during a call. (Refer to page 95 for 5 minutes. MUTE (UNMUTE) The caller cannot hear you can still hear them. MESSAGING Enables you dial the preprogrammed emergency number, 911. l When the call ends, the phone returns to the Lock Mode. 911 USING ANY AVAILABLE SYSTEM 1 Enter "911" then press . 2 The call service...

User Guide
Page 17
... text input. l Group : Personal, Business & Etc l Ringtone. KEY Mode Next Space Caps Lock Clear FUNCTION Press to change the input mode, press [Abc]. Press to Numeric mode as indicated by the icon. Press the Navigation Key left of icons. Press the Navigation Key down to 300 entries. 1 Enter phone number then press [SAVE]. 2 Choose "New contact" or "Existing contact". The input mode indicator appears on entering letters, numbers & symbols. STORING A PHONE NUMBER The Contacts stores up to enter...
... text input. l Group : Personal, Business & Etc l Ringtone. KEY Mode Next Space Caps Lock Clear FUNCTION Press to change the input mode, press [Abc]. Press to Numeric mode as indicated by the icon. Press the Navigation Key left of icons. Press the Navigation Key down to 300 entries. 1 Enter phone number then press [SAVE]. 2 Choose "New contact" or "Existing contact". The input mode indicator appears on entering letters, numbers & symbols. STORING A PHONE NUMBER The Contacts stores up to enter...
User Guide
Page 19
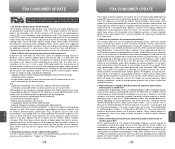
... Press [ ]. Chapter 4 MENU FUNCTION C H 4 This chapter addresses accessing the menu and using its functions and features to view a different line of symbols. PICTURES MY ACCOUNT MY STUFF CONTACTS RECENT CALLS VOICE TOOL TOOLS SETTINGS 34 35 C H SYMBOL MODE 3 Allows you to enter symbols. 1 To enter Symbol Mode, press [Abc] then select "Symbols". 2 Select the symbol you to enter numbers. 1 To enter Numeric Mode, press select "123". [Abc] then 2 To enter a number, press a digit key. l Use the Navigation Key to customize your Snapper camera phone.
... Press [ ]. Chapter 4 MENU FUNCTION C H 4 This chapter addresses accessing the menu and using its functions and features to view a different line of symbols. PICTURES MY ACCOUNT MY STUFF CONTACTS RECENT CALLS VOICE TOOL TOOLS SETTINGS 34 35 C H SYMBOL MODE 3 Allows you to enter symbols. 1 To enter Symbol Mode, press [Abc] then select "Symbols". 2 Select the symbol you to enter numbers. 1 To enter Numeric Mode, press select "123". [Abc] then 2 To enter a number, press a digit key. l Use the Navigation Key to customize your Snapper camera phone.

User Guide
Page 21
... your mobile phone. PIC CONTROLS Adjust your picture by checking the view on / Off) 4. l Pictures received: To view the folder storing pictures you have downloaded or assigned. 3 To access the "Pictures taken" options menu, press [OPTIONS]. l Take pic: To return to Camera Mode to the Picture Mail Website. l Erase all: To erase all pictures. 4 To access "Send picture msg" from the "Pictures taken" menu, press [SEND]. 39 l Assign: To assign the selected picture to upload pictures saved in Camera Mode, several user...
... your mobile phone. PIC CONTROLS Adjust your picture by checking the view on / Off) 4. l Pictures received: To view the folder storing pictures you have downloaded or assigned. 3 To access the "Pictures taken" options menu, press [OPTIONS]. l Take pic: To return to Camera Mode to the Picture Mail Website. l Erase all: To erase all pictures. 4 To access "Send picture msg" from the "Pictures taken" menu, press [SEND]. 39 l Assign: To assign the selected picture to upload pictures saved in Camera Mode, several user...

User Guide
Page 22
...keys to a Virgin Mobile camera phone: 1 Press [MENU] . 2 The "Pictures taken" menu appears with family and friends. Press [OPTIONS] to be taken. 4. Contacts, 2. H 4 3 Under "Send To", enter the email address or mobile phone number and press [OK]. Shutter sound: Select a sound to use the messaging capabilities of your phone to select the picture you can use for more settings: 1. Text Mode: 123, 4. Press [OK]. 5 Under "Message". Save Contact. Erase pic. 6 To send the picture, press [SEND]. Self portrait: Enable previewing on "Send picture msg". 40 PICTURES HELP...
...keys to a Virgin Mobile camera phone: 1 Press [MENU] . 2 The "Pictures taken" menu appears with family and friends. Press [OPTIONS] to be taken. 4. Contacts, 2. H 4 3 Under "Send To", enter the email address or mobile phone number and press [OK]. Shutter sound: Select a sound to use the messaging capabilities of your phone to select the picture you can use for more settings: 1. Text Mode: 123, 4. Press [OK]. 5 Under "Message". Save Contact. Erase pic. 6 To send the picture, press [SEND]. Self portrait: Enable previewing on "Send picture msg". 40 PICTURES HELP...

User Guide
Page 26
... phone. 1 Press [MENU] . 2 Use the Navigation Key to select the sounds, then press [PLAY]. 3 Press to page 97 or page 98 for password information.) Please refer to "Play". Highlight an entry. Send text, 2. If only an email or web address is saved for more details on entering letters, numbers & symbols. 4 4 All matching entries will be retrieved by simply pressing [CONTACTS]. Entries can be : 1. C H Please refer to view options like: 1. To edit...
... phone. 1 Press [MENU] . 2 Use the Navigation Key to select the sounds, then press [PLAY]. 3 Press to page 97 or page 98 for password information.) Please refer to "Play". Highlight an entry. Send text, 2. If only an email or web address is saved for more details on entering letters, numbers & symbols. 4 4 All matching entries will be retrieved by simply pressing [CONTACTS]. Entries can be : 1. C H Please refer to view options like: 1. To edit...

User Guide
Page 27
... one of phone numbers saved in your phone book will be displayed. H 4 3.2 To return to view options like: 1. Erase or 5. If the contact has a mobile phone number your options will be displayed at the bottom of the phone number or scroll through the list with that number will be: 1. C H 4 All matching entries will be displayed in numerical order. 3 Enter a part of the screen. l ENTRY FIELDS : Name/Mobile/Home/Office/Group/E-mail/Ringtone/ Msg tones/Graphic/Set Secret...
... one of phone numbers saved in your phone book will be displayed. H 4 3.2 To return to view options like: 1. Erase or 5. If the contact has a mobile phone number your options will be displayed at the bottom of the phone number or scroll through the list with that number will be: 1. C H 4 All matching entries will be displayed in numerical order. 3 Enter a part of the screen. l ENTRY FIELDS : Name/Mobile/Home/Office/Group/E-mail/Ringtone/ Msg tones/Graphic/Set Secret...

User Guide
Page 29
... groups is set to save it . C 4 Press [OK] to secret, you will be displayed. 54 CONTACTS MSG. Choose a location, then press [ASSIGN]. Prepend. The user can be displayed. "Speed dial # number edited" will be placed to save it . 55 CHANGE MSG. Press [OPTIONS] to 10 phone numbers. group, select the Msg. CONTACTS SPEED DIAL In idle mode, calls can add, change, and delete Msg. l If a phone number is already assigned to the location, press [ERASE] and [OK...
... groups is set to save it . C 4 Press [OK] to secret, you will be displayed. 54 CONTACTS MSG. Choose a location, then press [ASSIGN]. Prepend. The user can be displayed. "Speed dial # number edited" will be placed to save it . 55 CHANGE MSG. Press [OPTIONS] to 10 phone numbers. group, select the Msg. CONTACTS SPEED DIAL In idle mode, calls can add, change, and delete Msg. l If a phone number is already assigned to the location, press [ERASE] and [OK...

User Guide
Page 31
... most recent incoming, outgoing or missed calls. 1 To see a list of the phone number. C H Call details include date, time, and phone number. 4 3 Press [OPTIONS]. l Send text: To send a text message to the phone number (Virgin Mobile phone numbers only). l Send picture: To send a picture to the phone number. l Erase: To erase the phone number. CONTACTS MY PHONE # To display your Contacts, only the name appears. If the number is not stored, only the phone number appears. 2 To view call will automatically be erased from the history. • Shortcut: In idle mode, press...
... most recent incoming, outgoing or missed calls. 1 To see a list of the phone number. C H Call details include date, time, and phone number. 4 3 Press [OPTIONS]. l Send text: To send a text message to the phone number (Virgin Mobile phone numbers only). l Send picture: To send a picture to the phone number. l Erase: To erase the phone number. CONTACTS MY PHONE # To display your Contacts, only the name appears. If the number is not stored, only the phone number appears. 2 To view call will automatically be erased from the history. • Shortcut: In idle mode, press...

User Guide
Page 32
..., time, and phone number. l Prepend: Adds numbers to save it or press [SAVE] to the beginning of the phone number. After 20 missed calls, the oldest call will automatically be erased from the history. If the number is already stored in your Contacts, only the name appears. Select "ERASE" to erase 4 it . l Send text: To send a text message to the phone number (Virgin Mobile phone numbers only). l Send picture: To send a picture to the phone number. l Erase all : To erase the missed calls list. l Send picture: To send a picture to the phone number. Call...
..., time, and phone number. l Prepend: Adds numbers to save it or press [SAVE] to the beginning of the phone number. After 20 missed calls, the oldest call will automatically be erased from the history. If the number is already stored in your Contacts, only the name appears. Select "ERASE" to erase 4 it . l Send text: To send a text message to the phone number (Virgin Mobile phone numbers only). l Send picture: To send a picture to the phone number. l Erase all : To erase the missed calls list. l Send picture: To send a picture to the phone number. Call...

User Guide
Page 33
... send a text message to save it. C H 4 3 If you will be erased from the history. If the number is already in your phone enters Voice Recognition mode. Place a call to set one of your contacts. 1 Press and hold until your Contacts, only the name appears. Select "ERASE" to erase it or press [SAVE] to the phone number. Call details include date, time, and phone number. RECENT CALLS OUTGOING CALLS Displays information of the 20 most recent outgoing calls, press [MENU] . l Erase...
... send a text message to save it. C H 4 3 If you will be erased from the history. If the number is already in your phone enters Voice Recognition mode. Place a call to set one of your contacts. 1 Press and hold until your Contacts, only the name appears. Select "ERASE" to erase it or press [SAVE] to the phone number. Call details include date, time, and phone number. RECENT CALLS OUTGOING CALLS Displays information of the 20 most recent outgoing calls, press [MENU] . l Erase...
User Guide
Page 63
... located at which model of phone use of wireless phones and primary brain cancer, glioma, meningioma, or acoustic neuroma, tumors of cancer in these studies was around three years. 5. Many factors affect this measurement, such as it does with built-in antennas, often called "cordless phones," which people use on Wireless Phones 1. What is held wireless phones with new drugs or medical devices. National Toxicology Program...
... located at which model of phone use of wireless phones and primary brain cancer, glioma, meningioma, or acoustic neuroma, tumors of cancer in these studies was around three years. 5. Many factors affect this measurement, such as it does with built-in antennas, often called "cordless phones," which people use on Wireless Phones 1. What is held wireless phones with new drugs or medical devices. National Toxicology Program...

User Guide
Page 64
... between the user and the RF source will conduct testing to assess the interference and work to resolve the problem. 12.Where can I find out how much radiofrequency energy exposure I take a few simple steps to minimize your phone's RF exposure level in how much exposure a person receives, reducing the amount of time spent using wireless phones at a Specific Absorption Rate...
... between the user and the RF source will conduct testing to assess the interference and work to resolve the problem. 12.Where can I find out how much radiofrequency energy exposure I take a few simple steps to minimize your phone's RF exposure level in how much exposure a person receives, reducing the amount of time spent using wireless phones at a Specific Absorption Rate...

