
User Guide
Page 24
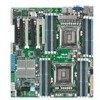
... 2: Hardware information LSI MegaRAID or Intel RSTe selection jumper (3-pin RAID_SEL1) 5. LAN 2 (RJ-45) port 5. Clear RTC RAM (CLRTC1) 2. LAN 4 (RJ-45) port (Z9PE-D16 only) 7. CPU sockets 2. PS/2 keyboard port (purple) 8. VGA controller setting (3-pin VGA_SW1) 3. LAN controller setting (3-pin... LAN_SW1) 4. LAN 3 (RJ-45) port (Z9PE-D16 only) 6. 2.2.4 Layout contents Slots/Soocket 1. LAN 1 (RJ-45) port 4. PMBus 1.2 PSU select jumper (3-pin SMART_PSU1) Page ...
... 2: Hardware information LSI MegaRAID or Intel RSTe selection jumper (3-pin RAID_SEL1) 5. LAN 2 (RJ-45) port 5. Clear RTC RAM (CLRTC1) 2. LAN 4 (RJ-45) port (Z9PE-D16 only) 7. CPU sockets 2. PS/2 keyboard port (purple) 8. VGA controller setting (3-pin VGA_SW1) 3. LAN controller setting (3-pin... LAN_SW1) 4. LAN 3 (RJ-45) port (Z9PE-D16 only) 6. 2.2.4 Layout contents Slots/Soocket 1. LAN 1 (RJ-45) port 4. PMBus 1.2 PSU select jumper (3-pin SMART_PSU1) Page ...
User Guide
Page 40
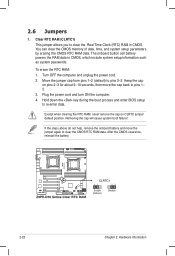
... help, remove the onboard battery and move the cap back to pins 1- 2. 3. Keep the cap on CLRTC jumper default position. Except when clearing the RTC RAM, never remove the cap on pins 2-3 for about 5-10 seconds, then move the jumper again to pins 2-3. Hold down the key during the boot process... and enter BIOS setup to clear the Real Time Clock (RTC) RAM in CMOS, which include system setup information such as system passwords. Clear RTC RAM (CLRTC1) This jumper allows you to re-enter data. Plug the power cord and turn ON the computer...
... help, remove the onboard battery and move the cap back to pins 1- 2. 3. Keep the cap on CLRTC jumper default position. Except when clearing the RTC RAM, never remove the cap on pins 2-3 for about 5-10 seconds, then move the jumper again to pins 2-3. Hold down the key during the boot process... and enter BIOS setup to clear the Real Time Clock (RTC) RAM in CMOS, which include system setup information such as system passwords. Clear RTC RAM (CLRTC1) This jumper allows you to re-enter data. Plug the power cord and turn ON the computer...
User Guide
Page 58
... MRC Progress MRC Progress MRC Progress MRC Progress Progress Progress Progress Progress Progress DESCRIPTION First post code(POWER_ON_POST_CODE) Load BSP microcode(MICROCODE_POST_CODE) Set cache as ram for PEI phase(CACHE_ENABLED_POST_CODE) CPU Early init.(CPU_EARLY_INIT_POST_CODE) initializes South bridge for PEI preparation PEI Core Entry NB initialize before installed memory SB initialize before...
... MRC Progress MRC Progress MRC Progress MRC Progress Progress Progress Progress Progress Progress DESCRIPTION First post code(POWER_ON_POST_CODE) Load BSP microcode(MICROCODE_POST_CODE) Set cache as ram for PEI phase(CACHE_ENABLED_POST_CODE) CPU Early init.(CPU_EARLY_INIT_POST_CODE) initializes South bridge for PEI preparation PEI Core Entry NB initialize before installed memory SB initialize before...

User Guide
Page 71
... prompted to use as possible. You can also restart by pressing the reset button on your screen. • Visit the ASUS website (www.asus.com) to download the latest BIOS file for most conditions to reconfigure your system using the provided utility described in section 5.1...program This motherboard supports a programmable firmware chip that the computer can recognize these changes and record them in the CMOS RAM of your computer in the future. ASUS Z9PE-D16 Series 4-7 For example, you with its test routines. This section explains how to ensure system compatibility and stability....
... prompted to use as possible. You can also restart by pressing the reset button on your screen. • Visit the ASUS website (www.asus.com) to download the latest BIOS file for most conditions to reconfigure your system using the provided utility described in section 5.1...program This motherboard supports a programmable firmware chip that the computer can recognize these changes and record them in the CMOS RAM of your computer in the future. ASUS Z9PE-D16 Series 4-7 For example, you with its test routines. This section explains how to ensure system compatibility and stability....

User Guide
Page 94
...] [Enabled] The following item appears only when you to Hibernate (OS/S4 sleep state). Configuration options: [Suspend Disabled] [S1 (CPU Stop Clock)] [S3 (Suspend to RAM)] Lock Legacy Resources [Disabled] Allows you set the ACPI Sleep State. Advanced ACPI Settings Enable ACPI Auto Configuration [Disabled] Allows you to enable or disable...
...] [Enabled] The following item appears only when you to Hibernate (OS/S4 sleep state). Configuration options: [Suspend Disabled] [S1 (CPU Stop Clock)] [S3 (Suspend to RAM)] Lock Legacy Resources [Disabled] Allows you set the ACPI Sleep State. Advanced ACPI Settings Enable ACPI Auto Configuration [Disabled] Allows you to enable or disable...
User Guide
Page 109
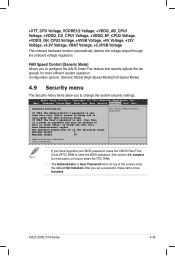
... on how to erase the RTC RAM. • The Administrator or User Password items on password and must be entered to configure the ASUS Smart Fan feature that smartly adjusts the fan speeds for more efficient system operation. ASUS Z9PE-D16 Series 4-45 After you have forgotten... your BIOS password, erase the CMOS Real Time Clock (RTC) RAM to change the system security settings. Aptio Setup Utility - Configuration options: [Generic Mode] [High Speed ...
... on how to erase the RTC RAM. • The Administrator or User Password items on password and must be entered to configure the ASUS Smart Fan feature that smartly adjusts the fan speeds for more efficient system operation. ASUS Z9PE-D16 Series 4-45 After you have forgotten... your BIOS password, erase the CMOS Real Time Clock (RTC) RAM to change the system security settings. Aptio Setup Utility - Configuration options: [Generic Mode] [High Speed ...