User Guide
Page 3
... guide x Typography x Z9PE-D16 Series specifications summary xi Z9PE-D16 Series specifications summary xii Chapter 1: Product introduction 1.1 Welcome 1-3 1.2 Package contents 1-3 1.3 Serial number label 1-4 1.4 Special features 1-4 1.4.1 Product highlights 1-4 1.4.2 Innovative ASUS features 1-6 Chapter 2: Hardware information 2.1 Before you proceed 2-3 2.2 Motherboard overview 2-4 2.2.1 Placement direction 2-4 2.2.2 Screw holes 2-4 2.2.3 Motherboard layout 2-5 2.2.4 Layout contents 2-6 2.3 Central Processing Unit (CPU 2-8 2.3.1 Installing the CPU 2-8 2.4 System memory 2-13...
... guide x Typography x Z9PE-D16 Series specifications summary xi Z9PE-D16 Series specifications summary xii Chapter 1: Product introduction 1.1 Welcome 1-3 1.2 Package contents 1-3 1.3 Serial number label 1-4 1.4 Special features 1-4 1.4.1 Product highlights 1-4 1.4.2 Innovative ASUS features 1-6 Chapter 2: Hardware information 2.1 Before you proceed 2-3 2.2 Motherboard overview 2-4 2.2.1 Placement direction 2-4 2.2.2 Screw holes 2-4 2.2.3 Motherboard layout 2-5 2.2.4 Layout contents 2-6 2.3 Central Processing Unit (CPU 2-8 2.3.1 Installing the CPU 2-8 2.4 System memory 2-13...
User Guide
Page 11
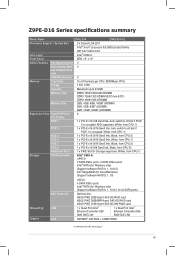
Z9PE-D16 Series specifications summary Model Name Z9PE-D16 Z9PE-D16/2L Processor Support / System Bus 2 x Socket LGA 2011 Intel® Xeon® processor E5-2600 product family QPI 6.4/7.2/8.0 GT/s Core Logic Intel® C602-A Form Factor EEB, 12" x 13" ASUS Features Fan Speed Control V Rack Ready (Rack V and Pedestal dual use) ASWM Enterprise V Memory Total Slots 16 (4 Channels per...
Z9PE-D16 Series specifications summary Model Name Z9PE-D16 Z9PE-D16/2L Processor Support / System Bus 2 x Socket LGA 2011 Intel® Xeon® processor E5-2600 product family QPI 6.4/7.2/8.0 GT/s Core Logic Intel® C602-A Form Factor EEB, 12" x 13" ASUS Features Fan Speed Control V Rack Ready (Rack V and Pedestal dual use) ASWM Enterprise V Memory Total Slots 16 (4 Channels per...
User Guide
Page 16
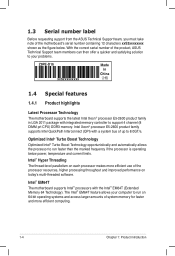
...Z9PE-D16 xxS2xxxxxxxx Made in China 合格 1.4 Special features 1.4.1 Product highlights Latest Processor Technology The motherboard supports the latest Intel Xeon® processor E5-2600 product family in LGA 2011 package with integrated memory controller to 8.0GT/s. 1.3 Serial number label Before requesting support from the ASUS... systems and access larger amounts of system memory for faster and more efficient use of up to support 4 channel (8 DIMM prt CPU) DDR3 memory. With the correct serial number of the product, ASUS Technical Support team members can then offer ...
...Z9PE-D16 xxS2xxxxxxxx Made in China 合格 1.4 Special features 1.4.1 Product highlights Latest Processor Technology The motherboard supports the latest Intel Xeon® processor E5-2600 product family in LGA 2011 package with integrated memory controller to 8.0GT/s. 1.3 Serial number label Before requesting support from the ASUS... systems and access larger amounts of system memory for faster and more efficient use of up to support 4 channel (8 DIMM prt CPU) DDR3 memory. With the correct serial number of the product, ASUS Technical Support team members can then offer ...

User Guide
Page 17
...memory solution. Serial ATA allows thinner, more flexible cables with an integrated quad port Gigabit LAN controller which uses a specially designed buffer to reduce the data load to a single load and can save platform power with EEE and DMA coordination features and enhances management features with a host of PCIe 2.0. ASUS Z9PE-D16... support. USB 2.0 is backward compatible with peak bandwidth of server and workstation applications. DDR3 memory support The Z9PE-D16 supports DDR3 memory that features data transfer rates of 1600/1333/1066 MHz to meet the higher bandwidth requirements of...
...memory solution. Serial ATA allows thinner, more flexible cables with an integrated quad port Gigabit LAN controller which uses a specially designed buffer to reduce the data load to a single load and can save platform power with EEE and DMA coordination features and enhances management features with a host of PCIe 2.0. ASUS Z9PE-D16... support. USB 2.0 is backward compatible with peak bandwidth of server and workstation applications. DDR3 memory support The Z9PE-D16 supports DDR3 memory that features data transfer rates of 1600/1333/1066 MHz to meet the higher bandwidth requirements of...

User Guide
Page 20
Chapter summary 2 2.1 Before you proceed 2-3 2.2 Motherboard overview 2-4 2.3 Central Processing Unit (CPU 2-8 2.4 System memory 2-13 2.5 Expansion slots 2-16 2.6 Jumpers 2-22 2.7 Connectors 2-26 2.8 Internal LEDs 2-37 ASUS Z9PE-D16 Series
Chapter summary 2 2.1 Before you proceed 2-3 2.2 Motherboard overview 2-4 2.3 Central Processing Unit (CPU 2-8 2.4 System memory 2-13 2.5 Expansion slots 2-16 2.6 Jumpers 2-22 2.7 Connectors 2-26 2.8 Internal LEDs 2-37 ASUS Z9PE-D16 Series

User Guide
Page 31
...X 8 DIMMs X X X X X X X X • *Refer to ASUS Server AVL for better performance with eight (per CPU) Double Data Rate 3 (DDR3) Dual Inline Memory Modules (DIMM) sockets. The figure illustrates the location of the DDR3 DIMM sockets: 2.4.2 Memory Configurations You may install 2GB, 4GB, 8GB, and 16GB RDIMMs or...memory modules from slot A1 and B1 (light blue). • Always install DIMMs with ECC/Non-ECC UDIMMs or 8GB, 16GB and 32GB* LR-DIMMs into the DIMM sockets using the memory configurations in this section. 1 CPU Configuration (must on a DDR2 DIMM socket. ASUS Z9PE-D16...
...X 8 DIMMs X X X X X X X X • *Refer to ASUS Server AVL for better performance with eight (per CPU) Double Data Rate 3 (DDR3) Dual Inline Memory Modules (DIMM) sockets. The figure illustrates the location of the DDR3 DIMM sockets: 2.4.2 Memory Configurations You may install 2GB, 4GB, 8GB, and 16GB RDIMMs or...memory modules from slot A1 and B1 (light blue). • Always install DIMMs with ECC/Non-ECC UDIMMs or 8GB, 16GB and 32GB* LR-DIMMs into the DIMM sockets using the memory configurations in this section. 1 CPU Configuration (must on a DDR2 DIMM socket. ASUS Z9PE-D16...
User Guide
Page 33
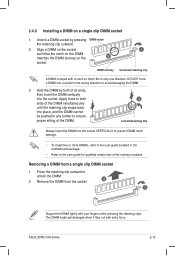
...single clip DIMM socket 1. 2.4.3 Installing a DIMM on the socket such that it flips out with extra force. Apply force to both of the memory modules. Press the retaining clip outward to avoid damaging the DIMM. 3. DIMM slot key 1 Unlocked retaining clip A DIMM is keyed with your ...socket. 2 1 Support the DIMM lightly with a notch so that the notch on the DIMM matches the DIMM slot key on the 2 socket. ASUS Z9PE-D16 Series 2-15 Hold the DIMM by pressing DIMM notch the retaining clip outward. 2. Unlock a DIMM socket by both ends of the DIMM simultaneously ...
...single clip DIMM socket 1. 2.4.3 Installing a DIMM on the socket such that it flips out with extra force. Apply force to both of the memory modules. Press the retaining clip outward to avoid damaging the DIMM. 3. DIMM slot key 1 Unlocked retaining clip A DIMM is keyed with your ...socket. 2 1 Support the DIMM lightly with a notch so that the notch on the DIMM matches the DIMM slot key on the 2 socket. ASUS Z9PE-D16 Series 2-15 Hold the DIMM by pressing DIMM notch the retaining clip outward. 2. Unlock a DIMM socket by both ends of the DIMM simultaneously ...
User Guide
Page 40
... to pins 2-3. Removing the cap will cause system boot failure! Clear RTC RAM (CLRTC1) This jumper allows you to pins 1- 2. 3. You can clear the CMOS memory of date, time, and system setup parameters by erasing the CMOS RTC RAM data. Move the jumper cap from pins 1-2 (default) to re-enter data...
... to pins 2-3. Removing the cap will cause system boot failure! Clear RTC RAM (CLRTC1) This jumper allows you to pins 1- 2. 3. You can clear the CMOS memory of date, time, and system setup parameters by erasing the CMOS RTC RAM data. Move the jumper cap from pins 1-2 (default) to re-enter data...
User Guide
Page 58
... QPI initialization QPI initialization QPI initialization QPI initialization QPI initialization QPI initialization QPI initialization Complete Memory Init. Memory Init. Memory Init. CPU Init. RC Reset if require Memory Init. Memory Init. Memory Init. Memory Init. Memory Init. Memory Init. Memory Init. Memory Init. After RC end Memory already installed. Q-Code table Action Normal boot PHASE Security Phase POST CODE 01 02 03...
... QPI initialization QPI initialization QPI initialization QPI initialization QPI initialization QPI initialization QPI initialization Complete Memory Init. Memory Init. Memory Init. CPU Init. RC Reset if require Memory Init. Memory Init. Memory Init. Memory Init. Memory Init. Memory Init. Memory Init. Memory Init. After RC end Memory already installed. Q-Code table Action Normal boot PHASE Security Phase POST CODE 01 02 03...
User Guide
Page 72
... the keyboard until the desired item is highlighted. 4-8 Chapter 4: BIOS setup System Date System Time [Tue 01/17/2012] [15:07:28] Access Level Memory Information Total Memory Processor CPU Speed Count: Onboard LAN1 MAC Onboard LAN2 MAC Onboard LAN3 MAC Onboard LAN4 MAC Administrator 2048 MB (DDR3) 2600 MHz 1 00:E0...
... the keyboard until the desired item is highlighted. 4-8 Chapter 4: BIOS setup System Date System Time [Tue 01/17/2012] [15:07:28] Access Level Memory Information Total Memory Processor CPU Speed Count: Onboard LAN1 MAC Onboard LAN2 MAC Onboard LAN3 MAC Onboard LAN4 MAC Administrator 2048 MB (DDR3) 2600 MHz 1 00:E0...

User Guide
Page 74
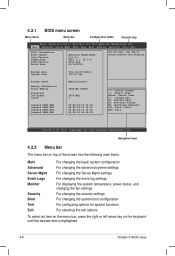
... setup 4.3 Main menu When you to switch between Data elements. Copyright (C) 2011 American Megatrends, Inc. Aptio Setup Utility - System Date System Time Access Level Memory Information Total Memory Processor CPU Speed Count: Onboard LAN1 MAC Onboard LAN2 MAC Onboard LAN3 MAC Onboard LAN4 MAC [Tue 01/17/2012] [15:07:28] Administrator...
... setup 4.3 Main menu When you to switch between Data elements. Copyright (C) 2011 American Megatrends, Inc. Aptio Setup Utility - System Date System Time Access Level Memory Information Total Memory Processor CPU Speed Count: Onboard LAN1 MAC Onboard LAN2 MAC Onboard LAN3 MAC Onboard LAN4 MAC [Tue 01/17/2012] [15:07:28] Administrator...

User Guide
Page 80
... Frequency Select [Auto] This item allows for Directed I/O Configuration QPI Configuration Page QPI Configuration Aptio Setup Utility - Copyright (C) 2011 American Megatrends, Inc. Advanced QPI Configuration Memory Configuration CPU II0 Bridge Configuration PCH Configuration Intel(R) VT for selecting the QPI link frequency Configuration options: [Auto] [6.4 GT/s] [7.2 GT/s (Fast Mode Only)] [8.0 GT/s (Fast...
... Frequency Select [Auto] This item allows for Directed I/O Configuration QPI Configuration Page QPI Configuration Aptio Setup Utility - Copyright (C) 2011 American Megatrends, Inc. Advanced QPI Configuration Memory Configuration CPU II0 Bridge Configuration PCH Configuration Intel(R) VT for selecting the QPI link frequency Configuration options: [Auto] [6.4 GT/s] [7.2 GT/s (Fast Mode Only)] [8.0 GT/s (Fast...

User Guide
Page 81
...Configuration options: [Enabled] [Disabled] Memory Mode [Independent] Select the mode for compatibility Revision ID(CRID) Functionality mentioned in Sandybridge BIOS spec. Configuration options: [Auto] [1 Way] [2 Way] [4 Way] [8 Way] ASUS Z9PE-D16 Series 4-17 Copyright (C) 2011 ... Rank Interleaving [Auto] Select different rank interleaving setting. Advanced Compatibility RID Memory Configuration Total Memory Current Memory Mode Currently Memory Speed Mirroring Sparing Memory Mode DDR Speed Channel Interleaving Rank Interleaving Patrol Scrub Demand Scrub Data Scrambling...
...Configuration options: [Enabled] [Disabled] Memory Mode [Independent] Select the mode for compatibility Revision ID(CRID) Functionality mentioned in Sandybridge BIOS spec. Configuration options: [Auto] [1 Way] [2 Way] [4 Way] [8 Way] ASUS Z9PE-D16 Series 4-17 Copyright (C) 2011 ... Rank Interleaving [Auto] Select different rank interleaving setting. Advanced Compatibility RID Memory Configuration Total Memory Current Memory Mode Currently Memory Speed Mirroring Sparing Memory Mode DDR Speed Channel Interleaving Rank Interleaving Patrol Scrub Demand Scrub Data Scrambling...
User Guide
Page 82
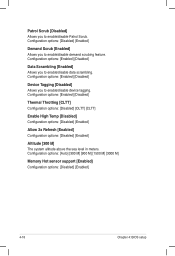
...] Allows you to enable/disable Patrol Scrub. Patrol Scrub [Disabled] Allows you to enable/disable demand scrubing feature. Configuration options: [Auto] [300 M] [900 M] [1500 M] [3000 M] Memory Hot sensor support [Enabled] Configuration options: [Disabled] [Enabled] 4-18 Chapter 4: BIOS setup
...] Allows you to enable/disable Patrol Scrub. Patrol Scrub [Disabled] Allows you to enable/disable demand scrubing feature. Configuration options: [Auto] [300 M] [900 M] [1500 M] [3000 M] Memory Hot sensor support [Enabled] Configuration options: [Disabled] [Enabled] 4-18 Chapter 4: BIOS setup