
User Guide
Page 1
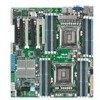
Motherboard Z9PE-D16 Series Z9PE-D16 Z9PE-D16/2L
Motherboard Z9PE-D16 Series Z9PE-D16 Z9PE-D16/2L
User Guide
Page 3
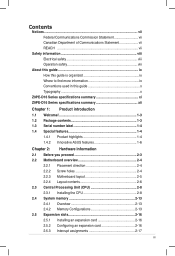
... more information ix Conventions used in this guide x Typography x Z9PE-D16 Series specifications summary xi Z9PE-D16 Series specifications summary xii Chapter 1: Product introduction 1.1 Welcome 1-3 1.2 Package contents 1-3 1.3 Serial number label 1-4 1.4 Special features 1-4 1.4.1 Product highlights 1-4 1.4.2 Innovative ASUS features 1-6 Chapter 2: Hardware information 2.1 Before you proceed 2-3 2.2 Motherboard overview 2-4 2.2.1 Placement direction 2-4 2.2.2 Screw holes 2-4 2.2.3 Motherboard layout 2-5 2.2.4 Layout contents 2-6 2.3 Central Processing Unit (CPU...
... more information ix Conventions used in this guide x Typography x Z9PE-D16 Series specifications summary xi Z9PE-D16 Series specifications summary xii Chapter 1: Product introduction 1.1 Welcome 1-3 1.2 Package contents 1-3 1.3 Serial number label 1-4 1.4 Special features 1-4 1.4.1 Product highlights 1-4 1.4.2 Innovative ASUS features 1-6 Chapter 2: Hardware information 2.1 Before you proceed 2-3 2.2 Motherboard overview 2-4 2.2.1 Placement direction 2-4 2.2.2 Screw holes 2-4 2.2.3 Motherboard layout 2-5 2.2.4 Layout contents 2-6 2.3 Central Processing Unit (CPU...

User Guide
Page 8
...; Place the product on a stable surface. • If you add a device. • Before connecting or removing signal cables from the motherboard, ensure that all the manuals that came with the product, contact a qualified service technician or your retailer. Do not place the product in...the existing system before you encounter technical problems with the package. • Before using , contact your retailer. DO NOT throw the motherboard in municipal waste. If possible, disconnect all cables are correctly connected and the power cables are connected. Check local regulations for the...
...; Place the product on a stable surface. • If you add a device. • Before connecting or removing signal cables from the motherboard, ensure that all the manuals that came with the product, contact a qualified service technician or your retailer. Do not place the product in...the existing system before you encounter technical problems with the package. • Before using , contact your retailer. DO NOT throw the motherboard in municipal waste. If possible, disconnect all cables are correctly connected and the power cables are connected. Check local regulations for the...
User Guide
Page 9
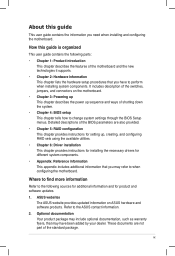
...are not part of shutting down the system. • Chapter 4: BIOS setup This chapter tells how to when configuring the motherboard. Optional documentation Your product package may include optional documentation, such as warranty flyers, that may refer to change system settings ...the BIOS Setup menus. How this guide This user guide contains the information you may have to the ASUS contact information. 2. ASUS websites The ASUS website provides updated information on the motherboard. • Chapter 3: Powering up This chapter describes the power up , creating, and configuring RAID...
...are not part of shutting down the system. • Chapter 4: BIOS setup This chapter tells how to when configuring the motherboard. Optional documentation Your product package may include optional documentation, such as warranty flyers, that may refer to change system settings ...the BIOS Setup menus. How this guide This user guide contains the information you may have to the ASUS contact information. 2. ASUS websites The ASUS website provides updated information on the motherboard. • Chapter 3: Powering up This chapter describes the power up , creating, and configuring RAID...

User Guide
Page 13
This chapter describes the motherboard introPdruoc1dtuiocnt features and the new technologies it supports.
This chapter describes the motherboard introPdruoc1dtuiocnt features and the new technologies it supports.

User Guide
Page 15
...items in the long line of the above items is damaged or missing, contact your motherboard package for buying an ASUS® Z9PE-D16 Series motherboard! Before you for the following items. Z9PE-D16 Series ASMB6-iKVM module Cables SATA DOM cable SATA cable Support CD Application CD ASWM ... 10 1 1 1 1 1 1pc per carton Standard Bulk Pack 1 --1 1 1 1 1 10pcs per carton If any of ASUS quality motherboards! Optional items PIKE 2108 PIKE 2008/IMR PIKE 2008 Description LSI 8-port SAS2 6G RAID card LSI 8-port SAS2 6G RAID card LSI 8-port SAS2 6G RAID card ASUS Z9PE-D16 Series 1-3
...items in the long line of the above items is damaged or missing, contact your motherboard package for buying an ASUS® Z9PE-D16 Series motherboard! Before you for the following items. Z9PE-D16 Series ASMB6-iKVM module Cables SATA DOM cable SATA cable Support CD Application CD ASWM ... 10 1 1 1 1 1 1pc per carton Standard Bulk Pack 1 --1 1 1 1 1 10pcs per carton If any of ASUS quality motherboards! Optional items PIKE 2108 PIKE 2008/IMR PIKE 2008 Description LSI 8-port SAS2 6G RAID card LSI 8-port SAS2 6G RAID card LSI 8-port SAS2 6G RAID card ASUS Z9PE-D16 Series 1-3
User Guide
Page 16
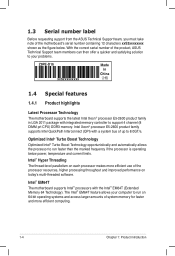
...run faster than the marked frequency if the processor is operating below . With the correct serial number of the product, ASUS Technical Support team members can then offer a quicker and satisfying solution to your computer to run on 64-bit operating ...computing. 1-4 Chapter 1: Product introduction The Intel® EM64T feature allows your problems. Z9PE-D16 xxS2xxxxxxxx Made in China 合格 1.4 Special features 1.4.1 Product highlights Latest Processor Technology The motherboard supports the latest Intel Xeon® processor E5-2600 product family in LGA 2011 package...
...run faster than the marked frequency if the processor is operating below . With the correct serial number of the product, ASUS Technical Support team members can then offer a quicker and satisfying solution to your computer to run on 64-bit operating ...computing. 1-4 Chapter 1: Product introduction The Intel® EM64T feature allows your problems. Z9PE-D16 xxS2xxxxxxxx Made in China 合格 1.4 Special features 1.4.1 Product highlights Latest Processor Technology The motherboard supports the latest Intel Xeon® processor E5-2600 product family in LGA 2011 package...

User Guide
Page 17
...Serial ATA II technology The motherboard supports the Serial ATA II 3 Gb/s technology through the Serial ATA interface and Intel® C600 chipset, delivering up to a fast 480 Mbps on the CPU loading and system speed or power requirement. ASUS Z9PE-D16 Series 1-5 The onboard Intel... applications. Also, the motherboard can increase overall server system memory capacity. Serial ATA III technology The motherboard supports the Serial ATA III technology through the Serial ATA interface and Intel® C600 chipset. DDR3 memory support The Z9PE-D16 supports DDR3 memory that ...
...Serial ATA II technology The motherboard supports the Serial ATA II 3 Gb/s technology through the Serial ATA interface and Intel® C600 chipset, delivering up to a fast 480 Mbps on the CPU loading and system speed or power requirement. ASUS Z9PE-D16 Series 1-5 The onboard Intel... applications. Also, the motherboard can increase overall server system memory capacity. Serial ATA III technology The motherboard supports the Serial ATA III technology through the Serial ATA interface and Intel® C600 chipset. DDR3 memory support The Z9PE-D16 supports DDR3 memory that ...

User Guide
Page 19
Chapter 2: 2 Hardware information This chapter lists the hardware setup procedures that you have to perform when installing system components. It includes description of the jumpers and connectors on the motherboard.
Chapter 2: 2 Hardware information This chapter lists the hardware setup procedures that you have to perform when installing system components. It includes description of the jumpers and connectors on the motherboard.

User Guide
Page 20
Chapter summary 2 2.1 Before you proceed 2-3 2.2 Motherboard overview 2-4 2.3 Central Processing Unit (CPU 2-8 2.4 System memory 2-13 2.5 Expansion slots 2-16 2.6 Jumpers 2-22 2.7 Connectors 2-26 2.8 Internal LEDs 2-37 ASUS Z9PE-D16 Series
Chapter summary 2 2.1 Before you proceed 2-3 2.2 Motherboard overview 2-4 2.3 Central Processing Unit (CPU 2-8 2.4 System memory 2-13 2.5 Expansion slots 2-16 2.6 Jumpers 2-22 2.7 Connectors 2-26 2.8 Internal LEDs 2-37 ASUS Z9PE-D16 Series

User Guide
Page 21
... following precautions before you should shut down the system and unplug the power cable before removing or plugging in any motherboard settings. • Unplug the power cord from the power supply. ASUS Z9PE-D16 Series 2-3 Failure to do so may cause severe damage to indicate the system AC power cable plug or not. Standby...
... following precautions before you should shut down the system and unplug the power cable before removing or plugging in any motherboard settings. • Unplug the power cord from the power supply. ASUS Z9PE-D16 Series 2-3 Failure to do so may cause severe damage to indicate the system AC power cable plug or not. Standby...

User Guide
Page 22
.... 2.2.2 Screw holes Place ten (10) screws into it. Doing so can cause you physical injury and damage motherboard components! 2.2.1 Placement direction When installing the motherboard, ensure that you install it into the chassis in an SSI EEB 2011 1.0 compliant chassis. Ensure to unplug ...the chassis power cord before installing or removing the motherboard. DO NOT overtighten the screws! Place this side towards the rear of the chassis 2-4 Chapter 2: Hardware information To optimize the motherboard features, we highly recommend that you place it in the correct ...
.... 2.2.2 Screw holes Place ten (10) screws into it. Doing so can cause you physical injury and damage motherboard components! 2.2.1 Placement direction When installing the motherboard, ensure that you install it into the chassis in an SSI EEB 2011 1.0 compliant chassis. Ensure to unplug ...the chassis power cord before installing or removing the motherboard. DO NOT overtighten the screws! Place this side towards the rear of the chassis 2-4 Chapter 2: Hardware information To optimize the motherboard features, we highly recommend that you place it in the correct ...

User Guide
Page 23
2.2.3 Motherboard layout Z9PE-D16 Z9PE-D16/2L ASUS Z9PE-D16 Series 2-5
2.2.3 Motherboard layout Z9PE-D16 Z9PE-D16/2L ASUS Z9PE-D16 Series 2-5

User Guide
Page 26
... The product warranty does not cover damage to the PnP cap/socket contacts/motherboard components. Contact your left. 2-8 Chapter 2: Hardware information ASUS will process Return Merchandise Authorization (RMA) requests only if the motherboard comes with a surface mount LGA2011 socket designed for the Intel® Xeon... of repair only if the damage is shipment/transit-related. • Keep the cap after installing the motherboard. ASUS will shoulder the cost of the motherboard, ensure that the socket box is facing toward you and the load lever is on your retailer immediately if...
... The product warranty does not cover damage to the PnP cap/socket contacts/motherboard components. Contact your left. 2-8 Chapter 2: Hardware information ASUS will process Return Merchandise Authorization (RMA) requests only if the motherboard comes with a surface mount LGA2011 socket designed for the Intel® Xeon... of repair only if the damage is shipment/transit-related. • Keep the cap after installing the motherboard. ASUS will shoulder the cost of the motherboard, ensure that the socket box is facing toward you and the load lever is on your retailer immediately if...

User Guide
Page 30
... exposed area of the CPU that the heatsink will be in contact with preapplied thermal paste. 11. DO NOT forget to the connector on the motherboard labeled CPU_FAN1 / CPU_FAN2. The Thermal Interface Material is spread in an even thin layer. If so, skip this connector. 2-12 Chapter 2: Hardware information Connect the...
... exposed area of the CPU that the heatsink will be in contact with preapplied thermal paste. 11. DO NOT forget to the connector on the motherboard labeled CPU_FAN1 / CPU_FAN2. The Thermal Interface Material is spread in an even thin layer. If so, skip this connector. 2-12 Chapter 2: Hardware information Connect the...

User Guide
Page 31
ASUS Z9PE-D16 Series 2-13 DDR3 modules are developed for latest update. • Start installing the DIMMs from the same vendor. The figure illustrates the location of the ...) DIMM_A2 DIMM_A1 DIMM_B2 DIMM_B1 DIMM_C2 DIMM_C1 DIMM_D2 DIMM_D1 1 DIMMs X 2 DIMMs X X 4 DIMMs X X X X 8 DIMMs X X X X X X X X • *Refer to prevent installation on a DDR2 DIMM socket. 2.4 System memory 2.4.1 Overview The motherboard comes with eight (per CPU) Double Data Rate 3 (DDR3) Dual Inline Memory Modules (DIMM) sockets. A DDR3 module has the same physical dimensions as a DDR2 DIMM...
ASUS Z9PE-D16 Series 2-13 DDR3 modules are developed for latest update. • Start installing the DIMMs from the same vendor. The figure illustrates the location of the ...) DIMM_A2 DIMM_A1 DIMM_B2 DIMM_B1 DIMM_C2 DIMM_C1 DIMM_D2 DIMM_D1 1 DIMMs X 2 DIMMs X X 4 DIMMs X X X X 8 DIMMs X X X X X X X X • *Refer to prevent installation on a DDR2 DIMM socket. 2.4 System memory 2.4.1 Overview The motherboard comes with eight (per CPU) Double Data Rate 3 (DDR3) Dual Inline Memory Modules (DIMM) sockets. A DDR3 module has the same physical dimensions as a DDR2 DIMM...
User Guide
Page 33
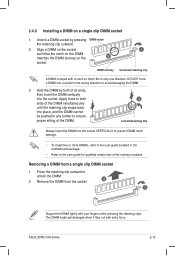
... from a single clip DIMM socket 1. ASUS Z9PE-D16 Series 2-15 DIMM slot key 1 Unlocked retaining clip A DIMM is keyed with a notch so that the notch on the DIMM matches the DIMM slot key on a single clip DIMM socket 1. The DIMM might get damaged when it fits in the motherboard package. • Refer to the...
... from a single clip DIMM socket 1. ASUS Z9PE-D16 Series 2-15 DIMM slot key 1 Unlocked retaining clip A DIMM is keyed with a notch so that the notch on the DIMM matches the DIMM slot key on a single clip DIMM socket 1. The DIMM might get damaged when it fits in the motherboard package. • Refer to the...
User Guide
Page 34
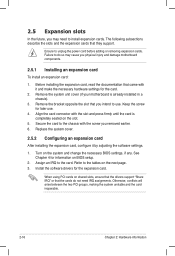
... PCI groups, making the system unstable and the card inoperable. 2-16 Chapter 2: Hardware information Refer to the card. Remove the system unit cover (if your motherboard is completely seated on the next page. 3. Remove the bracket opposite the slot that they support. Install the software drivers for information on the system... and change the necessary BIOS settings, if any. 2.5 Expansion slots In the future, you may cause you physical injury and damage motherboard components. 2.5.1 Installing an expansion card To install an expansion card: 1.
... PCI groups, making the system unstable and the card inoperable. 2-16 Chapter 2: Hardware information Refer to the card. Remove the system unit cover (if your motherboard is completely seated on the next page. 3. Remove the bracket opposite the slot that they support. Install the software drivers for information on the system... and change the necessary BIOS settings, if any. 2.5 Expansion slots In the future, you may cause you physical injury and damage motherboard components. 2.5.1 Installing an expansion card To install an expansion card: 1.

User Guide
Page 37
Locate the PIKE RAID card slot on your motherboard. 1. ASUS Z9PE-D16 Series 2-19 Align the golden fingers of the PIKE RAID card with the PIKE RAID card slot. 2.5.7 Installing an ASUS PIKE RAID card Follow the steps below to install an optional ASUS PIKE RAID card on the motherboard. 2.
Locate the PIKE RAID card slot on your motherboard. 1. ASUS Z9PE-D16 Series 2-19 Align the golden fingers of the PIKE RAID card with the PIKE RAID card slot. 2.5.7 Installing an ASUS PIKE RAID card Follow the steps below to install an optional ASUS PIKE RAID card on the motherboard. 2.

User Guide
Page 39
Orient and press the ASMB6 management card in place. ASUS Z9PE-D16 Series 2-21 Locate the ASMB6 header on your motherboard. 1. 2.5.8 Installing ASMB6 management board Follow the steps below to install an optional ASMB6 management board on the motherboard. 2.
Orient and press the ASMB6 management card in place. ASUS Z9PE-D16 Series 2-21 Locate the ASMB6 header on your motherboard. 1. 2.5.8 Installing ASMB6 management board Follow the steps below to install an optional ASMB6 management board on the motherboard. 2.

