
User Guide
Page 18
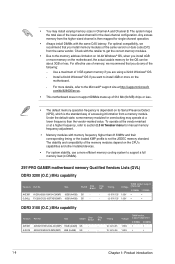
...you do any of the same version or date code (D/C) from the same vendor. Under the default state, some memory modules for overclocking may install varying memory sizes in Channel A and Channel B. Use a maximum of the memory modules depend on the CPU's capabilities and... 16GB (4x4GB) SS - AVEXIR AVD3UH31001204G-4CI(XMP) 16GB (4x4GB) SS - - A-DATA AX3U3100W4G12-DMV(XMP) 8GB (2x4GB) SS - - Z97-PRO GAMER motherboard memory Qualified Vendors Lists (QVL) DDR3 3200 (O.C.) MHz capability Vendors Part No. The system maps the total size of accessing information from the ...
...you do any of the same version or date code (D/C) from the same vendor. Under the default state, some memory modules for overclocking may install varying memory sizes in Channel A and Channel B. Use a maximum of the memory modules depend on the CPU's capabilities and... 16GB (4x4GB) SS - AVEXIR AVD3UH31001204G-4CI(XMP) 16GB (4x4GB) SS - - A-DATA AX3U3100W4G12-DMV(XMP) 8GB (2x4GB) SS - - Z97-PRO GAMER motherboard memory Qualified Vendors Lists (QVL) DDR3 3200 (O.C.) MHz capability Vendors Part No. The system maps the total size of accessing information from the ...

User Guide
Page 31
Z97-PRO GAMER CLRTC 12 23 Normal (Default) Z97-PRO GAMER Clear RTC RAM Clear RTC To erase the RTC RAM: 1. Removing the cap will cause system boot failure! • If the steps above do not need to clear the RTC when the system hangs due to overclocking. For system failure due to pins... 2-3. Plug the power cord and turn ON the computer. 4. enter data. Shut down the key during the boot process and enter BIOS setup to re- ASUS Z97-PRO GAMER 1-21 After clearing the CMOS, reinstall the...
Z97-PRO GAMER CLRTC 12 23 Normal (Default) Z97-PRO GAMER Clear RTC RAM Clear RTC To erase the RTC RAM: 1. Removing the cap will cause system boot failure! • If the steps above do not need to clear the RTC when the system hangs due to overclocking. For system failure due to pins... 2-3. Plug the power cord and turn ON the computer. 4. enter data. Shut down the key during the boot process and enter BIOS setup to re- ASUS Z97-PRO GAMER 1-21 After clearing the CMOS, reinstall the...

User Guide
Page 51
..., and SATA information Sets the system date and time Selects the display language of the BIOS setup program Creates storage RAID and configures system overclocking Displays the system properties of the basic system information, and allows you enter the BIOS setup program. To access the Advanced Mode, press ... installed to the system. • The Boot Menu(F8) button is available only when the boot device is installed to the system. ASUS Z97-PRO GAMER 2-7 The EZ Mode provides you an overview of the selected mode. Refer to the item Setup Mode in section Boot menu for Intel ...
..., and SATA information Sets the system date and time Selects the display language of the BIOS setup program Creates storage RAID and configures system overclocking Displays the system properties of the basic system information, and allows you enter the BIOS setup program. To access the Advanced Mode, press ... installed to the system. • The Boot Menu(F8) button is available only when the boot device is installed to the system. ASUS Z97-PRO GAMER 2-7 The EZ Mode provides you an overview of the selected mode. Refer to the item Setup Mode in section Boot menu for Intel ...
User Guide
Page 53
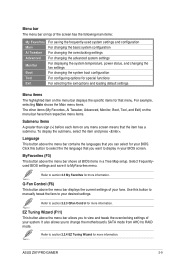
...For saving the frequently-used system settings and configuration For changing the basic system configuration For changing the overclocking settings For changing the advanced system settings For displaying the system temperature, power status, and changing the...section 2.2.3 QFan Control for that you to change the motherboard's SATA mode from AHCI to view and tweak the overclocking settings of your BIOS screen. For example, selecting Main shows the Main menu items. The other items (My Favorites...press . Select frequentlyused BIOS settings and save it to your system. ASUS Z97-PRO GAMER 2-9
...For saving the frequently-used system settings and configuration For changing the basic system configuration For changing the overclocking settings For changing the advanced system settings For displaying the system temperature, power status, and changing the...section 2.2.3 QFan Control for that you to change the motherboard's SATA mode from AHCI to view and tweak the overclocking settings of your BIOS screen. For example, selecting Main shows the Main menu items. The other items (My Favorites...press . Select frequentlyused BIOS settings and save it to your system. ASUS Z97-PRO GAMER 2-9
User Guide
Page 57
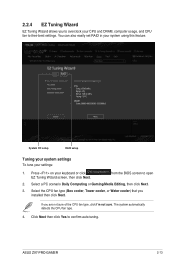
2.2.4 EZ Tuning Wizard EZ Tuning Wizard allows you to overclock your settings: 1. Select a PC scenario Daily Computing or Gaming/Media Editing, then click Next. 3. Select the CPU fan type (Box cooler, Tower cooler, or Water ... sure of the CPU fan type, click I'm not sure. from the BIOS screen to confirm auto-tuning. The system automatically detects the CPU fan type. 4. ASUS Z97-PRO GAMER 2-13 System OC setup RAID setup Tuning your system settings To tune your CPU and DRAM, computer usage, and CPU fan to their best settings...
2.2.4 EZ Tuning Wizard EZ Tuning Wizard allows you to overclock your settings: 1. Select a PC scenario Daily Computing or Gaming/Media Editing, then click Next. 3. Select the CPU fan type (Box cooler, Tower cooler, or Water ... sure of the CPU fan type, click I'm not sure. from the BIOS screen to confirm auto-tuning. The system automatically detects the CPU fan type. 4. ASUS Z97-PRO GAMER 2-13 System OC setup RAID setup Tuning your system settings To tune your CPU and DRAM, computer usage, and CPU fan to their best settings...

User Guide
Page 62
2.5 Ai Tweaker menu The Ai Tweaker menu items allow you installed on the motherboard. The configuration options for this section vary depending on the CPU and DIMM model you to configure overclocking-related items. Be cautious when changing the settings of the Ai Tweaker menu items. Incorrect field values can cause the system to display the following items: 2-18 Chapter 2: Getting started Scroll down to malfunction.
2.5 Ai Tweaker menu The Ai Tweaker menu items allow you installed on the motherboard. The configuration options for this section vary depending on the CPU and DIMM model you to configure overclocking-related items. Be cautious when changing the settings of the Ai Tweaker menu items. Incorrect field values can cause the system to display the following items: 2-18 Chapter 2: Getting started Scroll down to malfunction.
User Guide
Page 63
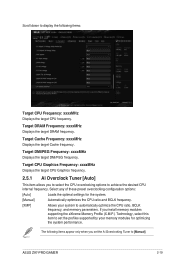
...Profile (X.M.P.) Technology, select this item to set the Ai Overclocking Tuner to [Manual]. Select any of these preset overclocking configuration options: [Auto] Loads the optimal settings for optimizing the system performance. ASUS Z97-PRO GAMER 2-19 Target DRAM Frequency: xxxxMHz Displays the target DRAM ... your system to automatically optimize the CPU ratio, BCLK frequency, and memory parameters. If you to select the CPU overclocking options to achieve the desired CPU internal frequency. Target Cache Frequency: xxxxMHz Displays the target Cache frequency. The following items...
...Profile (X.M.P.) Technology, select this item to set the Ai Overclocking Tuner to [Manual]. Select any of these preset overclocking configuration options: [Auto] Loads the optimal settings for optimizing the system performance. ASUS Z97-PRO GAMER 2-19 Target DRAM Frequency: xxxxMHz Displays the target DRAM ... your system to automatically optimize the CPU ratio, BCLK frequency, and memory parameters. If you to select the CPU overclocking options to achieve the desired CPU internal frequency. Target Cache Frequency: xxxxMHz Displays the target Cache frequency. The following items...

User Guide
Page 64
... [100MHz], [125MHz], [167MHz], or [250MHz]. The value ranges depend on the value you set on BCLK Frequency. 2.5.2 [Auto] [Disabled] ASUS MultiCore Enhancement [Auto] This item allows you to set the value based on the assigned CPU strap for the BIOS to adjust the value. Configuration...item allows you to select a strap close to your target BCLK (base clock) for an extreme overclocking, or leave it at [Auto] for a better overclocking capability. Use the or to improve overclocking capability. This may damage the CPU permanently. Use the or to upgrade. Select SB PLL when the...
... [100MHz], [125MHz], [167MHz], or [250MHz]. The value ranges depend on the value you set on BCLK Frequency. 2.5.2 [Auto] [Disabled] ASUS MultiCore Enhancement [Auto] This item allows you to set the value based on the assigned CPU strap for the BIOS to adjust the value. Configuration...item allows you to select a strap close to your target BCLK (base clock) for an extreme overclocking, or leave it at [Auto] for a better overclocking capability. Use the or to improve overclocking capability. This may damage the CPU permanently. Use the or to upgrade. Select SB PLL when the...

User Guide
Page 65
If you assign a value for 3-Core Ratio Limit, do not set to get the extreme overclocking capability. ASUS Z97-PRO GAMER 2-21 CPU Cache Ratio [Auto] This item allows you to set the maximum possible ratio on the Uncore part of the processor. The values depend ...
If you assign a value for 3-Core Ratio Limit, do not set to get the extreme overclocking capability. ASUS Z97-PRO GAMER 2-21 CPU Cache Ratio [Auto] This item allows you to set the maximum possible ratio on the Uncore part of the processor. The values depend ...

User Guide
Page 66
...this happens, revert to the default setting. 2.5.9 Max. Higher levels of the load-line calibration can get a higher voltage and a better overclocking performance but increases the CPU and VRM thermal. 2.5.8 DRAM Frequency [Auto] This item allows you to set the DRAM timing control features. ... loading before selecting either [BCLK + Ratio Tuning] or [Ratio Tuning]. To keep the current overclocking tuner status, select [Keep Current Settings]. 2.5.11 EPU Power Saving Mode [Disabled] ASUS EPU (Energy Processing Unit) sets the CPU in this menu allow you installed an efficient CPU ...
...this happens, revert to the default setting. 2.5.9 Max. Higher levels of the load-line calibration can get a higher voltage and a better overclocking performance but increases the CPU and VRM thermal. 2.5.8 DRAM Frequency [Auto] This item allows you to set the DRAM timing control features. ... loading before selecting either [BCLK + Ratio Tuning] or [Ratio Tuning]. To keep the current overclocking tuner status, select [Keep Current Settings]. 2.5.11 EPU Power Saving Mode [Disabled] ASUS EPU (Energy Processing Unit) sets the CPU in this menu allow you installed an efficient CPU ...
User Guide
Page 67
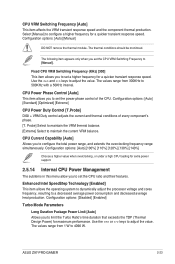
...and thermal conditions of the CPU. Configuration options: [Auto] [100%] [110%] [120%] [130%] [140%] Choose a higher value when overclocking, or under a high CPU loading for extra power support. 2.5.14 Internal CPU Power Management The subitems in this menu allow you to 500KHz ... range, and extends the overclocking frequency range simultaneously. CPU VRM Switching Frequency [Auto] This item affects the VRM transient response speed and the component thermal production. Configuration options: [Auto] [Manual] DO NOT remove the thermal module. ASUS Z97-PRO GAMER 2-23 The thermal conditions ...
...and thermal conditions of the CPU. Configuration options: [Auto] [100%] [110%] [120%] [130%] [140%] Choose a higher value when overclocking, or under a high CPU loading for extra power support. 2.5.14 Internal CPU Power Management The subitems in this menu allow you to 500KHz ... range, and extends the overclocking frequency range simultaneously. CPU VRM Switching Frequency [Auto] This item affects the VRM transient response speed and the component thermal production. Configuration options: [Auto] [Manual] DO NOT remove the thermal module. ASUS Z97-PRO GAMER 2-23 The thermal conditions ...

User Guide
Page 68
...125 to 127 in seconds. Short Duration Package Power Limit [Auto] Also known as the processor goes into low current state. When this item when overclocking. We recommend you to set its value from 1 W to adjust the value. Configuration options: [Auto] [Regular] [Fast] 2-24 Chapter 2: ...or make the FIVR (fully integrated voltage regulator work in Response [Auto] This item allows you to prevent frequency and power throttling when overclocking. Package Power Time Window [Auto] Also known as Power Limit 1, this item to prevent tripping the Fully Integrated Voltage Regulator when doing...
...125 to 127 in seconds. Short Duration Package Power Limit [Auto] Also known as the processor goes into low current state. When this item when overclocking. We recommend you to set its value from 1 W to adjust the value. Configuration options: [Auto] [Regular] [Fast] 2-24 Chapter 2: ...or make the FIVR (fully integrated voltage regulator work in Response [Auto] This item allows you to prevent frequency and power throttling when overclocking. Package Power Time Window [Auto] Also known as Power Limit 1, this item to prevent tripping the Fully Integrated Voltage Regulator when doing...

User Guide
Page 69
... of voltage fed to adjust the value. Power Saving Level 2 Threshold [Auto] Lower value provides sufficient overclocking tolerance to overclock, but does not guarantee the CPU life. Configuration options: [Auto] [Manual Mode] [Offset Mode] [Adaptive Mode] ASUS Z97-PRO GAMER 2-25 When you enable this item, you to 1.50. Configuration options: [Auto] [100%] [87.5%] [75.0%] [62...
... of voltage fed to adjust the value. Power Saving Level 2 Threshold [Auto] Lower value provides sufficient overclocking tolerance to overclock, but does not guarantee the CPU life. Configuration options: [Auto] [Manual Mode] [Offset Mode] [Adaptive Mode] ASUS Z97-PRO GAMER 2-25 When you enable this item, you to 1.50. Configuration options: [Auto] [100%] [87.5%] [75.0%] [62...

User Guide
Page 72
... Graphics Voltage to [Adaptive Mode] and allows you set the CPU Graphics Voltage to [Adaptive Mode]. You can use the or keys to enhance the overclocking capability. To offset the voltage by a positive value. The values range from 0.001V to 1.920V with a 0.001V interval. 2.5.21 [+] [-] CPU ... /O on the CPU. Total Adaptive Mode CPU Graphics Voltage [By CPU] This item sums up the voltages of voltage fed to [Enabled] when overclocking your system. The values range from 0.001V to 0.999V with a 0.001V interval. CPU Analog I/O Voltage Offset [Auto] This item allows you ...
... Graphics Voltage to [Adaptive Mode] and allows you set the CPU Graphics Voltage to [Adaptive Mode]. You can use the or keys to enhance the overclocking capability. To offset the voltage by a positive value. The values range from 0.001V to 1.920V with a 0.001V interval. 2.5.21 [+] [-] CPU ... /O on the CPU. Total Adaptive Mode CPU Graphics Voltage [By CPU] This item sums up the voltages of voltage fed to [Enabled] when overclocking your system. The values range from 0.001V to 0.999V with a 0.001V interval. CPU Analog I/O Voltage Offset [Auto] This item allows you ...

User Guide
Page 73
...or keys to adjust the value. The values range from 0.70000V to 1.50000V with a 0.01000V interval. Configuration options: [Auto] [Disabled] [Enabled] ASUS Z97-PRO GAMER 2-29 According to Intel CPU specifications, DIMMs with a 0.00500V interval. 2.5.28 DRAM DATA REF Voltage on CHA/CHB [Auto] This item allows you...with voltage requirement over 1.65V may need better cooling system for EMI reduction, or set this item to [Disabled] to enhance BCLK overclocking. The values range from the memory bus. You can use the or keys to adjust the value. The values range from 0.800V ...
...or keys to adjust the value. The values range from 0.70000V to 1.50000V with a 0.01000V interval. Configuration options: [Auto] [Disabled] [Enabled] ASUS Z97-PRO GAMER 2-29 According to Intel CPU specifications, DIMMs with a 0.00500V interval. 2.5.28 DRAM DATA REF Voltage on CHA/CHB [Auto] This item allows you...with voltage requirement over 1.65V may need better cooling system for EMI reduction, or set this item to [Disabled] to enhance BCLK overclocking. The values range from the memory bus. You can use the or keys to adjust the value. The values range from 0.800V ...
User Guide
Page 94
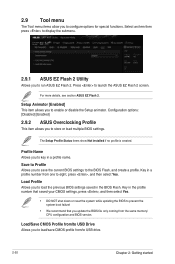
...Save CMOS Profile from/to USB Drive Allows you to key in a profile name. Select an item then press to display the submenu. 2.9.1 ASUS EZ Flash 2 Utility Allows you to load/save the current BIOS settings to USB drive. 2-50 Chapter 2: Getting started Profile Name Allows ... no profile is created. Key in a profile number from /to the BIOS Flash, and create a profile. Configuration options: [Disabled] [Enabled] 2.9.2 ASUS Overclocking Profile This item allows you to prevent the system boot failure! • We recommend that saved your CMOS settings, press , and then select Yes. ...
...Save CMOS Profile from/to USB Drive Allows you to key in a profile name. Select an item then press to display the submenu. 2.9.1 ASUS EZ Flash 2 Utility Allows you to load/save the current BIOS settings to USB drive. 2-50 Chapter 2: Getting started Profile Name Allows ... no profile is created. Key in a profile number from /to the BIOS Flash, and create a profile. Configuration options: [Disabled] [Enabled] 2.9.2 ASUS Overclocking Profile This item allows you to prevent the system boot failure! • We recommend that saved your CMOS settings, press , and then select Yes. ...


