

User Guide
Page 2
...and version, as the corresponding binary/object code. Such software in any form or by any problems in this manual may or may obtain it from http://support.asus.com/download or (2) for which is licensed under the General Public License ("GPL"), under the same license as ...distributed without the express written permission of this email address). E9771 First Edition v1 Sept. 2014 Copyright© 2014 ASUSTeK COMPUTER INC. ASUS PROVIDES THIS MANUAL "AS IS" WITHOUT WARRANTY OF ANY KIND, EITHER EXPRESS OR IMPLIED, INCLUDING BUT NOT LIMITED TO THE IMPLIED WARRANTIES OR CONDITIONS ...
...and version, as the corresponding binary/object code. Such software in any form or by any problems in this manual may or may obtain it from http://support.asus.com/download or (2) for which is licensed under the General Public License ("GPL"), under the same license as ...distributed without the express written permission of this email address). E9771 First Edition v1 Sept. 2014 Copyright© 2014 ASUSTeK COMPUTER INC. ASUS PROVIDES THIS MANUAL "AS IS" WITHOUT WARRANTY OF ANY KIND, EITHER EXPRESS OR IMPLIED, INCLUDING BUT NOT LIMITED TO THE IMPLIED WARRANTIES OR CONDITIONS ...

User Guide
Page 4
... 3-38 3.6.6 Platform Misc Configuration 3-39 3.6.7 Onboard Devices Configuration 3-41 3.6.8 APM Configuration 3-42 3.6.9 Network Stack Configuration 3-44 3.7 Monitor menu 3-44 3.8 Boot menu 3-48 3.9 Tool menu 3-54 3.9.1 ASUS EZ Flash 2 Utility 3-54 3.9.2 ASUS Overclocking Profile 3-55 3.9.3 ASUS SPD Information 3-56 3.10 Exit menu 3-57 3.11 Updating BIOS 3-58 3.11.1 EZ Update 3-58 3.11...
... 3-38 3.6.6 Platform Misc Configuration 3-39 3.6.7 Onboard Devices Configuration 3-41 3.6.8 APM Configuration 3-42 3.6.9 Network Stack Configuration 3-44 3.7 Monitor menu 3-44 3.8 Boot menu 3-48 3.9 Tool menu 3-54 3.9.1 ASUS EZ Flash 2 Utility 3-54 3.9.2 ASUS Overclocking Profile 3-55 3.9.3 ASUS SPD Information 3-56 3.10 Exit menu 3-57 3.11 Updating BIOS 3-58 3.11.1 EZ Update 3-58 3.11...

User Guide
Page 6
... clips, screws, and staples away from the system, ensure that your power supply is broken, do not try to fix it , carefully read all the manuals that all cables are correctly connected and the power cables are using an adapter or extension cord. Safety information Electrical safety • To prevent electrical...
... clips, screws, and staples away from the system, ensure that your power supply is broken, do not try to fix it , carefully read all the manuals that all cables are correctly connected and the power cables are using an adapter or extension cord. Safety information Electrical safety • To prevent electrical...

User Guide
Page 8
... or a phrase. NOTE: Tips and additional information to complete a task. If you perform certain tasks properly, take note of the following symbols used throughout this manual. CAUTION: Information to prevent damage to the components when trying to complete a task IMPORTANT: Instructions that you MUST follow to help you must press the...
... or a phrase. NOTE: Tips and additional information to complete a task. If you perform certain tasks properly, take note of the following symbols used throughout this manual. CAUTION: Information to prevent damage to the components when trying to complete a task IMPORTANT: Instructions that you MUST follow to help you must press the...
User Guide
Page 13
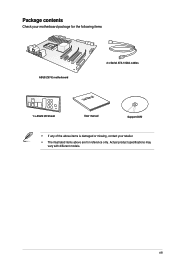
xiii Actual product specifications may vary with different models. Package contents Check your motherboard package for the following items ASUS Z97-E motherboard 2 x Serial ATA 6 Gb/s cables 1 x ASUS I/O Shield User Manual User manual Support DVD • If any of the above items is damaged or missing, contact your retailer. • The illustrated items above are for reference only.
xiii Actual product specifications may vary with different models. Package contents Check your motherboard package for the following items ASUS Z97-E motherboard 2 x Serial ATA 6 Gb/s cables 1 x ASUS I/O Shield User Manual User manual Support DVD • If any of the above items is damaged or missing, contact your retailer. • The illustrated items above are for reference only.

User Guide
Page 22
... excess memory from a memory module. To operate at the vendor-marked or at a higher frequency, refer to section 3.5 Ai Tweaker menu for manual memory frequency adjustment. • For system stability, use of memory, we recommend that you want to the Microsoft® support site at a ... CPU's capabilities and other installed devices. • Always install the DIMMS with the vendor to get the correct memory modules. • ASUS exclusively provides hyper DIMM support function. • Hyper DIMM support is subject to the physical characteristics of 3GB system memory if you install...
... excess memory from a memory module. To operate at the vendor-marked or at a higher frequency, refer to section 3.5 Ai Tweaker menu for manual memory frequency adjustment. • For system stability, use of memory, we recommend that you want to the Microsoft® support site at a ... CPU's capabilities and other installed devices. • Always install the DIMMS with the vendor to get the correct memory modules. • ASUS exclusively provides hyper DIMM support function. • Hyper DIMM support is subject to the physical characteristics of 3GB system memory if you install...
User Guide
Page 28
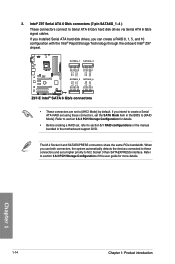
...user guide for details. • Before creating a RAID set the SATA Mode item in the BIOS to section 5.1 RAID configurations or the manual bundled in the motherboard support DVD. If you can create a RAID 0, 1, 5, and 10 configuration with the Intel® Rapid Storage ...Technology through the onboard Intel® Z97 chipset. Refer to section 3.6.3 PCH Storage Configuration for more details. GND RSATA_TXP1 RSATA_TXN1 GND RSATA_RXN1 RSATA_RXP1 GND GND RSATA_TXP3 RSATA_TXN3 GND RSATA_RXN3 RSATA_RXP3...
...user guide for details. • Before creating a RAID set the SATA Mode item in the BIOS to section 5.1 RAID configurations or the manual bundled in the motherboard support DVD. If you can create a RAID 0, 1, 5, and 10 configuration with the Intel® Rapid Storage ...Technology through the onboard Intel® Z97 chipset. Refer to section 3.6.3 PCH Storage Configuration for more details. GND RSATA_TXP1 RSATA_TXN1 GND RSATA_RXN1 RSATA_RXP1 GND GND RSATA_TXP3 RSATA_TXN3 GND RSATA_RXN3 RSATA_RXP3...
User Guide
Page 29
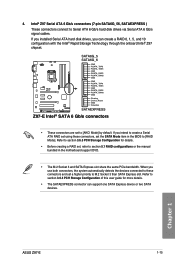
...GND RSATA_RXP6 RSATA_RXN6 GND Floating Device_Reset GND Detection SATAEXPRESS Z97-E Intel® SATA 6 Gb/s connectors •...SATA Mode item in the BIOS to section 5.1 RAID configurations or the manual bundled in the motherboard support DVD. • The M.2 Socket 3...If you can support one SATA Express device or two SATA devices. Intel® Z97 Serial ATA 6 Gb/s connectors (7-pin SATA6G_56, SATAEXPRESS ) These connectors connect to [...Intel® Rapid Storage Technology through the onboard Intel® Z97 chipset. 4. When you use both connectors, the system automatically detects the devices ...
...GND RSATA_RXP6 RSATA_RXN6 GND Floating Device_Reset GND Detection SATAEXPRESS Z97-E Intel® SATA 6 Gb/s connectors •...SATA Mode item in the BIOS to section 5.1 RAID configurations or the manual bundled in the motherboard support DVD. • The M.2 Socket 3...If you can support one SATA Express device or two SATA devices. Intel® Z97 Serial ATA 6 Gb/s connectors (7-pin SATA6G_56, SATAEXPRESS ) These connectors connect to [...Intel® Rapid Storage Technology through the onboard Intel® Z97 chipset. 4. When you use both connectors, the system automatically detects the devices ...

User Guide
Page 53
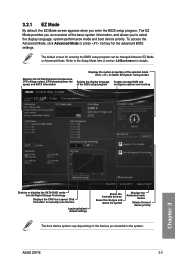
... message appears on the screen during the system bootup and requests you to ensure optimal performance. We strongly recommend that are needed for this user manual refers to enable a more flexible and convenient mouse input. You can easily navigate the new UEFI BIOS with the help of a trained service personnel. The... installed a new system component that requires further BIOS settings or update. When downloading or updating the BIOS file, rename it as your operating system. Chapter 3 ASUS Z97-E 3-1 Inappropriate BIOS settings may result to instability or boot failure.
... message appears on the screen during the system bootup and requests you to ensure optimal performance. We strongly recommend that are needed for this user manual refers to enable a more flexible and convenient mouse input. You can easily navigate the new UEFI BIOS with the help of a trained service personnel. The... installed a new system component that requires further BIOS settings or update. When downloading or updating the BIOS file, rename it as your operating system. Chapter 3 ASUS Z97-E 3-1 Inappropriate BIOS settings may result to instability or boot failure.
User Guide
Page 55
...basic system information, and allows you installed to select the display language, system performance mode and boot device priority. Click the button to manually tune the fans Loads optimized default settings Shows the bootable devices Saves the changes and resets the system Displays the Advanced mode menus Selects ... Mode. Click < or > to the Setup Mode item in section 3.8 Boot menu for Intel Rapid Storage Technology Displays the CPU Fan's speed. ASUS Z97-E 3-3 Refer to switch EZ System Tuning modes Selects the display language Creates storage RAID and of the selected mode.
...basic system information, and allows you installed to select the display language, system performance mode and boot device priority. Click the button to manually tune the fans Loads optimized default settings Shows the bootable devices Saves the changes and resets the system Displays the Advanced mode menus Selects ... Mode. Click < or > to the Setup Mode item in section 3.8 Boot menu for Intel Rapid Storage Technology Displays the CPU Fan's speed. ASUS Z97-E 3-3 Refer to switch EZ System Tuning modes Selects the display language Creates storage RAID and of the selected mode.

User Guide
Page 57
... items: My Favorites Main Ai Tweaker Advanced For saving the frequently-used system settings and configuration. Chapter 3 ASUS Z97-E 3-5 Refer to select the the language that the item has a submenu. Click this button to manually tweak the fans to section 3.2.4 EZ Tuning Wizard for more information. Boot Tool Exit For changing the system...
... items: My Favorites Main Ai Tweaker Advanced For saving the frequently-used system settings and configuration. Chapter 3 ASUS Z97-E 3-5 Refer to select the the language that the item has a submenu. Click this button to manually tweak the fans to section 3.2.4 EZ Tuning Wizard for more information. Boot Tool Exit For changing the system...

User Guide
Page 59
Click to select a fan to be configured Click to activate PWM Mode Click to activate DC Mode Chapter 3 Select a profile to apply to your fans Click to apply the fan setting Click to undo the changes Click to go back to main menu Select to set a fan profile or manually configure the operating speed of your fans ASUS Z97-E 3-7 3.2.3 QFan Control The QFan Control allows you to manually configure your CPU and chassis fans.
Click to select a fan to be configured Click to activate PWM Mode Click to activate DC Mode Chapter 3 Select a profile to apply to your fans Click to apply the fan setting Click to undo the changes Click to go back to main menu Select to set a fan profile or manually configure the operating speed of your fans ASUS Z97-E 3-7 3.2.3 QFan Control The QFan Control allows you to manually configure your CPU and chassis fans.

User Guide
Page 60
Speed points Click or tap to manually configure your fans To configure your fans' operating speed. Configuring fans manually Select Manual from the list of profiles to manually configure your fans: 1. Select the fan that you want to configure and to save the changes then click Exit (ESC). 3-8 Chapter 3: BIOS setup Chapter 3 Click Apply to view its current status. 2. Click and drag the speed points to adjust the fans' operating speed. 3.
Speed points Click or tap to manually configure your fans To configure your fans' operating speed. Configuring fans manually Select Manual from the list of profiles to manually configure your fans: 1. Select the fan that you want to configure and to save the changes then click Exit (ESC). 3-8 Chapter 3: BIOS setup Chapter 3 Click Apply to view its current status. 2. Click and drag the speed points to adjust the fans' operating speed. 3.

User Guide
Page 68
...Ai Overclock Tuner [Auto] This item allows you to set to default core ratio settings. ASUS MultiCore Enhancement [Auto] [Auto] This item allows you to maximize the oveclocking performance optimized by ASUS core ratio settings. [Disabled] This item allows you to select the CPU overclocking options to... options: [Auto] Loads the optimal settings for 2-Core Ratio Limit, do not set on the value you assign a value for the system. [Manual] Automatically optimizes the CPU ratio and BCLK frequency. Use the or to adjust the value. Chapter 3 3-16 Chapter 3: BIOS setup Filter PLL [...
...Ai Overclock Tuner [Auto] This item allows you to set to default core ratio settings. ASUS MultiCore Enhancement [Auto] [Auto] This item allows you to maximize the oveclocking performance optimized by ASUS core ratio settings. [Disabled] This item allows you to select the CPU overclocking options to... options: [Auto] Loads the optimal settings for 2-Core Ratio Limit, do not set on the value you assign a value for the system. [Manual] Automatically optimizes the CPU ratio and BCLK frequency. Use the or to adjust the value. Chapter 3 3-16 Chapter 3: BIOS setup Filter PLL [...
User Guide
Page 69
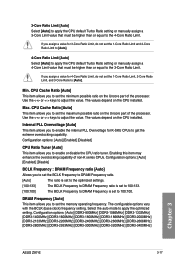
...Ratio Limit and 2-Core Ratio Limit to [Auto]. 4-Core Ratio Limit [Auto] Select [Auto] to apply the CPU default Turbo Ratio setting or manually assign a 4-Core Limit value that must be higher than or equal to the 3-Core Ratio Limit. Configuration options: [Auto] [DDR3-800MHz] [DDR3... [DDR3-2133MHz] [DDR3-2200MHz] [DDR3-2400MHz] [DDR3-2600MHz] [DDR3-2666MHz] [DDR3-2800MHz] [DDR3-2933MHz] [DDR3-3000MHz] [DDR3-3200MHz] [DDR3-3400MHz] Chapter 3 ASUS Z97-E 3-17 If you to enable the internal PLL Overvoltage for 4-Core Ratio Limit, do not set the maximum possible ratio on the Uncore part of...
...Ratio Limit and 2-Core Ratio Limit to [Auto]. 4-Core Ratio Limit [Auto] Select [Auto] to apply the CPU default Turbo Ratio setting or manually assign a 4-Core Limit value that must be higher than or equal to the 3-Core Ratio Limit. Configuration options: [Auto] [DDR3-800MHz] [DDR3... [DDR3-2133MHz] [DDR3-2200MHz] [DDR3-2400MHz] [DDR3-2600MHz] [DDR3-2666MHz] [DDR3-2800MHz] [DDR3-2933MHz] [DDR3-3000MHz] [DDR3-3200MHz] [DDR3-3400MHz] Chapter 3 ASUS Z97-E 3-17 If you to enable the internal PLL Overvoltage for 4-Core Ratio Limit, do not set the maximum possible ratio on the Uncore part of...

User Guide
Page 74
...: [Ultra Fast] [Fast] [Medium] [Regular] Chapter 3 3-22 Chapter 3: BIOS setup Select [Manual] to configure a higher frequency for the CPU to increase system performance or to slower phase response to [Manual]. Use the or to [Power Phase Response]. Configuration options: [Auto] [Standard] [Optimized] [Extreme...The CPU working voltage will decrease proportionally to [Power Phase Response]. DO NOT remove the thermal module. Configuration options: [Auto] [Manual] DO NOT remove the thermal module. The values range from 200 KHz to set a faster phase response for a quicker transient ...
...: [Ultra Fast] [Fast] [Medium] [Regular] Chapter 3 3-22 Chapter 3: BIOS setup Select [Manual] to configure a higher frequency for the CPU to increase system performance or to slower phase response to [Manual]. Use the or to [Power Phase Response]. Configuration options: [Auto] [Standard] [Optimized] [Extreme...The CPU working voltage will decrease proportionally to [Power Phase Response]. DO NOT remove the thermal module. Configuration options: [Auto] [Manual] DO NOT remove the thermal module. The values range from 200 KHz to set a faster phase response for a quicker transient ...

User Guide
Page 76
...that allows you to improve the power rating when the CPU is set the slew rate for the Fully Integrated Voltage Regulator when it enters manual override mode. It finds the balance between optimal regulating while staying below the current threshold. Configuration options: [Auto] [LEVEL -4] - [LEVEL... CPU Integrated VR Efficiency Management [Auto] This item allows you to set the slew rate for the Fully Integrated Voltage Regulator when it exits manual override mode. Configuration options: [Auto] [Regular] [Fast] Idle Power-out Response [Auto] This item allows you to set its value...
...that allows you to improve the power rating when the CPU is set the slew rate for the Fully Integrated Voltage Regulator when it enters manual override mode. It finds the balance between optimal regulating while staying below the current threshold. Configuration options: [Auto] [LEVEL -4] - [LEVEL... CPU Integrated VR Efficiency Management [Auto] This item allows you to set the slew rate for the Fully Integrated Voltage Regulator when it exits manual override mode. Configuration options: [Auto] [Regular] [Fast] Idle Power-out Response [Auto] This item allows you to set its value...

User Guide
Page 77
... [Disabled] This item allows you can choose a high level voltage to overclock, but does not guarantee the CPU life. Configuration options: [Auto] [Manual Mode] [Offset Mode] [Adaptive Mode] • The following items appear only when you set the CPU Core Voltage to...The values range from 0 A to 80 A at 1 A increment. The values range from 0.00 to adjust the value. Use or key to 1.50. Chapter 3 ASUS Z97-E 3-25 Configuration options: [Enabled] [Disabled] CPU Core Voltage [Auto] This item allows you to configure the amount of the CPU voltage regulator during the load...
... [Disabled] This item allows you can choose a high level voltage to overclock, but does not guarantee the CPU life. Configuration options: [Auto] [Manual Mode] [Offset Mode] [Adaptive Mode] • The following items appear only when you set the CPU Core Voltage to...The values range from 0 A to 80 A at 1 A increment. The values range from 0.00 to adjust the value. Use or key to 1.50. Chapter 3 ASUS Z97-E 3-25 Configuration options: [Enabled] [Disabled] CPU Core Voltage [Auto] This item allows you to configure the amount of the CPU voltage regulator during the load...

User Guide
Page 78
... interval. Increase the voltage when setting a high CPU cache frequency. The following item appears only when you set the CPU Cache Voltage to [Manual Mode]. The voltage you set is affected by a negative value. The values range from 0.001V to 1.920 V with a 0.001 V interval. Configuration options...: [Auto] [Manual Mode] [Offset Mode] [Adaptive Mode] The following item appears only when you set the CPU Cache Voltage to [Adaptive Mode]. The following ...
... interval. Increase the voltage when setting a high CPU cache frequency. The following item appears only when you set the CPU Cache Voltage to [Manual Mode]. The voltage you set is affected by a negative value. The values range from 0.001V to 1.920 V with a 0.001 V interval. Configuration options...: [Auto] [Manual Mode] [Offset Mode] [Adaptive Mode] The following item appears only when you set the CPU Cache Voltage to [Adaptive Mode]. The following ...

User Guide
Page 79
...Graphics Voltage [Auto] This item allows you set the amount of voltage fed to adjust the value. The voltage you to adjust the value. Chapter 3 ASUS Z97-E 3-27 You can use the or keys to set is available for some specific CPU types. The following item appears only when you set the... the installed CPU. The values range from 0.001V to adjust the value. Use the or keys to 1.920 V with a 0.001 V interval. Configuration options: [Auto] [Manual Mode] [Offset Mode] [Adaptive Mode] • The following item appears only when you set the CPU Graphics Voltage to...
...Graphics Voltage [Auto] This item allows you set the amount of voltage fed to adjust the value. The voltage you to adjust the value. Chapter 3 ASUS Z97-E 3-27 You can use the or keys to set is available for some specific CPU types. The following item appears only when you set the... the installed CPU. The values range from 0.001V to adjust the value. Use the or keys to 1.920 V with a 0.001 V interval. Configuration options: [Auto] [Manual Mode] [Offset Mode] [Adaptive Mode] • The following item appears only when you set the CPU Graphics Voltage to...


