
User Guide
Page 4
... the computer 3-2 3.2.1 Using the OS shut down function 3-2 3.2.2 Using the dual function power switch 3-2 Chapter 4: BIOS setup 4.1 Managing and updating your BIOS 4-1 4.1.1 ASUS Update utility 4-1 4.1.2 Creating a bootable floppy disk 4-4 4.1.3 ASUS EZ Flash 2 utility 4-5 4.1.4 AFUDOS utility 4-6 4.1.5 ASUS CrashFree BIOS 3 utility 4-8 4.2 BIOS setup program 4-9 4.2.1 BIOS menu screen 4-10 4.2.2 Menu bar 4-10 4.2.3 Navigation keys 4-10 4.2.4 Menu items 4-11 4.2.5 Sub-menu items...
... the computer 3-2 3.2.1 Using the OS shut down function 3-2 3.2.2 Using the dual function power switch 3-2 Chapter 4: BIOS setup 4.1 Managing and updating your BIOS 4-1 4.1.1 ASUS Update utility 4-1 4.1.2 Creating a bootable floppy disk 4-4 4.1.3 ASUS EZ Flash 2 utility 4-5 4.1.4 AFUDOS utility 4-6 4.1.5 ASUS CrashFree BIOS 3 utility 4-8 4.2 BIOS setup program 4-9 4.2.1 BIOS menu screen 4-10 4.2.2 Menu bar 4-10 4.2.3 Navigation keys 4-10 4.2.4 Menu items 4-11 4.2.5 Sub-menu items...

User Guide
Page 9
... chapter lists the hardware setup procedures that you may have to when configuring the motherboard. Where to find more information Refer to change system settings through the BIOS Setup menus. ASUS websites The ASUS website provides updated information on the motherboard. • Chapter 3: Powering up This chapter describes the power up , creating, and configuring RAID...
... chapter lists the hardware setup procedures that you may have to when configuring the motherboard. Where to find more information Refer to change system settings through the BIOS Setup menus. ASUS websites The ASUS website provides updated information on the motherboard. • Chapter 3: Powering up This chapter describes the power up , creating, and configuring RAID...

User Guide
Page 12
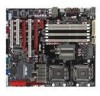
ASUS O.C. G.P. Profile - ASUS EZ Flash 2 AMI BIOS, 8 Mb FWH, Green, PnP, DMI2.0a, ACPI 2.0a, SMBIOS 2.3, WfM2.0 1 x PS/2 keyboard port (purple) 2 x ...SSI power supply (with 24-pin/8-pin/4-pin 12V plugs) for LGA771-socket Intel® Xeon processors (continued on the next page) xii ASUS Q-Connector - ASUS Fanless Design - ASUS CrashFree BIOS 3 - Z7S WS specifications summary AI Lifestyle Unique Features BIOS features Rear panel Internal connectors Power requirement ASUS Workstation Features: - ASUS SASsaby cards support (optional) ASUS Quiet Thermal Solution: - ASUS Q-Fan 2 ASUS...
ASUS O.C. G.P. Profile - ASUS EZ Flash 2 AMI BIOS, 8 Mb FWH, Green, PnP, DMI2.0a, ACPI 2.0a, SMBIOS 2.3, WfM2.0 1 x PS/2 keyboard port (purple) 2 x ...SSI power supply (with 24-pin/8-pin/4-pin 12V plugs) for LGA771-socket Intel® Xeon processors (continued on the next page) xii ASUS Q-Connector - ASUS Fanless Design - ASUS CrashFree BIOS 3 - Z7S WS specifications summary AI Lifestyle Unique Features BIOS features Rear panel Internal connectors Power requirement ASUS Workstation Features: - ASUS SASsaby cards support (optional) ASUS Quiet Thermal Solution: - ASUS Q-Fan 2 ASUS...

User Guide
Page 13
Z7S WS specifications summary Support DVD contents Manageability Other Features Form factor Drivers ASUS PC Probe II ASUS Update Utility ASUS AI Suite Anti-virus software Adobe Acrobat Reader ASUS Flash Utility under DOS WOL by PME, WOR by PME, PXE, AI NET 2, Chassis Intrusion, BIOS flash utility under DOS ASUS AI Booster utility ASUS MyLogo 2 ASUS C.P.R. (CPU Parameter Recall) Multi-language BIOS CEB form factor: 12 in x 10.5 in (30.5 cm x 26.67 cm) *Specifications are subject to change without notice. xiii
Z7S WS specifications summary Support DVD contents Manageability Other Features Form factor Drivers ASUS PC Probe II ASUS Update Utility ASUS AI Suite Anti-virus software Adobe Acrobat Reader ASUS Flash Utility under DOS WOL by PME, WOR by PME, PXE, AI NET 2, Chassis Intrusion, BIOS flash utility under DOS ASUS AI Booster utility ASUS MyLogo 2 ASUS C.P.R. (CPU Parameter Recall) Multi-language BIOS CEB form factor: 12 in x 10.5 in (30.5 cm x 26.67 cm) *Specifications are subject to change without notice. xiii

User Guide
Page 20
... levels to ensure stable supply of current for details. 1.3.2 Innovative ASUS features CrashFree BIOS 3 This feature allows you to restore the original BIOS data from the support CD in case when the BIOS codes and data are corrupted. See page 4-28 for critical components. ASUS MemCool FB-DIMM Fan Kit (optional) With this optional fan...
... levels to ensure stable supply of current for details. 1.3.2 Innovative ASUS features CrashFree BIOS 3 This feature allows you to restore the original BIOS data from the support CD in case when the BIOS codes and data are corrupted. See page 4-28 for critical components. ASUS MemCool FB-DIMM Fan Kit (optional) With this optional fan...

User Guide
Page 42
...IRQ assignments. Secure the card to the tables on the system and change the necessary BIOS settings, if any. 2.5 Expansion slots In the future, you may cause you physical injury and damage motherboard components. 2.5.1 Installing an expansion card To install an expansion card: 1. Align the ... cards that you removed earlier. 6. Failure to do not need to use . 4. Remove the system unit cover (if your motherboard is completely seated on BIOS setup. 2. Replace the system cover. 2.5.2 Configuring an expansion card After installing the expansion card, configure the it and make the...
...IRQ assignments. Secure the card to the tables on the system and change the necessary BIOS settings, if any. 2.5 Expansion slots In the future, you may cause you physical injury and damage motherboard components. 2.5.1 Installing an expansion card To install an expansion card: 1. Align the ... cards that you removed earlier. 6. Failure to do not need to use . 4. Remove the system unit cover (if your motherboard is completely seated on BIOS setup. 2. Replace the system cover. 2.5.2 Configuring an expansion card After installing the expansion card, configure the it and make the...

User Guide
Page 45
...Version ATI Radeon 7000 V6.13.10.6153 ATI Radeon 9250 Z7S WS Motherboard Qualified Vendors Lists (QVL) PCI Express x16 graphics cards Type Model PCIEX16 ASUS EAX300SE-HM128 Rev: V1.00 (BIOS: V008.015.128.000) ASUS EAX550GE/256M (BIOS: V5B60.8.15.139. Status Pass WinXP Pro. (CHT) ...HDCP Support DX10 V7.15.11.6222 ASUS Z7S WS 2-23 Pass Vista Ultimate Pass WinXP Pro. Pass WinXP Pro. Z7S WS Motherboard Qualified Vendors Lists (QVL) PCI graphics cards Type PCI Model Gecube R7000PCI-A3 Rev. 1.1 (BIOS: V008.004) Gecube R9250PCI-D3 Rev. 1.0 (BIOS: V008.011) Connect Interface PCI1 PCI1...
...Version ATI Radeon 7000 V6.13.10.6153 ATI Radeon 9250 Z7S WS Motherboard Qualified Vendors Lists (QVL) PCI Express x16 graphics cards Type Model PCIEX16 ASUS EAX300SE-HM128 Rev: V1.00 (BIOS: V008.015.128.000) ASUS EAX550GE/256M (BIOS: V5B60.8.15.139. Status Pass WinXP Pro. (CHT) ...HDCP Support DX10 V7.15.11.6222 ASUS Z7S WS 2-23 Pass Vista Ultimate Pass WinXP Pro. Pass WinXP Pro. Z7S WS Motherboard Qualified Vendors Lists (QVL) PCI graphics cards Type PCI Model Gecube R7000PCI-A3 Rev. 1.1 (BIOS: V008.004) Gecube R9250PCI-D3 Rev. 1.0 (BIOS: V008.011) Connect Interface PCI1 PCI1...

User Guide
Page 46
.... 2-24 Chapter 2: Hardware information Z7S WS Motherboard Qualified Vendors Lists (QVL) PCI Express x16 graphics cards (continued) Type PCIEX16 Model ASUS EN8600GT/2DHT/256M/A (BIOS:V60.84.31.00) ASUS EN8600GT/silent/HTDP/256M/A (BIOS:V60.84.41.00.AS41) ASUS EN8600GT GENT2/256M (BIOS:V60.84.5D.00.00) ASUS EN8600GTS/silent/HTDP/256M/A (BIOS:V60.84.41.00.AS09...
.... 2-24 Chapter 2: Hardware information Z7S WS Motherboard Qualified Vendors Lists (QVL) PCI Express x16 graphics cards (continued) Type PCIEX16 Model ASUS EN8600GT/2DHT/256M/A (BIOS:V60.84.31.00) ASUS EN8600GT/silent/HTDP/256M/A (BIOS:V60.84.41.00.AS41) ASUS EN8600GT GENT2/256M (BIOS:V60.84.5D.00.00) ASUS EN8600GTS/silent/HTDP/256M/A (BIOS:V60.84.41.00.AS09...

User Guide
Page 47
.... If the steps above do not need to clear the RTC when the system hangs due to pins 1-2. 3. You must turn ON the computer. 4. ASUS Z7S WS 2-25 Keep the cap on pins 2-3 for about 5~10 seconds, then move the jumper again to re-enter data. Removing the cap will cause system... reset parameter settings to default values. • Due to overclocking, use the C.P.R. (CPU Parameter Recall) feature. Hold down and reboot the system so the BIOS can clear the CMOS memory of date, time, and system setup parameters by erasing the CMOS RTC RAM data. After the CMOS clearance, reinstall the...
.... If the steps above do not need to clear the RTC when the system hangs due to pins 1-2. 3. You must turn ON the computer. 4. ASUS Z7S WS 2-25 Keep the cap on pins 2-3 for about 5~10 seconds, then move the jumper again to re-enter data. Removing the cap will cause system... reset parameter settings to default values. • Due to overclocking, use the C.P.R. (CPU Parameter Recall) feature. Hold down and reboot the system so the BIOS can clear the CMOS memory of date, time, and system setup parameters by erasing the CMOS RTC RAM data. After the CMOS clearance, reinstall the...

User Guide
Page 55
...RAID set the Configure SATA as item in the motherboard support DVD. right angle side ASUS Z7S WS 2-33 Serial ATA connectors (7-pin SATA1-6) These connectors are set to 5.4.3 Intel RAID configurations or the manual bundled in the BIOS to these connectors, set , refer to Standard IDE...SATA port to SATA 5-6 connectors. GND RSATA_TXP1 RSATA_TXN1 GND RSATA_RXP1 RSATA_RXN1 GND GND RSATA_TXP2 RSATA_TXN2 GND RSATA_RXP2 RSATA_RXN2 GND Z7S WS ® GND RSATA_TXP3 RSATA_TXN3 GND RSATA_RXP3 RSATA_RXN3 GND SATA2 SATA3 GND RSATA_TXP4 RSATA_TXN4 GND RSATA_RXP4 RSATA_RXN4 GND SATA1 SATA4 ...
...RAID set the Configure SATA as item in the motherboard support DVD. right angle side ASUS Z7S WS 2-33 Serial ATA connectors (7-pin SATA1-6) These connectors are set to 5.4.3 Intel RAID configurations or the manual bundled in the BIOS to these connectors, set , refer to Standard IDE...SATA port to SATA 5-6 connectors. GND RSATA_TXP1 RSATA_TXN1 GND RSATA_RXP1 RSATA_RXN1 GND GND RSATA_TXP2 RSATA_TXN2 GND RSATA_RXP2 RSATA_RXN2 GND Z7S WS ® GND RSATA_TXP3 RSATA_TXN3 GND RSATA_RXP3 RSATA_RXN3 GND SATA2 SATA3 GND RSATA_TXP4 RSATA_TXN4 GND RSATA_RXP4 RSATA_RXN4 GND SATA1 SATA4 ...

User Guide
Page 61
.... • Hard disk drive activity LED (Red 2-pin IDE_LED) This 2-pin connector is for easy connection. ASUS Z7S WS 2-39 PLED SPEAKER PLED+ PLED+5V Ground Ground Speaker Z7S WS ® PANEL IDE_LED+ IDE_LED- Connect the chassis power LED cable to this connector. The speaker allows you turn...warning speaker (Orange 4-pin SPEAKER) This 4-pin connector is for the system power button. Pressing the power button turns the system on the BIOS settings. Pressing the power switch for more than four seconds while the system is ON turns the system OFF. • Reset button (...
.... • Hard disk drive activity LED (Red 2-pin IDE_LED) This 2-pin connector is for easy connection. ASUS Z7S WS 2-39 PLED SPEAKER PLED+ PLED+5V Ground Ground Speaker Z7S WS ® PANEL IDE_LED+ IDE_LED- Connect the chassis power LED cable to this connector. The speaker allows you turn...warning speaker (Orange 4-pin SPEAKER) This 4-pin connector is for the system power button. Pressing the power button turns the system on the BIOS settings. Pressing the power switch for more than four seconds while the system is ON turns the system OFF. • Reset button (...

User Guide
Page 62
... Front Panel Support Type item in the BIOS setup to receive stereo audio input from sound sources such as a CD-ROM, TV tuner, or MPEG card. If you to [Azalia]. CD Right Audio Channel GND GND Left Audio Channel Z7S WS Internal audio connector 2-40 Chapter 2: Hardware... information 12. Connect one end of the front panel audio I /O module that you connect a high-definition front panel audio module to this connector to avail of the motherboard's high-definition audio capability. •...
... Front Panel Support Type item in the BIOS setup to receive stereo audio input from sound sources such as a CD-ROM, TV tuner, or MPEG card. If you to [Azalia]. CD Right Audio Channel GND GND Left Audio Channel Z7S WS Internal audio connector 2-40 Chapter 2: Hardware... information 12. Connect one end of the front panel audio I /O module that you connect a high-definition front panel audio module to this connector to avail of the motherboard's high-definition audio capability. •...

User Guide
Page 65
Diagnosis card via a bundled 90degree TPM adaptor for memory detection 87 and sizing A4 Enter BIOS setup BIOS boot menu D4 Memory test AC OS in PIC mode D5 Copy BIOS from ROM to RAM AA OS in APIC mode C0 Early CPU initiation 01 S1 C5 Wake up system 85 Show post error... Detect PS2 keyboard 10 Resume from S1 38 USB initiation 30 Resume from S3 52 Display USB devices 40 Resume from S4 2A Initiate VGA BIOS 00 Leave BIOS and pass control to OS ASUS Z7S WS 2-43 3. You may also install the G.P.
Diagnosis card via a bundled 90degree TPM adaptor for memory detection 87 and sizing A4 Enter BIOS setup BIOS boot menu D4 Memory test AC OS in PIC mode D5 Copy BIOS from ROM to RAM AA OS in APIC mode C0 Early CPU initiation 01 S1 C5 Wake up system 85 Show post error... Detect PS2 keyboard 10 Resume from S1 38 USB initiation 30 Resume from S3 52 Display USB devices 40 Resume from S4 2A Initiate VGA BIOS 00 Leave BIOS and pass control to OS ASUS Z7S WS 2-43 3. You may also install the G.P.

User Guide
Page 69
... power button. Connect the power cord to enter the BIOS Setup. The system then runs the power-on the devices in Chapter 4. Check the jumper settings and connections or call your monitor complies with the last device on the screen. ASUS Z7S WS 3-1 Turn on self tests or POST. Monitor b....) or additional messages appear on the chain) c. System power 6. At power on . If your retailer for the first time 1. AMI BIOS beep codes BIOS Beep One short beep One continuous beep followed by two short beeps then a pause (repeated) One continuous beep followed by three short beeps ...
... power button. Connect the power cord to enter the BIOS Setup. The system then runs the power-on the devices in Chapter 4. Check the jumper settings and connections or call your monitor complies with the last device on the screen. ASUS Z7S WS 3-1 Turn on self tests or POST. Monitor b....) or additional messages appear on the chain) c. System power 6. At power on . If your retailer for the first time 1. AMI BIOS beep codes BIOS Beep One short beep One continuous beep followed by two short beeps then a pause (repeated) One continuous beep followed by three short beeps ...

User Guide
Page 70
... While the system is ON, pressing the power switch for less than four seconds lets the system enter the soft-off mode regardless of the BIOS setting. Click the Start button then select ShutDown. 2. The power supply should turn off after Windows® shuts down. 3.2 Turning off the computer 3.2.1 Using the... to section 4.5 Power Menu in Chapter 4 for more than four seconds puts the system to sleep mode or to soft-off mode, depending on the BIOS setting. Pressing the power switch for details. 3-2 Chapter 3: Powering up
... While the system is ON, pressing the power switch for less than four seconds lets the system enter the soft-off mode regardless of the BIOS setting. Click the Start button then select ShutDown. 2. The power supply should turn off after Windows® shuts down. 3.2 Turning off the computer 3.2.1 Using the... to section 4.5 Power Menu in Chapter 4 for more than four seconds puts the system to sleep mode or to soft-off mode, depending on the BIOS setting. Pressing the power switch for details. 3-2 Chapter 3: Powering up

User Guide
Page 71
This chapter tells how to change the system settings through the BIOS Setup Chapter 4: BIOS se4tup menus. Detailed descriptions of the BIOS parameters are also provided.
This chapter tells how to change the system settings through the BIOS Setup Chapter 4: BIOS se4tup menus. Detailed descriptions of the BIOS parameters are also provided.

User Guide
Page 72
Chapter summary 4 4.1 Managing and updating your BIOS 4-1 4.2 BIOS setup program 4-9 4.3 Main menu 4-12 4.4 Advanced menu 4-17 4.5 Power menu 4-25 4.6 Boot menu 4-29 4.7 Tools menu 4-33 4.8 Exit menu 4-35 ASUS Z7S WS
Chapter summary 4 4.1 Managing and updating your BIOS 4-1 4.2 BIOS setup program 4-9 4.3 Main menu 4-12 4.4 Advanced menu 4-17 4.5 Power menu 4-25 4.6 Boot menu 4-29 4.7 Tools menu 4-33 4.8 Exit menu 4-35 ASUS Z7S WS
User Guide
Page 73
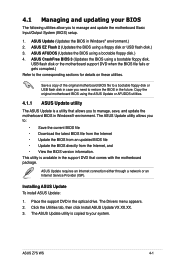
...; Update the BIOS from an updated BIOS file • Update the BIOS directly from the Internet, and • View the BIOS version information. Place the support DVD in Windows® environment.) 2. ASUS CrashFree BIOS 3 (Updates the BIOS using a bootable floppy disk.) 4. This utility is a utility that comes with the motherboard package. Installing ASUS Update To install ASUS Update: 1. ASUS Z7S WS 4-1 ASUS Update requires...
...; Update the BIOS from an updated BIOS file • Update the BIOS directly from the Internet, and • View the BIOS version information. Place the support DVD in Windows® environment.) 2. ASUS CrashFree BIOS 3 (Updates the BIOS using a bootable floppy disk.) 4. This utility is a utility that comes with the motherboard package. Installing ASUS Update To install ASUS Update: 1. ASUS Z7S WS 4-1 ASUS Update requires...

User Guide
Page 74
The ASUS Update main window appears. 2. Select the ASUS FTP site nearest Internet option from the drop‑down you update the BIOS using this utility. Click Next. 4-2 Chapter 4: BIOS setup Select Update BIOS from the Windows® desktop by clicking Start > Programs > ASUS > ASUSUpdate > ASUSUpdate. click Auto Select. Launch the ASUS Update utility from the 3. Quit all Windows® applications before you to avoid network traffic, or menu, then click Next. Updating the BIOS through the Internet To update the BIOS through the Internet: 1.
The ASUS Update main window appears. 2. Select the ASUS FTP site nearest Internet option from the drop‑down you update the BIOS using this utility. Click Next. 4-2 Chapter 4: BIOS setup Select Update BIOS from the Windows® desktop by clicking Start > Programs > ASUS > ASUSUpdate > ASUSUpdate. click Auto Select. Launch the ASUS Update utility from the 3. Quit all Windows® applications before you to avoid network traffic, or menu, then click Next. Updating the BIOS through the Internet To update the BIOS through the Internet: 1.

User Guide
Page 75
... option from the Windows® desktop by clicking Start > Programs > ASUS > ASUSUpdate > ASUSUpdate. Z7S WS.ROM Z7S WS ASUS Z7S WS 4-3 4. From the FTP site, select the BIOS version that you wish to complete the update process. Updating the BIOS through a BIOS file To update the BIOS through the Internet. Launch the ASUS Update utility from the drop‑down menu, then click...
... option from the Windows® desktop by clicking Start > Programs > ASUS > ASUSUpdate > ASUSUpdate. Z7S WS.ROM Z7S WS ASUS Z7S WS 4-3 4. From the FTP site, select the BIOS version that you wish to complete the update process. Updating the BIOS through a BIOS file To update the BIOS through the Internet. Launch the ASUS Update utility from the drop‑down menu, then click...


