
User Guide
Page 13
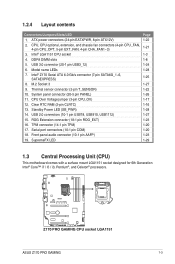
...RAM (2-pin CLRTC) 13. USB 3.0 connector (20-1 pin USB3_12) 6. Intel® Z170 Serial ATA 6.0 Gb/s connector (7-pin SATA6G_1~6, SATAEXPRESS) 8. USB 2.0 connectors (10-1 pin USB78, USB910, USB1112) 15. CPU Over Voltage jumper (3-pin CPU_OV) 12. Front panel audio connector (10-1 pin AAFP) 19. DDR4 DIMM slots 5. Standby Power LED (SB_PWR) 14. Z170 PRO GAMING... CPU socket LGA1151 ASUS Z170 PRO GAMING 1-3 ROG Extension connector (18-1 pin ROG_EXT) 16. CPU, CPU optional, extension, and ...
...RAM (2-pin CLRTC) 13. USB 3.0 connector (20-1 pin USB3_12) 6. Intel® Z170 Serial ATA 6.0 Gb/s connector (7-pin SATA6G_1~6, SATAEXPRESS) 8. USB 2.0 connectors (10-1 pin USB78, USB910, USB1112) 15. CPU Over Voltage jumper (3-pin CPU_OV) 12. Front panel audio connector (10-1 pin AAFP) 19. DDR4 DIMM slots 5. Standby Power LED (SB_PWR) 14. Z170 PRO GAMING... CPU socket LGA1151 ASUS Z170 PRO GAMING 1-3 ROG Extension connector (18-1 pin ROG_EXT) 16. CPU, CPU optional, extension, and ...
User Guide
Page 26
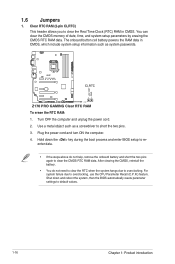
...the computer. 4. You can clear the CMOS memory of date, time, and system setup parameters by erasing the CMOS RTC RAM data. CLRTC PIN 1 Z170 PRO GAMING Clear RTC RAM To erase the RTC RAM: 1. Shut down the key during the boot process and enter BIOS setup to clear the CMOS RTC... RAM data. +3V_BAT GND 1.6 Jumpers 1. The onboard button cell battery powers the RAM data in CMOS. For system failure due to default values. ...
...the computer. 4. You can clear the CMOS memory of date, time, and system setup parameters by erasing the CMOS RTC RAM data. CLRTC PIN 1 Z170 PRO GAMING Clear RTC RAM To erase the RTC RAM: 1. Shut down the key during the boot process and enter BIOS setup to clear the CMOS RTC... RAM data. +3V_BAT GND 1.6 Jumpers 1. The onboard button cell battery powers the RAM data in CMOS. For system failure due to default values. ...
User Guide
Page 46
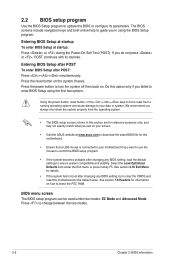
... POST To enter BIOS Setup after changing any BIOS setting, try to clear the CMOS and reset the motherboard to your screen. • Visit the ASUS website at startup: Press or during the Power-On Self Test (POST). Press to guide you in this motherboard. • Ensure that a USB ...include navigation keys and brief online help to change between the two modes. 2-6 Chapter 2: BIOS information Press the power button to erase the RTC RAM. See section 1.6 Headers for this section are for reference purposes only, and may not exactly match what you want to use the mouse to control...
... POST To enter BIOS Setup after changing any BIOS setting, try to clear the CMOS and reset the motherboard to your screen. • Visit the ASUS website at startup: Press or during the Power-On Self Test (POST). Press to guide you in this motherboard. • Ensure that a USB ...include navigation keys and brief online help to change between the two modes. 2-6 Chapter 2: BIOS information Press the power button to erase the RTC RAM. See section 1.6 Headers for this section are for reference purposes only, and may not exactly match what you want to use the mouse to control...
User Guide
Page 57
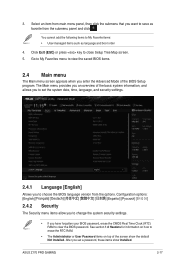
... item from main menu panel, then click the submenu that you have forgotten your BIOS password, erase the CMOS Real Time Clock (RTC) RAM to erase the RTC RAM. • The Administrator or User Password items on how to clear the BIOS password. Configuration options: [English] [Español 2.4.2 Security The Security... want to choose the BIOS language version from the submenu panel and click . The Main menu provides you an overview of the screen show Installed. ASUS Z170 PRO GAMING 2-17
... item from main menu panel, then click the submenu that you have forgotten your BIOS password, erase the CMOS Real Time Clock (RTC) RAM to erase the RTC RAM. • The Administrator or User Password items on how to clear the BIOS password. Configuration options: [English] [Español 2.4.2 Security The Security... want to choose the BIOS language version from the submenu panel and click . The Main menu provides you an overview of the screen show Installed. ASUS Z170 PRO GAMING 2-17


