User's Manual for English Edition
Page 4
.../PPPoE network connection 67 Configuring a static IP network connection 69 Turning your Notebook PC off 70 Putting your Notebook PC to sleep 70 Chapter 4: ASUS apps Featured ASUS Apps 72 LifeFrame...72 Power4Gear Hybrid...74 Instant On...76 Chapter 5: Power-on Self Test (POST) The Power-on Self Test (POST 78 Using...
.../PPPoE network connection 67 Configuring a static IP network connection 69 Turning your Notebook PC off 70 Putting your Notebook PC to sleep 70 Chapter 4: ASUS apps Featured ASUS Apps 72 LifeFrame...72 Power4Gear Hybrid...74 Instant On...76 Chapter 5: Power-on Self Test (POST) The Power-on Self Test (POST 78 Using...
User's Manual for English Edition
Page 5
BIOS...78 Accessing BIOS...78 BIOS Settings...79 Troubleshoot...89 Refresh your PC...89 Reset your PC...90 Advanced options...91 Tips and FAQs Useful tips for your Notebook PC 94 ...
BIOS...78 Accessing BIOS...78 BIOS Settings...79 Troubleshoot...89 Refresh your PC...89 Reset your PC...90 Advanced options...91 Tips and FAQs Useful tips for your Notebook PC 94 ...

User's Manual for English Edition
Page 78
...onscreen during POST. 78 Notebook PC E-Manual Do not change the BIOS settings only with the help of your Notebook PC. We strongly recommend that requires further BIOS settings or updates. You may result to run the BIOS Setup. • You have installed a new system component that ...of the Notebook PC's architecture. The Power-on Self Test (POST) The Power-on or restart your Notebook PC. BIOS The Basic Input and Output System (BIOS) stores system hardware settings that controls the POST is a series of software-controlled diagnostic tests that run troubleshooting options using...
...onscreen during POST. 78 Notebook PC E-Manual Do not change the BIOS settings only with the help of your Notebook PC. We strongly recommend that requires further BIOS settings or updates. You may result to run the BIOS Setup. • You have installed a new system component that ...of the Notebook PC's architecture. The Power-on Self Test (POST) The Power-on or restart your Notebook PC. BIOS The Basic Input and Output System (BIOS) stores system hardware settings that controls the POST is a series of software-controlled diagnostic tests that run troubleshooting options using...

User's Manual for English Edition
Page 79
... Boot Option #1. F1 : General Help F9 : Optimized Defaults F10 : Save & Exit ESC : Exit Version 2.15.1226. Copyright (C) 2012 American Megatrends, Inc. Notebook PC E-Manual 79 BIOS Settings NOTE: The BIOS screens in this section are for reference only. Aptio Setup Utility - You may differ by model and territory.
... Boot Option #1. F1 : General Help F9 : Optimized Defaults F10 : Save & Exit ESC : Exit Version 2.15.1226. Copyright (C) 2012 American Megatrends, Inc. Notebook PC E-Manual 79 BIOS Settings NOTE: The BIOS screens in this section are for reference only. Aptio Setup Utility - You may differ by model and territory.
User's Manual for English Edition
Page 81
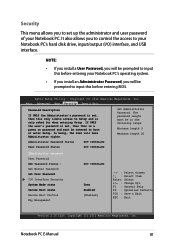
... control the access to your Notebook PC's operating system. • If you install an Administrator Password, you will be prompted to input this before entering BIOS. F1 : General Help F9 : Optimized Defaults F10 : Save & Exit ESC : Exit Version 2.15.1226.
... control the access to your Notebook PC's operating system. • If you install an Administrator Password, you will be prompted to input this before entering BIOS. F1 : General Help F9 : Optimized Defaults F10 : Save & Exit ESC : Exit Version 2.15.1226.

User's Manual for English Edition
Page 86
...;↓ : Select Item Enter: Select +/- : Change Opt. Aptio Setup Utility - Save & Exit To keep your configuration settings, select Save Changes and Exit before exiting the BIOS. Main Advanced Boot Security Save & Exit Save Changes and Exit Discard Changes and Exit Exit system setup after saving the changes. F1 : General Help F9...
...;↓ : Select Item Enter: Select +/- : Change Opt. Aptio Setup Utility - Save & Exit To keep your configuration settings, select Save Changes and Exit before exiting the BIOS. Main Advanced Boot Security Save & Exit Save Changes and Exit Discard Changes and Exit Exit system setup after saving the changes. F1 : General Help F9...
User's Manual for English Edition
Page 87
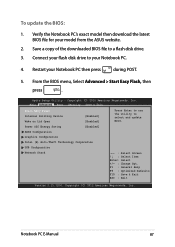
... Select Item Enter: Select +/- : Change Opt. F1 : General Help F9 : Optimized Defaults F10 : Save & Exit ESC : Exit Version 2.15.1226. To update the BIOS: 1. Start Easy Flash Internal Pointing Device [Enabled] Wake on Lid Open [Enabled] Power Off Energy Saving [Enabled] SATA Configuration Graphics Configuration Intel (R) Anti-Theft Technology... during POST. 5. Copyright (C) 2012 American Megatrends, Inc. Notebook PC E-Manual 87 Verify the Notebook PC's exact model then download the latest BIOS file for your model from the ASUS website. 2. Aptio Setup Utility -
... Select Item Enter: Select +/- : Change Opt. F1 : General Help F9 : Optimized Defaults F10 : Save & Exit ESC : Exit Version 2.15.1226. To update the BIOS: 1. Start Easy Flash Internal Pointing Device [Enabled] Wake on Lid Open [Enabled] Power Off Energy Saving [Enabled] SATA Configuration Graphics Configuration Intel (R) Anti-Theft Technology... during POST. 5. Copyright (C) 2012 American Megatrends, Inc. Notebook PC E-Manual 87 Verify the Notebook PC's exact model then download the latest BIOS file for your model from the ASUS website. 2. Aptio Setup Utility -

User's Manual for English Edition
Page 88
After the BIOS update process, select Exit > Restore Defaults to restore the system to its default settings. 88 Notebook PC E-Manual ASUSTek Easy Flash Utility FLASH TYPE: MXIC 25L Series Current BIOS Platform: X450/X550 Version: 101 Build Date: Oct 26 2012 Build Time: 11:51:05 FSO 0 EFI FS1 FS2 FS3 FS4 New BIOS Platform: Unknown Version: Unknown Build Date: Unknown Build Time: Unknown [←→]: Switch [↑↓]: Choose [q]: Exit [Enter]: Enter/Execute 7. 6. Locate your downloaded BIOS file in the flash disk drive then press .
After the BIOS update process, select Exit > Restore Defaults to restore the system to its default settings. 88 Notebook PC E-Manual ASUSTek Easy Flash Utility FLASH TYPE: MXIC 25L Series Current BIOS Platform: X450/X550 Version: 101 Build Date: Oct 26 2012 Build Time: 11:51:05 FSO 0 EFI FS1 FS2 FS3 FS4 New BIOS Platform: Unknown Version: Unknown Build Date: Unknown Build Time: Unknown [←→]: Switch [↑↓]: Choose [q]: Exit [Enter]: Enter/Execute 7. 6. Locate your downloaded BIOS file in the flash disk drive then press .
User's Manual for English Edition
Page 96
... • Check if your speakers were set to disable the touchpad when connecting an external pointing device. 6. Contact your touchpad. • Check if ASUS Smart Gesture has been set to mute. • Check if a headphone jack is connected to your Notebook PC and remove it. • Unlock ...hear any of the following suggestions: • Press to the power outlet and Notebook PC. • If the problem still exists, contact your system's BIOS. What's wrong? • Check whether the power adapter or battery pack is my touchpad not working ? Why is attached correctly. When I play ...
... • Check if your speakers were set to disable the touchpad when connecting an external pointing device. 6. Contact your touchpad. • Check if ASUS Smart Gesture has been set to mute. • Check if a headphone jack is connected to your Notebook PC and remove it. • Unlock ...hear any of the following suggestions: • Press to the power outlet and Notebook PC. • If the problem still exists, contact your system's BIOS. What's wrong? • Check whether the power adapter or battery pack is my touchpad not working ? Why is attached correctly. When I play ...

User's Manual for English Edition
Page 100
b. c. Press and hold ESC to Disabled. Refer to save changes and exit BIOS. d. Press F10 to the following steps: a. Go to DOS using my USB drive or ODD? How can I boot to Boot > Launch CSM > Enabled. e. Go to the Security menu then set Secure Boot Control to launch boot menu when your keyboard. 6. Restart your Notebook PC and enter BIOS by pressing F2 on your Notebook PC restarts. 100 Notebook PC E-Manual
b. c. Press and hold ESC to Disabled. Refer to save changes and exit BIOS. d. Press F10 to the following steps: a. Go to DOS using my USB drive or ODD? How can I boot to Boot > Launch CSM > Enabled. e. Go to the Security menu then set Secure Boot Control to launch boot menu when your keyboard. 6. Restart your Notebook PC and enter BIOS by pressing F2 on your Notebook PC restarts. 100 Notebook PC E-Manual

