
Users Manual
Page 3
... disposal...11 Battery safety information 12 Chapter 1: Hardware Setup Getting to know your Notebook PC 16 Top View...16 Bottom View...21 Right View...23 Left View...27 Chapter 2: Using your Notebook PC Getting started...30 Charge your Notebook PC 30 Lift to open the display panel 32 Press the power button 32 Using the touchpad 33 Using the DialPad...40 Using the keyboard...44 HotKeys...44 Function keys...45 Windows keys...45 Using the...
... disposal...11 Battery safety information 12 Chapter 1: Hardware Setup Getting to know your Notebook PC 16 Top View...16 Bottom View...21 Right View...23 Left View...27 Chapter 2: Using your Notebook PC Getting started...30 Charge your Notebook PC 30 Lift to open the display panel 32 Press the power button 32 Using the touchpad 33 Using the DialPad...40 Using the keyboard...44 HotKeys...44 Function keys...45 Windows keys...45 Using the...

Users Manual
Page 4
... Center...59 MyASUS Splendid...61 Setting the OLED display 63 Setting the Dark Mode 63 Turning off the display when not in use 65 Adjusting display brightness 67 Auto-hide the taskbar...69 Setting the Dark Mode in Microsoft Office 71 Other keyboard shortcuts 72 Connecting to wireless networks 74 Wi-Fi...74 Bluetooth...75 Airplane mode...76 Turning your Notebook PC off 77 Putting your Notebook PC to sleep 78 4 Notebook PC E-Manual
... Center...59 MyASUS Splendid...61 Setting the OLED display 63 Setting the Dark Mode 63 Turning off the display when not in use 65 Adjusting display brightness 67 Auto-hide the taskbar...69 Setting the Dark Mode in Microsoft Office 71 Other keyboard shortcuts 72 Connecting to wireless networks 74 Wi-Fi...74 Bluetooth...75 Airplane mode...76 Turning your Notebook PC off 77 Putting your Notebook PC to sleep 78 4 Notebook PC E-Manual

Users Manual
Page 5
... Self-Test (POST) The Power-On Self-Test (POST 80 Using POST to access BIOS and Troubleshoot 80 BIOS...80 Accessing BIOS...80 Recovering your system 81 Performing a recovery option 82 Tips and FAQs Useful tips for your Notebook PC 86 Hardware FAQs...88 Software FAQs...91 Appendices DVD-ROM Drive Information 94 Blu-ray ROM Drive Information 96 Internal Modem Compliancy 96 Overview...97 Network Compatibility Declaration 97 Non-Voice Equipment...
... Self-Test (POST) The Power-On Self-Test (POST 80 Using POST to access BIOS and Troubleshoot 80 BIOS...80 Accessing BIOS...80 Recovering your system 81 Performing a recovery option 82 Tips and FAQs Useful tips for your Notebook PC 86 Hardware FAQs...88 Software FAQs...91 Appendices DVD-ROM Drive Information 94 Blu-ray ROM Drive Information 96 Internal Modem Compliancy 96 Overview...97 Network Compatibility Declaration 97 Non-Voice Equipment...

Users Manual
Page 7
... the following chapters: Chapter 1: Hardware Setup This chapter details the hardware components of your Notebook PC. Chapter 3: Working with your Notebook PC. Chapter 4: Power-On Self-Test (POST) This chapter shows you how to use POST to use the different parts of your Notebook PC. Chapter 2: Using your Notebook PC This chapter shows you how to change the settings of your Notebook PC. Appendices This section...
... the following chapters: Chapter 1: Hardware Setup This chapter details the hardware components of your Notebook PC. Chapter 3: Working with your Notebook PC. Chapter 4: Power-On Self-Test (POST) This chapter shows you how to use POST to use the different parts of your Notebook PC. Chapter 2: Using your Notebook PC This chapter shows you how to change the settings of your Notebook PC. Appendices This section...

Users Manual
Page 10
... top of nonabrasive detergent. Caring for your Notebook PC Disconnect the AC power and remove the battery pack (if applicable) before cleaning your Notebook PC to dusty environments. 10 Notebook PC E-Manual Do not place objects on or near your Notebook PC near liquids, rain, or moisture. Remove any liquids from your Notebook PC using a dry cloth. Do not expose your...
... top of nonabrasive detergent. Caring for your Notebook PC Disconnect the AC power and remove the battery pack (if applicable) before cleaning your Notebook PC to dusty environments. 10 Notebook PC E-Manual Do not place objects on or near your Notebook PC near liquids, rain, or moisture. Remove any liquids from your Notebook PC using a dry cloth. Do not expose your...

Users Manual
Page 12
... set between 90% and 100%. Battery safety information Battery protection • Frequently charging a battery under high voltage may result in high ambient temperatures may shorten the battery life. Actual value may vary by models. • Charging or storing a battery in permanent damage to protect the battery. • Battery power capacity may stop charging when the battery power is powered off and disconnected from the battery. 12 Notebook PC E-Manual...
... set between 90% and 100%. Battery safety information Battery protection • Frequently charging a battery under high voltage may result in high ambient temperatures may shorten the battery life. Actual value may vary by models. • Charging or storing a battery in permanent damage to protect the battery. • Battery power capacity may stop charging when the battery power is powered off and disconnected from the battery. 12 Notebook PC E-Manual...
Users Manual
Page 18
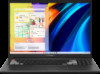
... Windows as default and shortening the idle time before the screen is turned off . Display panel This high-definition display panel provides excellent viewing features for typing. It also enables you to use the function keys, allows quick access to the Setting the OLED display section in on OLED display. It is turned off . Keyboard The keyboard provides full-sized QWERTY keys with OLED display (on your OLED display. Disclaimer: Prolonged display of your Notebook PC. Microphone indicator...
... Windows as default and shortening the idle time before the screen is turned off . Display panel This high-definition display panel provides excellent viewing features for typing. It also enables you to use the function keys, allows quick access to the Setting the OLED display section in on OLED display. It is turned off . Keyboard The keyboard provides full-sized QWERTY keys with OLED display (on your OLED display. Disclaimer: Prolonged display of your Notebook PC. Microphone indicator...
Users Manual
Page 24
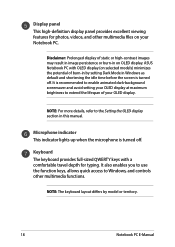
... to your Notebook PC. Thunderbolt™ 4/Power Delivery combo port The Thunderbolt™ 4 port is compatible with the USB Power Delivery combo port. IMPORTANT! • It may vary per model. For more information, consult an ASUS service center for assistance. Connect a power source rated 20V/5A to charge the battery pack and supply power to 40 Gbit/s for file sharing or extending your display monitor. 24 Notebook PC E-Manual
... to your Notebook PC. Thunderbolt™ 4/Power Delivery combo port The Thunderbolt™ 4 port is compatible with the USB Power Delivery combo port. IMPORTANT! • It may vary per model. For more information, consult an ASUS service center for assistance. Connect a power source rated 20V/5A to charge the battery pack and supply power to 40 Gbit/s for file sharing or extending your display monitor. 24 Notebook PC E-Manual
Users Manual
Page 26
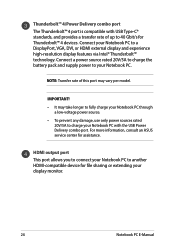
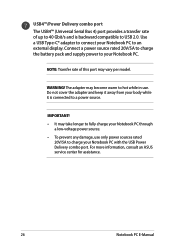
... Gbit/s and is connected to USB 2.0. Connect a power source rated 20V/5A to charge the battery pack and supply power to an external display. WARNING! USB4™/Power Delivery combo port The USB4™ (Universal Serial Bus 4) port provides a transfer rate of this port may vary per model. For more information, consult an ASUS service center for assistance. 26 Notebook PC E-Manual Do not cover the adapter and keep it away...
... Gbit/s and is connected to USB 2.0. Connect a power source rated 20V/5A to charge the battery pack and supply power to an external display. WARNING! USB4™/Power Delivery combo port The USB4™ (Universal Serial Bus 4) port provides a transfer rate of this port may vary per model. For more information, consult an ASUS service center for assistance. 26 Notebook PC E-Manual Do not cover the adapter and keep it away...

Users Manual
Page 27
Status indicators The status indicators help identify the current hardware status of your Notebook PC. Power indicator The power indicator lights up when the Notebook PC is turned on and blinks slowly when the Notebook PC is compatible with USB 2.0 or USB 1.1 devices such as keyboards, pointing devices, flash disk drives, external HDDs, speakers, cameras and printers. Notebook PC E-Manual 27 Left View USB 2.0 port The USB (Universal Serial Bus) port is in sleep mode.
Status indicators The status indicators help identify the current hardware status of your Notebook PC. Power indicator The power indicator lights up when the Notebook PC is turned on and blinks slowly when the Notebook PC is compatible with USB 2.0 or USB 1.1 devices such as keyboards, pointing devices, flash disk drives, external HDDs, speakers, cameras and printers. Notebook PC E-Manual 27 Left View USB 2.0 port The USB (Universal Serial Bus) port is in sleep mode.

Users Manual
Page 31
... is found. • The battery and its main power supply, unplug your power adapter. Always plug the power cord into a wall socket without using any extension cords. Some Notebook PC models may present a risk of fire or chemical burn if removed or disassembled. • Follow the warning labels for the first time. For your safety, connect this device may have multiple rating...
... is found. • The battery and its main power supply, unplug your power adapter. Always plug the power cord into a wall socket without using any extension cords. Some Notebook PC models may present a risk of fire or chemical burn if removed or disassembled. • Follow the warning labels for the first time. For your safety, connect this device may have multiple rating...

Users Manual
Page 44
Using the keyboard HotKeys The HotKeys on your Notebook PC's keyboard can trigger the following commands: Turns the speaker on or off Turns the speaker volume down Turns the speaker volume up Decreases display brightness Increases display brightness Enables or disables the touchpad Adjusts brightness for the backlit keyboard Toggles the display mode NOTE: Ensure that the second display is connected to your Notebook PC. 44 Notebook PC E-Manual
Using the keyboard HotKeys The HotKeys on your Notebook PC's keyboard can trigger the following commands: Turns the speaker on or off Turns the speaker volume down Turns the speaker volume up Decreases display brightness Increases display brightness Enables or disables the touchpad Adjusts brightness for the backlit keyboard Toggles the display mode NOTE: Ensure that the second display is connected to your Notebook PC. 44 Notebook PC E-Manual
Users Manual
Page 48
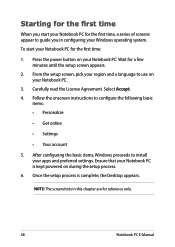
.... 48 Notebook PC E-Manual From the setup screen, pick your region and a language to use on your Notebook PC is complete, the Desktop appears. Follow the onscreen instructions to install your Notebook PC for the first time: 1. Ensure that your Notebook PC. 3. Starting for the first time When you start your apps and preferred settings. Once the setup process is kept powered on your Windows operating system...
.... 48 Notebook PC E-Manual From the setup screen, pick your region and a language to use on your Notebook PC is complete, the Desktop appears. Follow the onscreen instructions to install your Notebook PC for the first time: 1. Ensure that your Notebook PC. 3. Starting for the first time When you start your apps and preferred settings. Once the setup process is kept powered on your Windows operating system...

Users Manual
Page 49
..., or put your Notebook PC to sleep Launch an app from the taskbar You can use the Start menu to do these common activities: • Start programs or Windows apps • Open commonly used programs or Windows apps • Adjust Notebook PC settings • Get help with the Windows operating system • Turn off your Notebook PC • Log off from Windows or switch to your Notebook PC's programs, Windows apps, folders...
..., or put your Notebook PC to sleep Launch an app from the taskbar You can use the Start menu to do these common activities: • Start programs or Windows apps • Open commonly used programs or Windows apps • Adjust Notebook PC settings • Get help with the Windows operating system • Turn off your Notebook PC • Log off from Windows or switch to your Notebook PC's programs, Windows apps, folders...
Users Manual
Page 61
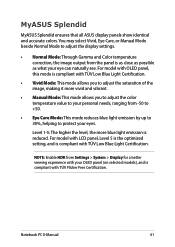
... model with LCD panel, Level 5 is the optimized setting, and is compliant with TÜV Low Blue Light Certification. • Vivid Mode: This mode allows you to adjust the saturation of the image, making it more blue light emission is compliant with TÜV Flicker Free Certification. MyASUS Splendid MyASUS Splendid ensures that all ASUS display panels show identical and accurate colors. For model with OLED panel, this mode...
... model with LCD panel, Level 5 is the optimized setting, and is compliant with TÜV Low Blue Light Certification. • Vivid Mode: This mode allows you to adjust the saturation of the image, making it more blue light emission is compliant with TÜV Flicker Free Certification. MyASUS Splendid MyASUS Splendid ensures that all ASUS display panels show identical and accurate colors. For model with OLED panel, this mode...
Users Manual
Page 80
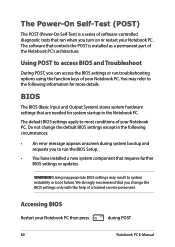
... troubleshooting options using the function keys of your Notebook PC. The default BIOS settings apply to run when you change the default BIOS settings except in the following information for system startup in the Notebook PC. We strongly recommend that requires further BIOS settings or updates. You may result to the following circumstances: • An error message appears onscreen during POST. 80 Notebook PC E-Manual The software that controls the POST is a series of software-controlled...
... troubleshooting options using the function keys of your Notebook PC. The default BIOS settings apply to run when you change the default BIOS settings except in the following information for system startup in the Notebook PC. We strongly recommend that requires further BIOS settings or updates. You may result to the following circumstances: • An error message appears onscreen during POST. 80 Notebook PC E-Manual The software that controls the POST is a series of software-controlled...

Users Manual
Page 86
... and make it a point to create a backup data in an external storage drive. • If you are not using your Notebook PC for a long period of time, ensure to charge the battery power to 50% then power off your Notebook PC and disconnect the AC power adapter. • If you are constantly using AC power for your Notebook PC, set the Battery Health Charging to Balanced mode in MyASUS. 86 Notebook PC E-Manual
... and make it a point to create a backup data in an external storage drive. • If you are not using your Notebook PC for a long period of time, ensure to charge the battery power to 50% then power off your Notebook PC and disconnect the AC power adapter. • If you are constantly using AC power for your Notebook PC, set the Battery Health Charging to Balanced mode in MyASUS. 86 Notebook PC E-Manual
Users Manual
Page 88
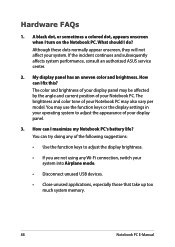
...-Fi connection, switch your system into Airplane mode. • Disconnect unused USB devices. • Close unused applications, especially those that take up too much system memory. 88 Notebook PC E-Manual Hardware FAQs 1. My display panel has an uneven color and brightness. A black dot, or sometimes a colored dot, appears onscreen when I maximize my Notebook PC's battery life? The color and brightness of your display panel. 3. You can I turn on the Notebook...
...-Fi connection, switch your system into Airplane mode. • Disconnect unused USB devices. • Close unused applications, especially those that take up too much system memory. 88 Notebook PC E-Manual Hardware FAQs 1. My display panel has an uneven color and brightness. A black dot, or sometimes a colored dot, appears onscreen when I maximize my Notebook PC's battery life? The color and brightness of your display panel. 3. You can I turn on the Notebook...
Users Manual
Page 89
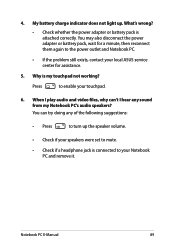
... a minute, then reconnect them again to enable your local ASUS service center for assistance. 5. When I hear any of the following suggestions: • Press to your Notebook PC and remove it. Why is attached correctly. My battery charge indicator does not light up the speaker volume. • Check if your speakers were set to mute. • Check if a headphone jack is connected to turn up . 4.
... a minute, then reconnect them again to enable your local ASUS service center for assistance. 5. When I hear any of the following suggestions: • Press to your Notebook PC and remove it. Why is attached correctly. My battery charge indicator does not light up the speaker volume. • Check if your speakers were set to mute. • Check if a headphone jack is connected to turn up . 4.
Users Manual
Page 91
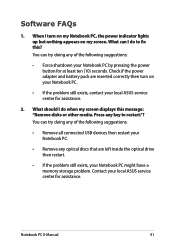
... your Notebook PC. • Remove any key to fix this message: "Remove disks or other media. You can I do when my screen displays this ? Press any optical discs that are inserted correctly then turn on my Notebook PC, the power indicator lights up but nothing appears on your Notebook PC. • If the problem still exists, contact your Notebook PC might have a memory storage problem. Software FAQs 1. Check if the power adapter and battery...
... your Notebook PC. • Remove any key to fix this message: "Remove disks or other media. You can I do when my screen displays this ? Press any optical discs that are inserted correctly then turn on my Notebook PC, the power indicator lights up but nothing appears on your Notebook PC. • If the problem still exists, contact your Notebook PC might have a memory storage problem. Software FAQs 1. Check if the power adapter and battery...


