Warranty Card English/Thai/Turkish
Page 3
...the Product was first purchased by improper installation, operation, cleaning or maintenance, accident, damage, misuse, abuse, non-ASUS modifications to the product, any third party software programs, normal wear and tear or any manner whatsoever. 1. Software... the Product's original storage media. Third party software may be permanently deleted. If the Product is ". ASUS does not guarantee uninterrupted or error-free operation of any data or software from the respective vendors. 3. If... software only when it is fully charged and not turned on the Date of the Product.
...the Product was first purchased by improper installation, operation, cleaning or maintenance, accident, damage, misuse, abuse, non-ASUS modifications to the product, any third party software programs, normal wear and tear or any manner whatsoever. 1. Software... the Product's original storage media. Third party software may be permanently deleted. If the Product is ". ASUS does not guarantee uninterrupted or error-free operation of any data or software from the respective vendors. 3. If... software only when it is fully charged and not turned on the Date of the Product.
Warranty Card English/Thai/Turkish
Page 4
...keep the embedded security chip pre-boot password in safe and stable packaging. Please record Your RMA Number for ASUS to be requested by ASUS, which is called "RMA"). ASUS may not be useful for this completed warranty card and a copy of Your sales invoice/receipt detailing the ... t webs i te for the Product during transportation. ASUS shall not be deemed to reset the embedded security chip pre-boot password. The original packing may delete any service process is turned on the RMA request form. • Enclose a copy of your repaired Product back in identifying or ...
...keep the embedded security chip pre-boot password in safe and stable packaging. Please record Your RMA Number for ASUS to be requested by ASUS, which is called "RMA"). ASUS may not be useful for this completed warranty card and a copy of Your sales invoice/receipt detailing the ... t webs i te for the Product during transportation. ASUS shall not be deemed to reset the embedded security chip pre-boot password. The original packing may delete any service process is turned on the RMA request form. • Enclose a copy of your repaired Product back in identifying or ...
VM62N Users manual English
Page 3
...Connect the AC power adapter to your VivoPC 14 Connect a display panel to your VivoPC 16 Connect the USB cable from keyboard or mouse 17 Turn on your Vivo PC 18 Turning your VivoPC off 19 Putting your VivoPC to sleep 19 Entering the BIOS Setup... 19 Quickly enter the BIOS 20 Memory upgrade 21 Upgrading memory modules 22 Appendix 29 Safety information 30 Setting up your system 30 Care during use 30 Regulatory notices 32 ASUS contact information 38 VivoPC...
...Connect the AC power adapter to your VivoPC 14 Connect a display panel to your VivoPC 16 Connect the USB cable from keyboard or mouse 17 Turn on your Vivo PC 18 Turning your VivoPC off 19 Putting your VivoPC to sleep 19 Entering the BIOS Setup... 19 Quickly enter the BIOS 20 Memory upgrade 21 Upgrading memory modules 22 Appendix 29 Safety information 30 Setting up your system 30 Care during use 30 Regulatory notices 32 ASUS contact information 38 VivoPC...
VM62N Users manual English
Page 8
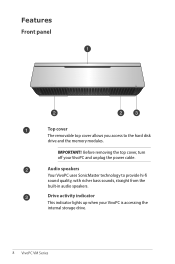
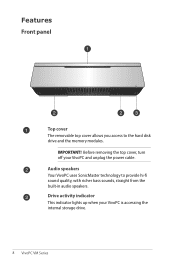
Drive activity indicator This indicator lights up when your VivoPC and unplug the power cable. Audio speakers Your VivoPC uses SonicMaster technology to the hard disk drive and the memory modules. IMPORTANT! Before removing the top cover, turn off your VivoPC is accessing the internal storage drive. 8 VivoPC VM Series Features Front panel Top cover The removable top cover allows you access to provide hi-fi sound quality, with richer bass sounds, straight from the built-in audio speakers.
Drive activity indicator This indicator lights up when your VivoPC and unplug the power cable. Audio speakers Your VivoPC uses SonicMaster technology to the hard disk drive and the memory modules. IMPORTANT! Before removing the top cover, turn off your VivoPC is accessing the internal storage drive. 8 VivoPC VM Series Features Front panel Top cover The removable top cover allows you access to provide hi-fi sound quality, with richer bass sounds, straight from the built-in audio speakers.
VM62N Users manual English
Page 10
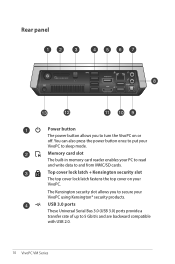
... These Universal Serial Bus 3.0 (USB 3.0) ports provide a transfer rate of up to 5 Gbit/s and are backward compatible with USB 2.0. 10 VivoPC VM Series The Kensington security slot allows you to turn the VivoPC on your PC to read and write data to and from MMC/SD cards. You can also press the power... button once to put your VivoPC using Kensington® security products. Memory card slot The built-in memory card reader enables your...
... These Universal Serial Bus 3.0 (USB 3.0) ports provide a transfer rate of up to 5 Gbit/s and are backward compatible with USB 2.0. 10 VivoPC VM Series The Kensington security slot allows you to turn the VivoPC on your PC to read and write data to and from MMC/SD cards. You can also press the power... button once to put your VivoPC using Kensington® security products. Memory card slot The built-in memory card reader enables your...
VM62N Users manual English
Page 18
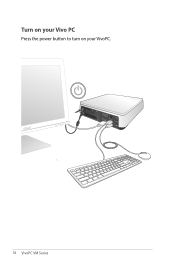
Turn on your Vivo PC Press the power button to turn on your VivoPC. 18 VivoPC VM Series
Turn on your Vivo PC Press the power button to turn on your VivoPC. 18 VivoPC VM Series
VM62N Users manual English
Page 19
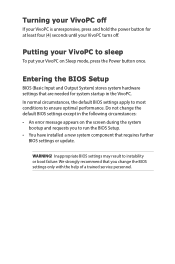
... settings apply to most conditions to instability or boot failure. Do not change the default BIOS settings except in the VivoPC. Turning your VivoPC off If your VivoPC is unresponsive, press and hold the power button for system startup in the following circumstances: • An error message...further BIOS settings or update. WARNING! We strongly recommend that you to sleep To put your VivoPC turns off. Inappropriate BIOS settings may result to ensure optimal performance. Putting your VivoPC to run the BIOS Setup. • You have installed a new system component that are ...
... settings apply to most conditions to instability or boot failure. Do not change the default BIOS settings except in the VivoPC. Turning your VivoPC off If your VivoPC is unresponsive, press and hold the power button for system startup in the following circumstances: • An error message...further BIOS settings or update. WARNING! We strongly recommend that you to sleep To put your VivoPC turns off. Inappropriate BIOS settings may result to ensure optimal performance. Putting your VivoPC to run the BIOS Setup. • You have installed a new system component that are ...

VM62N Users manual English
Page 20
NOTE: POST (Power-On Self Test) is off, disconnect the power cord from your PC. Quickly enter the BIOS To quickly enter the BIOS: • Press the power button for at least four (4) seconds to shut down your VivoPC, then press the power button again to turn on your VivoPC. Press or during POST. • When your PC is a series of software controlled diagnostic tests that run when you turn on your VivoPC's power connector. Reconnect the power cable and press the power button to turn your VivoPC back on, then press or during POST.
NOTE: POST (Power-On Self Test) is off, disconnect the power cord from your PC. Quickly enter the BIOS To quickly enter the BIOS: • Press the power button for at least four (4) seconds to shut down your VivoPC, then press the power button again to turn on your VivoPC. Press or during POST. • When your PC is a series of software controlled diagnostic tests that run when you turn on your VivoPC's power connector. Reconnect the power cable and press the power button to turn your VivoPC back on, then press or during POST.
VM62N Users manual English
Page 22
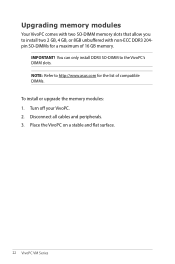
You can only install DDR3 SO-DIMM to http://www.asus.com for a maximum of compatible DIMMs. To install or upgrade the memory modules: 1. NOTE: Refer to the VivoPC's DIMM slots. Place the VivoPC on a stable and flat surface. 22 VivoPC VM Series Upgrading memory modules Your VivoPC comes with two SO-DIMM memory slots that allow you to install two 2 GB, 4 GB, or 8GB unbuffered with non-ECC DDR3 204pin SO-DIMMs for the list of 16 GB memory. Turn off your VivoPC. 2. IMPORTANT! Disconnect all cables and peripherals. 3.
You can only install DDR3 SO-DIMM to http://www.asus.com for a maximum of compatible DIMMs. To install or upgrade the memory modules: 1. NOTE: Refer to the VivoPC's DIMM slots. Place the VivoPC on a stable and flat surface. 22 VivoPC VM Series Upgrading memory modules Your VivoPC comes with two SO-DIMM memory slots that allow you to install two 2 GB, 4 GB, or 8GB unbuffered with non-ECC DDR3 204pin SO-DIMMs for the list of 16 GB memory. Turn off your VivoPC. 2. IMPORTANT! Disconnect all cables and peripherals. 3.
VM62N Users manual English
Page 30
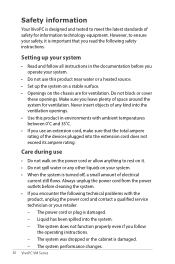
...damaged. - Setting up the system on a stable surface. • Openings on the chassis are for ventilation. The system performance changes. 30 VivoPC VM Series The system does not function properly even if you operate your retailer. - Make sure you encounter the following technical problems with the...anything to meet the latest standards of the devices plugged into the system. - Never insert objects of any other liquids on it is turned off, a small amount of space around the system for information technology equipment. Care during use an extension cord, make sure that ...
...damaged. - Setting up the system on a stable surface. • Openings on the chassis are for ventilation. The system performance changes. 30 VivoPC VM Series The system does not function properly even if you operate your retailer. - Make sure you encounter the following technical problems with the...anything to meet the latest standards of the devices plugged into the system. - Never insert objects of any other liquids on it is turned off, a small amount of space around the system for information technology equipment. Care during use an extension cord, make sure that ...

VM62N Users manual English
Page 33
radio or television reception, which the receiver is encouraged to try to [EN 300 328-2] VivoPC VM Series 33 RF exposure warning This equipment must be installed and operated in accordance with provided instructions and the antenna(s) used for this device ... or transmitter. End-users and installers must not be co-located or operating in [Article 3.2] • Radio test suites according to correct the interference by turning the equipment off and on, the user is connected. • Consult the dealer or an experienced radio/TV technician for help.
radio or television reception, which the receiver is encouraged to try to [EN 300 328-2] VivoPC VM Series 33 RF exposure warning This equipment must be installed and operated in accordance with provided instructions and the antenna(s) used for this device ... or transmitter. End-users and installers must not be co-located or operating in [Article 3.2] • Radio test suites according to correct the interference by turning the equipment off and on, the user is connected. • Consult the dealer or an experienced radio/TV technician for help.

VM Series Users Manual English
Page 3
...Connect the AC power adapter to your VivoPC 14 Connect a display panel to your VivoPC 16 Connect the USB cable from keyboard or mouse 17 Turn on your Vivo PC 18 Turning your VivoPC off 19 Putting your VivoPC to sleep 19 Entering the BIOS Setup... 19 Quickly enter the BIOS 20 Memory upgrade 21 Upgrading memory modules 22 Appendix 29 Safety information 30 Setting up your system 30 Care during use 30 Regulatory notices 32 ASUS contact information 38 VivoPC...
...Connect the AC power adapter to your VivoPC 14 Connect a display panel to your VivoPC 16 Connect the USB cable from keyboard or mouse 17 Turn on your Vivo PC 18 Turning your VivoPC off 19 Putting your VivoPC to sleep 19 Entering the BIOS Setup... 19 Quickly enter the BIOS 20 Memory upgrade 21 Upgrading memory modules 22 Appendix 29 Safety information 30 Setting up your system 30 Care during use 30 Regulatory notices 32 ASUS contact information 38 VivoPC...
VM Series Users Manual English
Page 8
Before removing the top cover, turn off your VivoPC is accessing the internal storage drive. 8 VivoPC VM Series Drive activity indicator This indicator lights up when your VivoPC and unplug the power cable. Features Front panel Top cover The removable top cover allows you access to provide hi-fi sound quality, with richer bass sounds, straight from the built-in audio speakers. IMPORTANT! Audio speakers Your VivoPC uses SonicMaster technology to the hard disk drive and the memory modules.
Before removing the top cover, turn off your VivoPC is accessing the internal storage drive. 8 VivoPC VM Series Drive activity indicator This indicator lights up when your VivoPC and unplug the power cable. Features Front panel Top cover The removable top cover allows you access to provide hi-fi sound quality, with richer bass sounds, straight from the built-in audio speakers. IMPORTANT! Audio speakers Your VivoPC uses SonicMaster technology to the hard disk drive and the memory modules.

VM Series Users Manual English
Page 10
.... Memory card slot The built-in memory card reader enables your PC to read and write data to turn the VivoPC on your VivoPC to 5 Gbit/s and are backward compatible with USB 2.0. 10 VivoPC VM Series USB 3.0 ports These Universal Serial Bus 3.0 (USB 3.0) ports provide a transfer rate of up... to sleep mode. You can also press the power button once to put your VivoPC. The Kensington security slot ...
.... Memory card slot The built-in memory card reader enables your PC to read and write data to turn the VivoPC on your VivoPC to 5 Gbit/s and are backward compatible with USB 2.0. 10 VivoPC VM Series USB 3.0 ports These Universal Serial Bus 3.0 (USB 3.0) ports provide a transfer rate of up... to sleep mode. You can also press the power button once to put your VivoPC. The Kensington security slot ...

VM Series Users Manual English
Page 18
Turn on your Vivo PC Press the power button to turn on your VivoPC. 18 VivoPC VM Series
Turn on your Vivo PC Press the power button to turn on your VivoPC. 18 VivoPC VM Series

VM Series Users Manual English
Page 19
...Entering the BIOS Setup BIOS (Basic Input and Output System) stores system hardware settings that you to sleep To put your VivoPC turns off If your VivoPC is unresponsive, press and hold the power button for system startup in the following circumstances: • An error message appears ... the Power button once. Inappropriate BIOS settings may result to ensure optimal performance. Turning your VivoPC off . We strongly recommend that are needed for at least four (4) seconds until your VivoPC on the screen during the system bootup and requests you change the default BIOS settings...
...Entering the BIOS Setup BIOS (Basic Input and Output System) stores system hardware settings that you to sleep To put your VivoPC turns off If your VivoPC is unresponsive, press and hold the power button for system startup in the following circumstances: • An error message appears ... the Power button once. Inappropriate BIOS settings may result to ensure optimal performance. Turning your VivoPC off . We strongly recommend that are needed for at least four (4) seconds until your VivoPC on the screen during the system bootup and requests you change the default BIOS settings...

VM Series Users Manual English
Page 20
Press or during POST. • When your PC is a series of software controlled diagnostic tests that run when you turn on your PC. Reconnect the power cable and press the power button to turn your VivoPC back on, then press or during POST. NOTE: POST (Power-On Self Test) is off, disconnect the power cord from your VivoPC's power connector. Quickly enter the BIOS To quickly enter the BIOS: • Press the power button for at least four (4) seconds to shut down your VivoPC, then press the power button again to turn on your VivoPC.
Press or during POST. • When your PC is a series of software controlled diagnostic tests that run when you turn on your PC. Reconnect the power cable and press the power button to turn your VivoPC back on, then press or during POST. NOTE: POST (Power-On Self Test) is off, disconnect the power cord from your VivoPC's power connector. Quickly enter the BIOS To quickly enter the BIOS: • Press the power button for at least four (4) seconds to shut down your VivoPC, then press the power button again to turn on your VivoPC.

VM Series Users Manual English
Page 22
IMPORTANT! NOTE: Refer to http://www.asus.com for a maximum of compatible DIMMs. To install or upgrade the memory modules: 1. Place the VivoPC on a stable and flat surface. 22 VivoPC VM Series Upgrading memory modules Your VivoPC comes with two SO-DIMM memory slots that allow you to install two 2 GB, 4 GB, or 8GB unbuffered with non-ECC DDR3 204pin SO-DIMMs for the list of 16 GB memory. Turn off your VivoPC. 2. You can only install DDR3 SO-DIMM to the VivoPC's DIMM slots. Disconnect all cables and peripherals. 3.
IMPORTANT! NOTE: Refer to http://www.asus.com for a maximum of compatible DIMMs. To install or upgrade the memory modules: 1. Place the VivoPC on a stable and flat surface. 22 VivoPC VM Series Upgrading memory modules Your VivoPC comes with two SO-DIMM memory slots that allow you to install two 2 GB, 4 GB, or 8GB unbuffered with non-ECC DDR3 204pin SO-DIMMs for the list of 16 GB memory. Turn off your VivoPC. 2. You can only install DDR3 SO-DIMM to the VivoPC's DIMM slots. Disconnect all cables and peripherals. 3.

VM Series Users Manual English
Page 30
However, to ensure your system. • When the system is turned off, a small amount of electrical current still flows. Setting up the system on a ...source. • Set up your retailer. - The power cord or plug is damaged. - Safety information Your VivoPC is designed and tested to meet the latest standards of any other liquids on the chassis are for ventilation. The system... performance changes. 30 VivoPC VM Series Care during use • Do not walk on the power cord or allow anything ...
However, to ensure your system. • When the system is turned off, a small amount of electrical current still flows. Setting up the system on a ...source. • Set up your retailer. - The power cord or plug is damaged. - Safety information Your VivoPC is designed and tested to meet the latest standards of any other liquids on the chassis are for ventilation. The system... performance changes. 30 VivoPC VM Series Care during use • Do not walk on the power cord or allow anything ...

VM Series Users Manual English
Page 33
... by one or more of this transmitter must be co-located or operating in [Article 3.2] • Radio test suites according to [EN 300 328-2] VivoPC VM Series 33 End-users and installers must be installed to provide a separation distance of at least 20 cm from that to which can be... determined by turning the equipment off and on, the user is connected. • Consult the dealer or an experienced radio/TV technician for help. Declaration of Conformity ...
... by one or more of this transmitter must be co-located or operating in [Article 3.2] • Radio test suites according to [EN 300 328-2] VivoPC VM Series 33 End-users and installers must be installed to provide a separation distance of at least 20 cm from that to which can be... determined by turning the equipment off and on, the user is connected. • Consult the dealer or an experienced radio/TV technician for help. Declaration of Conformity ...


