

Users Manual
Page 3
Table of Contents About this manual...7 Conventions used in this manual 8 Icons...8 Typography...8 Safety precautions...9 Using your Notebook PC 9 Caring for your Notebook PC 10 Proper disposal...11 Chapter 1: Hardware Setup Getting to know your Notebook PC 14 Top View...14 Bottom...19 Right Side...22 Left Side...26 Chapter 2: Using your Notebook PC Getting started...30 Charge your Notebook PC 30 Lift to open the display panel 32 Press the power button 32 Using the touchpad 33 Using the keyboard...40 HotKeys...40 Function keys...41 Using the numeric keypad 42 Notebook PC E-Manual 3
Table of Contents About this manual...7 Conventions used in this manual 8 Icons...8 Typography...8 Safety precautions...9 Using your Notebook PC 9 Caring for your Notebook PC 10 Proper disposal...11 Chapter 1: Hardware Setup Getting to know your Notebook PC 14 Top View...14 Bottom...19 Right Side...22 Left Side...26 Chapter 2: Using your Notebook PC Getting started...30 Charge your Notebook PC 30 Lift to open the display panel 32 Press the power button 32 Using the touchpad 33 Using the keyboard...40 HotKeys...40 Function keys...41 Using the numeric keypad 42 Notebook PC E-Manual 3

Users Manual
Page 4
... Snap hotspots...52 Action Center...54 Other keyboard shortcuts 55 Connecting to wireless networks 57 Wi-Fi...57 Bluetooth...58 Airplane mode...59 Turning your Notebook PC off 60 Putting your Notebook PC to sleep 61 Chapter 4: Power-On Self-Test (POST) The Power-On Self-Test (POST 64 Using POST to access BIOS and Troubleshoot 64 BIOS...64 Accessing BIOS...64 BIOS Settings...65 Recovering your system 72 Performing a recovery option 73 4 Notebook PC E-Manual
... Snap hotspots...52 Action Center...54 Other keyboard shortcuts 55 Connecting to wireless networks 57 Wi-Fi...57 Bluetooth...58 Airplane mode...59 Turning your Notebook PC off 60 Putting your Notebook PC to sleep 61 Chapter 4: Power-On Self-Test (POST) The Power-On Self-Test (POST 64 Using POST to access BIOS and Troubleshoot 64 BIOS...64 Accessing BIOS...64 BIOS Settings...65 Recovering your system 72 Performing a recovery option 73 4 Notebook PC E-Manual

Users Manual
Page 5
Tips and FAQs Useful tips for your Notebook PC 76 Hardware FAQs...77 Software FAQs...80 Appendices DVD-ROM Drive Information 84 Blu-ray ROM Drive Information 86 Internal Modem Compliancy 86 Overview...87 Network Compatibility Declaration 87 Non-Voice Equipment...87 Federal Communications Commission Interference Statement 90 FCC Radio Frequency (RF) Exposure Caution Statement 91 Wireless Operation Channel for Different Domains 91 Compliance...
Tips and FAQs Useful tips for your Notebook PC 76 Hardware FAQs...77 Software FAQs...80 Appendices DVD-ROM Drive Information 84 Blu-ray ROM Drive Information 86 Internal Modem Compliancy 86 Overview...87 Network Compatibility Declaration 87 Non-Voice Equipment...87 Federal Communications Commission Interference Statement 90 FCC Radio Frequency (RF) Exposure Caution Statement 91 Wireless Operation Channel for Different Domains 91 Compliance...
Users Manual
Page 7
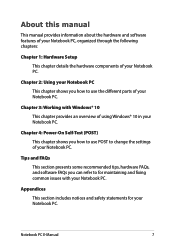
... E-Manual 7 About this manual This manual provides information about the hardware and software features of your Notebook PC, organized through the following chapters: Chapter 1: Hardware Setup This chapter details the hardware components of your Notebook PC. Tips and FAQs This section presents some recommended tips, hardware FAQs, and software FAQs you can refer to change the settings of using Windows® 10 in your Notebook PC. Chapter 3: Working...
... E-Manual 7 About this manual This manual provides information about the hardware and software features of your Notebook PC, organized through the following chapters: Chapter 1: Hardware Setup This chapter details the hardware components of your Notebook PC. Tips and FAQs This section presents some recommended tips, hardware FAQs, and software FAQs you can refer to change the settings of using Windows® 10 in your Notebook PC. Chapter 3: Working...

Users Manual
Page 10
... Notebook PC. Do not use your Notebook PC. Do not use strong solvents such as thinners, benzene, or other chemicals on top of warm water. Do not place objects on or near liquids, rain, or moisture. Caring for your Notebook PC Disconnect the AC power and remove the battery pack (if applicable) before cleaning your Notebook PC using a dry cloth. Remove...
... Notebook PC. Do not use your Notebook PC. Do not use strong solvents such as thinners, benzene, or other chemicals on top of warm water. Do not place objects on or near liquids, rain, or moisture. Caring for your Notebook PC Disconnect the AC power and remove the battery pack (if applicable) before cleaning your Notebook PC using a dry cloth. Remove...

Users Manual
Page 17
... quick access to navigate onscreen, providing an intuitive user experience. Notebook PC E-Manual 17 NOTE: The keyboard layout differs by model or territory. NOTE: For more details, refer to the Using the touchpad section in this manual. Keyboard The keyboard provides full-sized QWERTY keys with a comfortable travel depth for typing. It also simulates the functions of multi-gestures to Windows®, and controls other multimedia functions. Function key lock indicator This indicator lights...
... quick access to navigate onscreen, providing an intuitive user experience. Notebook PC E-Manual 17 NOTE: The keyboard layout differs by model or territory. NOTE: For more details, refer to the Using the touchpad section in this manual. Keyboard The keyboard provides full-sized QWERTY keys with a comfortable travel depth for typing. It also simulates the functions of multi-gestures to Windows®, and controls other multimedia functions. Function key lock indicator This indicator lights...
Users Manual
Page 22
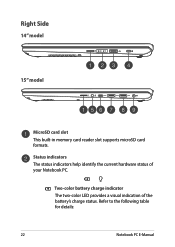
Two-color battery charge indicator The two-color LED provides a visual indication of your Notebook PC. Refer to the following table for details: 22 Notebook PC E-Manual Right Side 14" model 15" model MicroSD card slot This built-in memory card reader slot supports microSD card formats. Status indicators The status indicators help identify the current hardware status of the battery's charge status.
Two-color battery charge indicator The two-color LED provides a visual indication of your Notebook PC. Refer to the following table for details: 22 Notebook PC E-Manual Right Side 14" model 15" model MicroSD card slot This built-in memory card reader slot supports microSD card formats. Status indicators The status indicators help identify the current hardware status of the battery's charge status.

Users Manual
Page 23
... the battery power is less than 95%. Power indicator The power indicator lights up when the Notebook PC is turned on battery mode and the battery power is between 95% and 100%. The Notebook PC is plugged to a power source, charging its battery, and the battery power is in sleep mode. Notebook PC E-Manual 23 USB 2.0 port The USB (Universal Serial Bus) port is between 10% to a power source and the battery power is compatible with USB 2.0 or USB 1.1 devices such as keyboards, pointing devices, flash disk drives, external HDDs, speakers, cameras...
... the battery power is less than 95%. Power indicator The power indicator lights up when the Notebook PC is turned on battery mode and the battery power is between 95% and 100%. The Notebook PC is plugged to a power source, charging its battery, and the battery power is in sleep mode. Notebook PC E-Manual 23 USB 2.0 port The USB (Universal Serial Bus) port is between 10% to a power source and the battery power is compatible with USB 2.0 or USB 1.1 devices such as keyboards, pointing devices, flash disk drives, external HDDs, speakers, cameras...

Users Manual
Page 27
USB 2.0 port The USB (Universal Serial Bus) port is backward compatible to USB 2.0. NOTE: Transfer rate of up to 5 Gbit/s and is compatible with USB 2.0 or USB 1.1 devices such as keyboards, pointing devices, flash disk drives, external HDDs, speakers, cameras and printers. Headphone/Headset/Microphone jack This port allows you to connect your headset or an external microphone. You can also use this port may vary per model. USB 3.1 Gen 1 Type-C™ port The USB 3.1 (Universal Serial Bus 3.1) Gen 1 Type-C™ port provides a transfer...
USB 2.0 port The USB (Universal Serial Bus) port is backward compatible to USB 2.0. NOTE: Transfer rate of up to 5 Gbit/s and is compatible with USB 2.0 or USB 1.1 devices such as keyboards, pointing devices, flash disk drives, external HDDs, speakers, cameras and printers. Headphone/Headset/Microphone jack This port allows you to connect your headset or an external microphone. You can also use this port may vary per model. USB 3.1 Gen 1 Type-C™ port The USB 3.1 (Universal Serial Bus 3.1) Gen 1 Type-C™ port provides a transfer...

Users Manual
Page 31
Notebook PC E-Manual 31 WARNING! IMPORTANT! • Locate the input/output rating label on your Notebook PC and ensure that your Notebook PC is replaced by an incorrect type. • Do not dispose of properly. • Keep the battery and other small components away from children. Read the following precautions for your Notebook PC's battery: • Only ASUS-authorized technicians should remove the...
Notebook PC E-Manual 31 WARNING! IMPORTANT! • Locate the input/output rating label on your Notebook PC and ensure that your Notebook PC is replaced by an incorrect type. • Do not dispose of properly. • Keep the battery and other small components away from children. Read the following precautions for your Notebook PC's battery: • Only ASUS-authorized technicians should remove the...

Users Manual
Page 40
Using the keyboard HotKeys The HotKeys on your Notebook PC's keyboard can trigger the following commands: Turns the speaker on or off Turns the speaker volume down Turns the speaker volume up Decreases display brightness Increases display brightness Enables or disables the touchpad Adjusts brightness for the backlit keyboard Toggles the display mode NOTE: Ensure that the second display is connected to your Notebook PC. 40 Notebook PC E-Manual
Using the keyboard HotKeys The HotKeys on your Notebook PC's keyboard can trigger the following commands: Turns the speaker on or off Turns the speaker volume down Turns the speaker volume up Decreases display brightness Increases display brightness Enables or disables the touchpad Adjusts brightness for the backlit keyboard Toggles the display mode NOTE: Ensure that the second display is connected to your Notebook PC. 40 Notebook PC E-Manual

Users Manual
Page 45
... your Notebook PC to sleep Launch Settings Launch File Explorer You can use the Start menu to do these common activities: • Start programs or Windows® apps • Open commonly used programs or Windows® apps • Adjust Notebook PC settings • Get help with the Windows operating system • Turn off your Notebook PC • Log off from Windows or switch to your Notebook PC's programs, Windows® apps, folders, and settings.
... your Notebook PC to sleep Launch Settings Launch File Explorer You can use the Start menu to do these common activities: • Start programs or Windows® apps • Open commonly used programs or Windows® apps • Adjust Notebook PC settings • Get help with the Windows operating system • Turn off your Notebook PC • Log off from Windows or switch to your Notebook PC's programs, Windows® apps, folders, and settings.

Users Manual
Page 64
... Notebook PC E-Manual BIOS The BIOS (Basic Input and Output System) stores system hardware settings that requires further BIOS settings or updates. We strongly recommend that controls the POST is a series of your Notebook PC. The software that you turn on or restart your Notebook PC. Accessing BIOS Enter the BIOS settings by using the function keys of software-controlled diagnostic tests that run when you change the default BIOS settings except in the Notebook PC. The default BIOS settings apply to access BIOS and Troubleshoot...
... Notebook PC E-Manual BIOS The BIOS (Basic Input and Output System) stores system hardware settings that requires further BIOS settings or updates. We strongly recommend that controls the POST is a series of your Notebook PC. The software that you turn on or restart your Notebook PC. Accessing BIOS Enter the BIOS settings by using the function keys of software-controlled diagnostic tests that run when you change the default BIOS settings except in the Notebook PC. The default BIOS settings apply to access BIOS and Troubleshoot...
Users Manual
Page 65
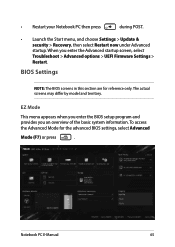
.... To access the Advanced Mode for reference only. BIOS Settings NOTE: The BIOS screens in this section are for the advanced BIOS settings, select Advanced Mode (F7) or press . EZ Mode This menu appears when you enter the BIOS setup program and provides you enter the Advanced startup screen, select Troubleshoot > Advanced options > UEFI Firmware Settings > Restart. • Restart your Notebook PC then press during POST. • Launch the Start menu, and choose Settings > Update & security > Recovery...
.... To access the Advanced Mode for reference only. BIOS Settings NOTE: The BIOS screens in this section are for the advanced BIOS settings, select Advanced Mode (F7) or press . EZ Mode This menu appears when you enter the BIOS setup program and provides you enter the Advanced startup screen, select Troubleshoot > Advanced options > UEFI Firmware Settings > Restart. • Restart your Notebook PC then press during POST. • Launch the Start menu, and choose Settings > Update & security > Recovery...

Users Manual
Page 67
Security This menu allows you will be prompted to your Notebook PC. NOTE: • If you install a User Password, you will be prompted to input this before entering the operating system. • If you install an Administrator Password, you to set up the administrator and user password of your Notebook PC's hard disk drive, input/output (I/O) interface, and USB interface. Notebook PC E-Manual 67 It also allows you to control the access to input this before entering BIOS.
Security This menu allows you will be prompted to your Notebook PC. NOTE: • If you install a User Password, you will be prompted to input this before entering the operating system. • If you install an Administrator Password, you to set up the administrator and user password of your Notebook PC's hard disk drive, input/output (I/O) interface, and USB interface. Notebook PC E-Manual 67 It also allows you to control the access to input this before entering BIOS.
Users Manual
Page 70
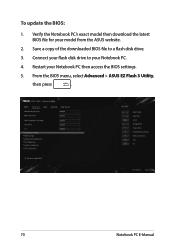
Connect your flash disk drive to a flash disk drive. 3. Restart your Notebook PC. 4. Save a copy of the downloaded BIOS file to your Notebook PC then access the BIOS settings. 5. To update the BIOS: 1. From the BIOS menu, select Advanced > ASUS EZ Flash 3 Utility, then press . 70 Notebook PC E-Manual Verify the Notebook PC's exact model then download the latest BIOS file for your model from the ASUS website. 2.
Connect your flash disk drive to a flash disk drive. 3. Restart your Notebook PC. 4. Save a copy of the downloaded BIOS file to your Notebook PC then access the BIOS settings. 5. To update the BIOS: 1. From the BIOS menu, select Advanced > ASUS EZ Flash 3 Utility, then press . 70 Notebook PC E-Manual Verify the Notebook PC's exact model then download the latest BIOS file for your model from the ASUS website. 2.

Users Manual
Page 76
... using force shutdown to turn off your Notebook PC. • Always backup your data and make it a point to create a backup data in ID and password - If you are some useful tips that you can follow: • Update Windows® periodically to ensure that your applications have the following items prior to resetting your operating systems and other installed applications - Backup data - Internet connection information 76 Notebook PC E-Manual...
... using force shutdown to turn off your Notebook PC. • Always backup your data and make it a point to create a backup data in ID and password - If you are some useful tips that you can follow: • Update Windows® periodically to ensure that your applications have the following items prior to resetting your operating systems and other installed applications - Backup data - Internet connection information 76 Notebook PC E-Manual...
Users Manual
Page 77
..., consult an authorized ASUS service center. 2. You can try doing any Wi-Fi connection, switch your Notebook PC may use the function keys or the display settings in your operating system to adjust the display brightness. • If you are not using any of your Notebook PC. What should I fix this? How can I turn on the Notebook PC. How can I do? The color and brightness of your display panel may be affected...
..., consult an authorized ASUS service center. 2. You can try doing any Wi-Fi connection, switch your Notebook PC may use the function keys or the display settings in your operating system to adjust the display brightness. • If you are not using any of your Notebook PC. What should I fix this? How can I turn on the Notebook PC. How can I do? The color and brightness of your display panel may be affected...
Users Manual
Page 78
...; Press to enable your Notebook PC and remove it. 7. When I play audio and video files, why can try doing any sound from my Notebook PC's audio speakers? My battery charge indicator does not light up the speaker volume. • Check if your speakers were set to your touchpad. 6. What's wrong? • Check whether the power adapter or battery pack is connected to mute. • Check if a headphone jack is attached...
...; Press to enable your Notebook PC and remove it. 7. When I play audio and video files, why can try doing any sound from my Notebook PC's audio speakers? My battery charge indicator does not light up the speaker volume. • Check if your speakers were set to your touchpad. 6. What's wrong? • Check whether the power adapter or battery pack is connected to mute. • Check if a headphone jack is attached...
Users Manual
Page 80
... then turn on my Notebook PC, the power indicator lights up but nothing appears on your Notebook PC. • If the problem still exists, contact your Notebook PC by pressing the power button for at least four (4) seconds. My Notebook PC boots slower than usual and my operating system lags. Software FAQs 1. What can try doing any key to fix this? When I fix this message: "Remove disks or other media...
... then turn on my Notebook PC, the power indicator lights up but nothing appears on your Notebook PC. • If the problem still exists, contact your Notebook PC by pressing the power button for at least four (4) seconds. My Notebook PC boots slower than usual and my operating system lags. Software FAQs 1. What can try doing any key to fix this? When I fix this message: "Remove disks or other media...


