
User Manual
Page 7
Turn off the Power Switch and turn it on again to the nature of the following symptoms are normal with the LCD. The screen will recover slowly or you use due to make sure that you perform certain tasks properly, take note of the fluorescent light...sure that the flicker disappears. • You may remain after switching the image. Conventions used throughout this manual. Use a cleaner intended for use with the monitor: • The screen may be removed with a cloth dampened with a lint-free, non-abrasive cloth. DANGER/WARNING: Information to prevent injury to yourself...
Turn off the Power Switch and turn it on again to the nature of the following symptoms are normal with the LCD. The screen will recover slowly or you use due to make sure that you perform certain tasks properly, take note of the fluorescent light...sure that the flicker disappears. • You may remain after switching the image. Conventions used throughout this manual. Use a cleaner intended for use with the monitor: • The screen may be removed with a cloth dampened with a lint-free, non-abrasive cloth. DANGER/WARNING: Information to prevent injury to yourself...

User Manual
Page 9
... cord x1 • VGA cable x1 • Support CD (For VW223B only) • USB cable x1 (For VW223B only) • DVI cable x1 (For VW223N / VW223T only) • Audio cable x1 (For VW223S / VW223T only) If any of features that the VW223 Series brings you for purchasing the ASUS® VW223 Series LCD monitor! 1.1 Welcome!
... cord x1 • VGA cable x1 • Support CD (For VW223B only) • USB cable x1 (For VW223B only) • DVI cable x1 (For VW223N / VW223T only) • Audio cable x1 (For VW223S / VW223T only) If any of features that the VW223 Series brings you for purchasing the ASUS® VW223 Series LCD monitor! 1.1 Welcome!

User Manual
Page 11
...function. • This is as VW223B. Power Button / Power Indicator: • Press this button to turn the monitor on /off • The color definition of the function selected or move right/up to the previous menu as the... below table. Power Button / Power Indicator: • Press this button to turn the monitor on /off • The color definition of the function selected or move left/down to enter/select the icon... this button to the next function. • This is as the OSD menu is activated. 4. ASUS VW223 Series LCD Monitor 1-3 6.
...function. • This is as VW223B. Power Button / Power Indicator: • Press this button to turn the monitor on /off • The color definition of the function selected or move right/up to the previous menu as the... below table. Power Button / Power Indicator: • Press this button to turn the monitor on /off • The color definition of the function selected or move left/down to enter/select the icon... this button to the next function. • This is as the OSD menu is activated. 4. ASUS VW223 Series LCD Monitor 1-3 6.

User Manual
Page 13
Power Button / Power Indicator: • Press this button to turn the monitor on/off • The color definition of the power indicator is activated. 4. VW223N 1 2 3 4 5 6 1. MENU Button: • Press this button to enter/select the icon (function) ..., Game Mode, Night View Mode) with SPLENDID™ Video Enhancement Technology. • Exit the OSD menu or go back to the previous menu as VW223B. ASUS VW223 Series LCD Monitor 1-5 Button: • Use this button for 2-4 seconds (for Contrast adjustment. 3.
Power Button / Power Indicator: • Press this button to turn the monitor on/off • The color definition of the power indicator is activated. 4. VW223N 1 2 3 4 5 6 1. MENU Button: • Press this button to enter/select the icon (function) ..., Game Mode, Night View Mode) with SPLENDID™ Video Enhancement Technology. • Exit the OSD menu or go back to the previous menu as VW223B. ASUS VW223 Series LCD Monitor 1-5 Button: • Use this button for 2-4 seconds (for Contrast adjustment. 3.
User Manual
Page 15
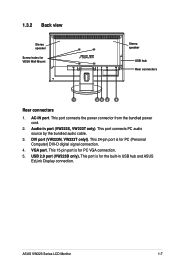
... by the bundled audio cable. 3. VGA port. This port connects the power connector from the bundled power cord. 2. USB 2.0 port (VW223B only). ASUS VW223 Series LCD Monitor 1-7 DVI port (VW223N, VW223T onlyl). This 15-pin port is for VESA Wall Mount Stereo speaker USB hub Rear connectors 1 23 4 5 Rear connectors 1. Audio-in USB hub...
... by the bundled audio cable. 3. VGA port. This port connects the power connector from the bundled power cord. 2. USB 2.0 port (VW223B only). ASUS VW223 Series LCD Monitor 1-7 DVI port (VW223N, VW223T onlyl). This 15-pin port is for VESA Wall Mount Stereo speaker USB hub Rear connectors 1 23 4 5 Rear connectors 1. Audio-in USB hub...
User Manual
Page 17
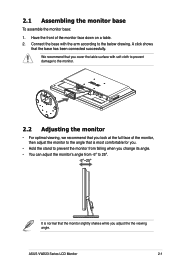
... you. • Hold the stand to prevent the monitor from falling when you look at the full face of the monitor face down on a table. 2. ASUS VW223 Series LCD Monitor 2-1 Have the front of the monitor, then adjust the monitor to the angle that is normal that the base has... been connected successfully. 2.1 Assembling the monitor base To assemble the monitor base: 1. Connect the base ...
... you. • Hold the stand to prevent the monitor from falling when you look at the full face of the monitor face down on a table. 2. ASUS VW223 Series LCD Monitor 2-1 Have the front of the monitor, then adjust the monitor to the angle that is normal that the base has... been connected successfully. 2.1 Assembling the monitor base To assemble the monitor base: 1. Connect the base ...
User Manual
Page 18
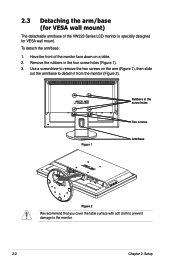
... cover the table surface with soft cloth to prevent damage to detach it from the monitor (Figure 2). Have the front of the VW223 Series LCD monitor is specially designed for VESA wall mount) The detachable arm/base of the monitor face down on the arm (Figure 1), then slide out the arm/base to the...
... cover the table surface with soft cloth to prevent damage to detach it from the monitor (Figure 2). Have the front of the VW223 Series LCD monitor is specially designed for VESA wall mount) The detachable arm/base of the monitor face down on the arm (Figure 1), then slide out the arm/base to the...
User Manual
Page 19
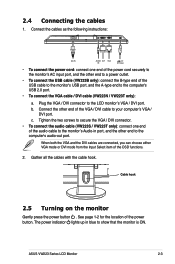
... the VGA / DVI cable to your computer's VGA / DVI port. ASUS VW223 Series LCD Monitor 2-3 See page 1-2 for the location of the OSD functions. 2. Connect the other end to the computer's USB 2.0 port. • To connect the VGA cable / DVI cable (VW223N / VW223T only): a. Gather all the cables with the cable hook. Connect the...
... the VGA / DVI cable to your computer's VGA / DVI port. ASUS VW223 Series LCD Monitor 2-3 See page 1-2 for the location of the OSD functions. 2. Connect the other end to the computer's USB 2.0 port. • To connect the VGA cable / DVI cable (VW223N / VW223T only): a. Gather all the cables with the cable hook. Connect the...

User Manual
Page 21
... with SPLENDID™ Video Enhancement. • Night View Mode: best choice for your setting or return to change the settings of the selected function. 4. ASUS VW223 Series LCD Monitor 3-1 Press and to the preset mode. • Scenery Mode: best choice for scenery photo display with SPLENDID™ Video Enhancement. • Standard Mode: best...
... with SPLENDID™ Video Enhancement. • Night View Mode: best choice for your setting or return to change the settings of the selected function. 4. ASUS VW223 Series LCD Monitor 3-1 Press and to the preset mode. • Scenery Mode: best choice for scenery photo display with SPLENDID™ Video Enhancement. • Standard Mode: best...
User Manual
Page 23
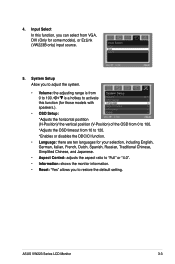
... to adjust the system. • Volume: the adjusting range is a hotkey to activate this function (for some models), or EzLink (VW223B only) input source. 5. ASUS VW223 Series LCD Monitor 3-3 System Setup Allow you to 100. *Adjusts the OSD timeout from VGA, DVI (Only for those models with speakers.). • OSD Setup: *Adjusts the...
... to adjust the system. • Volume: the adjusting range is a hotkey to activate this function (for some models), or EzLink (VW223B only) input source. 5. ASUS VW223 Series LCD Monitor 3-3 System Setup Allow you to 100. *Adjusts the OSD timeout from VGA, DVI (Only for those models with speakers.). • OSD Setup: *Adjusts the...
User Manual
Page 24
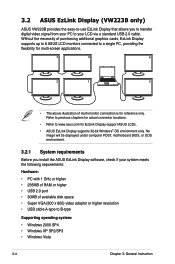
Without the necessity of purchasing additional graphics cards, EzLink Display supports up to 6 ASUS LCD monitors connected to a single PC, providing the flexibility for multi-screen applications. 3 4 6 2 1 5 • The above illustration of available disk space •...; Windows Vista 3-4 Chapter 3: General Instruction Refer to previous chapters for actual connector locations. • Refer to www.asus.com for EzLink Display-support ASUS LCDs. • ASUS EzLink Display supports 32-bit Windows® OS environment only. No image will be displayed under computer POST, motherboard BIOS...
Without the necessity of purchasing additional graphics cards, EzLink Display supports up to 6 ASUS LCD monitors connected to a single PC, providing the flexibility for multi-screen applications. 3 4 6 2 1 5 • The above illustration of available disk space •...; Windows Vista 3-4 Chapter 3: General Instruction Refer to previous chapters for actual connector locations. • Refer to www.asus.com for EzLink Display-support ASUS LCDs. • ASUS EzLink Display supports 32-bit Windows® OS environment only. No image will be displayed under computer POST, motherboard BIOS...
User Manual
Page 25
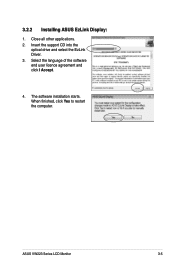
The software installation starts. Select the language of the software end user licence agreement and click I Accept. 4. When finished, click Yes to restart the computer. ASUS VW223 Series LCD Monitor 3-5 3.2.2 Installing ASUS EzLink Display: 1. Insert the support CD into the optical drive and select the EzLink Driver. 3. Close all other applications. 2.
The software installation starts. Select the language of the software end user licence agreement and click I Accept. 4. When finished, click Yes to restart the computer. ASUS VW223 Series LCD Monitor 3-5 3.2.2 Installing ASUS EzLink Display: 1. Insert the support CD into the optical drive and select the EzLink Driver. 3. Close all other applications. 2.
User Manual
Page 27
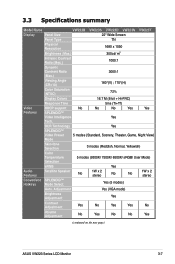
... Yes Contrast Adjustment Yes No Yes Yes No Volume Adjustment No Yes No No Yes (continued on the next page) ASUS VW223 Series LCD Monitor 3-7 3.3 Specifications summary Model Name VW223B VW223S VW223D VW223N VW223T Display Panel Size 22" Wide Screen Panel Type TN Physical Resolution Brightness (Max.) 1680 x 1050 300cd/ m2 Intrisinc Contrast Ratio...
... Yes Contrast Adjustment Yes No Yes Yes No Volume Adjustment No Yes No No Yes (continued on the next page) ASUS VW223 Series LCD Monitor 3-7 3.3 Specifications summary Model Name VW223B VW223S VW223D VW223N VW223T Display Panel Size 22" Wide Screen Panel Type TN Physical Resolution Brightness (Max.) 1680 x 1050 300cd/ m2 Intrisinc Contrast Ratio...
User Manual
Page 29
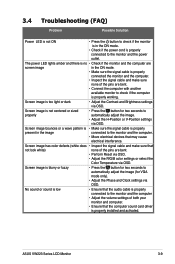
...Adjust the Contrast and Brightness settings via OSD. Screen image is not centered or sized • Press the button for two seconds to the monitor and the computer. • Move electrical devices that the computer sound card driver is properly installed and activated. Screen image bounces or a ... the pins are bent. • Perform Reset via OSD. • Adjust the R/G/B color settings or select the Color Temperature via OSD. ASUS VW223 Series LCD Monitor 3-9 3.4 Troubleshooting (FAQ) Problem Possible Solution Power LED is not ON • Press the button to check if the...
...Adjust the Contrast and Brightness settings via OSD. Screen image is not centered or sized • Press the button for two seconds to the monitor and the computer. • Move electrical devices that the computer sound card driver is properly installed and activated. Screen image bounces or a ... the pins are bent. • Perform Reset via OSD. • Adjust the R/G/B color settings or select the Color Temperature via OSD. ASUS VW223 Series LCD Monitor 3-9 3.4 Troubleshooting (FAQ) Problem Possible Solution Power LED is not ON • Press the button to check if the...


