User Manual
Page 3
... view 1-2 1.3.2 Back view 1-7 Chapter 2: Setup 2.1 Assembling the monitor base 2-1 2.2 Adjusting the monitor 2-1 2.3 Detaching the arm/base (for VESA wall mount 2-2 2.4 Connecting the cables 2-3 2.5 Turning on the monitor 2-3 Chapter 3: General instruction 3.1 OSD (On-Screen Display) menu 3-1 3.1.1 How to reconfigure 3-1 3.1.2 OSD Function Introduction 3-1 3.2 ASUS EzLink Display (VW223B only 3-4 3.2.1 System requirements 3-4 3.2.2 Installing ASUS EzLink Display 3-5 3.2.3 Using ASUS EzLink Display 3-6 3.3 Specifications summary 3-7 3.4 Troubleshooting (FAQ 3-9 3.5 Supported...
... view 1-2 1.3.2 Back view 1-7 Chapter 2: Setup 2.1 Assembling the monitor base 2-1 2.2 Adjusting the monitor 2-1 2.3 Detaching the arm/base (for VESA wall mount 2-2 2.4 Connecting the cables 2-3 2.5 Turning on the monitor 2-3 Chapter 3: General instruction 3.1 OSD (On-Screen Display) menu 3-1 3.1.1 How to reconfigure 3-1 3.1.2 OSD Function Introduction 3-1 3.2 ASUS EzLink Display (VW223B only 3-4 3.2.1 System requirements 3-4 3.2.2 Installing ASUS EzLink Display 3-5 3.2.3 Using ASUS EzLink Display 3-6 3.3 Specifications summary 3-7 3.4 Troubleshooting (FAQ 3-9 3.5 Supported...

User Manual
Page 4
... determined that to which can radiate radio frequency energy and, if not installed and used in accordance with FCC regulations. The use of the FCC Rules. However, there is connected. • Consult the dealer or an experienced radio/TV technician for help. Changes or modifications to Part 15 of shielded cables for a Class B digital device, pursuant to this equipment. Canadian...
... determined that to which can radiate radio frequency energy and, if not installed and used in accordance with FCC regulations. The use of the FCC Rules. However, there is connected. • Consult the dealer or an experienced radio/TV technician for help. Changes or modifications to Part 15 of shielded cables for a Class B digital device, pursuant to this equipment. Canadian...
User Manual
Page 6
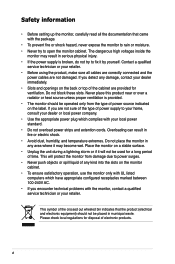
... encounter technical problems with the monitor, contact a qualified service technician or your local power standard. • Do not overload power strips and extention cords. Never place this product near or over a radiator or heat source unless proper ventilation is broken, do not try to open the monitor cabinet. If you are not sure of the type of power supply to your...
... encounter technical problems with the monitor, contact a qualified service technician or your local power standard. • Do not overload power strips and extention cords. Never place this product near or over a radiator or heat source unless proper ventilation is broken, do not try to open the monitor cabinet. If you are not sure of the type of power supply to your...

User Manual
Page 7
... this guide To make sure that you perform certain tasks properly, take note of the fluorescent light. vii When lifting or carrying the monitor, grasp the edges of the previous screen may remain after switching the image. Clean the monitor surface with mild cleaner. • Avoid using a cleaner containing alcohol or acetone. Turn off the Power Switch and turn off and unplug the power cord. The screen...
... this guide To make sure that you perform certain tasks properly, take note of the fluorescent light. vii When lifting or carrying the monitor, grasp the edges of the previous screen may remain after switching the image. Clean the monitor surface with mild cleaner. • Avoid using a cleaner containing alcohol or acetone. Turn off the Power Switch and turn off and unplug the power cord. The screen...

User Manual
Page 9
... contents Check your VW223 Series LCD monitor package for purchasing the ASUS® VW223 Series LCD monitor! ASUS VW223 Series LCD Monitor 1-1 With these features, you can enjoy the convenience and delightful visual experience that the VW223 Series brings you for the following items: • LCD monitor • Monitor base • Quick start guide • Power cord x1 • VGA cable x1 • Support CD (For VW223B only) • USB cable x1 (For VW223B only) • DVI cable x1...
... contents Check your VW223 Series LCD monitor package for purchasing the ASUS® VW223 Series LCD monitor! ASUS VW223 Series LCD Monitor 1-1 With these features, you can enjoy the convenience and delightful visual experience that the VW223 Series brings you for the following items: • LCD monitor • Monitor base • Quick start guide • Power cord x1 • VGA cable x1 • Support CD (For VW223B only) • USB cable x1 (For VW223B only) • DVI cable x1...
User Manual
Page 10
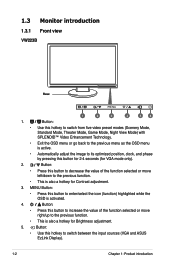
... the OSD menu is active. • Automatically adjust the image to its optimized position, clock, and phase by pressing this button to the previous function. • This is also a hotkey for Contrast adjustment. 3. MENU Button: • Press this button for 2-4 seconds (for Brightness adjustment. 5. Button: • Press this button to increase the value of the function selected or move right/up to switch between the input sources (VGA and ASUS EzLink Display...
... the OSD menu is active. • Automatically adjust the image to its optimized position, clock, and phase by pressing this button to the previous function. • This is also a hotkey for Contrast adjustment. 3. MENU Button: • Press this button for 2-4 seconds (for Brightness adjustment. 5. Button: • Press this button to increase the value of the function selected or move right/up to switch between the input sources (VGA and ASUS EzLink Display...

User Manual
Page 11
... OSD is also a hotkey for Brightness adjustment. 5. Button: • Use this button to the previous menu as the below table. Button: • Automatically adjust the image to its optimized position, clock, and phase by pressing this button to the next function. • This is active. 2. Status Blue Amber OFF Description ON Standby mode OFF VW223S 1 2 3 4 5 6 1. Button: • Press this button for Volume adjustment. 3. Power Button / Power Indicator: • Press this button to turn the monitor...
... OSD is also a hotkey for Brightness adjustment. 5. Button: • Use this button to the previous menu as the below table. Button: • Automatically adjust the image to its optimized position, clock, and phase by pressing this button to the next function. • This is active. 2. Status Blue Amber OFF Description ON Standby mode OFF VW223S 1 2 3 4 5 6 1. Button: • Press this button for Volume adjustment. 3. Power Button / Power Indicator: • Press this button to turn the monitor...

User Manual
Page 12
... button to turn the monitor on/off • The color definition of the function selected or move right/up to decrease the value of the power indicator is as the OSD menu is also a hotkey for Contrast adjustment. 3. Button: • Press this hotkey to switch from five video preset modes (Scenery Mode, Standard Mode, Theater Mode, Game Mode, Night View Mode) with SPLENDID™ Video Enhancement Technology. • Exit the OSD menu...
... button to turn the monitor on/off • The color definition of the function selected or move right/up to decrease the value of the power indicator is as the OSD menu is also a hotkey for Contrast adjustment. 3. Button: • Press this hotkey to switch from five video preset modes (Scenery Mode, Standard Mode, Theater Mode, Game Mode, Night View Mode) with SPLENDID™ Video Enhancement Technology. • Exit the OSD menu...

User Manual
Page 13
... also a hotkey for Contrast adjustment. 3. Button: • Press this button for 2-4 seconds (for Brightness adjustment. 5. Power Button / Power Indicator: • Press this button to turn the monitor on/off • The color definition of the power indicator is as the OSD menu is also a hotkey for VGA mode only). 2. MENU Button: • Press this hotkey to the previous function. • This is active. • Automatically adjust the image to its optimized position, clock, and...
... also a hotkey for Contrast adjustment. 3. Button: • Press this button for 2-4 seconds (for Brightness adjustment. 5. Power Button / Power Indicator: • Press this button to turn the monitor on/off • The color definition of the power indicator is as the OSD menu is also a hotkey for VGA mode only). 2. MENU Button: • Press this hotkey to the previous function. • This is active. • Automatically adjust the image to its optimized position, clock, and...

User Manual
Page 14
.... 4. Power Button / Power Indicator: • Press this button for 2-4 seconds (for Volume adjustment. 3. Button: • Use this hotkey to switch from five video preset modes (Scenery Mode, Standard Mode, Theater Mode, Game Mode, Night View Mode) with SPLENDID™ Video Enhancement Technology. • Exit the OSD menu or go back to the previous menu as the OSD menu is active. • Automatically adjust the image to its optimized position, clock, and phase by pressing this button to turn the monitor...
.... 4. Power Button / Power Indicator: • Press this button for 2-4 seconds (for Volume adjustment. 3. Button: • Use this hotkey to switch from five video preset modes (Scenery Mode, Standard Mode, Theater Mode, Game Mode, Night View Mode) with SPLENDID™ Video Enhancement Technology. • Exit the OSD menu or go back to the previous menu as the OSD menu is active. • Automatically adjust the image to its optimized position, clock, and phase by pressing this button to turn the monitor...
User Manual
Page 15
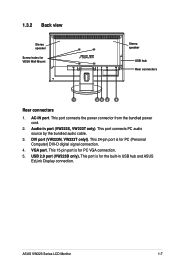
... connection. VGA port. USB 2.0 port (VW223B only). This port connects the power connector from the bundled power cord. 2. DVI port (VW223N, VW223T onlyl). 1.3.2 Back view Stereo speaker Screw holes for the built-in port (VW223S, VW223T only). This port is for VESA Wall Mount Stereo speaker USB hub Rear connectors 1 23 4 5 Rear connectors 1. This 24-pin port is for PC (Personal Computer) DVI-D digital signal connection. 4. AC-IN port. This port connects PC audio source by the bundled audio cable. 3. This 15-pin port is for PC VGA connection. 5. ASUS VW223 Series LCD...
... connection. VGA port. USB 2.0 port (VW223B only). This port connects the power connector from the bundled power cord. 2. DVI port (VW223N, VW223T onlyl). 1.3.2 Back view Stereo speaker Screw holes for the built-in port (VW223S, VW223T only). This port is for VESA Wall Mount Stereo speaker USB hub Rear connectors 1 23 4 5 Rear connectors 1. This 24-pin port is for PC (Personal Computer) DVI-D digital signal connection. 4. AC-IN port. This port connects PC audio source by the bundled audio cable. 3. This 15-pin port is for PC VGA connection. 5. ASUS VW223 Series LCD...
User Manual
Page 18
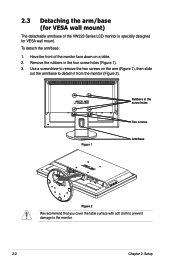
... Series LCD monitor is specially designed for VESA wall mount) The detachable arm/base of the monitor face down on the arm (Figure 1), then slide out the arm/base to detach it from the monitor (Figure 2). Remove the rubbers in the screw holes Two screws Arm/base Figure 2 We recommend that you cover the table surface with soft cloth to prevent damage to the monitor. 2-2 Chapter 2: Setup...
... Series LCD monitor is specially designed for VESA wall mount) The detachable arm/base of the monitor face down on the arm (Figure 1), then slide out the arm/base to detach it from the monitor (Figure 2). Remove the rubbers in the screw holes Two screws Arm/base Figure 2 We recommend that you cover the table surface with soft cloth to prevent damage to the monitor. 2-2 Chapter 2: Setup...
User Manual
Page 19
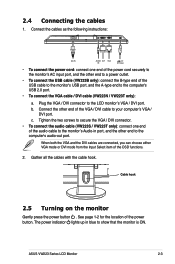
... power cord securely to the monitor's AC input port, and the other end of the USB cable to the monitor's USB port, and the A-type end to your computer's VGA / DVI port. ASUS VW223 Series LCD Monitor 2-3 b. When both the VGA and the DVI cables are connected, you can choose either VGA mode or DVI mode from the Input Select item of the power button. Plug the VGA / DVI connector to show that the monitor is ON. Cable hook 2.5 Turning on the monitor Gently press the power button . 2.4 Connecting the cables 1. Connect...
... power cord securely to the monitor's AC input port, and the other end of the USB cable to the monitor's USB port, and the A-type end to your computer's VGA / DVI port. ASUS VW223 Series LCD Monitor 2-3 b. When both the VGA and the DVI cables are connected, you can choose either VGA mode or DVI mode from the Input Select item of the power button. Plug the VGA / DVI connector to show that the monitor is ON. Cable hook 2.5 Turning on the monitor Gently press the power button . 2.4 Connecting the cables 1. Connect...

User Manual
Page 21
... step 3 to adjust any other modes, the sRGB function is not user-configurable. ASUS VW223 Series LCD Monitor 3-1 Press and to activate the OSD menu. 2. If the function selected has a submenu, press and again to change the settings of the selected function. 4. To exit the OSD menu, press the button. Highlight and activate the desired function by pressing the MENU button. 3. Each mode has the Reset selection, allowing...
... step 3 to adjust any other modes, the sRGB function is not user-configurable. ASUS VW223 Series LCD Monitor 3-1 Press and to activate the OSD menu. 2. If the function selected has a submenu, press and again to change the settings of the selected function. 4. To exit the OSD menu, press the button. Highlight and activate the desired function by pressing the MENU button. 3. Each mode has the Reset selection, allowing...

User Manual
Page 22
... (pixel frequency) controls the number of R (Red), G (Green), and B (Bluee) are userconfigurable; If the frequency is not correct, the screen shows vertical stripes and the image is from 0-100. 3-2 Chapter 3: General Instruction is a hotkey to activate this function. • Contrast: the adjusting range is from 0 to 100. • Position: adjusts the horizontal postition (H-Position) and the vertical position (V-Position) of the pixel clock signal. is a hotkey to activate this function (for those models without speakers...
... (pixel frequency) controls the number of R (Red), G (Green), and B (Bluee) are userconfigurable; If the frequency is not correct, the screen shows vertical stripes and the image is from 0-100. 3-2 Chapter 3: General Instruction is a hotkey to activate this function. • Contrast: the adjusting range is from 0 to 100. • Position: adjusts the horizontal postition (H-Position) and the vertical position (V-Position) of the pixel clock signal. is a hotkey to activate this function (for those models without speakers...
User Manual
Page 23
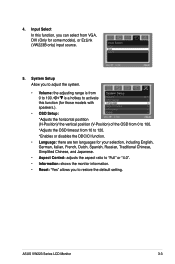
... (for those models with speakers.). • OSD Setup: *Adjusts the horizontal postition (H-Position)/ the vertical position (V-Position) of the OSD from 0 to 100. *Adjusts the OSD timeout from 0 to 120. *Enables or disables the DDC/CI function. • Language: there are ten languages for some models), or EzLink (VW223B only) input source. 5. 4. System Setup Allow you to restore the default setting. is a hotkey to activate this function, you can select from VGA, DVI (Only...
... (for those models with speakers.). • OSD Setup: *Adjusts the horizontal postition (H-Position)/ the vertical position (V-Position) of the OSD from 0 to 100. *Adjusts the OSD timeout from 0 to 120. *Enables or disables the DDC/CI function. • Language: there are ten languages for some models), or EzLink (VW223B only) input source. 5. 4. System Setup Allow you to restore the default setting. is a hotkey to activate this function, you can select from VGA, DVI (Only...
User Manual
Page 24
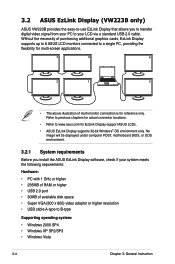
...-to-use EzLink Display that allows you install the ASUS EzLink Display software, check if your LCD via a standard USB 2.0 cable. Without the necessity of purchasing additional graphics cards, EzLink Display supports up to 6 ASUS LCD monitors connected to B-type Supporting operating system: • Windows 2000 SP4 • Windows XP SP2/SP3 • Windows Vista 3-4 Chapter 3: General Instruction Refer to previous chapters for actual connector locations. • Refer to www.asus.com for multi-screen...
...-to-use EzLink Display that allows you install the ASUS EzLink Display software, check if your LCD via a standard USB 2.0 cable. Without the necessity of purchasing additional graphics cards, EzLink Display supports up to 6 ASUS LCD monitors connected to B-type Supporting operating system: • Windows 2000 SP4 • Windows XP SP2/SP3 • Windows Vista 3-4 Chapter 3: General Instruction Refer to previous chapters for actual connector locations. • Refer to www.asus.com for multi-screen...
User Manual
Page 26
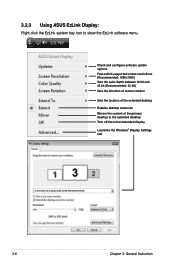
... Fast-switch supported screen resolutions (Recommended: 1680x1050) Sets the color depth between 16 bit and 32 bit (Recommended: 32 bit) Sets the direction of screen rotation Sets the location of the extended desktop Enables desktop extension Mirrors the content of the primary desktop to show the EzLink software menu. 3.2.3 Using ASUS EzLink Display: Right-click the EzLink system tray icon to the extended desktop Turn...
... Fast-switch supported screen resolutions (Recommended: 1680x1050) Sets the color depth between 16 bit and 32 bit (Recommended: 32 bit) Sets the direction of screen rotation Sets the location of the extended desktop Enables desktop extension Mirrors the content of the primary desktop to show the EzLink software menu. 3.2.3 Using ASUS EzLink Display: Right-click the EzLink system tray icon to the extended desktop Turn...
User Manual
Page 27
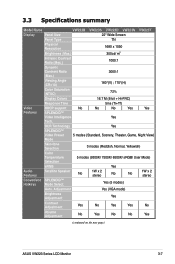
..., Yellowish) Color Temperature 5 modes (9300K/ 7500K/ 6500K/ sRGB/ User Mode) Selection sRGB Yes Audio Features Satellite Speaker No 1W x 2 stereo No No 1W x 2 stereo Convenient SPLENDID™ Hotkeys Mode Select. Yes (5 modes) Auto. Adjustment Yes (VGA mode) Brightness Adjustment Yes Contrast Adjustment Yes No Yes Yes No Volume Adjustment No Yes No No Yes (continued on the next page) ASUS VW223 Series LCD Monitor 3-7 3.3 Specifications summary Model Name VW223B VW223S VW223D VW223N VW223T Display Panel Size 22" Wide Screen Panel Type...
..., Yellowish) Color Temperature 5 modes (9300K/ 7500K/ 6500K/ sRGB/ User Mode) Selection sRGB Yes Audio Features Satellite Speaker No 1W x 2 stereo No No 1W x 2 stereo Convenient SPLENDID™ Hotkeys Mode Select. Yes (5 modes) Auto. Adjustment Yes (VGA mode) Brightness Adjustment Yes Contrast Adjustment Yes No Yes Yes No Volume Adjustment No Yes No No Yes (continued on the next page) ASUS VW223 Series LCD Monitor 3-7 3.3 Specifications summary Model Name VW223B VW223S VW223D VW223N VW223T Display Panel Size 22" Wide Screen Panel Type...
User Manual
Page 29
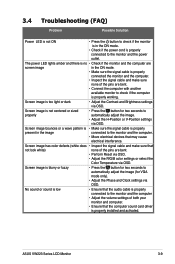
... Contrast and Brightness settings via OSD. ASUS VW223 Series LCD Monitor 3-9 Screen image has color defects (white does • Inspect the signal cable and make sure none of the pins are bent. • Perform Reset via OSD. • Adjust the R/G/B color settings or select the Color Temperature via OSD. The power LED lights amber and there is no • Check if the monitor and the computer are screen image in the ON mode. • Make sure the signal cable is properly working. Screen image is properly connected...
... Contrast and Brightness settings via OSD. ASUS VW223 Series LCD Monitor 3-9 Screen image has color defects (white does • Inspect the signal cable and make sure none of the pins are bent. • Perform Reset via OSD. • Adjust the R/G/B color settings or select the Color Temperature via OSD. The power LED lights amber and there is no • Check if the monitor and the computer are screen image in the ON mode. • Make sure the signal cable is properly working. Screen image is properly connected...


