

User Manual
Page 9
...8226; Support CD (For VW223B only) • USB cable x1 (For VW223B only) • DVI cable x1 (For VW223N / VW223T only) • Audio cable x1 (For VW223S / VW223T only) If any of features that the VW223 Series brings you for purchasing the ASUS® VW223 Series LCD monitor! The ...latest widescreen LCD monitor from ASUS provides a crisper, broader...
...8226; Support CD (For VW223B only) • USB cable x1 (For VW223B only) • DVI cable x1 (For VW223N / VW223T only) • Audio cable x1 (For VW223S / VW223T only) If any of features that the VW223 Series brings you for purchasing the ASUS® VW223 Series LCD monitor! The ...latest widescreen LCD monitor from ASUS provides a crisper, broader...

User Manual
Page 11
...the next function. • This is as VW223B. Power Button / Power Indicator: • Press this button to decrease the value of the function selected or move right/up to the previous function. • This is active. 2. ASUS VW223 Series LCD Monitor 1-3 Power Button / Power ...) highlighted while the OSD is as the OSD menu is also a hotkey for Brightness adjustment. 5. Status Blue Amber OFF Description ON Standby mode OFF VW223S 1 2 3 4 5 6 1. Button: • Automatically adjust the image to the previous menu as the below table. 6. Button: •...
...the next function. • This is as VW223B. Power Button / Power Indicator: • Press this button to decrease the value of the function selected or move right/up to the previous function. • This is active. 2. ASUS VW223 Series LCD Monitor 1-3 Power Button / Power ...) highlighted while the OSD is as the OSD menu is also a hotkey for Brightness adjustment. 5. Status Blue Amber OFF Description ON Standby mode OFF VW223S 1 2 3 4 5 6 1. Button: • Automatically adjust the image to the previous menu as the below table. 6. Button: •...

User Manual
Page 13
... Mode, Game Mode, Night View Mode) with SPLENDID™ Video Enhancement Technology. • Exit the OSD menu or go back to the previous menu as VW223B. ASUS VW223 Series LCD Monitor 1-5 Button: • Press this button to decrease the value of the function selected or move right/up to the previous function. •...
... Mode, Game Mode, Night View Mode) with SPLENDID™ Video Enhancement Technology. • Exit the OSD menu or go back to the previous menu as VW223B. ASUS VW223 Series LCD Monitor 1-5 Button: • Press this button to decrease the value of the function selected or move right/up to the previous function. •...
User Manual
Page 15
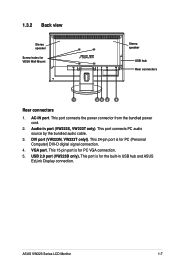
AC-IN port. DVI port (VW223N, VW223T onlyl). USB 2.0 port (VW223B only). Audio-in USB hub and ASUS EzLink Display connection. VGA port. ASUS VW223 Series LCD Monitor 1-7 1.3.2 Back view Stereo speaker Screw holes for PC (Personal Computer) DVI-D digital signal connection. 4. This port connects PC audio source by the ...
AC-IN port. DVI port (VW223N, VW223T onlyl). USB 2.0 port (VW223B only). Audio-in USB hub and ASUS EzLink Display connection. VGA port. ASUS VW223 Series LCD Monitor 1-7 1.3.2 Back view Stereo speaker Screw holes for PC (Personal Computer) DVI-D digital signal connection. 4. This port connects PC audio source by the ...
User Manual
Page 17
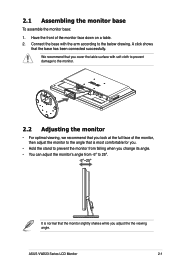
... at the full face of the monitor face down on a table. 2. A click shows that the monitor slightly shakes while you adjust the the viewing angle. ASUS VW223 Series LCD Monitor 2-1 Have the front of the monitor, then adjust the monitor to the angle that is normal that the base has been connected...
... at the full face of the monitor face down on a table. 2. A click shows that the monitor slightly shakes while you adjust the the viewing angle. ASUS VW223 Series LCD Monitor 2-1 Have the front of the monitor, then adjust the monitor to the angle that is normal that the base has been connected...
User Manual
Page 18
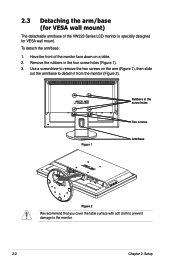
... with soft cloth to prevent damage to the monitor. 2-2 Chapter 2: Setup Use a screwdriver to detach it from the monitor (Figure 2). Have the front of the VW223 Series LCD monitor is specially designed for VESA wall mount) The detachable arm/base of the monitor face down on the arm (Figure 1), then slide...
... with soft cloth to prevent damage to the monitor. 2-2 Chapter 2: Setup Use a screwdriver to detach it from the monitor (Figure 2). Have the front of the VW223 Series LCD monitor is specially designed for VESA wall mount) The detachable arm/base of the monitor face down on the arm (Figure 1), then slide...
User Manual
Page 19
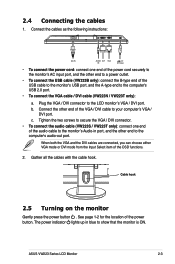
...end to a power outlet. • To connect the USB cable (VW223B only): connect the B-type end of the VGA / DVI cable to the LCD monitor's VGA / DVI port. See page 1-2 for the location of the OSD functions. 2. ASUS VW223 Series LCD Monitor 2-3 Tighten the two screws to secure the VGA /... DVI connector. • To connect the audio cable (VW223S / VW223T only): connect one end of the power cord securely to the monitor's AC input...
...end to a power outlet. • To connect the USB cable (VW223B only): connect the B-type end of the VGA / DVI cable to the LCD monitor's VGA / DVI port. See page 1-2 for the location of the OSD functions. 2. ASUS VW223 Series LCD Monitor 2-3 Tighten the two screws to secure the VGA /... DVI connector. • To connect the audio cable (VW223S / VW223T only): connect one end of the power cord securely to the monitor's AC input...

User Manual
Page 21
Press the MENU button to reconfigure 1. Repeat step 2 and step 3 to maintain your preference. ASUS VW223 Series LCD Monitor 3-1 3.1 OSD (On-Screen Display) menu 3.1.1 How to activate the OSD menu. 2. To exit the OSD menu, press the button. Spendid This function ...
Press the MENU button to reconfigure 1. Repeat step 2 and step 3 to maintain your preference. ASUS VW223 Series LCD Monitor 3-1 3.1 OSD (On-Screen Display) menu 3.1.1 How to activate the OSD menu. 2. To exit the OSD menu, press the button. Spendid This function ...
User Manual
Page 23
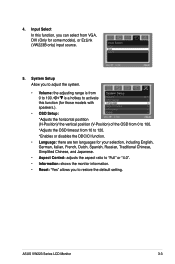
... OSD timeout from 10 to 120. *Enables or disables the DDC/CI function. • Language: there are ten languages for some models), or EzLink (VW223B only) input source. 5. ASUS VW223 Series LCD Monitor 3-3 4. System Setup Allow you can select from 0 to adjust the system. • Volume: the adjusting range is from VGA, DVI...
... OSD timeout from 10 to 120. *Enables or disables the DDC/CI function. • Language: there are ten languages for some models), or EzLink (VW223B only) input source. 5. ASUS VW223 Series LCD Monitor 3-3 4. System Setup Allow you can select from 0 to adjust the system. • Volume: the adjusting range is from VGA, DVI...
User Manual
Page 25
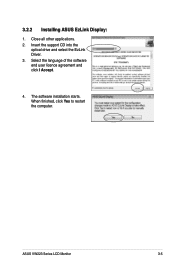
When finished, click Yes to restart the computer. Select the language of the software end user licence agreement and click I Accept. 4. Close all other applications. 2. The software installation starts. 3.2.2 Installing ASUS EzLink Display: 1. Insert the support CD into the optical drive and select the EzLink Driver. 3. ASUS VW223 Series LCD Monitor 3-5
When finished, click Yes to restart the computer. Select the language of the software end user licence agreement and click I Accept. 4. Close all other applications. 2. The software installation starts. 3.2.2 Installing ASUS EzLink Display: 1. Insert the support CD into the optical drive and select the EzLink Driver. 3. ASUS VW223 Series LCD Monitor 3-5
User Manual
Page 27
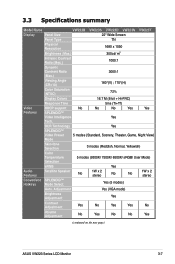
... Yes Contrast Adjustment Yes No Yes Yes No Volume Adjustment No Yes No No Yes (continued on the next page) ASUS VW223 Series LCD Monitor 3-7 Yes (5 modes) Auto. 3.3 Specifications summary Model Name VW223B VW223S VW223D VW223N VW223T Display Panel Size 22" Wide Screen Panel Type TN Physical Resolution Brightness (Max.) 1680 x 1050 300cd/ m2...
... Yes Contrast Adjustment Yes No Yes Yes No Volume Adjustment No Yes No No Yes (continued on the next page) ASUS VW223 Series LCD Monitor 3-7 Yes (5 modes) Auto. 3.3 Specifications summary Model Name VW223B VW223S VW223D VW223N VW223T Display Panel Size 22" Wide Screen Panel Type TN Physical Resolution Brightness (Max.) 1680 x 1050 300cd/ m2...
User Manual
Page 29
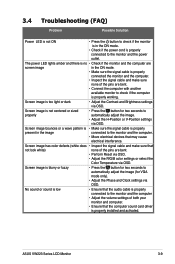
... sized • Press the button for VGA mode only). • Adjust the Phase and Clock settings via OSD. Screen image is properly installed and activated. ASUS VW223 Series LCD Monitor 3-9 Screen image is properly working. Screen image has color defects (white does • Inspect the signal cable and make sure none of...
... sized • Press the button for VGA mode only). • Adjust the Phase and Clock settings via OSD. Screen image is properly installed and activated. ASUS VW223 Series LCD Monitor 3-9 Screen image is properly working. Screen image has color defects (white does • Inspect the signal cable and make sure none of...