User Guide
Page 2
...DAMAGES ARISING FROM ANY DEFECT OR ERROR IN THIS MANUAL OR PRODUCT. Table of the LCD monitor 1-4 Chapter.2:. Setup 2.1. Specifications summary 3-4 3.3. ASUS ASSUMES NO RESPONSIBILITY OR LIABILITY FOR ANY ERRORS OR INACCURACIES THAT MAY APPEAR IN THIS ...MANUAL, INCLUDING THE PRODUCTS AND SOFTWARE DESCRIBED IN IT. Welcome 1-1 1.2. Monitor.introduction 1-3 1.4.1 Front of the LCD monitor 1-3 1.4.2 Rear of contents Notices...iii...
...DAMAGES ARISING FROM ANY DEFECT OR ERROR IN THIS MANUAL OR PRODUCT. Table of the LCD monitor 1-4 Chapter.2:. Setup 2.1. Specifications summary 3-4 3.3. ASUS ASSUMES NO RESPONSIBILITY OR LIABILITY FOR ANY ERRORS OR INACCURACIES THAT MAY APPEAR IN THIS ...MANUAL, INCLUDING THE PRODUCTS AND SOFTWARE DESCRIBED IN IT. Welcome 1-1 1.2. Monitor.introduction 1-3 1.4.1 Front of the LCD monitor 1-3 1.4.2 Rear of contents Notices...iii...
User Guide
Page 5
... of the previous screen may be removed with a cloth dampened with .the.monitor: • The screen may drip inside the monitor and cause an electric shock. Clean the monitor surface with the LCD. Never spray cleaner directly on the screen, as it on the desktop pattern... NOTE: Tips and additional information to complete a task. Care & Cleaning • Before you lift or reposition your monitor, it . When lifting or carrying the monitor, grasp the edges of the fluorescent light. Stubborn stains may remain after switching the image. Conventions.used.in completing a ...
... of the previous screen may be removed with a cloth dampened with .the.monitor: • The screen may drip inside the monitor and cause an electric shock. Clean the monitor surface with the LCD. Never spray cleaner directly on the screen, as it on the desktop pattern... NOTE: Tips and additional information to complete a task. Care & Cleaning • Before you lift or reposition your monitor, it . When lifting or carrying the monitor, grasp the edges of the fluorescent light. Stubborn stains may remain after switching the image. Conventions.used.in completing a ...
User Guide
Page 7
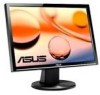
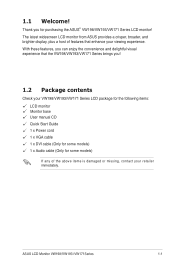
1.1 Welcome! ASUS LCD Monitor VW198/VW193 /VW171Series 1-1 The latest widescreen LCD monitor from ASUS provides a crisper, broader, and brighter display, plus a host of the above items is damaged or missing, contact your retailer immediately. Thank you ! 1.2 Package contents Check ...
1.1 Welcome! ASUS LCD Monitor VW198/VW193 /VW171Series 1-1 The latest widescreen LCD monitor from ASUS provides a crisper, broader, and brighter display, plus a host of the above items is damaged or missing, contact your retailer immediately. Thank you ! 1.2 Package contents Check ...
User Guide
Page 9
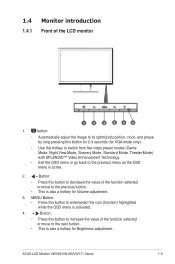
... to the previous menu as the OSD menu is also a hotkey for VGA mode only). • Use this button to decrease the value of .the.LCD.monitor 1 2 3 4 56 1. Button: • Press this hotkey to switch from five video preset modes (Game Mode, Night View Mode, Scenery Mode, Standard Mode, Theater Mode) with... is active. 2. button: • Automatically adjust the image to its optimized position, clock, and phase by long pressing this button for 2-4 seconds (for Brightness adjustment. ASUS LCD Monitor VW198/VW193/VW171 Series...
... to the previous menu as the OSD menu is also a hotkey for VGA mode only). • Use this button to decrease the value of .the.LCD.monitor 1 2 3 4 56 1. Button: • Press this hotkey to switch from five video preset modes (Game Mode, Night View Mode, Scenery Mode, Standard Mode, Theater Mode) with... is active. 2. button: • Automatically adjust the image to its optimized position, clock, and phase by long pressing this button for 2-4 seconds (for Brightness adjustment. ASUS LCD Monitor VW198/VW193/VW171 Series...
User Guide
Page 10
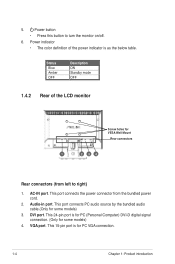
....holes.for some models) 4. VESA.Wall.Mount Rear.connectors 1 234 Rear.connectors.(from the bundled power cord. 2. Power indicator • The color definition of .the.LCD.monitor. Power button • Press this button to .right) 1. VGA.port. DVI.port. AC-IN.port. This port connects PC audio source by the bundled audio...
....holes.for some models) 4. VESA.Wall.Mount Rear.connectors 1 234 Rear.connectors.(from the bundled power cord. 2. Power indicator • The color definition of .the.LCD.monitor. Power button • Press this button to .right) 1. VGA.port. DVI.port. AC-IN.port. This port connects PC audio source by the bundled audio...
User Guide
Page 11
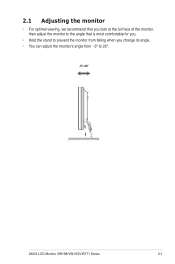
2.1 Adjusting the monitor • For optimal viewing, we recommend that you look at the full face of the monitor, then adjust the monitor to the angle that is most comfortable for you. • Hold the stand to prevent the monitor from falling when you change its angle. • You can adjust the monitor's angle from -5º to 20º. ..-5º~20º ASUS LCD Monitor VW198/VW193/VW171 Series 2-1
2.1 Adjusting the monitor • For optimal viewing, we recommend that you look at the full face of the monitor, then adjust the monitor to the angle that is most comfortable for you. • Hold the stand to prevent the monitor from falling when you change its angle. • You can adjust the monitor's angle from -5º to 20º. ..-5º~20º ASUS LCD Monitor VW198/VW193/VW171 Series 2-1
User Guide
Page 12
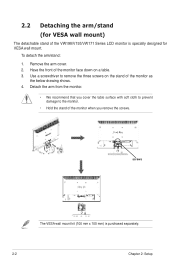
... front of the VW198/V193/VW171 Series LCD monitor is purchased separately. 2-2 Chapter 2: Setup Detach the arm from the monitor. • We recommend that you remove the screws. Remove the arm cover. 2. Use a screwdriver to the monitor. • Hold the stand of the monitor as the below drawing shows. 4. To...VESA wall mount kit (100 mm x 100 mm) is specially designed for VESA wall mount) The detachable stand of the monitor face down on the stand of the monitor when you cover the table surface with soft cloth to prevent damage to remove the three screws on a table. 3. 2.2 ...
... front of the VW198/V193/VW171 Series LCD monitor is purchased separately. 2-2 Chapter 2: Setup Detach the arm from the monitor. • We recommend that you remove the screws. Remove the arm cover. 2. Use a screwdriver to the monitor. • Hold the stand of the monitor as the below drawing shows. 4. To...VESA wall mount kit (100 mm x 100 mm) is specially designed for VESA wall mount) The detachable stand of the monitor face down on the stand of the monitor when you cover the table surface with soft cloth to prevent damage to remove the three screws on a table. 3. 2.2 ...
User Guide
Page 13
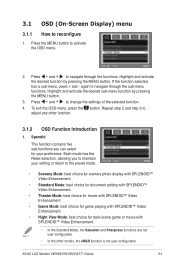
... change the settings of the selected function. 4. If the function selected has a sub-menu, press + and - Press and to navigate through the sub-menu functions. ASUS LCD Monitor VW198/VW193/VW171 Series 3-1 To exit the OSD menu, press the button. Highlight and activate the desired function by pressing the MENU button. 3. again to...
... change the settings of the selected function. 4. If the function selected has a sub-menu, press + and - Press and to navigate through the sub-menu functions. ASUS LCD Monitor VW198/VW193/VW171 Series 3-1 To exit the OSD menu, press the button. Highlight and activate the desired function by pressing the MENU button. 3. again to...
User Guide
Page 15
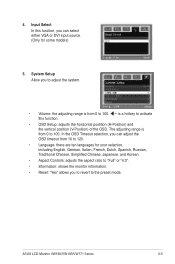
System Setup Allow you to adjust the system. • Volume: the adjusting range is from 0 to 100. ASUS LCD Monitor VW198/VW193/VW171 Series 3-3 In the OSD Timeout selection, you can select either VGA or DVI input source. (Only for your selection, ...Spanish, Russian, Traditional Chinese, Simplified Chinese, Japanese, and Korean. • Aspect Controls: adjusts the aspect ratio to "Full" or "4:3". • Information: shows the monitor information. • Reset: "Yes" allows you can adjust the OSD timeout from 0 to 100. Input Select In this function. • OSD Setup: adjusts the ...
System Setup Allow you to adjust the system. • Volume: the adjusting range is from 0 to 100. ASUS LCD Monitor VW198/VW193/VW171 Series 3-3 In the OSD Timeout selection, you can select either VGA or DVI input source. (Only for your selection, ...Spanish, Russian, Traditional Chinese, Simplified Chinese, Japanese, and Korean. • Aspect Controls: adjusts the aspect ratio to "Full" or "4:3". • Information: shows the monitor information. • Reset: "Yes" allows you can adjust the OSD timeout from 0 to 100. Input Select In this function. • OSD Setup: adjusts the ...

User Guide
Page 17
...connected to properly automatically adjust the image. • Adjust the H-Position or V-Position settings via OSD. Screen image is properly connected to the monitor and the power outlet. Screen image is not centered or sized • Press the button for VGA mode only). • Adjust the ...bounces or a wave pattern is • Make sure the signal cable is properly working. ASUS LCD Monitor VW198/VW193/VW171 Series 3-5 The power LED lights amber and there is no • Check if the monitor and the computer are screen image in the ON mode. • Make sure the signal ...
...connected to properly automatically adjust the image. • Adjust the H-Position or V-Position settings via OSD. Screen image is properly connected to the monitor and the power outlet. Screen image is not centered or sized • Press the button for VGA mode only). • Adjust the ...bounces or a wave pattern is • Make sure the signal cable is properly working. ASUS LCD Monitor VW198/VW193/VW171 Series 3-5 The power LED lights amber and there is no • Check if the monitor and the computer are screen image in the ON mode. • Make sure the signal ...


