User Guide
Page 2
... INFORMATIONAL USE ONLY, AND ARE SUBJECT TO CHANGE AT ANY TIME WITHOUT NOTICE, AND SHOULD NOT BE CONSTRUED AS A COMMITMENT BY ASUS. ii Product.introduction. 1.1. Package.contents 1-1 1.3. Monitor.introduction 1-3 1.4.1 Front of the LCD monitor 1-3 1.4.2 Rear of contents Notices...iii Safety.information iv Care.&.Cleaning v Chapter.1:. OSD.(On-Screen.Display).menu 3-1 3.1.1 How to infringe. Troubleshooting...
... INFORMATIONAL USE ONLY, AND ARE SUBJECT TO CHANGE AT ANY TIME WITHOUT NOTICE, AND SHOULD NOT BE CONSTRUED AS A COMMITMENT BY ASUS. ii Product.introduction. 1.1. Package.contents 1-1 1.3. Monitor.introduction 1-3 1.4.1 Front of the LCD monitor 1-3 1.4.2 Rear of contents Notices...iii Safety.information iv Care.&.Cleaning v Chapter.1:. OSD.(On-Screen.Display).menu 3-1 3.1.1 How to infringe. Troubleshooting...
User Guide
Page 5
...cleaner containing alcohol or acetone. NOTE: Tips and additional information to complete a task. Care & Cleaning • Before you lift or reposition your monitor, it is displayed for hours, an afterimage of the previous screen may remain after switching the image. IMPORTANT: Information that the flicker disappears. &#...the screen, as it may be removed with a cloth dampened with the LCD. Use a cleaner intended for hours. • When the screen becomes black or flashes, or cannot work anymore, contact your monitor off the Power Switch and turn off the Power Switch for use . &#...
...cleaner containing alcohol or acetone. NOTE: Tips and additional information to complete a task. Care & Cleaning • Before you lift or reposition your monitor, it is displayed for hours, an afterimage of the previous screen may remain after switching the image. IMPORTANT: Information that the flicker disappears. &#...the screen, as it may be removed with a cloth dampened with the LCD. Use a cleaner intended for hours. • When the screen becomes black or flashes, or cannot work anymore, contact your monitor off the Power Switch and turn off the Power Switch for use . &#...
User Guide
Page 7
... CD Quick Start Guide 1 x Power cord 1 x VGA cable 1 x DVI cable (Only for some models) 1 x Audio cable (Only for purchasing the ASUS® VW198/VW193/VW171 Series LCD monitor! The latest widescreen LCD monitor from ASUS provides a crisper, broader, and brighter display, plus a host of features that the VW198/VW193/VW171 Series brings you for some models...
... CD Quick Start Guide 1 x Power cord 1 x VGA cable 1 x DVI cable (Only for some models) 1 x Audio cable (Only for purchasing the ASUS® VW198/VW193/VW171 Series LCD monitor! The latest widescreen LCD monitor from ASUS provides a crisper, broader, and brighter display, plus a host of features that the VW198/VW193/VW171 Series brings you for some models...
User Guide
Page 9
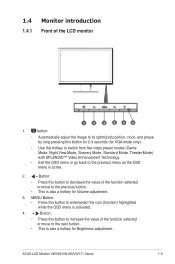
1.4 Monitor introduction 1.4.1. button: • Automatically adjust the image to its optimized position, clock, and phase by long pressing this button to increase the value of the ... this button to decrease the value of the function selected or move to the previous menu as the OSD menu is activated. 4. ASUS LCD Monitor VW198/VW193/VW171 Series 1-3 Front.of.the.LCD.monitor 1 2 3 4 56 1. MENU Button: • Press this hotkey to switch from five video preset modes (Game Mode, Night View Mode, Scenery Mode...
1.4 Monitor introduction 1.4.1. button: • Automatically adjust the image to its optimized position, clock, and phase by long pressing this button to increase the value of the ... this button to decrease the value of the function selected or move to the previous menu as the OSD menu is activated. 4. ASUS LCD Monitor VW198/VW193/VW171 Series 1-3 Front.of.the.LCD.monitor 1 2 3 4 56 1. MENU Button: • Press this hotkey to switch from five video preset modes (Game Mode, Night View Mode, Scenery Mode...
User Guide
Page 10
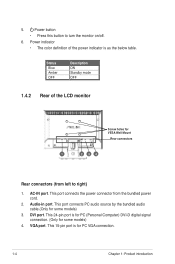
....(from the bundled power cord. 2. This 15-pin port is as the below table. 5. This port connects the power connector from .left.to turn the monitor on/off. 6. DVI.port. Power button • Press this button to .right) 1. Status Blue Amber OFF Description ON Standby mode OFF 1.4.2. AC-IN.port. This....(Only for PC VGA connection. 1-4 Chapter 1: Product introduction Rear.of the power indicator is for some models) 4. Power indicator • The color definition of .the.LCD.monitor.
....(from the bundled power cord. 2. This 15-pin port is as the below table. 5. This port connects the power connector from .left.to turn the monitor on/off. 6. DVI.port. Power button • Press this button to .right) 1. Status Blue Amber OFF Description ON Standby mode OFF 1.4.2. AC-IN.port. This....(Only for PC VGA connection. 1-4 Chapter 1: Product introduction Rear.of the power indicator is for some models) 4. Power indicator • The color definition of .the.LCD.monitor.
User Guide
Page 11
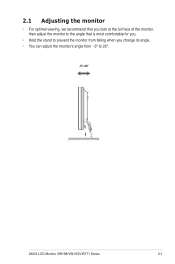
2.1 Adjusting the monitor • For optimal viewing, we recommend that you look at the full face of the monitor, then adjust the monitor to the angle that is most comfortable for you. • Hold the stand to prevent the monitor from falling when you change its angle. • You can adjust the monitor's angle from -5º to 20º. ..-5º~20º ASUS LCD Monitor VW198/VW193/VW171 Series 2-1
2.1 Adjusting the monitor • For optimal viewing, we recommend that you look at the full face of the monitor, then adjust the monitor to the angle that is most comfortable for you. • Hold the stand to prevent the monitor from falling when you change its angle. • You can adjust the monitor's angle from -5º to 20º. ..-5º~20º ASUS LCD Monitor VW198/VW193/VW171 Series 2-1
User Guide
Page 12
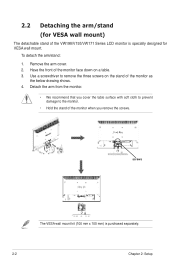
... the below drawing shows. 4. Use a screwdriver to the monitor. • Hold the stand of the VW198/V193/VW171 Series LCD monitor is purchased separately. 2-2 Chapter 2: Setup Detach the arm from the monitor. • We recommend that you cover the table surface with soft cloth to prevent damage ...to remove the three screws on the stand of the monitor face down on a table....
... the below drawing shows. 4. Use a screwdriver to the monitor. • Hold the stand of the VW198/V193/VW171 Series LCD monitor is purchased separately. 2-2 Chapter 2: Setup Detach the arm from the monitor. • We recommend that you cover the table surface with soft cloth to prevent damage ...to remove the three screws on the stand of the monitor face down on a table....
User Guide
Page 13
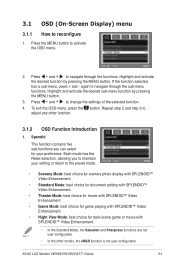
.... • In the other function. 3.1.2 OSD Function Introduction 1. Highlight and activate the desired function by pressing the MENU button. 3. Repeat step 2 and step 3 to reconfigure 1. ASUS LCD Monitor VW198/VW193/VW171 Series 3-1 Press the MENU button to change the settings of the selected function. 4. 3.1 OSD (On-Screen Display) menu 3.1.1 How to adjust any...
.... • In the other function. 3.1.2 OSD Function Introduction 1. Highlight and activate the desired function by pressing the MENU button. 3. Repeat step 2 and step 3 to reconfigure 1. ASUS LCD Monitor VW198/VW193/VW171 Series 3-1 Press the MENU button to change the settings of the selected function. 4. 3.1 OSD (On-Screen Display) menu 3.1.1 How to adjust any...
User Guide
Page 15
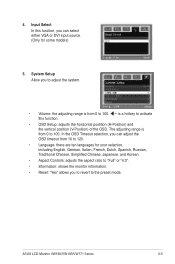
... Chinese, Simplified Chinese, Japanese, and Korean. • Aspect Controls: adjusts the aspect ratio to "Full" or "4:3". • Information: shows the monitor information. • Reset: "Yes" allows you to revert to activate this function, you to adjust the system. • Volume: the adjusting range... is from 0 to 100. ASUS LCD Monitor VW198/VW193/VW171 Series 3-3 is a hotkey to the preset mode. The adjusting range is from 0 to 100. Input Select In this function...
... Chinese, Simplified Chinese, Japanese, and Korean. • Aspect Controls: adjusts the aspect ratio to "Full" or "4:3". • Information: shows the monitor information. • Reset: "Yes" allows you to revert to activate this function, you to adjust the system. • Volume: the adjusting range... is from 0 to 100. ASUS LCD Monitor VW198/VW193/VW171 Series 3-3 is a hotkey to the preset mode. The adjusting range is from 0 to 100. Input Select In this function...

User Guide
Page 17
... properly working. Screen image bounces or a wave pattern is • Make sure the signal cable is properly present in the image connected to the monitor and the power outlet. ASUS LCD Monitor VW198/VW193/VW171 Series 3-5 3.3 Troubleshooting (FAQ) Problem Possible Solution Power LED is not ON • Press the button to check if the...
... properly working. Screen image bounces or a wave pattern is • Make sure the signal cable is properly present in the image connected to the monitor and the power outlet. ASUS LCD Monitor VW198/VW193/VW171 Series 3-5 3.3 Troubleshooting (FAQ) Problem Possible Solution Power LED is not ON • Press the button to check if the...


