
User Manual
Page 7
... If any of features that the monitor brings you can enjoy the convenience and delightful visual experience that enhance your viewing experience. The latest widescreen LED monitor from ASUS provides a crisper, broader, and brighter display, plus a host of the above items is damaged or missing, contact your package for purchasing the...
... If any of features that the monitor brings you can enjoy the convenience and delightful visual experience that enhance your viewing experience. The latest widescreen LED monitor from ASUS provides a crisper, broader, and brighter display, plus a host of the above items is damaged or missing, contact your package for purchasing the...
User Manual
Page 9
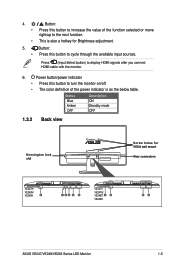
... adjustment. 5. 4. • • Button: Press this button to increase the value of the power indicator is also a hotkey for VESA wall mount Rear connectors VE247H/ VE248H/ VE249H 2 134 5 6 VE247T/ VE247S/ VE248T/ 1 2 VE248S 56 ASUS VE247/VE248/VE249 Series LED Monitor 1-3
... adjustment. 5. 4. • • Button: Press this button to increase the value of the power indicator is also a hotkey for VESA wall mount Rear connectors VE247H/ VE248H/ VE249H 2 134 5 6 VE247T/ VE247S/ VE248T/ 1 2 VE248S 56 ASUS VE247/VE248/VE249 Series LED Monitor 1-3

User Manual
Page 11
Assemble the base and the arm by fastening the bundled screw. ASUS VE247/VE248/VE249 Series LED Monitor 2-1 Release Lock 2.1 Assembling the monitor base To assemble the monitor base: 1. Have the front of the monitor, then adjust the monitor to the angle ...
Assemble the base and the arm by fastening the bundled screw. ASUS VE247/VE248/VE249 Series LED Monitor 2-1 Release Lock 2.1 Assembling the monitor base To assemble the monitor base: 1. Have the front of the monitor, then adjust the monitor to the angle ...
User Manual
Page 12
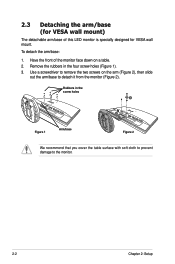
... the monitor. 2-2 Chapter 2: Setup Use a screwdriver to detach it from the monitor (Figure 2). Rubbers in the four screw holes (Figure 1). 3. Have the front of this LED monitor is specially designed for VESA wall mount) The detachable arm/base of the monitor face down on the arm (Figure 2), then slide out the...
... the monitor. 2-2 Chapter 2: Setup Use a screwdriver to detach it from the monitor (Figure 2). Rubbers in the four screw holes (Figure 1). 3. Have the front of this LED monitor is specially designed for VESA wall mount) The detachable arm/base of the monitor face down on the arm (Figure 2), then slide out the...
User Manual
Page 13
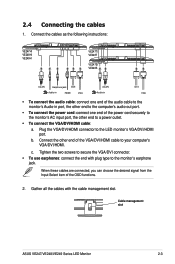
Connect the cables as the following instructions: VE247H/ VE248H/ VE249H VE247T/ VE248T VE247S/ VE248S Earphone jack Audio-in HDMI VGA Audio-in VGA • To connect the audio cable: connect one end of the ... connected, you can choose the desired signal from the Input Select item of the OSD functions. 2. Gather all the cables with plug type to the LED monitor's VGA/DVI/HDMI port. Plug the VGA/DVI/HDMI connector to the monitor's earphone jack. 2.4 Connecting the cables 1. c. Cable management slot...
Connect the cables as the following instructions: VE247H/ VE248H/ VE249H VE247T/ VE248T VE247S/ VE248S Earphone jack Audio-in HDMI VGA Audio-in VGA • To connect the audio cable: connect one end of the ... connected, you can choose the desired signal from the Input Select item of the OSD functions. 2. Gather all the cables with plug type to the LED monitor's VGA/DVI/HDMI port. Plug the VGA/DVI/HDMI connector to the monitor's earphone jack. 2.4 Connecting the cables 1. c. Cable management slot...

User Manual
Page 15
If the function selected has a sub-menu, press , and again to navigate through the sub-menu functions. Repeat step 2 and step 3.1.2 OSD Function Introduction 1. ASUS VE247/VE248/VE249 Series LED Monitor 3-1 Press , and to navigate through the functions. Press the MENU button to change the settings of the selected function. 4. Spendid This function...
If the function selected has a sub-menu, press , and again to navigate through the sub-menu functions. Repeat step 2 and step 3.1.2 OSD Function Introduction 1. ASUS VE247/VE248/VE249 Series LED Monitor 3-1 Press , and to navigate through the functions. Press the MENU button to change the settings of the selected function. 4. Spendid This function...

User Manual
Page 17
...; Language: there are 11 languages for your desired input source. 5. activate this function, you to adjust the system. • Splendid Demo Mode: turns on/off ASUS Splendid Demo function. • Volume: the adjusting range is a hotkey to • Aspect Control: adjusts the aspect ratio to full or 4:3. • OSD Setup: * Adjusts..., French, Dutch, Spanish, Russian, Traditional Chinese, Simplified Chinese, Japanese, and Korean. • Information: shows the monitor information. • All Reset: "Yes" allows you to 100. ASUS VE247/VE248/VE249 Series LED Monitor 3-3
...; Language: there are 11 languages for your desired input source. 5. activate this function, you to adjust the system. • Splendid Demo Mode: turns on/off ASUS Splendid Demo function. • Volume: the adjusting range is a hotkey to • Aspect Control: adjusts the aspect ratio to full or 4:3. • OSD Setup: * Adjusts..., French, Dutch, Spanish, Russian, Traditional Chinese, Simplified Chinese, Japanese, and Korean. • Information: shows the monitor information. • All Reset: "Yes" allows you to 100. ASUS VE247/VE248/VE249 Series LED Monitor 3-3

User Manual
Page 18
... SPLENDID™ selection Auto adjustment Color temperature selection Skin-Tone selection Digital input Analog input Audio-in port Earphone jack Colors Speaker (Built-in) Power LED VESA wall mount Tilt Kensington lock Voltage rating Power consumption Temperature (Operating) Temperature (Non-operating) Dimension (W x H x D) Weight (Esti.) Multi-languages Accessories Regulation approvals TFT LCD...
... SPLENDID™ selection Auto adjustment Color temperature selection Skin-Tone selection Digital input Analog input Audio-in port Earphone jack Colors Speaker (Built-in) Power LED VESA wall mount Tilt Kensington lock Voltage rating Power consumption Temperature (Operating) Temperature (Non-operating) Dimension (W x H x D) Weight (Esti.) Multi-languages Accessories Regulation approvals TFT LCD...
User Manual
Page 19
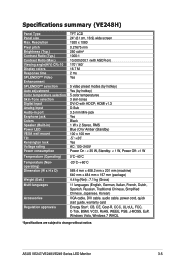
Specifications summary (VE248H) Panel Type Panel size Max. HDMI v1.3 D-Sub 3.5 mm Mini-jack Yes Black 1 W x 2 Stereo, RMS Blue (On)/ Amber (Standby) 100 x 100 mm -5˚~+20˚ ... SPLENDID™ selection Auto adjustment Color temperature selection Skin-Tone selection Digital input Analog input Audio-in port Earphone jack Colors Speaker (Built-in) Power LED VESA wall mount Tilt Kensington lock Voltage rating Power consumption Temperature (Operating) Temperature (Nonoperating) Dimension (W x H x D) Weight (Esti.) Multi-languages Accessories Regulation approvals TFT LCD 24...
Specifications summary (VE248H) Panel Type Panel size Max. HDMI v1.3 D-Sub 3.5 mm Mini-jack Yes Black 1 W x 2 Stereo, RMS Blue (On)/ Amber (Standby) 100 x 100 mm -5˚~+20˚ ... SPLENDID™ selection Auto adjustment Color temperature selection Skin-Tone selection Digital input Analog input Audio-in port Earphone jack Colors Speaker (Built-in) Power LED VESA wall mount Tilt Kensington lock Voltage rating Power consumption Temperature (Operating) Temperature (Nonoperating) Dimension (W x H x D) Weight (Esti.) Multi-languages Accessories Regulation approvals TFT LCD 24...

User Manual
Page 20
... SPLENDID™ selection Auto adjustment Color temperature selection Skin-Tone selection Digital input Analog input Audio-in port Earphone jack Colors Speaker (Built-in) Power LED VESA wall mount Tilt Kensington lock Voltage rating Power consumption Temperature (Operating) Temperature (Non-operating) Dimension (W x H x D) Weight (Esti.) Multi-languages Accessories Regulation approvals TFT LCD...
... SPLENDID™ selection Auto adjustment Color temperature selection Skin-Tone selection Digital input Analog input Audio-in port Earphone jack Colors Speaker (Built-in) Power LED VESA wall mount Tilt Kensington lock Voltage rating Power consumption Temperature (Operating) Temperature (Non-operating) Dimension (W x H x D) Weight (Esti.) Multi-languages Accessories Regulation approvals TFT LCD...

User Manual
Page 21
...; Video Enhancement SPLENDID™ selection Auto adjustment Color temperature selection Skin-Tone selection Analog input Audio-in port Earphone jack Colors Speaker (Built-in) Power LED VESA wall mount Tilt Kensington lock Voltage rating Power consumption Temperature (Operating) Temperature (Non-operating) Dimension (W x H x D) Weight (Esti.) Multi-languages Accessories Regulation approvals TFT LCD...
...; Video Enhancement SPLENDID™ selection Auto adjustment Color temperature selection Skin-Tone selection Analog input Audio-in port Earphone jack Colors Speaker (Built-in) Power LED VESA wall mount Tilt Kensington lock Voltage rating Power consumption Temperature (Operating) Temperature (Non-operating) Dimension (W x H x D) Weight (Esti.) Multi-languages Accessories Regulation approvals TFT LCD...

User Manual
Page 22
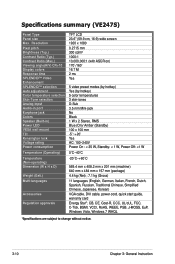
... SPLENDID™ selection Auto adjustment Color temperature selection Skin-Tone selection Digital input Analog input Audio-in port Earphone jack Colors Speaker (Built-in) Power LED VESA wall mount Tilt Kensington lock Voltage rating Power consumption Temperature (Operating) Temperature (Nonoperating) Dimension (W x H x D) Weight (Esti.) Multi-languages Accessories Regulation approvals TFT LCD 23...
... SPLENDID™ selection Auto adjustment Color temperature selection Skin-Tone selection Digital input Analog input Audio-in port Earphone jack Colors Speaker (Built-in) Power LED VESA wall mount Tilt Kensington lock Voltage rating Power consumption Temperature (Operating) Temperature (Nonoperating) Dimension (W x H x D) Weight (Esti.) Multi-languages Accessories Regulation approvals TFT LCD 23...

User Manual
Page 23
... SPLENDID™ selection Auto adjustment Color temperature selection Skin-Tone selection Digital input Analog input Audio-in port Earphone jack Colors Speaker (Built-in) Power LED VESA wall mount Tilt Kensington lock Voltage rating Power consumption Temperature (Operating) Temperature (Non-operating) Dimension (W x H x D) Weight (Esti.) Multi-languages Accessories Regulation approvals TFT LCD...
... SPLENDID™ selection Auto adjustment Color temperature selection Skin-Tone selection Digital input Analog input Audio-in port Earphone jack Colors Speaker (Built-in) Power LED VESA wall mount Tilt Kensington lock Voltage rating Power consumption Temperature (Operating) Temperature (Non-operating) Dimension (W x H x D) Weight (Esti.) Multi-languages Accessories Regulation approvals TFT LCD...
User Manual
Page 24
...; Video Enhancement SPLENDID™ selection Auto adjustment Color temperature selection Skin-Tone selection Analog input Audio-in port Earphone jack Colors Speaker (Built-in) Power LED VESA wall mount Tilt Kensington lock Voltage rating Power consumption Temperature (Operating) Temperature (Non-operating) Dimension (W x H x D) Weight (Esti.) Multi-languages Accessories Regulation approvals TFT LCD...
...; Video Enhancement SPLENDID™ selection Auto adjustment Color temperature selection Skin-Tone selection Analog input Audio-in port Earphone jack Colors Speaker (Built-in) Power LED VESA wall mount Tilt Kensington lock Voltage rating Power consumption Temperature (Operating) Temperature (Non-operating) Dimension (W x H x D) Weight (Esti.) Multi-languages Accessories Regulation approvals TFT LCD...

User Manual
Page 25
...properly present in the ON mode. • Check if the power cord is properly connected to the monitor and the power outlet. ASUS VE247/VE248/VE249 Series LED Monitor 3-11 Screen image is blurry or fuzzy • Press the or button for two seconds to automatically adjust the image (for... and make sure not look white) that the computer sound card driver is properly installed and activated. 3.3 Troubleshooting (FAQ) Problem Possible Solution Power LED is not ON • Press the button to check if the monitor is in the image connected to the monitor and the computer. •...
...properly present in the ON mode. • Check if the power cord is properly connected to the monitor and the power outlet. ASUS VE247/VE248/VE249 Series LED Monitor 3-11 Screen image is blurry or fuzzy • Press the or button for two seconds to automatically adjust the image (for... and make sure not look white) that the computer sound card driver is properly installed and activated. 3.3 Troubleshooting (FAQ) Problem Possible Solution Power LED is not ON • Press the button to check if the monitor is in the image connected to the monitor and the computer. •...


