
VE228D User's Manual
Page 7
... the above items is damaged or missing, contact your viewing experience. With these features, you ! 1.2 Package contents Check your package for purchasing the ASUS® LED monitor! ASUS VE228 Series LED Monitor 1-1 Thank you for the following items: LED monitor Monitor base and screw Warranty card Quick start guide Power cord VGA cable...
... the above items is damaged or missing, contact your viewing experience. With these features, you ! 1.2 Package contents Check your package for purchasing the ASUS® LED monitor! ASUS VE228 Series LED Monitor 1-1 Thank you for the following items: LED monitor Monitor base and screw Warranty card Quick start guide Power cord VGA cable...

VE228D User's Manual
Page 8
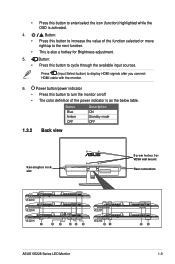
1.3 Monitor introduction 1.3.1 Front view VE228H VE228T/ VE228S S/A Volume/Down Menu Brightness/Up Input Select Power Key S Volume/Down Menu Brightness/Up A Power Key VE228N/ VE228D S Contrast/Down Menu Brightness/Up A Power Key 1 2 3 4 ...
1.3 Monitor introduction 1.3.1 Front view VE228H VE228T/ VE228S S/A Volume/Down Menu Brightness/Up Input Select Power Key S Volume/Down Menu Brightness/Up A Power Key VE228N/ VE228D S Contrast/Down Menu Brightness/Up A Power Key 1 2 3 4 ...
VE228D User's Manual
Page 9
... button to increase the value of the power indicator is also a hotkey for VESA wall mount Rear connectors VE228D VE228N VE228H 1 23 45 6 VE228T VE228S 31 56 ASUS VE228 Series LED Monitor 1-3 Power button/power indicator • Press this button to display HDMI signals after you connect HDMI cable with the monitor. 6. Status...
... button to increase the value of the power indicator is also a hotkey for VESA wall mount Rear connectors VE228D VE228N VE228H 1 23 45 6 VE228T VE228S 31 56 ASUS VE228 Series LED Monitor 1-3 Power button/power indicator • Press this button to display HDMI signals after you connect HDMI cable with the monitor. 6. Status...

VE228D User's Manual
Page 11
... stand to prevent the monitor from falling when you look at the full face of the monitor face down on the base and the arm. 3. ASUS VE228 Series LED Monitor 2-1 We recommend that you cover the table surface with soft cloth to prevent damage to the monitor. 2 1 2.2 Adjusting the monitor • For...
... stand to prevent the monitor from falling when you look at the full face of the monitor face down on the base and the arm. 3. ASUS VE228 Series LED Monitor 2-1 We recommend that you cover the table surface with soft cloth to prevent damage to the monitor. 2 1 2.2 Adjusting the monitor • For...

VE228D User's Manual
Page 13
.../DVI/HDMI connector to a power outlet. • To connect the VGA/DVI/HDMI cable: a. c. Connect the cables as the following instructions: VE228D VE228N VE228H VE228T VE228S Audio-in Earphone jack HDMI VGA Audio-in VGA • To connect the audio cable: connect one end of the audio cable to the monitor..., you can choose the desired signal from the Input Select item of the VGA/DVI/HDMI cable to the monitor's earphone jack. Cable management slot ASUS VE228 Series LED Monitor 2-3 Connect the other end to the LED monitor's VGA/DVI/HDMI port. 2.4 Connecting the cables 1.
.../DVI/HDMI connector to a power outlet. • To connect the VGA/DVI/HDMI cable: a. c. Connect the cables as the following instructions: VE228D VE228N VE228H VE228T VE228S Audio-in Earphone jack HDMI VGA Audio-in VGA • To connect the audio cable: connect one end of the audio cable to the monitor..., you can choose the desired signal from the Input Select item of the VGA/DVI/HDMI cable to the monitor's earphone jack. Cable management slot ASUS VE228 Series LED Monitor 2-3 Connect the other end to the LED monitor's VGA/DVI/HDMI port. 2.4 Connecting the cables 1.

VE228D User's Manual
Page 15
... (or ), and to navigate through the functions. If the function selected has a sub-menu, press (or ), and again to navigate through the sub-menu functions. ASUS VE228 Series LED Monitor 3-1 Highlight and activate the desired function by pressing the MENU button. 3. Press the MENU button to change the settings of the selected...
... (or ), and to navigate through the functions. If the function selected has a sub-menu, press (or ), and again to navigate through the sub-menu functions. ASUS VE228 Series LED Monitor 3-1 Highlight and activate the desired function by pressing the MENU button. 3. Press the MENU button to change the settings of the selected...

VE228D User's Manual
Page 17
... monitor information. • All Reset: "Yes" allows you to adjust the system. • Splendid Demo Mode: turns on/off ASUS Splendid Demo function. • Volume: the adjusting range is from 0 to 100. ASUS VE228 Series LED Monitor 3-3 Input Select In this function. System Setup Allow you to 120. * Enables or disables the DDC...
... monitor information. • All Reset: "Yes" allows you to adjust the system. • Splendid Demo Mode: turns on/off ASUS Splendid Demo function. • Volume: the adjusting range is from 0 to 100. ASUS VE228 Series LED Monitor 3-3 Input Select In this function. System Setup Allow you to 120. * Enables or disables the DDC...

VE228D User's Manual
Page 19
ASUS VE228 Series LED Monitor 3-5 Resolution Pixel pitch Brightness (Typ.) Contrast Ratio (Typ.) Contrast Ratio (Max.) Viewing angle(H/V) CR>10 Display colors Response time SPLENDID™ Video ...
ASUS VE228 Series LED Monitor 3-5 Resolution Pixel pitch Brightness (Typ.) Contrast Ratio (Typ.) Contrast Ratio (Max.) Viewing angle(H/V) CR>10 Display colors Response time SPLENDID™ Video ...

VE228D User's Manual
Page 21
..., CE, Gost-R, CCC, UL/cUL, FCC, C-Tick, BSMI, VCCI, RoHS, WEEE, PSB, J-MOSS, EuP, Windows Vista, Windows 7 WHQL *Specifications are subject to change without notice. ASUS VE228 Series LED Monitor 3-7 Specifications summary (VE228S) Panel Type Panel size Max.
..., CE, Gost-R, CCC, UL/cUL, FCC, C-Tick, BSMI, VCCI, RoHS, WEEE, PSB, J-MOSS, EuP, Windows Vista, Windows 7 WHQL *Specifications are subject to change without notice. ASUS VE228 Series LED Monitor 3-7 Specifications summary (VE228S) Panel Type Panel size Max.

VE228D User's Manual
Page 23
... image (for VGA mode only) • Adjust the H-Position or V-Position settings via OSD. Screen image is low • Ensure that may cause electrical interference. ASUS VE228 Series LED Monitor 3-9 The power LED lights amber and there is no screen image • Check if the monitor and the computer are bent. •...
... image (for VGA mode only) • Adjust the H-Position or V-Position settings via OSD. Screen image is low • Ensure that may cause electrical interference. ASUS VE228 Series LED Monitor 3-9 The power LED lights amber and there is no screen image • Check if the monitor and the computer are bent. •...
