User Guide
Page 3
... contents Notices...iv Safety information v Care & Cleaning vi Takeback Services vii 1.1 Welcome 1-1 1.2 Package contents 1-1 1.3 Assembling the monitor base 1-2 1.4 Connect cables 1-3 1.4.1 Rear of the LCD monitor 1-3 1.5 Monitor introduction 1-4 1.5.1 Using the Controls button 1-4 1.5.2 QuickFit Function 1-6 2.1 Detaching the base (for VESA wall mount 2-1 2.2 Adjusting the monitor 2-2 3.1 OSD (On-Screen Display) menu 3-1 3.1.1 How to reconfigure 3-1 3.1.2 OSD Function Introduction 3-2 3.2 Specifications 3-12 3.3 Troubleshooting (FAQ 3-13 3.4 Supported Timing List 3-14 iii
... contents Notices...iv Safety information v Care & Cleaning vi Takeback Services vii 1.1 Welcome 1-1 1.2 Package contents 1-1 1.3 Assembling the monitor base 1-2 1.4 Connect cables 1-3 1.4.1 Rear of the LCD monitor 1-3 1.5 Monitor introduction 1-4 1.5.1 Using the Controls button 1-4 1.5.2 QuickFit Function 1-6 2.1 Detaching the base (for VESA wall mount 2-1 2.2 Adjusting the monitor 2-2 3.1 OSD (On-Screen Display) menu 3-1 3.1.1 How to reconfigure 3-1 3.1.2 OSD Function Introduction 3-2 3.2 Specifications 3-12 3.3 Troubleshooting (FAQ 3-13 3.4 Supported Timing List 3-14 iii

User Guide
Page 4
..., uses and can be determined by turning the equipment off and on a circuit different from digital apparatus set out in a particular installation. This product implements power management...Part 15 of no guarantee that may cause undesired operation. However, there is no signal input after 10 seconds, the product automatically goes to sleep/ standby mode. If this product meets the Energy Star® guidelines for help... which can radiate radio frequency energy and, if not installed and used in accordance with manufacturer's instructions, may cause harmful interference to provide reasonable...
..., uses and can be determined by turning the equipment off and on a circuit different from digital apparatus set out in a particular installation. This product implements power management...Part 15 of no guarantee that may cause undesired operation. However, there is no signal input after 10 seconds, the product automatically goes to sleep/ standby mode. If this product meets the Energy Star® guidelines for help... which can radiate radio frequency energy and, if not installed and used in accordance with manufacturer's instructions, may cause harmful interference to provide reasonable...

User Guide
Page 5
... retailer. • Before using the product, make sure all the documentation that came with UL listed computers which complies with the monitor, contact a qualified service technician or your local power standard. • Do not overload power strips and extention cords. Safety information • Before setting up the monitor, carefully read all cables are correctly connected and the power cables are not damaged. The...
... retailer. • Before using the product, make sure all the documentation that came with UL listed computers which complies with the monitor, contact a qualified service technician or your local power standard. • Do not overload power strips and extention cords. Safety information • Before setting up the monitor, carefully read all cables are correctly connected and the power cables are not damaged. The...

User Guide
Page 6
... your dealer or service center to fix it. Turn your monitor off the Power Switch and turn off the Power Switch for hours. • When the screen becomes black or flashes, or cannot work anymore, contact your monitor, it is displayed for use with a lint-free, non-abrasive cloth. Stubborn stains may flicker during the initial use . • When the same image is better to disconnect the cables and power cord. CAUTION: Information...
... your dealer or service center to fix it. Turn your monitor off the Power Switch and turn off the Power Switch for hours. • When the screen becomes black or flashes, or cannot work anymore, contact your monitor, it is displayed for use with a lint-free, non-abrasive cloth. Stubborn stains may flicker during the initial use . • When the same image is better to disconnect the cables and power cord. CAUTION: Information...
User Guide
Page 8
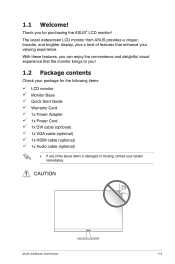
.... 1.1 Welcome! CAUTION ASUS LCD Monitor VC279 Series 1-1 Thank you ! 1.2 Package contents Check your package for the following items: LCD monitor Monitor Base Quick Start Guide Warranty Card 1x Power Adapter 1x Power Cord 1x DVI cable (optional) 1x VGA cable (optional) 1x HDMI cable (optional) 1x Audio cable (optional) •• If any of features that the monitor brings to you for purchasing the ASUS® LCD monitor! The latest widescreen LCD monitor from ASUS provides a crisper, broader, and brighter display, plus a host...
.... 1.1 Welcome! CAUTION ASUS LCD Monitor VC279 Series 1-1 Thank you ! 1.2 Package contents Check your package for the following items: LCD monitor Monitor Base Quick Start Guide Warranty Card 1x Power Adapter 1x Power Cord 1x DVI cable (optional) 1x VGA cable (optional) 1x HDMI cable (optional) 1x Audio cable (optional) •• If any of features that the monitor brings to you for purchasing the ASUS® LCD monitor! The latest widescreen LCD monitor from ASUS provides a crisper, broader, and brighter display, plus a host...
User Guide
Page 10
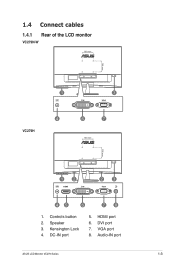
Speaker 3. DVI port 7. VGA port 8. HDMI port 6. Audio-IN port ASUS LCD Monitor VC279 Series 1-3 Controls button 2. Kensington Lock 4. 1.4 Connect cables 1.4.1 Rear of the LCD monitor VC279N-W 100 mm 100 mm VC279H 1 4 HDMI DVI VGA 3 DVI VGA 6 7 100 mm 100 mm HDMI DVI VGA 12 HDMI DVI 23 VGA 45 6 78 1. DC-IN port 5.
Speaker 3. DVI port 7. VGA port 8. HDMI port 6. Audio-IN port ASUS LCD Monitor VC279 Series 1-3 Controls button 2. Kensington Lock 4. 1.4 Connect cables 1.4.1 Rear of the LCD monitor VC279N-W 100 mm 100 mm VC279H 1 4 HDMI DVI VGA 3 DVI VGA 6 7 100 mm 100 mm HDMI DVI VGA 12 HDMI DVI 23 VGA 45 6 78 1. DC-IN port 5.
User Guide
Page 11
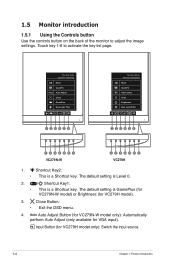
... is a Shortcut key. The default setting is Level 0. 2. / Shortcut Key1: • This is a Shortcut key. The default setting is GamePlus (for VC279N-W model) or Brightness (for VGA input). Standard Mode VGA 1920 x 1080 @ 60Hz Menu QuickFit Auto Auto Adjust Close GamePlus Blue Light Filter Auto 123456 Standard Mode VGA 1920 x 1080 @ 60Hz Menu QuickFit Input Select Close Brightness Blue Light Filter 123456 1234567 VC279N-W 1234567 VC279H 1. Touch key 1-6 to adjust the image settings. Input Button (for VC279H model only): Switch the input source. 1-4 Chapter 1: Product...
... is a Shortcut key. The default setting is Level 0. 2. / Shortcut Key1: • This is a Shortcut key. The default setting is GamePlus (for VC279N-W model) or Brightness (for VGA input). Standard Mode VGA 1920 x 1080 @ 60Hz Menu QuickFit Auto Auto Adjust Close GamePlus Blue Light Filter Auto 123456 Standard Mode VGA 1920 x 1080 @ 60Hz Menu QuickFit Input Select Close Brightness Blue Light Filter 123456 1234567 VC279N-W 1234567 VC279H 1. Touch key 1-6 to adjust the image settings. Input Button (for VC279H model only): Switch the input source. 1-4 Chapter 1: Product...

User Guide
Page 14
Using a coin, turn the screw counter-clockwise to remove the stand. 5. Align and install the wall mount bracket on a clean table. 2. Disconnect power and signal cables. Remove the base from the stand. 4. Then loosen the 4 screws to loosen the screw located at the bottom of the monitor. Screw holes for VESA wall mount) To detach the base, perform the following: 1. Carefully put the front of the monitor face down on the rear of the base. 3. 2.1 Detaching...
Using a coin, turn the screw counter-clockwise to remove the stand. 5. Align and install the wall mount bracket on a clean table. 2. Disconnect power and signal cables. Remove the base from the stand. 4. Then loosen the 4 screws to loosen the screw located at the bottom of the monitor. Screw holes for VESA wall mount) To detach the base, perform the following: 1. Carefully put the front of the monitor face down on the rear of the base. 3. 2.1 Detaching...
User Guide
Page 16
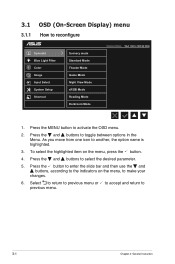
... Instruction Select to return to previous menu or to accept and return to select the desired parameter. 5. 3.1 OSD (On-Screen Display) menu 3.1.1 How to activate the OSD menu. 2. Press the MENU button to reconfigure Splendid Blue Light Filter Color Image Input Select System Setup Shortcut Scenery mode Standard Mode Theater Mode Game Mode Night View Mode sRGB Mode Reading Mode Darkroom Mode Standard Mode VGA 1920 x 1080 @ 60Hz 1. Press the button to enter the slide bar and then use...
... Instruction Select to return to previous menu or to accept and return to select the desired parameter. 5. 3.1 OSD (On-Screen Display) menu 3.1.1 How to activate the OSD menu. 2. Press the MENU button to reconfigure Splendid Blue Light Filter Color Image Input Select System Setup Shortcut Scenery mode Standard Mode Theater Mode Game Mode Night View Mode sRGB Mode Reading Mode Darkroom Mode Standard Mode VGA 1920 x 1080 @ 60Hz 1. Press the button to enter the slide bar and then use...

User Guide
Page 17
Each mode has the Reset selection, allowing you can select for a weak ambient light environmen with SPLENDID™ Video Intelligence Technology. • Darkroom Mode: This is the best choice for book reading with SPLENDID™ Video Intelligence Technology. Splendid Blue Light Filter Color Image Input Select System Setup Shortcut Scenery mode Standard Mode Theater Mode Game Mode Night View Mode sRGB Mode Reading Mode Darkroom Mode Standard Mode VGA 1920 x 1080 @ 60Hz • Scenery: This...
Each mode has the Reset selection, allowing you can select for a weak ambient light environmen with SPLENDID™ Video Intelligence Technology. • Darkroom Mode: This is the best choice for book reading with SPLENDID™ Video Intelligence Technology. Splendid Blue Light Filter Color Image Input Select System Setup Shortcut Scenery mode Standard Mode Theater Mode Game Mode Night View Mode sRGB Mode Reading Mode Darkroom Mode Standard Mode VGA 1920 x 1080 @ 60Hz • Scenery: This...
User Guide
Page 18
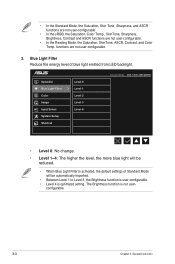
Splendid Blue Light Filter Color Image Input Select System Setup Shortcut Level 0 Level 1 Level 2 Level 3 Level 4 Standard Mode VGA 1920 x 1080 @ 60Hz • Level 0: No change. • Level 1~4: The higher the level, the more blue light will be reduced. • When Blue Light Filter is activated, the default settings of blue light emitted from LED backlight. The Brightness function is optimized setting. configurable. 3-3 Chapter 3: General Instruction Blue Light Filter Reduce the energy level of Standard Mode will...
Splendid Blue Light Filter Color Image Input Select System Setup Shortcut Level 0 Level 1 Level 2 Level 3 Level 4 Standard Mode VGA 1920 x 1080 @ 60Hz • Level 0: No change. • Level 1~4: The higher the level, the more blue light will be reduced. • When Blue Light Filter is activated, the default settings of blue light emitted from LED backlight. The Brightness function is optimized setting. configurable. 3-3 Chapter 3: General Instruction Blue Light Filter Reduce the energy level of Standard Mode will...
User Guide
Page 19
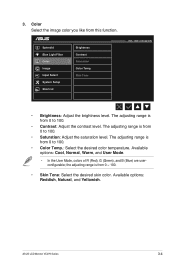
... Mode VGA 1920 x 1080 @ 60Hz • Brightness: Adjust the brightness level. Available options: Cool, Normal, Warm, and User Mode. • In the User Mode, colors of R (Red), G (Green), and B (Blue) are userconfigurable; ASUS LCD Monitor VC279 Series 3-4 The adjusting range is from 0 to 100. • Saturation: Adjust the saturation level. 3. The adjusting range is from 0 to 100. • Color Temp.: Select the desired color temperature. The adjusting range is from 0 to 100. • Contrast: Adjust the contrast level. the adjusting range...
... Mode VGA 1920 x 1080 @ 60Hz • Brightness: Adjust the brightness level. Available options: Cool, Normal, Warm, and User Mode. • In the User Mode, colors of R (Red), G (Green), and B (Blue) are userconfigurable; ASUS LCD Monitor VC279 Series 3-4 The adjusting range is from 0 to 100. • Saturation: Adjust the saturation level. 3. The adjusting range is from 0 to 100. • Color Temp.: Select the desired color temperature. The adjusting range is from 0 to 100. • Contrast: Adjust the contrast level. the adjusting range...
User Guide
Page 20
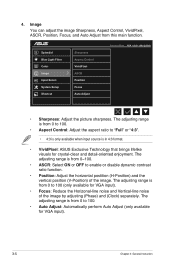
... or disable dynamic contrast ratio function. • Position: Adjust the horizontal postition (H-Position) and the vertical position (V-Position) of the image by adjusting (Phase) and (Clock) separately. The adjusting range is in 4:3 format. • VividPixel: ASUS Exclusive Technology that brings lifelike visuals for VGA input). 3-5 Chapter 3: General Instruction Splendid Blue Light Filter Color Image Input Select System Setup Shortcut Sharpness Aspect Control VividPixel ASCR Position Focus Auto Adjust Standard Mode VGA 1920 x 1080 @ 60Hz • Sharpness: Adjust the picture...
... or disable dynamic contrast ratio function. • Position: Adjust the horizontal postition (H-Position) and the vertical position (V-Position) of the image by adjusting (Phase) and (Clock) separately. The adjusting range is in 4:3 format. • VividPixel: ASUS Exclusive Technology that brings lifelike visuals for VGA input). 3-5 Chapter 3: General Instruction Splendid Blue Light Filter Color Image Input Select System Setup Shortcut Sharpness Aspect Control VividPixel ASCR Position Focus Auto Adjust Standard Mode VGA 1920 x 1080 @ 60Hz • Sharpness: Adjust the picture...
User Guide
Page 21
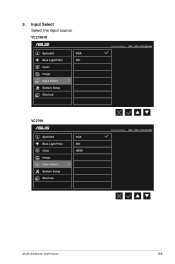
Input Select Select the input source. 5. VC279N-W Splendid Blue Light Filter Color Image Input Select System Setup Shortcut VGA DVI VC279H Splendid Blue Light Filter Color Image Input Select System Setup Shortcut VGA DVI HDMI Standard Mode VGA 1920 x 1080 @ 60Hz Standard Mode VGA 1920 x 1080 @ 60Hz ASUS LCD Monitor VC279 Series 3-6
Input Select Select the input source. 5. VC279N-W Splendid Blue Light Filter Color Image Input Select System Setup Shortcut VGA DVI VC279H Splendid Blue Light Filter Color Image Input Select System Setup Shortcut VGA DVI HDMI Standard Mode VGA 1920 x 1080 @ 60Hz Standard Mode VGA 1920 x 1080 @ 60Hz ASUS LCD Monitor VC279 Series 3-6

User Guide
Page 22
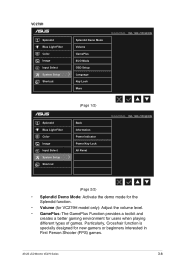
VC279N-W Splendid Blue Light Filter Color Image Input Select System Setup Shortcut Splendid Demo Mode GamePlus ECO Mode OSD Setup Language Key Lock Information More Standard Mode VGA 1920 x 1080 @ 60Hz (Page 1/2) Splendid Blue Light Filter Color Image Input Select System Setup Shortcut Back Power Indicator Power Key Lock All Reset Standard Mode VGA 1920 x 1080 @ 60Hz (Page 2/2) 3-7 Chapter 3: General Instruction System Setup Adjust the system configuration. 6.
VC279N-W Splendid Blue Light Filter Color Image Input Select System Setup Shortcut Splendid Demo Mode GamePlus ECO Mode OSD Setup Language Key Lock Information More Standard Mode VGA 1920 x 1080 @ 60Hz (Page 1/2) Splendid Blue Light Filter Color Image Input Select System Setup Shortcut Back Power Indicator Power Key Lock All Reset Standard Mode VGA 1920 x 1080 @ 60Hz (Page 2/2) 3-7 Chapter 3: General Instruction System Setup Adjust the system configuration. 6.
User Guide
Page 23
VC279H Splendid Blue Light Filter Color Image Input Select System Setup Shortcut Splendid Demo Mode Volume GamePlus ECO Mode OSD Setup Language Key Lock More Standard Mode VGA 1920 x 1080 @ 60Hz (Page 1/2) Splendid Blue Light Filter Color Image Input Select System Setup Shortcut Back Information Power Indicator Power Key Lock All Reset Standard Mode VGA 1920 x 1080 @ 60Hz (Page 2/2) • Splendid Demo Mode: Activate the demo mode for the Splendid function. • Volume (for VC279H model only): Adjust the volume level. • GamePlus: The GamePlus Function...
VC279H Splendid Blue Light Filter Color Image Input Select System Setup Shortcut Splendid Demo Mode Volume GamePlus ECO Mode OSD Setup Language Key Lock More Standard Mode VGA 1920 x 1080 @ 60Hz (Page 1/2) Splendid Blue Light Filter Color Image Input Select System Setup Shortcut Back Information Power Indicator Power Key Lock All Reset Standard Mode VGA 1920 x 1080 @ 60Hz (Page 2/2) • Splendid Demo Mode: Activate the demo mode for the Splendid function. • Volume (for VC279H model only): Adjust the volume level. • GamePlus: The GamePlus Function...

User Guide
Page 24
.... • Key Lock: Pressing the second button on the right for power saving. • OSD Setup: Adjust the OSD Timeout, DDC/CI, and Transparency of System Setting. • Information: Display the monitor information. • Power Indicator: Turn the power LED indicator on/off. • Power Key Lock: Disable/Enable the power key. • All Reset: Select YES to revert all settings to go back. Press to the factory default mode. 3-9 Chapter 3: General Instruction To active...
.... • Key Lock: Pressing the second button on the right for power saving. • OSD Setup: Adjust the OSD Timeout, DDC/CI, and Transparency of System Setting. • Information: Display the monitor information. • Power Indicator: Turn the power LED indicator on/off. • Power Key Lock: Disable/Enable the power key. • All Reset: Select YES to revert all settings to go back. Press to the factory default mode. 3-9 Chapter 3: General Instruction To active...
User Guide
Page 26
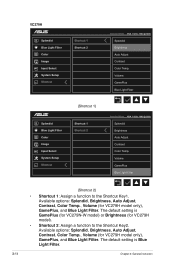
... Key1. The default setting is GamePlus (for VC279N-W model) or Brightness (for VC279H model only), GamePlus, and Blue Light Filter. Volume GamePlus Blue Light Filter (Shortcut 1) Splendid Blue Light Filter Color Image Input Select System Setup Shortcut Shortcut 1 Shortcut 2 Standard Mode VGA 1920 x 1080 @ 60Hz Splendid Brightness Auto Adjust Contrast Color Temp. Available options: Splendid, Brightness, Auto Adjust, Contrast, Color Temp., Volume (for VC279H model only), GamePlus, and Blue Light Filter. VC279H Splendid Blue Light Filter Color Image Input Select System Setup Shortcut...
... Key1. The default setting is GamePlus (for VC279N-W model) or Brightness (for VC279H model only), GamePlus, and Blue Light Filter. Volume GamePlus Blue Light Filter (Shortcut 1) Splendid Blue Light Filter Color Image Input Select System Setup Shortcut Shortcut 1 Shortcut 2 Standard Mode VGA 1920 x 1080 @ 60Hz Splendid Brightness Auto Adjust Contrast Color Temp. Available options: Splendid, Brightness, Auto Adjust, Contrast, Color Temp., Volume (for VC279H model only), GamePlus, and Blue Light Filter. VC279H Splendid Blue Light Filter Color Image Input Select System Setup Shortcut...
User Guide
Page 27
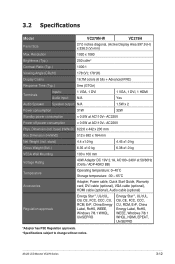
.... Dimension (incl. 3.2 Specifications Model Panel Size Max. Resolution Brightness (Typ.) VC279N-W VC279H 27.0 inches diagonal, (Active Display Area 597.9 (H) x 336.3 (V) mm) 1920 x 1080 250 cd/m2 Contrast Ratio (Typ.) 1000:1 Viewing Angle (CR≤10) 178°(V); 178°(H) Display Colors 16.7M colors (6 bits + Advanced-FRC) Response Time (Typ.) 5ms (GTGσ) Terminals Inputs: Audio input: 1 VGA, 1 DVI N/A Audio Speaker Speaker output: N/A 1 VGA, 1 DVI, 1 HDMI Yes 1.5W x 2 Power consumption 31W 32W Standby power consumption < 0.5W at...
.... Dimension (incl. 3.2 Specifications Model Panel Size Max. Resolution Brightness (Typ.) VC279N-W VC279H 27.0 inches diagonal, (Active Display Area 597.9 (H) x 336.3 (V) mm) 1920 x 1080 250 cd/m2 Contrast Ratio (Typ.) 1000:1 Viewing Angle (CR≤10) 178°(V); 178°(H) Display Colors 16.7M colors (6 bits + Advanced-FRC) Response Time (Typ.) 5ms (GTGσ) Terminals Inputs: Audio input: 1 VGA, 1 DVI N/A Audio Speaker Speaker output: N/A 1 VGA, 1 DVI, 1 HDMI Yes 1.5W x 2 Power consumption 31W 32W Standby power consumption < 0.5W at...

User Guide
Page 28
Screen image is properly installed and activated. 3-13 Chapter 3: General Instruction No sound or sound is low • Adjust the volume settings of both your monitor and computer. • Make sure the computer sound card driver is too light or dark • Adjust the Contrast and Brightness settings via OSD. Select "ON" to turn on power LED. Screen image bounces or a wave • Make sure the signal cable is properly connected to pattern is present in the image the monitor and the...
Screen image is properly installed and activated. 3-13 Chapter 3: General Instruction No sound or sound is low • Adjust the volume settings of both your monitor and computer. • Make sure the computer sound card driver is too light or dark • Adjust the Contrast and Brightness settings via OSD. Select "ON" to turn on power LED. Screen image bounces or a wave • Make sure the signal cable is properly connected to pattern is present in the image the monitor and the...


