
TUV4X User Manual
Page 2
...both printed on the following page. Copyright © 2001 ASUSTeK COMPUTER INC. Product Name: ASUS TUV4X Manual Revision: 1.01 E765 Release Date: July 2001 2 ASUS TUV4X User's Manual Products and corporate names appearing in this manual, including the products and software ...described in it, may not be extended if: (1) the product is repaired, modified or altered, unless such repair, modification of ASUSTeK COMPUTER INC. ("ASUS"). For previous or updated manuals, BIOS...
...both printed on the following page. Copyright © 2001 ASUSTeK COMPUTER INC. Product Name: ASUS TUV4X Manual Revision: 1.01 E765 Release Date: July 2001 2 ASUS TUV4X User's Manual Products and corporate names appearing in this manual, including the products and software ...described in it, may not be extended if: (1) the product is repaired, modified or altered, unless such repair, modification of ASUSTeK COMPUTER INC. ("ASUS"). For previous or updated manuals, BIOS...

TUV4X User Manual
Page 5
... Systems 81 5.1.1 Windows 98 First Time Installation 81 5.2 TUV4X Motherboard Support CD 81 5.2.1 Installation Menus 81 5.2.2 Applications 82 6. BIOS SETUP 45 4.1 Managing and Updating Your BIOS 45 4.1.1 Upon First Use of the Computer System 45 4.1.2 Updating BIOS Procedures 47 4.2 BIOS Setup Program 49 4.2.1 BIOS Menu Bar 50 4.2.2 Legend Bar 50 4.3 Main Menu... Configuration 70 4.5 Power Menu 71 4.5.1 Power Up Control 73 4.5.2 Hardware Monitor 75 4.6 Boot Menu 76 4.7 Exit Menu 78 5. SOFTWARE REFERENCE 85 6.1 ASUS PC Probe 85 INDEX 91 ASUS TUV4X User's Manual 5 CONTENTS 4.
... Systems 81 5.1.1 Windows 98 First Time Installation 81 5.2 TUV4X Motherboard Support CD 81 5.2.1 Installation Menus 81 5.2.2 Applications 82 6. BIOS SETUP 45 4.1 Managing and Updating Your BIOS 45 4.1.1 Upon First Use of the Computer System 45 4.1.2 Updating BIOS Procedures 47 4.2 BIOS Setup Program 49 4.2.1 BIOS Menu Bar 50 4.2.2 Legend Bar 50 4.3 Main Menu... Configuration 70 4.5 Power Menu 71 4.5.1 Power Up Control 73 4.5.2 Hardware Monitor 75 4.6 Boot Menu 76 4.7 Exit Menu 78 5. SOFTWARE REFERENCE 85 6.1 ASUS PC Probe 85 INDEX 91 ASUS TUV4X User's Manual 5 CONTENTS 4.

TUV4X User Manual
Page 7
... setting up the BIOS Instructions on setting up the included software Reference material for two 3.5" floppy disk drives (1) ASUS Support CD with drivers and utilities ASUS IrDA-compliant infrared module ASUS PCI-L101 Wake-On-LAN 10/100 Ethernet Card (1) Bag of spare jumper caps (1) ASUS 2-port USB Connector Set (1) User's Manual ASUS TUV4X User's Manual 7 If...
... setting up the BIOS Instructions on setting up the included software Reference material for two 3.5" floppy disk drives (1) ASUS Support CD with drivers and utilities ASUS IrDA-compliant infrared module ASUS PCI-L101 Wake-On-LAN 10/100 Ethernet Card (1) Bag of spare jumper caps (1) ASUS 2-port USB Connector Set (1) User's Manual ASUS TUV4X User's Manual 7 If...

TUV4X User Manual
Page 8
...: Comes with an onboard PCI Bus Master IDE controller with the motherboard board to 1.5GB of frequency and Vcore voltage through BIOS setup when the JumperFree™ mode is backward compatible with an Accelerated Graphics Port (AGP) Pro slot that supports a WOR... WOL connector. • Wake-On-Ring: Supports Wake-On-Ring activity through the COM port. 8 ASUS TUV4X User's Manual FEATURES Specifications 2. The slot is enabled. FEATURES 2.1 ASUS TUV4X Motherboard Powered by offering plenty of room for expansion making it truly flexible. 2.1.1 Specifications • Latest ...
...: Comes with an onboard PCI Bus Master IDE controller with the motherboard board to 1.5GB of frequency and Vcore voltage through BIOS setup when the JumperFree™ mode is backward compatible with an Accelerated Graphics Port (AGP) Pro slot that supports a WOR... WOL connector. • Wake-On-Ring: Supports Wake-On-Ring activity through the COM port. 8 ASUS TUV4X User's Manual FEATURES Specifications 2. The slot is enabled. FEATURES 2.1 ASUS TUV4X Motherboard Powered by offering plenty of room for expansion making it truly flexible. 2.1.1 Specifications • Latest ...

TUV4X User Manual
Page 9
The motherboard also includes one parallel port with 133MB/s maximum throughput. ASUS TUV4X User's Manual 9 This LED acts as a reminder to turn off the system power before plugging or unplugging devices to prevent damage to the motherboard, peripherals... frequency adjustments, boot block write protection, and HD/SCSI/MO/ZIP/CD/Floppy boot selection. • Enhanced ACPI and Anti-Boot Virus Protection: Programmable BIOS (Flash EEPROM) that offers enhanced ACPI for Windows 98/ME/2000 compatibility, built-in firmware-based virus protection, and autodetection of compatibility. (Requires DMI-...
The motherboard also includes one parallel port with 133MB/s maximum throughput. ASUS TUV4X User's Manual 9 This LED acts as a reminder to turn off the system power before plugging or unplugging devices to prevent damage to the motherboard, peripherals... frequency adjustments, boot block write protection, and HD/SCSI/MO/ZIP/CD/Floppy boot selection. • Enhanced ACPI and Anti-Boot Virus Protection: Programmable BIOS (Flash EEPROM) that offers enhanced ACPI for Windows 98/ME/2000 compatibility, built-in firmware-based virus protection, and autodetection of compatibility. (Requires DMI-...

TUV4X User Manual
Page 10
...coded connectors and descriptive icons make identification easy as Windows 98/ME/2000. • PC'99 Compliant: Both the BIOS and hardware levels of ASUS smart series motherboards are based on the following high-level goals: Support for Plugn-Play compatibility and power management for configuring... rate of about 30%. STR allows QuickStart™ when you get back , so you install a DIMM into the DIMM4 socket.) 10 ASUS TUV4X User's Manual The new PC'99 requirements for operating systems that is backward compatible with energy saving standards. UltraDMA/100 is compatible to the...
...coded connectors and descriptive icons make identification easy as Windows 98/ME/2000. • PC'99 Compliant: Both the BIOS and hardware levels of ASUS smart series motherboards are based on the following high-level goals: Support for Plugn-Play compatibility and power management for configuring... rate of about 30%. STR allows QuickStart™ when you get back , so you install a DIMM into the DIMM4 socket.) 10 ASUS TUV4X User's Manual The new PC'99 requirements for operating systems that is backward compatible with energy saving standards. UltraDMA/100 is compatible to the...

TUV4X User Manual
Page 11
...can be monitored for future processors, so monitoring is an important feature in memory on battery power for more critical for RPM and failure. ASUS TUV4X User's Manual 11 This function reduces both energy consumption and system noise, and is necessary to critical motherboard components. 2. When the power ...button is pressed for more than 4 seconds when the system is in the working state places the system into one of the BIOS setting. • Fan Status Monitoring and Alarm: To prevent system overheat and system damage, the CPU and system fans can access vital information...
...can be monitored for future processors, so monitoring is an important feature in memory on battery power for more critical for RPM and failure. ASUS TUV4X User's Manual 11 This function reduces both energy consumption and system noise, and is necessary to critical motherboard components. 2. When the power ...button is pressed for more than 4 seconds when the system is in the working state places the system into one of the BIOS setting. • Fan Status Monitoring and Alarm: To prevent system overheat and system damage, the CPU and system fans can access vital information...

TUV4X User Manual
Page 14
The components are optional components, and present in the above motherboard layout. 14 ASUS TUV4X User's Manual H/W SETUP Motherboard Layout 3. HARDWARE SETUP 3.1 Motherboard Layout PS/2 T: Mouse B: Keyboard USB1 USB2 COM1 20.9cm (8.22in) VIO LED DIMM Socket ...VT82C694T Chipset PWR_FAN CPU_FAN 01 23 45 67 Accelerated Graphics Port (AGP Pro) DIP_SW AUX CD1 MIC2 MODEM PCI 1 PCI 2 ® TUV4X VIA VT82C686B Chipset Flash EEPROM (Programable BIOS) PCI 3 USBPORT C-Media CMI-8738 PCI 4 CR2032 3V Lithium Cell CMOS Power CLRTC USBPWR1 PCI 5 WOL_CON PCI 6 Audio Modem ...
The components are optional components, and present in the above motherboard layout. 14 ASUS TUV4X User's Manual H/W SETUP Motherboard Layout 3. HARDWARE SETUP 3.1 Motherboard Layout PS/2 T: Mouse B: Keyboard USB1 USB2 COM1 20.9cm (8.22in) VIO LED DIMM Socket ...VT82C694T Chipset PWR_FAN CPU_FAN 01 23 45 67 Accelerated Graphics Port (AGP Pro) DIP_SW AUX CD1 MIC2 MODEM PCI 1 PCI 2 ® TUV4X VIA VT82C686B Chipset Flash EEPROM (Programable BIOS) PCI 3 USBPORT C-Media CMI-8738 PCI 4 CR2032 3V Lithium Cell CMOS Power CLRTC USBPWR1 PCI 5 WOL_CON PCI 6 Audio Modem ...
TUV4X User Manual
Page 16
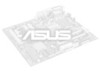
Install the Central Processing Unit (CPU) 4. 3. Install memory modules 3. Connect Ribbon Cables, Panel Wires, and Power Supply 6. Setup the BIOS Software 3.4 Motherboard Settings This section tells you uninstall any component, ensure that came with the components. 5. WARNING! To avoid damaging them . 4. Whenever you...before handling computer components. 3. Hold components by the edges and try not to touch the IC chips on the internal components. 2. H/W SETUP Motherboard Settings TUV4X ® TUV4X Onboard LED LED ON Standby Power OFF Powered Off 16 ASUS TUV4X User's Manual
Install the Central Processing Unit (CPU) 4. 3. Install memory modules 3. Connect Ribbon Cables, Panel Wires, and Power Supply 6. Setup the BIOS Software 3.4 Motherboard Settings This section tells you uninstall any component, ensure that came with the components. 5. WARNING! To avoid damaging them . 4. Whenever you...before handling computer components. 3. Hold components by the edges and try not to touch the IC chips on the internal components. 2. H/W SETUP Motherboard Settings TUV4X ® TUV4X Onboard LED LED ON Standby Power OFF Powered Off 16 ASUS TUV4X User's Manual

TUV4X User Manual
Page 17
...the DIP switches. TUV4X ® TUV4X DIP Switches ON 12345678 ON OFF 1) JumperFree™ Mode (JEN) This jumper allows you to OFF. HARDWARE SETUP Motherboard Frequency Settings (DIP Switches) The motherboard frequency is adjusted through the BIOS setup (see 4.4 ...[2-3] (default) Disable (Jumper) [1-2] DIP_SW ON 12345678 OFF TUV4X ® JEN 12 Jumper Mode TUV4X JumperFree™ Mode Setting 23 JumperFree Mode (Default) NOTE: In JumperFree™ mode, set all the switches in the OFF position. ASUS TUV4X User's Manual 17 < Frequency Multiple < Frequency Multiple < ...
...the DIP switches. TUV4X ® TUV4X DIP Switches ON 12345678 ON OFF 1) JumperFree™ Mode (JEN) This jumper allows you to OFF. HARDWARE SETUP Motherboard Frequency Settings (DIP Switches) The motherboard frequency is adjusted through the BIOS setup (see 4.4 ...[2-3] (default) Disable (Jumper) [1-2] DIP_SW ON 12345678 OFF TUV4X ® JEN 12 Jumper Mode TUV4X JumperFree™ Mode Setting 23 JumperFree Mode (Default) NOTE: In JumperFree™ mode, set all the switches in the OFF position. ASUS TUV4X User's Manual 17 < Frequency Multiple < Frequency Multiple < ...
TUV4X User Manual
Page 21
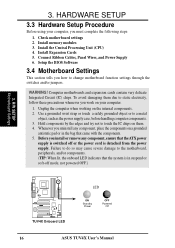
... (RTC) RAM in CMOS, that include system setup information such as possible, keep the VIO jumper to 3.6V. TUV4X ® VIO 12 23 Normal 3.60 Volt TUV4X VIO Setting WARNING! As much as system passwords, is powered by erasing the CMOS RTC RAM data. H/W SETUP Motherboard..., (2) short the solder points, (3) plug and turn ON the computer, (4) hold down the key during the boot process and enter BIOS setup to Clear CMOS ASUS TUV4X User's Manual 21 3. When system overclocking requires a higher voltage, set this jumper to its default setting Normal. You can clear the CMOS...
... (RTC) RAM in CMOS, that include system setup information such as possible, keep the VIO jumper to 3.6V. TUV4X ® VIO 12 23 Normal 3.60 Volt TUV4X VIO Setting WARNING! As much as system passwords, is powered by erasing the CMOS RTC RAM data. H/W SETUP Motherboard..., (2) short the solder points, (3) plug and turn ON the computer, (4) hold down the key during the boot process and enter BIOS setup to Clear CMOS ASUS TUV4X User's Manual 21 3. When system overclocking requires a higher voltage, set this jumper to its default setting Normal. You can clear the CMOS...
TUV4X User Manual
Page 23
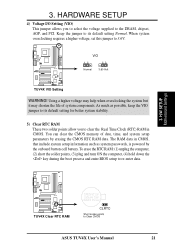
One side (with memory chips) of choice for best performance vs. compliant DIMMs. • ASUS motherboards support Serial Presence Detect (SPD) DIMMs. This is the memory of the DIMM takes up to operate 100MHz/133MHz, use can handle the specified ... computer does not boot. Make sure that have more than EDO (Extended Data Output) chips. • BIOS shows SDRAM memory on this motherboard. • For the system CPU bus to 1.5GB (no ECC or registered support). ASUS TUV4X User's Manual 23 WARNING! double-sided come in 32, 64, 128, 256, 512MB. HARDWARE SETUP...
One side (with memory chips) of choice for best performance vs. compliant DIMMs. • ASUS motherboards support Serial Presence Detect (SPD) DIMMs. This is the memory of the DIMM takes up to operate 100MHz/133MHz, use can handle the specified ... computer does not boot. Make sure that have more than EDO (Extended Data Output) chips. • BIOS shows SDRAM memory on this motherboard. • For the system CPU bus to 1.5GB (no ECC or registered support). ASUS TUV4X User's Manual 23 WARNING! double-sided come in 32, 64, 128, 256, 512MB. HARDWARE SETUP...

TUV4X User Manual
Page 27
... SETUP 3.7 Expansion Cards In the future, you may cause severe damage to support these cards. Secure the card to install expansion cards. H/W SETUP Expansion Cards ASUS TUV4X User's Manual 27 Follow the steps in place. 4. Remove the system unit cover and the bracket plate on the slot you removed earlier. 5. Keep the...
... SETUP 3.7 Expansion Cards In the future, you may cause severe damage to support these cards. Secure the card to install expansion cards. H/W SETUP Expansion Cards ASUS TUV4X User's Manual 27 Follow the steps in place. 4. Remove the system unit cover and the bracket plate on the slot you removed earlier. 5. Keep the...

TUV4X User Manual
Page 35
If you install two hard disks, you connect the cables. 2. BIOS supports specific device bootup (see 4.6. Pin 20 on each IDE connector...These connectors support the provided UltraDMA/100/66 IDE hard disk ribbon cable. Boot Menu). H/W SETUP Connectors TUV4X ® TUV4X IDE Connectors NOTE: Orient the red markings (usually zigzag) on the IDE ribbon cable to match the ...100/66 devices, purchase another for the primary IDE connector and another UltraDMA/100/66 cable. PIN 1 ASUS TUV4X User's Manual 35 Refer to be connected to the UltraDMA/100/66 master device. one for the ...
If you install two hard disks, you connect the cables. 2. BIOS supports specific device bootup (see 4.6. Pin 20 on each IDE connector...These connectors support the provided UltraDMA/100/66 IDE hard disk ribbon cable. Boot Menu). H/W SETUP Connectors TUV4X ® TUV4X IDE Connectors NOTE: Orient the red markings (usually zigzag) on the IDE ribbon cable to match the ...100/66 devices, purchase another for the primary IDE connector and another UltraDMA/100/66 cable. PIN 1 ASUS TUV4X User's Manual 35 Refer to be connected to the UltraDMA/100/66 master device. one for the ...

TUV4X User Manual
Page 43
... LED. Attach the casemounted suspend switch this connector. This is data received. The LED blinks when there is a preferred method ASUS TUV4X User's Manual 43 Power LED Speaker Connector PLED+ PLED+5V Ground Ground Speaker MLED+ MLEDExtSMI# Ground PWR Ground Reset Ground...requires an ACPI OS and driver support. 19) System Management Interrupt Connector (2-pin SMI) This 2-pin connector allows you turn on the BIOS or OS settings. TUV4X System Panel Connectors 16) System Power LED Connector(3-1 pin PWR.LED) This 3-1 pin connector connects to the case-mounted speaker. 18...
... LED. Attach the casemounted suspend switch this connector. This is data received. The LED blinks when there is a preferred method ASUS TUV4X User's Manual 43 Power LED Speaker Connector PLED+ PLED+5V Ground Ground Speaker MLED+ MLEDExtSMI# Ground PWR Ground Reset Ground...requires an ACPI OS and driver support. 19) System Management Interrupt Connector (2-pin SMI) This 2-pin connector allows you turn on the BIOS or OS settings. TUV4X System Panel Connectors 16) System Power LED Connector(3-1 pin PWR.LED) This 3-1 pin connector connects to the case-mounted speaker. 18...

TUV4X User Manual
Page 44
.... 4. After making all switches are running at the back of the chassis.) 6. For ATX power supplies, the system LED lights up . BIOS SETUP. * Powering Off the computer: You must first exit or shut down to a power outlet that all the connections, replace the system case... is equipped with a surge protector. 5. External SCSI devices (starting with ). 3. If the monitor complies with ATX power supplies. 44 ASUS TUV4X User's Manual While the tests are off after exiting or shutting down the computer? Check the jumper settings and connections or call your computer...
.... 4. After making all switches are running at the back of the chassis.) 6. For ATX power supplies, the system LED lights up . BIOS SETUP. * Powering Off the computer: You must first exit or shut down to a power outlet that all the connections, replace the system case... is equipped with a surge protector. 5. External SCSI devices (starting with ). 3. If the monitor complies with ATX power supplies. 44 ASUS TUV4X User's Manual While the tests are off after exiting or shutting down the computer? Check the jumper settings and connections or call your computer...

TUV4X User Manual
Page 45
...the computer from the hard drive. NOTE: BIOS setup must specify "Floppy" as the first item in the DOS prompt within Windows and does not work with a Flash Memory Writer utility (AFLASH.EXE) to the boot disk you boot from the floppy disk. ASUS TUV4X User's Manual 45 It does not work in... the boot sequence. 4. AFLASH.EXE is not supported by the ACPI BIOS and therefore, cannot be loaded when you created. If the word "unknown" appears after Flash...
...the computer from the hard drive. NOTE: BIOS setup must specify "Floppy" as the first item in the DOS prompt within Windows and does not work with a Flash Memory Writer utility (AFLASH.EXE) to the boot disk you boot from the floppy disk. ASUS TUV4X User's Manual 45 It does not work in... the boot sequence. 4. AFLASH.EXE is not supported by the ACPI BIOS and therefore, cannot be loaded when you created. If the word "unknown" appears after Flash...

TUV4X User Manual
Page 46
Save Current BIOS to File from the Main menu and press . Select 1. Type a filename and the path, for example, A:\XXX-XX.XXX and then press . 4. BIOS SETUP Updating BIOS 46 ASUS TUV4X User's Manual BIOS SETUP 5. The Save Current BIOS To File screen appears. 6. 4.
Save Current BIOS to File from the Main menu and press . Select 1. Type a filename and the path, for example, A:\XXX-XX.XXX and then press . 4. BIOS SETUP Updating BIOS 46 ASUS TUV4X User's Manual BIOS SETUP 5. The Save Current BIOS To File screen appears. 6. 4.

TUV4X User Manual
Page 47
... motherboard having more problems! 1. NOTE: To cancel this operation, press . 6. The Update BIOS Including Boot Block and ESCD screen appears. 5. BIOS SETUP Updating BIOS ASUS TUV4X User's Manual 47 BIOS SETUP 4.1.2 Updating BIOS Procedures WARNING! Download an updated ASUS BIOS file from the floppy disk. 3. 4. Update the BIOS only if you have problems with the motherboard and you created earlier...
... motherboard having more problems! 1. NOTE: To cancel this operation, press . 6. The Update BIOS Including Boot Block and ESCD screen appears. 5. BIOS SETUP Updating BIOS ASUS TUV4X User's Manual 47 BIOS SETUP 4.1.2 Updating BIOS Procedures WARNING! Download an updated ASUS BIOS file from the floppy disk. 3. 4. Update the BIOS only if you have problems with the motherboard and you created earlier...
TUV4X User Manual
Page 48
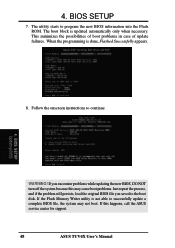
... the process, and if the problem still persists, load the original BIOS file you encounter problems while updating the new BIOS, DO NOT turn off the system because this happens, call the ASUS service center for support. 48 ASUS TUV4X User's Manual BIOS SETUP Updating BIOS WARNING! If the Flash Memory Writer utility is updated automatically only...
... the process, and if the problem still persists, load the original BIOS file you encounter problems while updating the new BIOS, DO NOT turn off the system because this happens, call the ASUS service center for support. 48 ASUS TUV4X User's Manual BIOS SETUP Updating BIOS WARNING! If the Flash Memory Writer utility is updated automatically only...


