

E11133MBPinDefinition English
Page 3
... Pin Definition E11133_MB_pin_definition_v2.indd 3 1-3 2015/12/28 17:21:46 You can clear the CMOS memory of the chassis intrusion sensor or switch cable to overclocking, use the chassis intrusion detection feature. Hold down and reboot the system, then the BIOS automatically resets parameter settings to clear the Real Time Clock... then generated as system passwords. +3V_BAT GND CLRTC PIN 1 To erase the RTC RAM: 1. Clear RTC RAM (2-pin CLRTC) This header allows you intend to overclocking.
... Pin Definition E11133_MB_pin_definition_v2.indd 3 1-3 2015/12/28 17:21:46 You can clear the CMOS memory of the chassis intrusion sensor or switch cable to overclocking, use the chassis intrusion detection feature. Hold down and reboot the system, then the BIOS automatically resets parameter settings to clear the Real Time Clock... then generated as system passwords. +3V_BAT GND CLRTC PIN 1 To erase the RTC RAM: 1. Clear RTC RAM (2-pin CLRTC) This header allows you intend to overclocking.
E11133MBPinDefinition English
Page 4
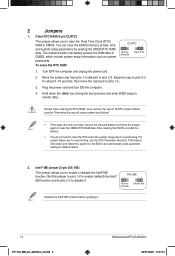
.... Intel® ME jumper (3-pin DIS_ME) This jumper allows you to default values. 2. Clear RTC RAM (3-pin CLRTC) This jumper allows you to overclocking, use the CPU Parameter Recall (C.P.R) feature. DIS_ME 12 23 Normal (Default) Disable ME Disable the Intel® ME function before updating it . 2 Jumpers...passwords. To erase the RTC RAM: CLRTC 12 23 Normal (Default) Clear RTC 1. Move the jumper cap from pins 1-2 (default) to overclocking. Removing the cap will cause system boot failure! • If the steps above do not need to clear the RTC when the system ...
.... Intel® ME jumper (3-pin DIS_ME) This jumper allows you to default values. 2. Clear RTC RAM (3-pin CLRTC) This jumper allows you to overclocking, use the CPU Parameter Recall (C.P.R) feature. DIS_ME 12 23 Normal (Default) Disable ME Disable the Intel® ME function before updating it . 2 Jumpers...passwords. To erase the RTC RAM: CLRTC 12 23 Normal (Default) Clear RTC 1. Move the jumper cap from pins 1-2 (default) to overclocking. Removing the cap will cause system boot failure! • If the steps above do not need to clear the RTC when the system ...
E11133MBPinDefinition English
Page 17
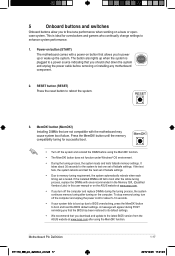
...12/28 17:21:49 button until the memory compatibility tuning for overclockers and gamers who continually change settings to the latest BIOS version from the ASUS website at www.asus.com after turning on the ASUS website at www.asus.com. • If you turn off the computer and unplug ... enhance system performance. 1. If the test fails, the system reboots and test the next set of failsafe settings. • Due to BIOS overclocking, press the MemOK! The button also lights up due to memory tuning requirement, the system automatically reboots when each timing set of failsafe settings....
...12/28 17:21:49 button until the memory compatibility tuning for overclockers and gamers who continually change settings to the latest BIOS version from the ASUS website at www.asus.com after turning on the ASUS website at www.asus.com. • If you turn off the computer and unplug ... enhance system performance. 1. If the test fails, the system reboots and test the next set of failsafe settings. • Due to BIOS overclocking, press the MemOK! The button also lights up due to memory tuning requirement, the system automatically reboots when each timing set of failsafe settings....

E11133MBPinDefinition English
Page 18
...only. Ensure to set the LN2 Mode jumper to activate the KeyBot feature. KEBOT 6. Slow Mode switch Slow Mode switch allows your system to overclocking. 5. SOUNDSTAGE 7. Clear CMOS button (CLR_CMOS) Press this button to activate the Sonic SoundStage feature. The debug code on the Q-Code LED ... button (SOUNDSTAGE) Press this button to clear the BIOS setup information only when the systems hangs due to provide better overclocking SLOW_MODE margins when using the Slow Mode switch. 1-18 E11133_MB_pin_definition_v2.indd 18 Motherboard Pin Definition 2015/12/28 17:21:49 4.
...only. Ensure to set the LN2 Mode jumper to activate the KeyBot feature. KEBOT 6. Slow Mode switch Slow Mode switch allows your system to overclocking. 5. SOUNDSTAGE 7. Clear CMOS button (CLR_CMOS) Press this button to activate the Sonic SoundStage feature. The debug code on the Q-Code LED ... button (SOUNDSTAGE) Press this button to clear the BIOS setup information only when the systems hangs due to provide better overclocking SLOW_MODE margins when using the Slow Mode switch. 1-18 E11133_MB_pin_definition_v2.indd 18 Motherboard Pin Definition 2015/12/28 17:21:49 4.


