User Guide
Page 3
... the front panel assembly 2-11 2.4.2 Reinstalling the front panel assembly 2-11 2.5 5.25-inch drives 2-12 2.6 SATA/SAS hard disk drives 2-13 2.6.1 Installing the HDD module cage 2-13 2.6.2 Removing the HDD module cage 2-14 2.6.3 Installing a hot-swap SATA/SAS hard disk drive........... 2-14 2.6.4 Removing and reinstalling the backplane 2-16 iii
... the front panel assembly 2-11 2.4.2 Reinstalling the front panel assembly 2-11 2.5 5.25-inch drives 2-12 2.6 SATA/SAS hard disk drives 2-13 2.6.1 Installing the HDD module cage 2-13 2.6.2 Removing the HDD module cage 2-14 2.6.3 Installing a hot-swap SATA/SAS hard disk drive........... 2-14 2.6.4 Removing and reinstalling the backplane 2-16 iii
User Guide
Page 15
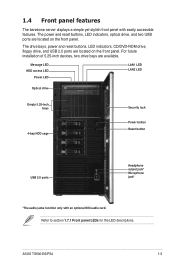
The power and reset buttons, LED indicators, optical drive, and two USB ports are available. ASUS TS500-E6/PS4 1-5 Message LED HDD access LED Power LED LAN1 LED LAN2 LED Optical drive Empty 5.25-inch bays 4-bay HDD cage Security lock Power button Reset button USB 2.0 ports Headphone output jack* Microphone jack* *The audio jacks function...
The power and reset buttons, LED indicators, optical drive, and two USB ports are available. ASUS TS500-E6/PS4 1-5 Message LED HDD access LED Power LED LAN1 LED LAN2 LED Optical drive Empty 5.25-inch bays 4-bay HDD cage Security lock Power button Reset button USB 2.0 ports Headphone output jack* Microphone jack* *The audio jacks function...

User Guide
Page 33
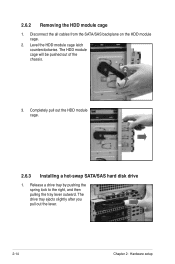
... Level the HDD module cage latch counterclockwise. 3 3. Ensure of the type of wires and other obstructions. 2. Lock the cage latch properly. 6. Insert the HDD module cage into the bay. 2 4. ASUS TS500-E6/PS4 5 2-13 When the HDD module cage is free of HDD module cage you to the SATA/...SAS backplane on the HDD module cage. Connect the appropriate cables to ...
... Level the HDD module cage latch counterclockwise. 3 3. Ensure of the type of wires and other obstructions. 2. Lock the cage latch properly. 6. Insert the HDD module cage into the bay. 2 4. ASUS TS500-E6/PS4 5 2-13 When the HDD module cage is free of HDD module cage you to the SATA/...SAS backplane on the HDD module cage. Connect the appropriate cables to ...
User Guide
Page 34
Release a drive tray by pushing the spring lock to the right, and then pulling the tray lever outward. Disconnect the all cables from the SATA/SAS backplane on the HDD module cage. 2. Completely pull out the HDD module cage. 2.6.3 Installing a hot-swap SATA/SAS hard disk drive 1. The drive tray ejects slightly after you pull out the lever. 2-14 Chapter 2: Hardware setup The HDD module cage will be pushed out of the chassis. 2 3. Level the HDD module cage latch counterclockwise. 2.6.2 Removing the HDD module cage 1.
Release a drive tray by pushing the spring lock to the right, and then pulling the tray lever outward. Disconnect the all cables from the SATA/SAS backplane on the HDD module cage. 2. Completely pull out the HDD module cage. 2.6.3 Installing a hot-swap SATA/SAS hard disk drive 1. The drive tray ejects slightly after you pull out the lever. 2-14 Chapter 2: Hardware setup The HDD module cage will be pushed out of the chassis. 2 3. Level the HDD module cage latch counterclockwise. 2.6.2 Removing the HDD module cage 1.