User Guide
Page 2
... of merchantability or fitness for backup purposes, without intent to infringe. Specifications and information contained in any form or by any time without notice, and should not be construed as a commitment by ASUS. All Rights Reserved. ii Products and corporate names appearing in this manual...warranty of any kind, either express or implied, including but not limited to change at any means, except documentation kept by ASUS; ASUS assumes no event shall ASUS, its directors, officers, employees, or agents be extended if: (1) the product is repaired, modified or altered, unless ...
... of merchantability or fitness for backup purposes, without intent to infringe. Specifications and information contained in any form or by any time without notice, and should not be construed as a commitment by ASUS. All Rights Reserved. ii Products and corporate names appearing in this manual...warranty of any kind, either express or implied, including but not limited to change at any means, except documentation kept by ASUS; ASUS assumes no event shall ASUS, its directors, officers, employees, or agents be extended if: (1) the product is repaired, modified or altered, unless ...
User Guide
Page 3
Contents Notices...vii Safety information viii About this guide ix Chapter 1: Product introduction 1.1 System package contents 1-2 1.2 Serial number label 1-2 1.3 System specifications 1-3 1.4 Front panel features 1-5 1.5 Rear panel features 1-6 1.6 Internal features 1-7 1.7 LED information 1-8 1.7.1 Front panel LEDs 1-8 1.7.2 Rear panel LEDs 1-9 Chapter 2: Hardware setup 2.1 Chassis cover 2-2 2.1.1 Removing the side cover 2-2 2.1.2 ...
Contents Notices...vii Safety information viii About this guide ix Chapter 1: Product introduction 1.1 System package contents 1-2 1.2 Serial number label 1-2 1.3 System specifications 1-3 1.4 Front panel features 1-5 1.5 Rear panel features 1-6 1.6 Internal features 1-7 1.7 LED information 1-8 1.7.1 Front panel LEDs 1-8 1.7.2 Rear panel LEDs 1-9 Chapter 2: Hardware setup 2.1 Chassis cover 2-2 2.1.1 Removing the side cover 2-2 2.1.2 ...
User Guide
Page 9
... the necessary drivers for system integrators, and experienced users with at least basic knowledge of the server, including sections on front panel and rear panel specifications. 2. ix Chapter 4: Motherboard information This chapter includes the motherboard layout and brief descriptions of electronic products. DO NOT throw the mercury-containing button cell battery...
... the necessary drivers for system integrators, and experienced users with at least basic knowledge of the server, including sections on front panel and rear panel specifications. 2. ix Chapter 4: Motherboard information This chapter includes the motherboard layout and brief descriptions of electronic products. DO NOT throw the mercury-containing button cell battery...
User Guide
Page 11
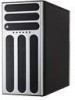
Product introduction Chapter 1 This chapter describes the general features of the server, including sections on front panel and rear panel specifications. ASUS TS500-E6/PS4
Product introduction Chapter 1 This chapter describes the general features of the server, including sections on front panel and rear panel specifications. ASUS TS500-E6/PS4
User Guide
Page 13
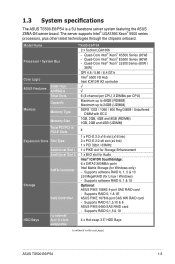
...specifications The ASUS TS500-E6/PS4 is a 5U barebone server system featuring the ASUS Z8NA-D6 server board. Supports software RAID 0, 1 & 10 Storage Optional: ASUS PIKE 1064E 4-port SAS RAID card - Supports RAID 0,1,5,10 & 6 ASUS PIKE 6480 SAS RAID card - Supports RAID 0, 1 & 1E SAS Controller ASUS PIKE 1078 8-port SAS HW RAID card - Model Name TS500-E6/PS4...4 x Hot-swap 3.5" HDD Bays swappable (continued on the next page) ASUS TS500-E6/PS4 1-3 Supports RAID 0,1,5 & 10 I /O controller ASUS Features Smart Fan ASWM2.0 √ √ Total Slots 6 (3-channel per...
...specifications The ASUS TS500-E6/PS4 is a 5U barebone server system featuring the ASUS Z8NA-D6 server board. Supports software RAID 0, 1 & 10 Storage Optional: ASUS PIKE 1064E 4-port SAS RAID card - Supports RAID 0,1,5,10 & 6 ASUS PIKE 6480 SAS RAID card - Supports RAID 0, 1 & 1E SAS Controller ASUS PIKE 1078 8-port SAS HW RAID card - Model Name TS500-E6/PS4...4 x Hot-swap 3.5" HDD Bays swappable (continued on the next page) ASUS TS500-E6/PS4 1-3 Supports RAID 0,1,5 & 10 I /O controller ASUS Features Smart Fan ASWM2.0 √ √ Total Slots 6 (3-channel per...
User Guide
Page 14
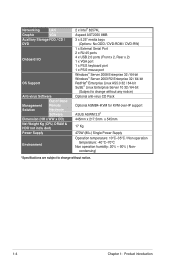
condensing) *Specifications are subject to change without any notice) Optional anti-virus CD Pack Optional ASMB4-iKVM for KVM-over-IP support ASUS ASWM 2.0® 445mm x 217.5mm x 545mm 17 Kg 470W (80+) Single Power Supply Operation temperature: 10°C-35°C / Non operation temperature: -40°C-70&#...
condensing) *Specifications are subject to change without any notice) Optional anti-virus CD Pack Optional ASMB4-iKVM for KVM-over-IP support ASUS ASWM 2.0® 445mm x 217.5mm x 545mm 17 Kg 470W (80+) Single Power Supply Operation temperature: 10°C-35°C / Non operation temperature: -40°C-70&#...
User Guide
Page 62
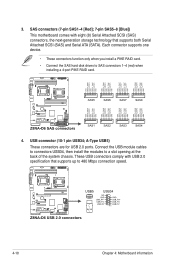
SAS connectors (7-pin SAS1-4 [Red]; 7-pin SAS5-8 [Blue]) This motherboard comes with USB 2.0 specification that supports both Serial Attached SCSI (SAS) and Serial ATA (SATA). 3. Connect the USB module cables to connectors USB34, then install the modules to SAS ...
SAS connectors (7-pin SAS1-4 [Red]; 7-pin SAS5-8 [Blue]) This motherboard comes with USB 2.0 specification that supports both Serial Attached SCSI (SAS) and Serial ATA (SATA). 3. Connect the USB module cables to connectors USB34, then install the modules to SAS ...
User Guide
Page 77
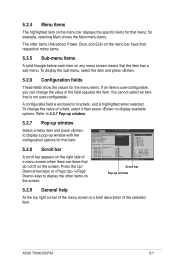
... 5.2.9 General help At the top right corner of the menu screen is user-configurable, you can change the value of the field opposite the item. ASUS TS500-E6/PS4 5-7 Assertion Width [112toUS2B sPeocrotnsds] PCIE Ports Configuration PCIE Port 0 PCIE Port 1 PCIE Port 2 PCIE Port 3 PCIE Port 4 PCIE Port 5 PCIE High ...Press the Up/ Down arrow keys or / keys to display available options. 5.2.4 Menu items The highlighted item on the menu bar displays the specific items for that item. 5.2.8 Scroll bar A scroll bar appears on the right side of a menu screen when there are items that do not...
... 5.2.9 General help At the top right corner of the menu screen is user-configurable, you can change the value of the field opposite the item. ASUS TS500-E6/PS4 5-7 Assertion Width [112toUS2B sPeocrotnsds] PCIE Ports Configuration PCIE Port 0 PCIE Port 1 PCIE Port 2 PCIE Port 3 PCIE Port 4 PCIE Port 5 PCIE High ...Press the Up/ Down arrow keys or / keys to display available options. 5.2.4 Menu items The highlighted item on the menu bar displays the specific items for that item. 5.2.8 Scroll bar A scroll bar appears on the right side of a menu screen when there are items that do not...
User Guide
Page 82
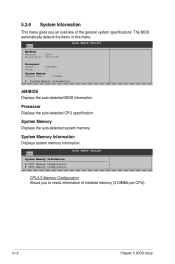
...). 5-12 Chapter 5: BIOS setup System Memory Displays the auto-detected system memory. 5.3.6 System Information This menu gives you to check information of the general system specifications. Processor Displays the auto-detected CPU specification. The BIOS automatically detects the items in this menu.
...). 5-12 Chapter 5: BIOS setup System Memory Displays the auto-detected system memory. 5.3.6 System Information This menu gives you to check information of the general system specifications. Processor Displays the auto-detected CPU specification. The BIOS automatically detects the items in this menu.
User Guide
Page 85
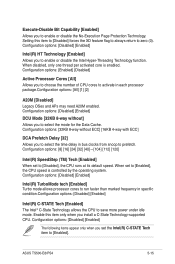
... specific condition.Configuration options: [Disabled] [Enabled] Intel(R) C-STATE Tech [Enabled] The Intel® C-State Technology allows the CPU to save more power under idle mode. Configuration options: [Disabled] [Enabled] Intel(R) TurboMode tech [Enabled] Turbo mode allows processor cores to run faster than marked frequency in bus clocks from snoop to prefetch. ASUS TS500-E6/PS4...
... specific condition.Configuration options: [Disabled] [Enabled] Intel(R) C-STATE Tech [Enabled] The Intel® C-State Technology allows the CPU to save more power under idle mode. Configuration options: [Disabled] [Enabled] Intel(R) TurboMode tech [Enabled] Turbo mode allows processor cores to run faster than marked frequency in bus clocks from snoop to prefetch. ASUS TS500-E6/PS4...
User Guide
Page 88
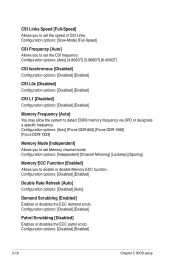
... disables the ECC demand scrub. Configuration options: [Slow-Mode] [Full-Speed] CSI Frequency [Auto] Allows you to detect DDR3 memory frequency via SPD or designate a specific frequency. Configuration options: [Auto] [4.800GT] [5.866GT] [6.400GT] CSI Isochronous [Disabled] Configuration options: [Disabled] [Enabled] CSI L0s [Disabled] Configuration options: [Disabled] [Enabled] CSI L1 [Disabled] Configuration...
... disables the ECC demand scrub. Configuration options: [Slow-Mode] [Full-Speed] CSI Frequency [Auto] Allows you to detect DDR3 memory frequency via SPD or designate a specific frequency. Configuration options: [Auto] [4.800GT] [5.866GT] [6.400GT] CSI Isochronous [Disabled] Configuration options: [Disabled] [Enabled] CSI L0s [Disabled] Configuration options: [Disabled] [Enabled] CSI L1 [Disabled] Configuration...
User Guide
Page 98
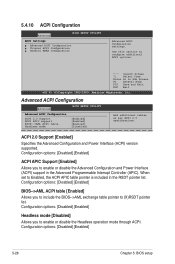
... UTILITY Advanced ACPI Configuration ACPI 2.0 Support ACPI APIC support BIOS-->AML ACPI table Headless mode [Enabled] [Enabled] [Enabled] [Disabled] Add additional tables as per ACPI 2.0 specifications. Configuration options: [Disabled] [Enabled] BIOS-->AML ACPI table [Enabled] Allows you to enable or disable the Headless operation mode through ACPI. Configuration options: [Disabled] [Enabled...
... UTILITY Advanced ACPI Configuration ACPI 2.0 Support ACPI APIC support BIOS-->AML ACPI table Headless mode [Enabled] [Enabled] [Enabled] [Disabled] Add additional tables as per ACPI 2.0 specifications. Configuration options: [Disabled] [Enabled] BIOS-->AML ACPI table [Enabled] Allows you to enable or disable the Headless operation mode through ACPI. Configuration options: [Disabled] [Enabled...
User Guide
Page 138
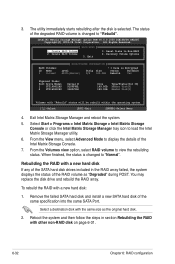
... Console or click the Intel Matrix Storage Manager tray icon to "Rebuild". To rebuild the RAID with a new hard disk If any of the same specification into the same SATA Port. Remove the failed SATA hard disk and install a new SATA hard disk of the SATA hard disk drives included in...
... Console or click the Intel Matrix Storage Manager tray icon to "Rebuild". To rebuild the RAID with a new hard disk If any of the same specification into the same SATA Port. Remove the failed SATA hard disk and install a new SATA hard disk of the SATA hard disk drives included in...