
User Manual
Page 2
... Side...1-7 Rear Side...1-8 Keyboard Usage...1-10 Special Function Keys 1-10 Touchpad Usage...1-12 Multi-finger gesture input 1-12 Tablet PC Mode...1-14 Chapter 2: Getting Started Powering on your Eee PC...2-2 First-time Startup...2-3 Desktop...2-5 Network Connection...2-6 Configuring a wireless network connection 2-6 Local Area Network 2-7 Browsing web pages 2-10 Chapter 3: Using the Eee PC ASUS Update...3-2 Updating the BIOS through the...
... Side...1-7 Rear Side...1-8 Keyboard Usage...1-10 Special Function Keys 1-10 Touchpad Usage...1-12 Multi-finger gesture input 1-12 Tablet PC Mode...1-14 Chapter 2: Getting Started Powering on your Eee PC...2-2 First-time Startup...2-3 Desktop...2-5 Network Connection...2-6 Configuring a wireless network connection 2-6 Local Area Network 2-7 Browsing web pages 2-10 Chapter 3: Using the Eee PC ASUS Update...3-2 Updating the BIOS through the...

User Manual
Page 3
... Tool Bar 3-7 Fun Touch...3-7 Eee Amuse...3-8 Eee Sharing...3-9 Eee Xperience...3-9 Eee Tools...3-9 Boingo (on selected models 3-10 Touch Gate Mode 3-10 Touch Gate Mode...3-11 Using Touch Gate Mode 3-11 Changing Function Shortcuts 3-12 Switching back to Windows Mode 3-13 Microsoft® Office Trial...3-14 Chapter 4: ... Partition (F9 Recovery 4-4 Using the Support DVD 4-4 Boot Booster...4-6 Appendix Declarations and Safety Statements A-2 Copyright Information...A-12 Limitation of Liability...A-13 Service and Support...A-13 ASUS Eee PC iii
... Tool Bar 3-7 Fun Touch...3-7 Eee Amuse...3-8 Eee Sharing...3-9 Eee Xperience...3-9 Eee Tools...3-9 Boingo (on selected models 3-10 Touch Gate Mode 3-10 Touch Gate Mode...3-11 Using Touch Gate Mode 3-11 Changing Function Shortcuts 3-12 Switching back to Windows Mode 3-13 Microsoft® Office Trial...3-14 Chapter 4: ... Partition (F9 Recovery 4-4 Using the Support DVD 4-4 Boot Booster...4-6 Appendix Declarations and Safety Statements A-2 Copyright Information...A-12 Limitation of Liability...A-13 Service and Support...A-13 ASUS Eee PC iii
User Manual
Page 17
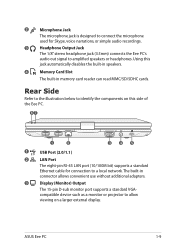
Rear Side Refer to the illustration below to identify the components on a larger external display. ASUS Eee PC 1-9 compatible device such as a monitor or projector to a local network. The built-in memory card reader can read MMC/SD/SDHC cards..... 3 Display (Monitor) Output The 15-pin D-sub monitor port supports a standard VGA- Using this side of the Eee PC. 67 1 2 3 4 5 1 USB Port (2.0/1.1) 2 LAN Port The eight-pin RJ-45 LAN port (10/100M bit) supports a standard Ethernet cable for Skype, voice narrations, or simple audio recordings. 3 Headphone Output Jack The...
Rear Side Refer to the illustration below to identify the components on a larger external display. ASUS Eee PC 1-9 compatible device such as a monitor or projector to a local network. The built-in memory card reader can read MMC/SD/SDHC cards..... 3 Display (Monitor) Output The 15-pin D-sub monitor port supports a standard VGA- Using this side of the Eee PC. 67 1 2 3 4 5 1 USB Port (2.0/1.1) 2 LAN Port The eight-pin RJ-45 LAN port (10/100M bit) supports a standard Ethernet cable for Skype, voice narrations, or simple audio recordings. 3 Headphone Output Jack The...
User Manual
Page 18
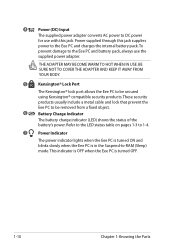
...Refer to the LED status table on pages 1-3 to 1-4. 7 Power Indicator The power indicator lights when the Eee PC is turned ON and blinks slowly when the Eee PC is turned OFF. 1-10 Chapter 1: Knowing the Parts Power supplied through this jack. 4 Power (DC) Input The supplied power adapter ...converts AC power to DC power for use with this jack supplies power to the Eee PC and charges the internal ...
...Refer to the LED status table on pages 1-3 to 1-4. 7 Power Indicator The power indicator lights when the Eee PC is turned ON and blinks slowly when the Eee PC is turned OFF. 1-10 Chapter 1: Knowing the Parts Power supplied through this jack. 4 Power (DC) Input The supplied power adapter ...converts AC power to DC power for use with this jack supplies power to the Eee PC and charges the internal ...

User Manual
Page 29
Select the network's location. 10. The initialization is finished. ASUS Eee PC 2-5 Click Next to launch the corresponding applications and enter the specified folders. Desktop There are several shortcuts on the desktop. Double-click them to continue. The actual Desktop screen may vary according to different models. Some applications would form minimized icons in the Notification area. 9.
Select the network's location. 10. The initialization is finished. ASUS Eee PC 2-5 Click Next to launch the corresponding applications and enter the specified folders. Desktop There are several shortcuts on the desktop. Double-click them to continue. The actual Desktop screen may vary according to different models. Some applications would form minimized icons in the Notification area. 9.

User Manual
Page 33
Click the network icon in the taskbar and click the connection you just created. 12. Enter your User name and, Password, and Connection name. ASUS Eee PC 2-9 Click Connect. 10. 7. Select Connect to finish the configuration. 11. Click Close to the Internet and click Next. 8. Click Connect to connect to the Internet. Enter your user name and password. Select Broadband (PPPoE) and click Next. 9.
Click the network icon in the taskbar and click the connection you just created. 12. Enter your User name and, Password, and Connection name. ASUS Eee PC 2-9 Click Connect. 10. 7. Select Connect to finish the configuration. 11. Click Close to the Internet and click Next. 8. Click Connect to connect to the Internet. Enter your user name and password. Select Broadband (PPPoE) and click Next. 9.
User Manual
Page 34
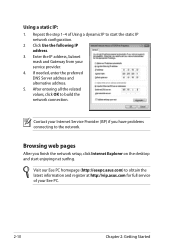
... the network. Using a static IP: 1. Enter the IP address, Subnet mask and Gateway from your Eee PC. 2-10 Chapter 2: Getting Started Visit our Eee PC homepage (http://eeepc.asus.com) to obtain the latest information and register at http://vip.asus.com for full service of Using a dynamic IP to build the network connection. After entering all...
... the network. Using a static IP: 1. Enter the IP address, Subnet mask and Gateway from your Eee PC. 2-10 Chapter 2: Getting Started Visit our Eee PC homepage (http://eeepc.asus.com) to obtain the latest information and register at http://vip.asus.com for full service of Using a dynamic IP to build the network connection. After entering all...
User Manual
Page 44
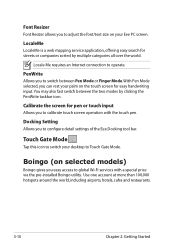
Font Resizer Font Resizer allows you to configure detail settings of the Eee Docking tool bar. With Pen Mode selected, you can rest your palm on the touch screen for pen or touch input Allows you to switch ... sorted by clicking the PenWrite taskbar icon. Use one account at more than 100,000 hotspots around the world, including airports, hotels, cafes and restaurants. 3-10 Chapter 2: Getting Started Locale Me requires an Internet connection to switch your Eee PC screen.
Font Resizer Font Resizer allows you to configure detail settings of the Eee Docking tool bar. With Pen Mode selected, you can rest your palm on the touch screen for pen or touch input Allows you to switch ... sorted by clicking the PenWrite taskbar icon. Use one account at more than 100,000 hotspots around the world, including airports, hotels, cafes and restaurants. 3-10 Chapter 2: Getting Started Locale Me requires an Internet connection to switch your Eee PC screen.


