Sabertooth X58 user's manual
Page 4
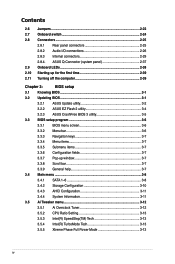
... Chapter 3: BIOS setup 3.1 Knowing BIOS 3-1 3.2 Updating BIOS 3-1 3.2.1 ASUS Update utility 3-2 3.2.2 ASUS EZ Flash 2 utility 3-4 3.2.3 ASUS CrashFree BIOS 3 utility 3-5 3.3 BIOS setup program 3-6 3.3.1 BIOS menu screen 3-6 3.3.2 Menu bar 3-6 3.3.3 Navigation keys 3-7 3.3.4 Menu items 3-7 3.3.5 Submenu items 3-7 3.3.6 Configuration fields 3-7 3.3.7 Pop-up window 3-7 3.3.8 Scroll bar 3-7 3.3.9 General help 3-7 3.4 Main menu 3-8 3.4.1 SATA 1-6 3-8 3.4.2 Storage Configuration 3-10 3.4.3 AHCI Configuration 3-11 3.4.4 System Information 3-11 3.5 Ai Tweaker...
... Chapter 3: BIOS setup 3.1 Knowing BIOS 3-1 3.2 Updating BIOS 3-1 3.2.1 ASUS Update utility 3-2 3.2.2 ASUS EZ Flash 2 utility 3-4 3.2.3 ASUS CrashFree BIOS 3 utility 3-5 3.3 BIOS setup program 3-6 3.3.1 BIOS menu screen 3-6 3.3.2 Menu bar 3-6 3.3.3 Navigation keys 3-7 3.3.4 Menu items 3-7 3.3.5 Submenu items 3-7 3.3.6 Configuration fields 3-7 3.3.7 Pop-up window 3-7 3.3.8 Scroll bar 3-7 3.3.9 General help 3-7 3.4 Main menu 3-8 3.4.1 SATA 1-6 3-8 3.4.2 Storage Configuration 3-10 3.4.3 AHCI Configuration 3-11 3.4.4 System Information 3-11 3.5 Ai Tweaker...

Sabertooth X58 user's manual
Page 6
...Priority 3-31 3.8.2 Boot Settings Configuration 3-32 3.8.3 Security 3-33 3.9 Tools menu 3-35 3.9.1 ASUS EZ Flash 2 3-35 3.9.2 ASUS O.C. Profile 3-35 3.9.3 AI NET 2 3-37 3.9.4 Drive Xpert Configuration 3-37 3.10 Exit menu 3-39 Chapter 4: Software support 4.1 Installing an operating system 4-1 4.2 Support DVD...4.5.1 Creating a RAID driver disk without entering the OS 4-15 4.5.2 Creating a RAID driver disk in Windows 4-15 4.5.3 Installing the RAID driver during Windows® OS installation....... 4-16 4.5.4 Using a USB floppy disk drive 4-17 Chapter 5: Multiple GPU technology...
...Priority 3-31 3.8.2 Boot Settings Configuration 3-32 3.8.3 Security 3-33 3.9 Tools menu 3-35 3.9.1 ASUS EZ Flash 2 3-35 3.9.2 ASUS O.C. Profile 3-35 3.9.3 AI NET 2 3-37 3.9.4 Drive Xpert Configuration 3-37 3.10 Exit menu 3-39 Chapter 4: Software support 4.1 Installing an operating system 4-1 4.2 Support DVD...4.5.1 Creating a RAID driver disk without entering the OS 4-15 4.5.2 Creating a RAID driver disk in Windows 4-15 4.5.3 Installing the RAID driver during Windows® OS installation....... 4-16 4.5.4 Using a USB floppy disk drive 4-17 Chapter 5: Multiple GPU technology...
Sabertooth X58 user's manual
Page 42
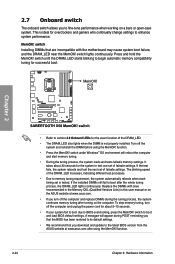
...the system and reinstall the DIMM before using the MemOK! switch under Windows® OS environment will appear during the tuning process, the system ... 2 • Refer to section 2.9 Onboard LEDs for successful boot. It takes about 30 seconds for about 5-10 seconds. • If your system fail to boot due to BIOS overclocking, press the MemOK! Replace the DIMMs... ones recommended in the Memory QVL (Qualified Vendors Lists) in this user manual or on the ASUS website at www.asus.com after the whole tuning process, the DRAM_LED lights continuously. 2.7 Onboard switch The onboard switch ...
...the system and reinstall the DIMM before using the MemOK! switch under Windows® OS environment will appear during the tuning process, the system ... 2 • Refer to section 2.9 Onboard LEDs for successful boot. It takes about 30 seconds for about 5-10 seconds. • If your system fail to boot due to BIOS overclocking, press the MemOK! Replace the DIMMs... ones recommended in the Memory QVL (Qualified Vendors Lists) in this user manual or on the ASUS website at www.asus.com after the whole tuning process, the DRAM_LED lights continuously. 2.7 Onboard switch The onboard switch ...

Sabertooth X58 user's manual
Page 43
... DVD. Optical S/PDIF Out port 7. USB 3.0 ports 1 and 2 11. External SATA port 10. Audio I/O ports** *and **: Refer to the tables on the next page for LAN port and...port. • Due to USB 3.0 controller limitation, USB 3.0 devices can only be used under Windows® OS environment and after the USB 3.0 driver installation. • USB 3.0 devices can only... in the BIOS setting to USB 3.0 ports for faster and better performance for details. USB 2.0 ports 5 and 6 6. ASUS SABERTOOTH X58 2-25 LAN (RJ-45) port* 5. IEEE 1394a port 8. Power External SATA port 9. USB 2.0 ports 3 and 4...
... DVD. Optical S/PDIF Out port 7. USB 3.0 ports 1 and 2 11. External SATA port 10. Audio I/O ports** *and **: Refer to the tables on the next page for LAN port and...port. • Due to USB 3.0 controller limitation, USB 3.0 devices can only be used under Windows® OS environment and after the USB 3.0 driver installation. • USB 3.0 devices can only... in the BIOS setting to USB 3.0 ports for faster and better performance for details. USB 2.0 ports 5 and 6 6. ASUS SABERTOOTH X58 2-25 LAN (RJ-45) port* 5. IEEE 1394a port 8. Power External SATA port 9. USB 2.0 ports 3 and 4...

Sabertooth X58 user's manual
Page 47
.... ASUS SABERTOOTH X58 2-29 See section 3.4.2 Storage Configuration for details. • Before creating a RAID set the Configure SATA as item in the BIOS to [AHCI]. Intel® ICH10R Serial ATA 3.0 Gb/s connectors (7-pin SATA 1-6 [black]) These connectors are set the Configure SATA as in the motherboard support DVD. • You must install Windows®...
.... ASUS SABERTOOTH X58 2-29 See section 3.4.2 Storage Configuration for details. • Before creating a RAID set the Configure SATA as item in the BIOS to [AHCI]. Intel® ICH10R Serial ATA 3.0 Gb/s connectors (7-pin SATA 1-6 [black]) These connectors are set the Configure SATA as in the motherboard support DVD. • You must install Windows®...
Sabertooth X58 user's manual
Page 61
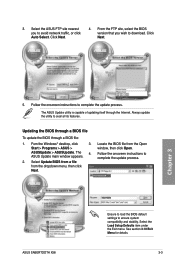
... a BIOS file To update the BIOS through the Internet. See section 3.10 Exit Menu for details. 3-3 3. Click Next. 4. Fom the Windows® desktop, click Start > Programs > ASUS > ASUSUpdate > ASUSUpdate. Follow the onscreen instructions to ensure system compatibility and stability. SABTOX58.ROM ASUS SABERTOOTH X58 SABTOX58 Ensure to load the BIOS default settings to complete the update...
... a BIOS file To update the BIOS through the Internet. See section 3.10 Exit Menu for details. 3-3 3. Click Next. 4. Fom the Windows® desktop, click Start > Programs > ASUS > ASUSUpdate > ASUSUpdate. Follow the onscreen instructions to ensure system compatibility and stability. SABTOX58.ROM ASUS SABERTOOTH X58 SABTOX58 Ensure to load the BIOS default settings to complete the update...
Sabertooth X58 user's manual
Page 97
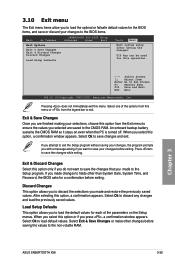
... Exit & Save Changes Exit & Discard Changes Discard Changes Load Setup Defaults Exit system setup after saving the changes. Chapter 3 ASUS SABERTOOTH X58 3-39 3.10 Exit menu The Exit menu items allow you to load the optimal or failsafe default values for this operation. ←→ Select...restore the previously saved values. Select Ok to the CMOS RAM. After selecting this menu. When you select this option, a confirmation window appears. Pressing does not immediately exit this option, a confirmation appears. Exit & Save Changes Once you select this option or if ...
... Exit & Save Changes Exit & Discard Changes Discard Changes Load Setup Defaults Exit system setup after saving the changes. Chapter 3 ASUS SABERTOOTH X58 3-39 3.10 Exit menu The Exit menu items allow you to load the optimal or failsafe default values for this operation. ←→ Select...restore the previously saved values. Select Ok to the CMOS RAM. After selecting this menu. When you select this option, a confirmation window appears. Pressing does not immediately exit this option, a confirmation appears. Exit & Save Changes Once you select this option or if ...
Sabertooth X58 user's manual
Page 104
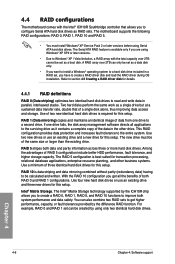
... data transfer rate, double that allows you to create a RAID 0, RAID 1, RAID 5, and RAID 10 functions to configure Serial ATA hard disk drives as a data disk only. • If you want to install a Windows® operating system to Windows® XP / Vista limitation, a RAID array with the Intel® ICH10R Southbridge controller that...
... data transfer rate, double that allows you to create a RAID 0, RAID 1, RAID 5, and RAID 10 functions to configure Serial ATA hard disk drives as a data disk only. • If you want to install a Windows® operating system to Windows® XP / Vista limitation, a RAID array with the Intel® ICH10R Southbridge controller that...

