Sabertooth X58 user's manual
Page 4
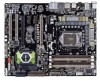
...3-1 3.2.1 ASUS Update utility 3-2 3.2.2 ASUS EZ Flash 2 utility 3-4 3.2.3 ASUS CrashFree BIOS 3 utility 3-5 3.3 BIOS setup program 3-6 3.3.1 BIOS menu screen 3-6 3.3.2 Menu bar 3-6 3.3.3 Navigation keys 3-7 3.3.4 Menu items 3-7 3.3.5 Submenu items 3-7 3.3.6 Configuration fields 3-7 3.3.7 Pop-up window 3-7 3.3.8 Scroll bar 3-7 3.3.9 General help 3-7 3.4 Main menu 3-8 3.4.1 SATA 1-6 3-8 3.4.2 Storage Configuration 3-10 3.4.3 AHCI Configuration 3-11 3.4.4 System Information 3-11 3.5 Ai Tweaker menu 3-12 3.5.1 Ai Overclock Tuner 3-12 3.5.2 CPU Ratio Setting...
...3-1 3.2.1 ASUS Update utility 3-2 3.2.2 ASUS EZ Flash 2 utility 3-4 3.2.3 ASUS CrashFree BIOS 3 utility 3-5 3.3 BIOS setup program 3-6 3.3.1 BIOS menu screen 3-6 3.3.2 Menu bar 3-6 3.3.3 Navigation keys 3-7 3.3.4 Menu items 3-7 3.3.5 Submenu items 3-7 3.3.6 Configuration fields 3-7 3.3.7 Pop-up window 3-7 3.3.8 Scroll bar 3-7 3.3.9 General help 3-7 3.4 Main menu 3-8 3.4.1 SATA 1-6 3-8 3.4.2 Storage Configuration 3-10 3.4.3 AHCI Configuration 3-11 3.4.4 System Information 3-11 3.5 Ai Tweaker menu 3-12 3.5.1 Ai Overclock Tuner 3-12 3.5.2 CPU Ratio Setting...

Sabertooth X58 user's manual
Page 6
... operating system 4-1 4.2 Support DVD information 4-1 4.2.1 Running the support DVD 4-1 4.2.2 Obtaining the software manuals 4-2 4.3 Software information 4-3 4.3.1 ASUS PC Probe II 4-3 4.3.2 ASUS Fan Xpert 4-4 4.3.3 Audio configurations 4-5 4.4 RAID configurations 4-6 4.4.1 RAID definitions 4-6 4.4.2 Installing Serial ATA hard disks 4-7 4.4.3 Setting the RAID item in BIOS 4-7 4.4.4 Intel® Matrix Storage Manager option ROM utility 4-7 4.4.5 Marvell RAID utility 4-11 4.5 Creating a RAID driver...
... operating system 4-1 4.2 Support DVD information 4-1 4.2.1 Running the support DVD 4-1 4.2.2 Obtaining the software manuals 4-2 4.3 Software information 4-3 4.3.1 ASUS PC Probe II 4-3 4.3.2 ASUS Fan Xpert 4-4 4.3.3 Audio configurations 4-5 4.4 RAID configurations 4-6 4.4.1 RAID definitions 4-6 4.4.2 Installing Serial ATA hard disks 4-7 4.4.3 Setting the RAID item in BIOS 4-7 4.4.4 Intel® Matrix Storage Manager option ROM utility 4-7 4.4.5 Marvell RAID utility 4-11 4.5 Creating a RAID driver...

Sabertooth X58 user's manual
Page 10
...and for product and software updates. 1. ASUS websites The ASUS website provides updated information on the motherboard. • Chapter 3: BIOS setup This chapter tells how to change system settings through the BIOS Setup menus. Detailed descriptions of the BIOS parameters are not part of the support ...the following parts: • Chapter 1: Product introduction This chapter describes the features of the switches, jumpers, and connectors on ASUS hardware and software products. How this guide This user guide contains the information you have been added by your dealer. It ...
...and for product and software updates. 1. ASUS websites The ASUS website provides updated information on the motherboard. • Chapter 3: BIOS setup This chapter tells how to change system settings through the BIOS Setup menus. Detailed descriptions of the BIOS parameters are not part of the support ...the following parts: • Chapter 1: Product introduction This chapter describes the features of the switches, jumpers, and connectors on ASUS hardware and software products. How this guide This user guide contains the information you have been added by your dealer. It ...

Sabertooth X58 user's manual
Page 18
... on your choice from the available options. ASUS EZ-Flash 2 ASUS EZ Flash 2 is a user-friendly utility that allows you to conveniently store or load multiple BIOS settings. Refer to page 3-35 for details. ASUS Q-Connector ASUS Q-Connector allows you configure your motherboard. Refer... to page 2-37 for details. Profile The motherboard features the ASUS O.C. ASUS MyLogo2™ This feature allows you to select...
... on your choice from the available options. ASUS EZ-Flash 2 ASUS EZ Flash 2 is a user-friendly utility that allows you to conveniently store or load multiple BIOS settings. Refer to page 3-35 for details. ASUS Q-Connector ASUS Q-Connector allows you configure your motherboard. Refer... to page 2-37 for details. Profile The motherboard features the ASUS O.C. ASUS MyLogo2™ This feature allows you to select...

Sabertooth X58 user's manual
Page 34
...subject to the physical characteristics of individual CPUs. or D.O.C.P. settings in the BIOS for the hyper DIMM support. • Visit the ASUS website for the latest QVL. 2-16 Chapter 2: Hardware... V V V V 7 N/A V V V V 7(1066-7-7-7-20) N/A V V V V 7(1066-7-7-7-20) N/A V V V 7(1066-7-7-7-20) N/A V V 8(7-7-7-20) 1.5 V VV V 7(1066-7-7-7-20) N/A V V V V (7-7-7-20) N/A V V V V (7-7-7-20) N/A V V V V (1066-7-7-7-20) N/A V V V V 7 N/A V V Side(s): SS - Load the X.M.P. Chapter 2 SABERTOOTH X58 Motherboard Qualified Vendors Lists (QVL) DDR3-1066MHz capability Vendor Part No.
...subject to the physical characteristics of individual CPUs. or D.O.C.P. settings in the BIOS for the hyper DIMM support. • Visit the ASUS website for the latest QVL. 2-16 Chapter 2: Hardware... V V V V 7 N/A V V V V 7(1066-7-7-7-20) N/A V V V V 7(1066-7-7-7-20) N/A V V V 7(1066-7-7-7-20) N/A V V 8(7-7-7-20) 1.5 V VV V 7(1066-7-7-7-20) N/A V V V V (7-7-7-20) N/A V V V V (7-7-7-20) N/A V V V V (1066-7-7-7-20) N/A V V V V 7 N/A V V Side(s): SS - Load the X.M.P. Chapter 2 SABERTOOTH X58 Motherboard Qualified Vendors Lists (QVL) DDR3-1066MHz capability Vendor Part No.

Sabertooth X58 user's manual
Page 36
...they support. Replace the system cover. 2.5.2 Configuring an expansion card After installing the expansion card, configure it and make the necessary hardware settings for details. 2-18 Chapter 2: Hardware information Secure the card to the card. See Chapter 3 for the expansion card. Align the...the card. 2. Assign an IRQ to the chassis with it by adjusting the software settings. 1. Install the software drivers for information on the system and change the necessary BIOS settings, if any. The following subsections describe the slots and the expansion cards that the cards...
...they support. Replace the system cover. 2.5.2 Configuring an expansion card After installing the expansion card, configure it and make the necessary hardware settings for details. 2-18 Chapter 2: Hardware information Secure the card to the card. See Chapter 3 for the expansion card. Align the...the card. 2. Assign an IRQ to the chassis with it by adjusting the software settings. 1. Install the software drivers for information on the system and change the necessary BIOS settings, if any. The following subsections describe the slots and the expansion cards that the cards...
Sabertooth X58 user's manual
Page 40
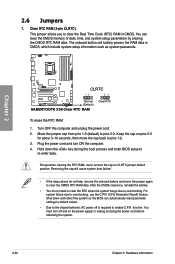
...Hold down and reboot the system so the BIOS can clear the CMOS memory of date, time, and system setup parameters by erasing the CMOS RTC RAM data. You must turn ON the computer. 4. Chapter 2 ® CLRTC 12 23 Normal (Default) SABERTOOTH X58 Clear RTC RAM Clear RTC To erase the...Time Clock (RTC) RAM in CMOS, which include system setup information such as system passwords. 2.6 Jumpers 1. function. You can automatically reset parameter settings to default values. • Due to the chipset behavior, AC power off and on CLRTC jumper default position. Except when clearing the RTC RAM,...
...Hold down and reboot the system so the BIOS can clear the CMOS memory of date, time, and system setup parameters by erasing the CMOS RTC RAM data. You must turn ON the computer. 4. Chapter 2 ® CLRTC 12 23 Normal (Default) SABERTOOTH X58 Clear RTC RAM Clear RTC To erase the...Time Clock (RTC) RAM in CMOS, which include system setup information such as system passwords. 2.6 Jumpers 1. function. You can automatically reset parameter settings to default values. • Due to the chipset behavior, AC power off and on CLRTC jumper default position. Except when clearing the RTC RAM,...

Sabertooth X58 user's manual
Page 41
...00V up to enable or disable the advanced CPU and DRAM Bus overvoltage settings in BIOS. ASUS SABERTOOTH X58 2-23 Ensure that your system functions well under high voltage settings. Read the following information before you change the setting of the OV_CPU jumper, shut down the computer and move the cap ... DIMMs with the voltage requirement below 1.65V. • The system may cause the system to work stably under the highest BIOS voltage settings before you to 2.46V • Before you install a new CPU and have not booted for the first time. 2. CPU / DRAM Bus...
...00V up to enable or disable the advanced CPU and DRAM Bus overvoltage settings in BIOS. ASUS SABERTOOTH X58 2-23 Ensure that your system functions well under high voltage settings. Read the following information before you change the setting of the OV_CPU jumper, shut down the computer and move the cap ... DIMMs with the voltage requirement below 1.65V. • The system may cause the system to work stably under the highest BIOS voltage settings before you to 2.46V • Before you install a new CPU and have not booted for the first time. 2. CPU / DRAM Bus...
Sabertooth X58 user's manual
Page 42
...; During the tuning process, the system loads and tests failsafe memory settings. switch Installing DIMMs that you download and update to the latest BIOS version from the ASUS website at www.asus.com. • If you that the BIOS has been restored to BIOS overclocking, press the MemOK! Replace the DIMMs with the motherboard may cause...
...; During the tuning process, the system loads and tests failsafe memory settings. switch Installing DIMMs that you download and update to the latest BIOS version from the ASUS website at www.asus.com. • If you that the BIOS has been restored to BIOS overclocking, press the MemOK! Replace the DIMMs with the motherboard may cause...

Sabertooth X58 user's manual
Page 43
... to use the hot-plug function of the external SATA ports, you have to set the JMB 36x ATA Controller item in the BIOS setting to section 3.6.3 Onboard Devices Configuration for details. 2.8 Connectors 2.8.1 Rear panel connectors Chapter 2 Rear panel connectors 1. ASUS SABERTOOTH X58 2-25 USB 2.0 ports 3 and 4 3. External SATA port 10. PS/2 keyboard/mouse combo port...
... to use the hot-plug function of the external SATA ports, you have to set the JMB 36x ATA Controller item in the BIOS setting to section 3.6.3 Onboard Devices Configuration for details. 2.8 Connectors 2.8.1 Rear panel connectors Chapter 2 Rear panel connectors 1. ASUS SABERTOOTH X58 2-25 USB 2.0 ports 3 and 4 3. External SATA port 10. PS/2 keyboard/mouse combo port...

Sabertooth X58 user's manual
Page 47
...8226; You must install Windows® XP Service Pack 2 or later version before using hot-plug and NCQ, set the Configure SATA as item in the BIOS to these connectors, set to [RAID]. ASUS SABERTOOTH X58 2-29 2.8.3 Internal connectors 1. Chapter 2 • These connectors are for the Serial ATA 3.0 Gb/s signal... drives and optical disc drives. Intel® ICH10R Serial ATA 3.0 Gb/s connectors (7-pin SATA 1-6 [black]) These connectors are set the Configure SATA as in the BIOS to Standard IDE mode by default. In Standard IDE mode, you intend to create a Serial ATA RAID...
...8226; You must install Windows® XP Service Pack 2 or later version before using hot-plug and NCQ, set the Configure SATA as item in the BIOS to these connectors, set to [RAID]. ASUS SABERTOOTH X58 2-29 2.8.3 Internal connectors 1. Chapter 2 • These connectors are for the Serial ATA 3.0 Gb/s signal... drives and optical disc drives. Intel® ICH10R Serial ATA 3.0 Gb/s connectors (7-pin SATA 1-6 [black]) These connectors are set the Configure SATA as in the BIOS to Standard IDE mode by default. In Standard IDE mode, you intend to create a Serial ATA RAID...

Sabertooth X58 user's manual
Page 48
...Driver. Chapter 2 2. Refer to section 3.6.3 Onboard Devices Configuration for Serial ATA 6.0 Gb/s hard disk drives. • These connectors are set the Marvell 9128 Controller item in the BIOS to [AHCI Mode]. For Windows Vista / Windows 7 OS, load only the Marvell 91xx SATA Controller Driver. 2-30 Chapter 2: Hardware ...2 or later versions before using the Marvell SATA controller, you have to IDE Mode by default. When using hot-plug and NCQ, set to create a RAID driver disk using the motherboard support DVD and load the driver during POST to enter the Marvell RAID utility to create...
...Driver. Chapter 2 2. Refer to section 3.6.3 Onboard Devices Configuration for Serial ATA 6.0 Gb/s hard disk drives. • These connectors are set the Marvell 9128 Controller item in the BIOS to [AHCI Mode]. For Windows Vista / Windows 7 OS, load only the Marvell 91xx SATA Controller Driver. 2-30 Chapter 2: Hardware ...2 or later versions before using the Marvell SATA controller, you have to IDE Mode by default. When using hot-plug and NCQ, set to create a RAID driver disk using the motherboard support DVD and load the driver during POST to enter the Marvell RAID utility to create...
Sabertooth X58 user's manual
Page 54
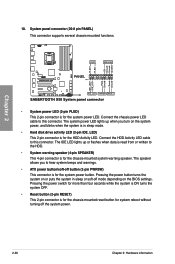
Connect the chassis power LED cable to this connector. Connect the HDD Activity LED cable to this connector. The speaker allows you turn on the BIOS settings. Pressing the power button turns the system on or puts the system in sleep or soft-off mode depending on the system power, and blinks ...
Connect the chassis power LED cable to this connector. Connect the HDD Activity LED cable to this connector. The speaker allows you turn on the BIOS settings. Pressing the power button turns the system on or puts the system in sleep or soft-off mode depending on the system power, and blinks ...
Sabertooth X58 user's manual
Page 57
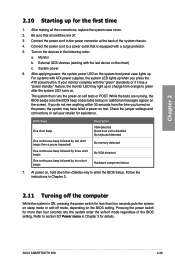
... it has a "power standby" feature, the monitor LED may have failed a power-on . Refer to the power connector at the back of the BIOS setting. Chapter 2 2.10 Starting up for less than four seconds lets the system enter the soft-off mode regardless of the system chassis. 4. Be sure... or POST. If you do not see the BIOS beep codes table below) or additional messages appear on the system front panel case lights up when you turned on , hold down the key to disabled No keyboard detected No memory detected No VGA detected Hardware component failure 7. ASUS SABERTOOTH X58 2-39
... it has a "power standby" feature, the monitor LED may have failed a power-on . Refer to the power connector at the back of the BIOS setting. Chapter 2 2.10 Starting up for less than four seconds lets the system enter the soft-off mode regardless of the system chassis. 4. Be sure... or POST. If you do not see the BIOS beep codes table below) or additional messages appear on the system front panel case lights up when you turned on , hold down the key to disabled No keyboard detected No memory detected No VGA detected Hardware component failure 7. ASUS SABERTOOTH X58 2-39

Sabertooth X58 user's manual
Page 59
... no problem using a USB flash drive. 3. Chapter 3 ASUS SABERTOOTH X58 3-1 Inappropriate BIOS updating may result to instability or failure to boot. Save a copy of BIOS, DO NOT manually update the BIOS. In normal circumstances, the default BIOS settings apply to most conditions to ensure optimum performance. Chapter 3: Chapter 3 BIOS setup 3.1 Knowing BIOS BIOS (Basic Input and Output System) stores system hardware...
... no problem using a USB flash drive. 3. Chapter 3 ASUS SABERTOOTH X58 3-1 Inappropriate BIOS updating may result to instability or failure to boot. Save a copy of BIOS, DO NOT manually update the BIOS. In normal circumstances, the default BIOS settings apply to most conditions to ensure optimum performance. Chapter 3: Chapter 3 BIOS setup 3.1 Knowing BIOS BIOS (Basic Input and Output System) stores system hardware...
Sabertooth X58 user's manual
Page 63
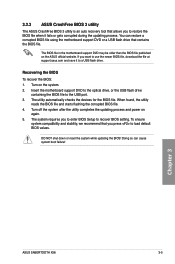
...process. Chapter 3 ASUS SABERTOOTH X58 3-5 DO NOT shut down or reset the system while updating the BIOS! The BIOS file in the motherboard support DVD may be older than the BIOS file published on the ASUS official website. Doing so can restore a corrupted BIOS file using the motherboard...the USB flash drive containing the BIOS file to recover BIOS setting. The utility automatically checks the devices for the BIOS file. Recovering the BIOS To recover the BIOS: 1. When found, the utility reads the BIOS file and starts flashing the corrupted BIOS file. 4. To ensure system ...
...process. Chapter 3 ASUS SABERTOOTH X58 3-5 DO NOT shut down or reset the system while updating the BIOS! The BIOS file in the motherboard support DVD may be older than the BIOS file published on the ASUS official website. Doing so can restore a corrupted BIOS file using the motherboard...the USB flash drive containing the BIOS file to recover BIOS setting. The utility automatically checks the devices for the BIOS file. Recovering the BIOS To recover the BIOS: 1. When found, the utility reads the BIOS file and starts flashing the corrupted BIOS file. 4. To ensure system ...
Sabertooth X58 user's manual
Page 64
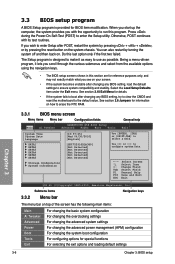
... select a field. See section 3.10 Exit Menu for BIOS item modification. 3.3 BIOS setup program A BIOS Setup program is designed to erase the RTC RAM. If you wish to enter Setup after changing any BIOS setting, try to clear the CMOS and reset the motherboard to...after changing any BIOS setting, load the default settings to use as easy to ensure system compatibility and stability. See section 2.6 Jumpers for information on the system chassis. Chapter 3 3.3.1 BIOS menu screen Menu items Menu bar Configuration fields Main Ai Tweaker SABERTOOTH X58 BIOS Setup Advanced ...
... select a field. See section 3.10 Exit Menu for BIOS item modification. 3.3 BIOS setup program A BIOS Setup program is designed to erase the RTC RAM. If you wish to enter Setup after changing any BIOS setting, try to clear the CMOS and reset the motherboard to...after changing any BIOS setting, load the default settings to use as easy to ensure system compatibility and stability. See section 2.6 Jumpers for information on the system chassis. Chapter 3 3.3.1 BIOS menu screen Menu items Menu bar Configuration fields Main Ai Tweaker SABERTOOTH X58 BIOS Setup Advanced ...
Sabertooth X58 user's manual
Page 93
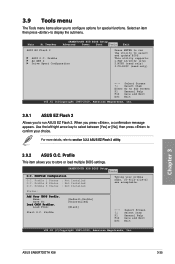
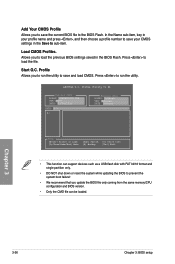
...to select between [Yes] or [No], then press to store or load multiple BIOS settings. Profile This item allows you to confirm your profile name, [0-9][a-z][A-Z] are acceptable. SABERTOOTH X58 BIOS Setup Tools O.C. Profile 3 Status : Not Installed Typing your choice. Profile [Default... Chapter 3 ASUS SABERTOOTH X58 3-35 Main Ai Tweaker SABERTOOTH X58 BIOS Setup Advanced Power Boot Tools Exit ASUS EZ Flash 2 ASUS O.C. 3.9 Tools menu The Tools menu items allow you to select and update BIOS. Profile AI NET 2 Drive Xpert Configuration Press ENTER to run ASUS EZ Flash ...
...to select between [Yes] or [No], then press to store or load multiple BIOS settings. Profile This item allows you to confirm your profile name, [0-9][a-z][A-Z] are acceptable. SABERTOOTH X58 BIOS Setup Tools O.C. Profile 3 Status : Not Installed Typing your choice. Profile [Default... Chapter 3 ASUS SABERTOOTH X58 3-35 Main Ai Tweaker SABERTOOTH X58 BIOS Setup Advanced Power Boot Tools Exit ASUS EZ Flash 2 ASUS O.C. 3.9 Tools menu The Tools menu items allow you to select and update BIOS. Profile AI NET 2 Drive Xpert Configuration Press ENTER to run ASUS EZ Flash ...
Sabertooth X58 user's manual
Page 94
.../16 format and single partition only. • DO NOT shut down or reset the system while updating the BIOS to load the previous BIOS settings saved in the BIOS Flash. Profile Utility V1.44 Current CMOS BOARD: SABERTOOTH X58 VER: 0103 DATE: 03/09/2010 Restore CMOS BOARD: Unknown VER: Unknown DATE: Unknown PATH: A:\ A: Note [Enter...
.../16 format and single partition only. • DO NOT shut down or reset the system while updating the BIOS to load the previous BIOS settings saved in the BIOS Flash. Profile Utility V1.44 Current CMOS BOARD: SABERTOOTH X58 VER: 0103 DATE: 03/09/2010 Restore CMOS BOARD: Unknown VER: Unknown DATE: Unknown PATH: A:\ A: Note [Enter...
Sabertooth X58 user's manual
Page 95
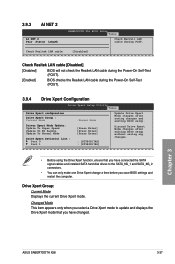
.... Drive Xpert Group: Current Mode Displays the current Drive Xpert mode. Chapter 3 ASUS SABERTOOTH X58 3-37 Changed Mode This item appears only when you select a Drive Xpert mode to update and displays the Drive Xpert mode that you save BIOS settings and restart the computer. Check Realtek LAN cable [Disabled] Check Realtek LAN cable [Disabled...
.... Drive Xpert Group: Current Mode Displays the current Drive Xpert mode. Chapter 3 ASUS SABERTOOTH X58 3-37 Changed Mode This item appears only when you select a Drive Xpert mode to update and displays the Drive Xpert mode that you save BIOS settings and restart the computer. Check Realtek LAN cable [Disabled] Check Realtek LAN cable [Disabled...


