
User Manual
Page 5
... drive 4-12 Chapter 5: Multiple GPU technology support 5.1 ATI® CrossFireX™ technology 5-1 5.1.1 Requirements 5-1 5.1.2 Before you begin 5-1 5.1.3 Installing two CrossFireX™ graphics cards 5-2 5.1.4 Installing the device drivers 5-3 5.1.5 Enabling the ATI® CrossFireX™ technology 5-3 5.2 NVIDIA® SLI™ technology 5-4 5.2.1 Requirements 5-4 5.2.2 Installing two SLI-ready graphics cards 5-4 5.2.3 Installing the device...
... drive 4-12 Chapter 5: Multiple GPU technology support 5.1 ATI® CrossFireX™ technology 5-1 5.1.1 Requirements 5-1 5.1.2 Before you begin 5-1 5.1.3 Installing two CrossFireX™ graphics cards 5-2 5.1.4 Installing the device drivers 5-3 5.1.5 Enabling the ATI® CrossFireX™ technology 5-3 5.2 NVIDIA® SLI™ technology 5-4 5.2.1 Requirements 5-4 5.2.2 Installing two SLI-ready graphics cards 5-4 5.2.3 Installing the device...

User Manual
Page 12
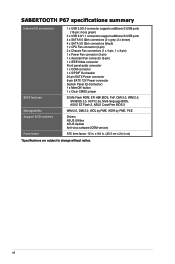
... EFI AMI BIOS, PnP, DMI 2.0, WfM 2.0, SM BIOS 2.5, ACPI 2.0a, Multi-language BIOS, ASUS EZ Flash 2, ASUS CrashFree BIOS 3 WfM 2.0, DMI 2.0, WOL by PME, WOR by PME, PXE Drivers ASUS Utilities ASUS Update Anti-virus software (OEM version) ATX form factor: 12 in . (30.5 cm x 24...COM connector 1 x S/PDIF Out header 24-pin EATX Power connector 8-pin EATX 12V Power connector System Panel (Q-Connector) 1 x MemOK! SABERTOOTH P67 specifications summary Internal I/O connectors BIOS features Manageability Support DVD contents Form factor 1 x USB 3.0/2.0 connector supports additional 2 USB ports (19-pin;
... EFI AMI BIOS, PnP, DMI 2.0, WfM 2.0, SM BIOS 2.5, ACPI 2.0a, Multi-language BIOS, ASUS EZ Flash 2, ASUS CrashFree BIOS 3 WfM 2.0, DMI 2.0, WOL by PME, WOR by PME, PXE Drivers ASUS Utilities ASUS Update Anti-virus software (OEM version) ATX form factor: 12 in . (30.5 cm x 24...COM connector 1 x S/PDIF Out header 24-pin EATX Power connector 8-pin EATX 12V Power connector System Panel (Q-Connector) 1 x MemOK! SABERTOOTH P67 specifications summary Internal I/O connectors BIOS features Manageability Support DVD contents Form factor 1 x USB 3.0/2.0 connector supports additional 2 USB ports (19-pin;
User Manual
Page 54
USB 2.0 ports 1 and 2 10. USB 3.0 ports 1 and 2 6. Refer to [Enabled] and install the JMicron JMB36X Controller Driver from the motherboard support DVD. PS/2 keyboard/mouse combo port 7. Optical S/PDIF Out port 3. External SATA port 2. USB 2.0 ports 3 and 4 9. Power ... operating system. • Due to USB 3.0 controller limitation, USB 3.0 devices can only be used under Windows® OS environment and after the USB 3.0 driver installation. • USB 3.0 devices can only be used as data storage only. • We strongly recommend that you connect USB 3.0 devices to USB ...
USB 2.0 ports 1 and 2 10. USB 3.0 ports 1 and 2 6. Refer to [Enabled] and install the JMicron JMB36X Controller Driver from the motherboard support DVD. PS/2 keyboard/mouse combo port 7. Optical S/PDIF Out port 3. External SATA port 2. USB 2.0 ports 3 and 4 9. Power ... operating system. • Due to USB 3.0 controller limitation, USB 3.0 devices can only be used under Windows® OS environment and after the USB 3.0 driver installation. • USB 3.0 devices can only be used as data storage only. • We strongly recommend that you connect USB 3.0 devices to USB ...

User Manual
Page 75
... disk errors occur, this feature allows the hard disk to [IDE Mode] [Disabled] [Enhanced] [Compatible] Disables the SATA function. The AHCI allows the onboard storage driver to enable advanced Serial ATA features that increases storage performance on random workloads by allowing the drive to support two SATA 6.0 Gb/s and two SATA... configuration from the SATA hard disk drives. Set to [Enhanced] to [Compatible] when using Windows 98/NT/2000/MS-DOS. Configuration options: [Enabled] [Disabled] Chapter 3 ASUS SABERTOOTH P67 3-17 Set to support two SATA 3.0 Gb/s devices. S.M.A.R.T.
... disk errors occur, this feature allows the hard disk to [IDE Mode] [Disabled] [Enhanced] [Compatible] Disables the SATA function. The AHCI allows the onboard storage driver to enable advanced Serial ATA features that increases storage performance on random workloads by allowing the drive to support two SATA 6.0 Gb/s and two SATA... configuration from the SATA hard disk drives. Set to [Enhanced] to [Compatible] when using Windows 98/NT/2000/MS-DOS. Configuration options: [Enabled] [Disabled] Chapter 3 ASUS SABERTOOTH P67 3-17 Set to support two SATA 3.0 Gb/s devices. S.M.A.R.T.

User Manual
Page 78
...disk drives as Parallel ATA physical storage devices. [AHCI Mode] Set to [AHCI Mode] when you to [Enabled] and install the JMicron JMB36X Controller Driver from the motherboard support DVD. Renesas USB 3.0 Controller [Enabled] [Enabled] Enables the USB 3.0 controller. [Disabled] Disables the controller. SPDIF Out ...Sets to [SPDIF] for SPDIF audio output. [HDMI] Sets to internally optimize the order of commands. The AHCI allows the onboard storage driver to enable advanced Serial ATA features that you set the previous item to [IDE Mode] or [AHCI Mode], and allows you want ...
...disk drives as Parallel ATA physical storage devices. [AHCI Mode] Set to [AHCI Mode] when you to [Enabled] and install the JMicron JMB36X Controller Driver from the motherboard support DVD. Renesas USB 3.0 Controller [Enabled] [Enabled] Enables the USB 3.0 controller. [Disabled] Disables the controller. SPDIF Out ...Sets to [SPDIF] for SPDIF audio output. [HDMI] Sets to internally optimize the order of commands. The AHCI allows the onboard storage driver to enable advanced Serial ATA features that you set the previous item to [IDE Mode] or [AHCI Mode], and allows you want ...

User Manual
Page 97
...;t�7� operating systems (OS). The Manual menu contains the list of the user manual. Double-click the ASSETUP.EXE to create the RAID/AHCI driver disk. ASUS SABERTOOTH P67 4-1 Click an item to install The Make Disk menu contains items to run the DVD. Refer to display DVD/ motherboard information Chapter 4 If Autorun...
...;t�7� operating systems (OS). The Manual menu contains the list of the user manual. Double-click the ASSETUP.EXE to create the RAID/AHCI driver disk. ASUS SABERTOOTH P67 4-1 Click an item to install The Make Disk menu contains items to run the DVD. Refer to display DVD/ motherboard information Chapter 4 If Autorun...

User Manual
Page 99
Click the icon to complete installation. ASUS SABERTOOTH P67 4-3 The Drivers installation tab appears if your computer 1. The AI Suite II icon ... more information. 4.3.1 AI Suite II AI Suite II is an all-in-one interface that integrates several ASUS utilities and allows users to customize the settings of AI Suite II. View the online help or readme file... software configuration. Place the support DVD to the software manual in the support DVD or visit the ASUS website at www.asus.com for reference only. The actual screenshots vary with models. • Refer to the optical drive...
Click the icon to complete installation. ASUS SABERTOOTH P67 4-3 The Drivers installation tab appears if your computer 1. The AI Suite II icon ... more information. 4.3.1 AI Suite II AI Suite II is an all-in-one interface that integrates several ASUS utilities and allows users to customize the settings of AI Suite II. View the online help or readme file... software configuration. Place the support DVD to the software manual in the support DVD or visit the ASUS website at www.asus.com for reference only. The actual screenshots vary with models. • Refer to the optical drive...
User Manual
Page 100
click on the icon to the software manual in the support DVD or visit the ASUS website at www.asus.com for Windows XP Configuration options Control settings window Information button Exit button Minimize button Chapter 4 Information button Refer to display the Realtek HD Audio ... HD Audio Manager icon on your computer. Double- 4.3.2 Audio configurations The Realtek® audio CODEC provides 8-channel audio capability to install the Realtek® Audio Driver from the support DVD that came with the motherboard package.
click on the icon to the software manual in the support DVD or visit the ASUS website at www.asus.com for Windows XP Configuration options Control settings window Information button Exit button Minimize button Chapter 4 Information button Refer to display the Realtek HD Audio ... HD Audio Manager icon on your computer. Double- 4.3.2 Audio configurations The Realtek® audio CODEC provides 8-channel audio capability to install the Realtek® Audio Driver from the support DVD that came with the motherboard package.

User Manual
Page 101
...provides data protection and increases fault tolerance to be calculated and written. RAID 5 stripes both RAID 0 and RAID 1 configurations. Chapter 4 ASUS SABERTOOTH P67 4-5 With the RAID 10 configuration you have to configure Serial ATA hard disk drives as it contains a complete copy of three identical hard ...data striping and data mirroring combined without parity (redundancy data) having to the entire system. Refer to section 4.5 Creating a RAID driver disk for this setup. Use two new drives or use an existing drive and three new drives for this setup. Among the ...
...provides data protection and increases fault tolerance to be calculated and written. RAID 5 stripes both RAID 0 and RAID 1 configurations. Chapter 4 ASUS SABERTOOTH P67 4-5 With the RAID 10 configuration you have to configure Serial ATA hard disk drives as it contains a complete copy of three identical hard ...data striping and data mirroring combined without parity (redundancy data) having to the entire system. Refer to section 4.5 Creating a RAID driver disk for this setup. Use two new drives or use an existing drive and three new drives for this setup. Among the ...

User Manual
Page 106
...connector. Follow the succeeding screen instructions to section 4.5.4 Using a USB floppy disk drive. 4.5.1 Creating a RAID driver disk without entering the OS To create a RAID driver disk without entering the OS: 1. Plug the USB floppy disk drive and insert a floppy disk. 3. Go... 6. Insert a formatted floppy disk into the optical drive. 4. Chapter 4 4-10 Chapter 4: Software support 4.5 Creating a RAID driver disk A floppy disk with the RAID driver is required when installing a Windows® operating system on a hard disk drive that is included in Windows®: 1. Start ...
...connector. Follow the succeeding screen instructions to section 4.5.4 Using a USB floppy disk drive. 4.5.1 Creating a RAID driver disk without entering the OS To create a RAID driver disk without entering the OS: 1. Plug the USB floppy disk drive and insert a floppy disk. 3. Go... 6. Insert a formatted floppy disk into the optical drive. 4. Chapter 4 4-10 Chapter 4: Software support 4.5 Creating a RAID driver disk A floppy disk with the RAID driver is required when installing a Windows® operating system on a hard disk drive that is included in Windows®: 1. Start ...

User Manual
Page 107
... the succeeding screen instructions to complete the installation. 4.5.3 Installing the RAID driver during Windows® OS installation To install the RAID driver in Windows® XP: 1. Chapter 4 ASUS SABERTOOTH P67 4-11 To install the RAID driver for the corresponding OS version. 4. party SCSI or RAID driver. 2. Click the name of the device you have to use another...
... the succeeding screen instructions to complete the installation. 4.5.3 Installing the RAID driver during Windows® OS installation To install the RAID driver in Windows® XP: 1. Chapter 4 ASUS SABERTOOTH P67 4-11 To install the RAID driver for the corresponding OS version. 4. party SCSI or RAID driver. 2. Click the name of the device you have to use another...

User Manual
Page 108
Select Device Manager. A window appears, allowing you install the RAID driver from a floppy disk during the OS installation. Right-click My Computer on the... 4-12 Chapter 4: Software support Using another computer, plug the USB floppy disk drive, and insert the floppy disk containing the RAID driver. 2. Browse the contents of the USB floppy disk drive varies with different vendors. 4. The Vendor ID (VID) and Product ID ...opening the oem file. Refer to the floppy disk containing the RAID driver. The name of the RAID driver disk to locate the file txtsetup.oem. 6. Click Details tab.
Select Device Manager. A window appears, allowing you install the RAID driver from a floppy disk during the OS installation. Right-click My Computer on the... 4-12 Chapter 4: Software support Using another computer, plug the USB floppy disk drive, and insert the floppy disk containing the RAID driver. 2. Browse the contents of the USB floppy disk drive varies with different vendors. 4. The Vendor ID (VID) and Product ID ...opening the oem file. Refer to the floppy disk containing the RAID driver. The name of the RAID driver disk to locate the file txtsetup.oem. 6. Click Details tab.

User Manual
Page 111
...installing ATI CrossFireX graphics cards to uninstall all current applications. 2. For Windows XP, select Add/Remove. ASUS SABERTOOTH P67 5-1 To uninstall existing graphics card drivers: 1. Turn off your current graphics card driver/s. 4. Select your computer. For Windows XP, go to Control Panel > Add/Remove Programs. For ...card that are ATI® certified. • Ensure that allows you to Control Panel > Programs and Features. 3. Download the latest driver from the AMD website (www.amd.com). • Ensure that your power supply unit (PSU) can provide at least the minimum...
...installing ATI CrossFireX graphics cards to uninstall all current applications. 2. For Windows XP, select Add/Remove. ASUS SABERTOOTH P67 5-1 To uninstall existing graphics card drivers: 1. Turn off your current graphics card driver/s. 4. Select your computer. For Windows XP, go to Control Panel > Add/Remove Programs. For ...card that are ATI® certified. • Ensure that allows you to Control Panel > Programs and Features. 3. Download the latest driver from the AMD website (www.amd.com). • Ensure that your power supply unit (PSU) can provide at least the minimum...
User Manual
Page 113
... CrossFireX technology 1. From the Graphics Adapter list, select the graphics card to exit the window. 2 3 4 ASUS SABERTOOTH P67 5-3 Click Apply, and then click OK to act as the display GPU. 1 3. Click Go to continue to install the device drivers. Right-click on the Windows® desktop and select Catalyst(TM) Control Center. In the...
... CrossFireX technology 1. From the Graphics Adapter list, select the graphics card to exit the window. 2 3 4 ASUS SABERTOOTH P67 5-3 Click Apply, and then click OK to act as the display GPU. 1 3. Click Go to continue to install the device drivers. Right-click on the Windows® desktop and select Catalyst(TM) Control Center. In the...
User Manual
Page 114
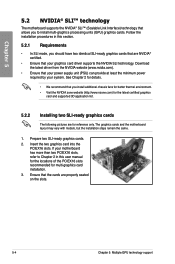
... NVIDIA website (www.nvidia.com). • Ensure that your power supply unit (PSU) can provide at least the minimum power required by your graphics card driver supports the NVIDIA SLI technology. Prepare two SLI-ready graphics cards. 2. Insert the two graphics card into the PCIEX16 slots. See Chapter 2 for details. •...
... NVIDIA website (www.nvidia.com). • Ensure that your power supply unit (PSU) can provide at least the minimum power required by your graphics card driver supports the NVIDIA SLI technology. Prepare two SLI-ready graphics cards. 2. Insert the two graphics card into the PCIEX16 slots. See Chapter 2 for details. •...

User Manual
Page 115
... on the empty space of the Windows® desktop and select NVIDIA Control Panel. Download the latest driver from the power supply to the two graphics cards separately. 6. A. Right click on each graphics card. ASUS SABERTOOTH P67 5-5 Connect two independent auxiliary power sources from the NVIDIA website (www.nvidia.com). 5.2.4 Enabling the NVIDIA®...
... on the empty space of the Windows® desktop and select NVIDIA Control Panel. Download the latest driver from the power supply to the two graphics cards separately. 6. A. Right click on each graphics card. ASUS SABERTOOTH P67 5-5 Connect two independent auxiliary power sources from the NVIDIA website (www.nvidia.com). 5.2.4 Enabling the NVIDIA®...
User Manual
Page 5
... drive 4-12 Chapter 5: Multiple GPU technology support 5.1 ATI® CrossFireX™ technology 5-1 5.1.1 Requirements 5-1 5.1.2 Before you begin 5-1 5.1.3 Installing two CrossFireX™ graphics cards 5-2 5.1.4 Installing the device drivers 5-3 5.1.5 Enabling the ATI® CrossFireX™ technology 5-3 5.2 NVIDIA® SLI™ technology 5-4 5.2.1 Requirements 5-4 5.2.2 Installing two SLI-ready graphics cards 5-4 5.2.3 Installing the device...
... drive 4-12 Chapter 5: Multiple GPU technology support 5.1 ATI® CrossFireX™ technology 5-1 5.1.1 Requirements 5-1 5.1.2 Before you begin 5-1 5.1.3 Installing two CrossFireX™ graphics cards 5-2 5.1.4 Installing the device drivers 5-3 5.1.5 Enabling the ATI® CrossFireX™ technology 5-3 5.2 NVIDIA® SLI™ technology 5-4 5.2.1 Requirements 5-4 5.2.2 Installing two SLI-ready graphics cards 5-4 5.2.3 Installing the device...
User Manual
Page 12
...1 x COM connector 1 x S/PDIF Out header 24-pin EATX Power connector 8-pin EATX 12V Power connector System Panel (Q-Connector) 1 x MemOK! SABERTOOTH P67 specifications summary Internal I/O connectors BIOS features Manageability Support DVD contents Form factor 1 x USB 3.0/2.0 connector supports additional 2 USB ports (19-pin; button ... BIOS, PnP, DMI 2.0, WfM 2.0, SM BIOS 2.5, ACPI 2.0a, Multi-language BIOS, ASUS EZ Flash 2, ASUS CrashFree BIOS 3 WfM 2.0, DMI 2.0, WOL by PME, WOR by PME, PXE Drivers ASUS Utilities ASUS Update Anti-virus software (OEM version) ATX form factor: 12 in . (30.5 cm...
...1 x COM connector 1 x S/PDIF Out header 24-pin EATX Power connector 8-pin EATX 12V Power connector System Panel (Q-Connector) 1 x MemOK! SABERTOOTH P67 specifications summary Internal I/O connectors BIOS features Manageability Support DVD contents Form factor 1 x USB 3.0/2.0 connector supports additional 2 USB ports (19-pin; button ... BIOS, PnP, DMI 2.0, WfM 2.0, SM BIOS 2.5, ACPI 2.0a, Multi-language BIOS, ASUS EZ Flash 2, ASUS CrashFree BIOS 3 WfM 2.0, DMI 2.0, WOL by PME, WOR by PME, PXE Drivers ASUS Utilities ASUS Update Anti-virus software (OEM version) ATX form factor: 12 in . (30.5 cm...

User Manual
Page 54
.... • Due to USB 3.0 controller limitation, USB 3.0 devices can only be used under Windows® OS environment and after the USB 3.0 driver installation. • USB 3.0 devices can only be used as data storage only. • We strongly recommend that you connect USB 3.0 devices to... [Enabled] and install the JMicron JMB36X Controller Driver from the motherboard support DVD. Optical S/PDIF Out port 3. Refer to section 3.5.6 Onboard Devices Configuration for your USB 3.0 devices. •...
.... • Due to USB 3.0 controller limitation, USB 3.0 devices can only be used under Windows® OS environment and after the USB 3.0 driver installation. • USB 3.0 devices can only be used as data storage only. • We strongly recommend that you connect USB 3.0 devices to... [Enabled] and install the JMicron JMB36X Controller Driver from the motherboard support DVD. Optical S/PDIF Out port 3. Refer to section 3.5.6 Onboard Devices Configuration for your USB 3.0 devices. •...

User Manual
Page 75
... SATA 3.0 Gb/s devices. Set to [Enhanced] to [Compatible] when using Windows 98/NT/2000/MS-DOS. Configuration options: [Enabled] [Disabled] Chapter 3 ASUS SABERTOOTH P67 3-17 The AHCI allows the onboard storage driver to enable advanced Serial ATA features that increases storage performance on random workloads by allowing the drive to support two SATA 3.0 Gb...
... SATA 3.0 Gb/s devices. Set to [Enhanced] to [Compatible] when using Windows 98/NT/2000/MS-DOS. Configuration options: [Enabled] [Disabled] Chapter 3 ASUS SABERTOOTH P67 3-17 The AHCI allows the onboard storage driver to enable advanced Serial ATA features that increases storage performance on random workloads by allowing the drive to support two SATA 3.0 Gb...


