
Spresso Hardware User Manual
Page 8
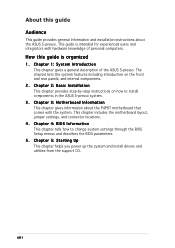
Chapter 4: BIOS Information This chapter tells how to install components in the ASUS S-presso system. 3 . Chapter 5: Starting Up This chapter helps you power up the system and install drivers and utilities from the support ...how to change system settings through the BIOS Setup menus and describes the BIOS parameters. 5. Chapter 3: Motherboard Information This chapter gives information about the ASUS S-presso. This chapter includes the motherboard layout, jumper settings, and connector locations. 4. Chapter 1: System Introduction This chapter gives a general description of personal ...
Chapter 4: BIOS Information This chapter tells how to install components in the ASUS S-presso system. 3 . Chapter 5: Starting Up This chapter helps you power up the system and install drivers and utilities from the support ...how to change system settings through the BIOS Setup menus and describes the BIOS parameters. 5. Chapter 3: Motherboard Information This chapter gives information about the ASUS S-presso. This chapter includes the motherboard layout, jumper settings, and connector locations. 4. Chapter 1: System Introduction This chapter gives a general description of personal ...
Spresso Hardware User Manual
Page 10
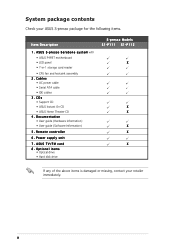
Cables • AC power cable • Serial ATA cable • IDE cables 3. CDs • Support CD • ASUS Instant On CD • ASUS Home Theater CD 4 . ASUS TV/FM card 8 . Remote controller 6 . Power supply unit 7 . A S U S S - Documentation • User ...drive S-presso Models S1-P111 S1-P112 X X X X X X If any of the above items is damaged or missing, contact your ASUS S-presso package for the following items. Item Description 1 . System package contents Check your retailer immediately. x p r e s s o b a r e b o n e s y s t e m with • ASUS P4P8T motherboard...
Cables • AC power cable • Serial ATA cable • IDE cables 3. CDs • Support CD • ASUS Instant On CD • ASUS Home Theater CD 4 . ASUS TV/FM card 8 . Remote controller 6 . Power supply unit 7 . A S U S S - Documentation • User ...drive S-presso Models S1-P111 S1-P112 X X X X X X If any of the above items is damaged or missing, contact your ASUS S-presso package for the following items. Item Description 1 . System package contents Check your retailer immediately. x p r e s s o b a r e b o n e s y s t e m with • ASUS P4P8T motherboard...
Spresso Hardware User Manual
Page 12
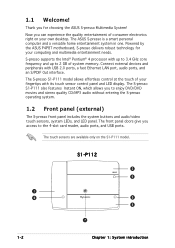
... features Instant ON, which allows you access to 2 GB of consumer electronics right on the S1-P111 model. Powered by the ASUS P4P8T motherboard, S-presso delivers robust technology for choosing the ASUS S-presso Multimedia System! S-presso supports the Intel® Pentium® 4 processor with its touch sensor control panel and LED display. The touch sensors are...
... features Instant ON, which allows you access to 2 GB of consumer electronics right on the S1-P111 model. Powered by the ASUS P4P8T motherboard, S-presso delivers robust technology for choosing the ASUS S-presso Multimedia System! S-presso supports the Intel® Pentium® 4 processor with its touch sensor control panel and LED display. The touch sensors are...
Spresso Hardware User Manual
Page 22
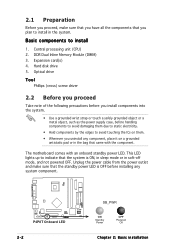
... supply case, before installing any component, place it on them due to static electricity. • Hold components by the edges to install in the system. P4P8T ® P4P8T Onboard LED 2-2 SB_PWR ON Standby Power OFF Powered Off Chapter 2: Basic installation Expansion card(s) 4. The motherboard comes with the component. Hard disk drive 5. 2.1 Preparation...
... supply case, before installing any component, place it on them due to static electricity. • Hold components by the edges to install in the system. P4P8T ® P4P8T Onboard LED 2-2 SB_PWR ON Standby Power OFF Powered Off Chapter 2: Basic installation Expansion card(s) 4. The motherboard comes with the component. Hard disk drive 5. 2.1 Preparation...
Spresso Hardware User Manual
Page 31
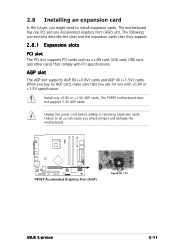
...5V AGP cards. When you buy an AGP card, make sure that comply with +0.8V or +1.5V specification. The P4P8T motherboard does not support 3.3V AGP cards. Unplug the power cord before adding or removing expansion cards. Failure to do ...with PCI specifications. AGP slot The AGP slot supports AGP 8X (+0.8V) cards and AGP 4X (+1.5V) cards. P4P8T ® P4P8T Accelerated Graphics Port (AGP) Keyed for one Accelerated Graphics Port (AGP) slot. The following sub-sections describe the slots... LAN card, SCSI card, USB card, and other cards that you ask for 1.5v ASUS S-presso 2-11
...5V AGP cards. When you buy an AGP card, make sure that comply with +0.8V or +1.5V specification. The P4P8T motherboard does not support 3.3V AGP cards. Unplug the power cord before adding or removing expansion cards. Failure to do ...with PCI specifications. AGP slot The AGP slot supports AGP 8X (+0.8V) cards and AGP 4X (+1.5V) cards. P4P8T ® P4P8T Accelerated Graphics Port (AGP) Keyed for one Accelerated Graphics Port (AGP) slot. The following sub-sections describe the slots... LAN card, SCSI card, USB card, and other cards that you ask for 1.5v ASUS S-presso 2-11
Spresso Hardware User Manual
Page 44
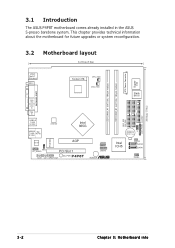
... AD1888 ATX12V Intel 865G AGP USB56 RTL8100C MDC FP_AUDIO PCI Slot 1 AUX1 CD1 SPDIF OUT SB_PWR P4P8T USB78 ® BUZZER CR2032 3V Lithium Cell CMOS Power Intel ICH5 CLRTC SATA2 SATA1 PANEL J1 LCD_PANEL FLOPPY 20.06cm (7.9in) 3-2 Chapter 3: Motherboard info 3.1 Introduction The ASUS P4P8T motherboard comes already installed in the ASUS S-presso barebone system.
... AD1888 ATX12V Intel 865G AGP USB56 RTL8100C MDC FP_AUDIO PCI Slot 1 AUX1 CD1 SPDIF OUT SB_PWR P4P8T USB78 ® BUZZER CR2032 3V Lithium Cell CMOS Power Intel ICH5 CLRTC SATA2 SATA1 PANEL J1 LCD_PANEL FLOPPY 20.06cm (7.9in) 3-2 Chapter 3: Motherboard info 3.1 Introduction The ASUS P4P8T motherboard comes already installed in the ASUS S-presso barebone system.

Spresso Hardware User Manual
Page 45
... battery powers the RAM data in CMOS. To erase the RTC RAM: 1. Remove the battery. 3. Keep the cap on when you to pins 1-2. 4. ASUS S-presso 3-3 You can clear the CMOS memory of date, time, and system setup parameters by erasing the CMOS RTC RAM data. Removing the cap will cause... system boot failure! Turn OFF the computer and unplug the power cord. 2. Plug the power cord and turn ON the computer. 6. P4P8T ® P4P8T Clear RTC RAM CLRTC 12 23 Normal (Default) Clear CMOS The system automatically turns on pins 2-3 for about 5-10 seconds, then move the cap...
... battery powers the RAM data in CMOS. To erase the RTC RAM: 1. Remove the battery. 3. Keep the cap on when you to pins 1-2. 4. ASUS S-presso 3-3 You can clear the CMOS memory of date, time, and system setup parameters by erasing the CMOS RTC RAM data. Removing the cap will cause... system boot failure! Turn OFF the computer and unplug the power cord. 2. Plug the power cord and turn ON the computer. 6. P4P8T ® P4P8T Clear RTC RAM CLRTC 12 23 Normal (Default) Clear CMOS The system automatically turns on pins 2-3 for about 5-10 seconds, then move the cap...
Spresso Hardware User Manual
Page 46
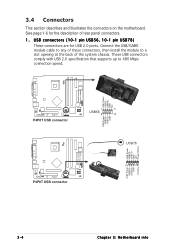
... comply with USB 2.0 specification that supports up to a slot opening at the back of rear panel connectors. 1 . USBP3+ GND USB78 1 P4P8T ® P4P8T USB connector USB Power USBP2- USBP2+ GND NC P4P8T ® P4P8T USB connector 1 5 USB56 6 10 USB Power USBP3- See page 1-6 for USB 2.0 ports. 3.4 Connectors This section describes and illustrates the connectors...
... comply with USB 2.0 specification that supports up to a slot opening at the back of rear panel connectors. 1 . USBP3+ GND USB78 1 P4P8T ® P4P8T USB connector USB Power USBP2- USBP2+ GND NC P4P8T ® P4P8T USB connector 1 5 USB56 6 10 USB Power USBP3- See page 1-6 for USB 2.0 ports. 3.4 Connectors This section describes and illustrates the connectors...
Spresso Hardware User Manual
Page 47
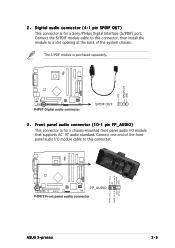
... at the back of the front panel audio I /O module that supports AC`97 audio standard. Line out_L NC Line out_R MICPWR MIC2 P4P8T ® FP_AUDIO P4P8T Front panel audio connector ASUS S-presso BLINE_OUT_L BLINE_OUT_R +5VA AGND 3-5 2 . The S/PDIF module is for a chassis-mounted front panel audio I /O module cable to this connector, then install the...
... at the back of the front panel audio I /O module that supports AC`97 audio standard. Line out_L NC Line out_R MICPWR MIC2 P4P8T ® FP_AUDIO P4P8T Front panel audio connector ASUS S-presso BLINE_OUT_L BLINE_OUT_R +5VA AGND 3-5 2 . The S/PDIF module is for a chassis-mounted front panel audio I /O module cable to this connector, then install the...

Spresso Hardware User Manual
Page 48
Connect the fan cables to the fan connectors. P4P8T ® P4P8T Fan connectors CPU_FAN GND +12V Rotation CHA_FAN GND +12V Rotation Do not forget to connect the fan cables to the fan connectors on the fan ...
Connect the fan cables to the fan connectors. P4P8T ® P4P8T Fan connectors CPU_FAN GND +12V Rotation CHA_FAN GND +12V Rotation Do not forget to connect the fan cables to the fan connectors on the fan ...
Spresso Hardware User Manual
Page 49
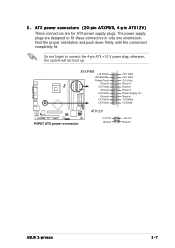
... for ATX power supply plugs. ATXPWR +12.0Volts +5V Standby Power Good Ground +5.0 Volts Ground +5.0 Volts Ground +3.3 Volts +3.3 Volts P4P8T ® P4P8T ATX power connector ATX12V +12V DC Ground +5.0 Volts +5.0 Volts -5.0 Volts Ground Ground Ground Power Supply On Ground -12.0Volts +3.3Volts +12V DC Ground ASUS S-presso 3-7 otherwise, the system will not boot up.
... for ATX power supply plugs. ATXPWR +12.0Volts +5V Standby Power Good Ground +5.0 Volts Ground +5.0 Volts Ground +3.3 Volts +3.3 Volts P4P8T ® P4P8T ATX power connector ATX12V +12V DC Ground +5.0 Volts +5.0 Volts -5.0 Volts Ground Ground Ground Power Supply On Ground -12.0Volts +3.3Volts +12V DC Ground ASUS S-presso 3-7 otherwise, the system will not boot up.

Spresso Hardware User Manual
Page 50
... the second drive as a CD-ROM, TV tuner, or MPEG card. Refer to match the covered hole on the Ultra DMA cable connector. SEC_IDE PRI_IDE P4P8T ® P4P8T IDE connectors PIN 1 7 . 6 . Internal audio connectors (4-pin AUX1, CD1) These connectors allow you connect the IDE cables. • Use the 80-conductor IDE cable.../66 IDE master device (hard disk drive). AUX1 (White) CD1 (Black) Right Audio Channel Ground Left Audio Channel Right Audio Channel Ground Left Audio Channel P4P8T ® P4P8T Internal audio connectors 3-8 Chapter 3: Motherboard info
... the second drive as a CD-ROM, TV tuner, or MPEG card. Refer to match the covered hole on the Ultra DMA cable connector. SEC_IDE PRI_IDE P4P8T ® P4P8T IDE connectors PIN 1 7 . 6 . Internal audio connectors (4-pin AUX1, CD1) These connectors allow you connect the IDE cables. • Use the 80-conductor IDE cable.../66 IDE master device (hard disk drive). AUX1 (White) CD1 (Black) Right Audio Channel Ground Left Audio Channel Right Audio Channel Ground Left Audio Channel P4P8T ® P4P8T Internal audio connectors 3-8 Chapter 3: Motherboard info
Spresso Hardware User Manual
Page 51
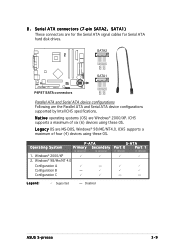
... GND RSATA_RXP1 RSATA_RXN1 GND P4P8T ® P4P8T SATA connectors Parallel ATA and Serial ATA device configurations Following are MS-DOS, Windows® 98/ME/NT4.0. L e g a c y OS are the Parallel ATA and Serial ATA device configurations supported by Intel ICH5 specifications. Windows® 98/Me/NT 4.0 Configuration A Configuration B Configuration C - - Disabled ASUS S-presso 3-9 Windows® 2000...
... GND RSATA_RXP1 RSATA_RXN1 GND P4P8T ® P4P8T SATA connectors Parallel ATA and Serial ATA device configurations Following are MS-DOS, Windows® 98/ME/NT4.0. L e g a c y OS are the Parallel ATA and Serial ATA device configurations supported by Intel ICH5 specifications. Windows® 98/Me/NT 4.0 Configuration A Configuration B Configuration C - - Disabled ASUS S-presso 3-9 Windows® 2000...

Spresso Hardware User Manual
Page 52
IDE Port Settings - P4P8T ® P4P8T LCD_PANEL connector LCD_PANEL +5VSB PIC_STB# PIC_CLK PIC_CLK PIC_STB# DJ_PLAY DJ_SCANFW SMBDATA SMBCLK DJ_VOLUP DJ_STOP# GND PIC_DOUT PIC_DIN PIC_DIN PIC_DOUT +5V DJ_SCANRW +5VSB GND +12V DJ_VOLDN 3-...
IDE Port Settings - P4P8T ® P4P8T LCD_PANEL connector LCD_PANEL +5VSB PIC_STB# PIC_CLK PIC_CLK PIC_STB# DJ_PLAY DJ_SCANFW SMBDATA SMBCLK DJ_VOLUP DJ_STOP# GND PIC_DOUT PIC_DIN PIC_DIN PIC_DOUT +5V DJ_SCANRW +5VSB GND +12V DJ_VOLDN 3-...
Spresso Hardware User Manual
Page 53
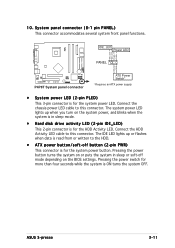
Connect the chassis power LED cable to this connector. ASUS S-presso 3-11 Connect the HDD Activity LED cable to this connector. Pressing the power button turns the system on or puts the system in sleep mode. &#... turns the system OFF. System panel connector (8-1 pin PANEL) This connector accommodates several system front panel functions. IDE_LED Power LED IDE_LEDIDE_LED+ PLEDPLED+ PANEL Ground PWR P4P8T ® P4P8T System panel connector ATX Power Switch* * Requires an ATX power supply. • System power LED (2-pin PLED) This 3-pin connector is for more than...
Connect the chassis power LED cable to this connector. ASUS S-presso 3-11 Connect the HDD Activity LED cable to this connector. Pressing the power button turns the system on or puts the system in sleep mode. &#... turns the system OFF. System panel connector (8-1 pin PANEL) This connector accommodates several system front panel functions. IDE_LED Power LED IDE_LEDIDE_LED+ PLEDPLED+ PANEL Ground PWR P4P8T ® P4P8T System panel connector ATX Power Switch* * Requires an ATX power supply. • System power LED (2-pin PLED) This 3-pin connector is for more than...

Spresso Hardware User Manual
Page 60
...process and automatically reboots the system when done. Reading file "p4p8t.rom". Checking for your motherboard and rename it is built-in the floppy disk, the error message "P 4 P 8 T . 4.1.4 Using ASUS EZ Flash to update the BIOS The ASUS EZ Flash feature allows you to easily update the BIOS ...without having to go through the long process of booting from a floppy disk and using ASUS EZ Flash: 1. Visit the ASUS website (www.asus.com) to download the latest BIOS file for floppy... Starting BIOS recovery... appears. 4. To launch EZ Flash, press +...
...process and automatically reboots the system when done. Reading file "p4p8t.rom". Checking for your motherboard and rename it is built-in the floppy disk, the error message "P 4 P 8 T . 4.1.4 Using ASUS EZ Flash to update the BIOS The ASUS EZ Flash feature allows you to easily update the BIOS ...without having to go through the long process of booting from a floppy disk and using ASUS EZ Flash: 1. Visit the ASUS website (www.asus.com) to download the latest BIOS file for floppy... Starting BIOS recovery... appears. 4. To launch EZ Flash, press +...

Spresso Hardware User Manual
Page 61
... rename it to P 4 P 8 T. Reading file "p4p8t.rom". To recover the BIOS from the ASUS website has a different filename (e.g. Starting BIOS recovery... R O M). P 4 P 8 T 1 1 . Starting BIOS recovery... When the BIOS update process is detected, the following message appears. ASUS S-presso 4-7 R O M is found ! DO NOT shut down ... Prepare the s u p p o r t C D that came with the motherboard or a floppy disk that contains the motherboard BIOS (P4P8T.ROM) before proceeding with the BIOS update process. • If you have saved a copy of the original motherboard BIOS to a bootable floppy ...
... rename it to P 4 P 8 T. Reading file "p4p8t.rom". To recover the BIOS from the ASUS website has a different filename (e.g. Starting BIOS recovery... R O M). P 4 P 8 T 1 1 . Starting BIOS recovery... When the BIOS update process is detected, the following message appears. ASUS S-presso 4-7 R O M is found ! DO NOT shut down ... Prepare the s u p p o r t C D that came with the motherboard or a floppy disk that contains the motherboard BIOS (P4P8T.ROM) before proceeding with the BIOS update process. • If you have saved a copy of the original motherboard BIOS to a bootable floppy ...

Spresso Hardware User Manual
Page 62
...failure! 4. Completed. Bad BIOS checksum. Checking for CD-ROM... The support CD contains the original BIOS for this motherboard. Reading file "p4p8t.rom". Start flashing... Starting BIOS recovery... Floppy not found . The system automatically checks the CD-ROM if there is no floppy disk...latest BIOS version for floppy... Place the support CD in the drive. 3. Starting BIOS recovery... Checking for this motherboard. Visit the ASUS website (www.asus.com) to download the latest BIOS file. 4-8 Chapter 4: BIOS information To recover the BIOS from the support CD: 1. DO ...
...failure! 4. Completed. Bad BIOS checksum. Checking for CD-ROM... The support CD contains the original BIOS for this motherboard. Reading file "p4p8t.rom". Start flashing... Starting BIOS recovery... Floppy not found . The system automatically checks the CD-ROM if there is no floppy disk...latest BIOS version for floppy... Place the support CD in the drive. 3. Starting BIOS recovery... Checking for this motherboard. Visit the ASUS website (www.asus.com) to download the latest BIOS file. 4-8 Chapter 4: BIOS information To recover the BIOS from the support CD: 1. DO ...

Spresso User Manual
Page 8
... intended for experienced users and integrators with the system. How this guide Audience This guide provides general information and installation instructions about the P4P8T motherboard that comes with hardware knowledge of the ASUS S-presso. Chapter 2: Basic Installation This chapter provides step-by-step instructions on the front and rear panels, and internal components. 2.
... intended for experienced users and integrators with the system. How this guide Audience This guide provides general information and installation instructions about the P4P8T motherboard that comes with hardware knowledge of the ASUS S-presso. Chapter 2: Basic Installation This chapter provides step-by-step instructions on the front and rear panels, and internal components. 2.

Spresso User Manual
Page 10
...s t e m with • ASUS P4P8T motherboard • LED panel • 7-in-1 storage card reader • CPU fan and heatsink assembly 2 . CDs • Support CD • ASUS Instant On CD • ASUS Home Theater CD 4 . Optional items • Optical drive • Hard disk drive • ASUS PVR-416 TV/FM card S-presso Models S1-P111 S1-P112 X X ...X X X If any of the above items is damaged or missing, contact your ASUS S-presso package for the following items. Item Description 1...
...s t e m with • ASUS P4P8T motherboard • LED panel • 7-in-1 storage card reader • CPU fan and heatsink assembly 2 . CDs • Support CD • ASUS Instant On CD • ASUS Home Theater CD 4 . Optional items • Optical drive • Hard disk drive • ASUS PVR-416 TV/FM card S-presso Models S1-P111 S1-P112 X X ...X X X If any of the above items is damaged or missing, contact your ASUS S-presso package for the following items. Item Description 1...