
Spresso Hardware User Manual
Page 2
... or may be reproduced, transmitted, transcribed, stored in a retrieval system, or translated into any means, except documentation kept by ASUS; ASUS ASSUMES NO RESPONSIBILITY OR LIABILITY FOR ANY ERRORS OR INACCURACIES THAT MAY APPEAR IN THIS MANUAL, INCLUDING THE PRODUCTS AND SOFTWARE DESCRIBED IN...or explanation and to the owners' benefit, without the express written permission of alteration is defaced or missing. IN NO EVENT SHALL ASUS, ITS DIRECTORS, OFFICERS, EMPLOYEES OR AGENTS BE LIABLE FOR ANY INDIRECT, SPECIAL, INCIDENTAL, OR CONSEQUENTIAL DAMAGES (INCLUDING DAMAGES FOR LOSS...
... or may be reproduced, transmitted, transcribed, stored in a retrieval system, or translated into any means, except documentation kept by ASUS; ASUS ASSUMES NO RESPONSIBILITY OR LIABILITY FOR ANY ERRORS OR INACCURACIES THAT MAY APPEAR IN THIS MANUAL, INCLUDING THE PRODUCTS AND SOFTWARE DESCRIBED IN...or explanation and to the owners' benefit, without the express written permission of alteration is defaced or missing. IN NO EVENT SHALL ASUS, ITS DIRECTORS, OFFICERS, EMPLOYEES OR AGENTS BE LIABLE FOR ANY INDIRECT, SPECIAL, INCIDENTAL, OR CONSEQUENTIAL DAMAGES (INCLUDING DAMAGES FOR LOSS...
Spresso Hardware User Manual
Page 3
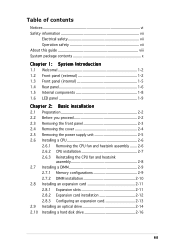
Table of contents Notices vi Safety information vii Electrical safety vii Operation safety vii About this guide viii System package contents x Chapter 1: System Introduction 1.1 Welcome 1-2 1.2 Front panel (external 1-2 1.3 Front panel (internal 1-5 1.4 Rear panel 1-6 1.5 Internal components 1-8 1.6 LED panel 1-9 Chapter 2: Basic installation 2.1 Preparation 2-2 2.2 Before you proceed 2-2 2.3 Removing the front panel 2-3 2.4 Removing the cover 2-4 2.5 Removing the power supply unit 2-5 2.6 Installing a CPU 2-6 2.6.1 Removing the CPU fan and heatsink assembly ....... 2-6 2.6.2...
Table of contents Notices vi Safety information vii Electrical safety vii Operation safety vii About this guide viii System package contents x Chapter 1: System Introduction 1.1 Welcome 1-2 1.2 Front panel (external 1-2 1.3 Front panel (internal 1-5 1.4 Rear panel 1-6 1.5 Internal components 1-8 1.6 LED panel 1-9 Chapter 2: Basic installation 2.1 Preparation 2-2 2.2 Before you proceed 2-2 2.3 Removing the front panel 2-3 2.4 Removing the cover 2-4 2.5 Removing the power supply unit 2-5 2.6 Installing a CPU 2-6 2.6.1 Removing the CPU fan and heatsink assembly ....... 2-6 2.6.2...
Spresso Hardware User Manual
Page 4
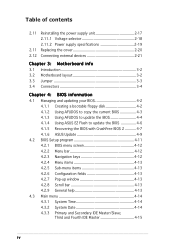
... BIOS 4-2 4.1.1 Creating a bootable floppy disk 4-2 4.1.2 Using AFUDOS to copy the current BIOS 4-3 4.1.3 Using AFUDOS to update the BIOS 4-4 4.1.4 Using ASUS EZ Flash to update the BIOS 4-6 4.1.5 Recovering the BIOS with CrashFree BIOS 2 4-7 4.1.6 ASUS Update 4-9 4.2 BIOS Setup program 4-11 4.2.1 BIOS menu screen 4-12 4.2.2 Menu bar 4-12 4.2.3 Navigation keys 4-12 4.2.4 Menu items 4-13 4.2.5 Sub...
... BIOS 4-2 4.1.1 Creating a bootable floppy disk 4-2 4.1.2 Using AFUDOS to copy the current BIOS 4-3 4.1.3 Using AFUDOS to update the BIOS 4-4 4.1.4 Using ASUS EZ Flash to update the BIOS 4-6 4.1.5 Recovering the BIOS with CrashFree BIOS 2 4-7 4.1.6 ASUS Update 4-9 4.2 BIOS Setup program 4-11 4.2.1 BIOS menu screen 4-12 4.2.2 Menu bar 4-12 4.2.3 Navigation keys 4-12 4.2.4 Menu items 4-13 4.2.5 Sub...

Spresso Hardware User Manual
Page 5
... 4.6.4 Security 4-32 4.7 Exit menu 4-34 Chapter 5: Starting up 5.2 Powering up 5-2 5.1 Installing an operating system 5-2 5.3 Support CD information 5-3 5.3.1 Running the support CD 5-3 5.3.2 Drivers menu 5-4 5.3.3 Utilities menu 5-5 5.3.4 ASUS contact information 5-6 5.3.5 Other information 5-6 5.4 Software information 5-8 5.4.1 ASUS Update 5-8 5.4.2 ASUS PC Probe 5-10 5.4.3 Multi-channel audio feature 5-14 v
... 4.6.4 Security 4-32 4.7 Exit menu 4-34 Chapter 5: Starting up 5.2 Powering up 5-2 5.1 Installing an operating system 5-2 5.3 Support CD information 5-3 5.3.1 Running the support CD 5-3 5.3.2 Drivers menu 5-4 5.3.3 Utilities menu 5-5 5.3.4 ASUS contact information 5-6 5.3.5 Other information 5-6 5.4 Software information 5-8 5.4.1 ASUS Update 5-8 5.4.2 ASUS PC Probe 5-10 5.4.3 Multi-channel audio feature 5-14 v
Spresso Hardware User Manual
Page 6
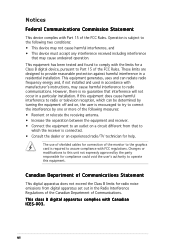
These limits are designed to provide reasonable protection against harmful interference in a particular installation. Operation is subject to the following measures: • Reorient or relocate the receiving antenna. • Increase the separation between the equipment and receiver. • Connect the equipment to an outlet on , the user is encouraged to try to correct the interference by one or more of the following two conditions: • This device may not cause harmful interference, and • This device must accept any interference received including interference that to ...
These limits are designed to provide reasonable protection against harmful interference in a particular installation. Operation is subject to the following measures: • Reorient or relocate the receiving antenna. • Increase the separation between the equipment and receiver. • Connect the equipment to an outlet on , the user is encouraged to try to correct the interference by one or more of the following two conditions: • This device may not cause harmful interference, and • This device must accept any interference received including interference that to ...
Spresso Hardware User Manual
Page 7
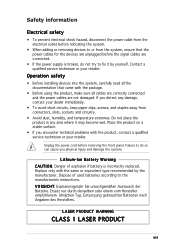
V O R S I O N: Danger of used batteries according to fix it may become wet. Ersatz nur durch denselben oder einem vom Hersteller empfohlenem ähnljchen Typ. If you encounter technical problems with the product, contact a qualified service technician or your retailer. Place the product on a stable surface. • If you detect any area where it by the manufacturer. Replace only with the package. • Before using the product, make sure all cables are correctly connected and the power cables are not damaged. Entsorgung gebrauchter Batterien nach Angaben des Herstellers....
V O R S I O N: Danger of used batteries according to fix it may become wet. Ersatz nur durch denselben oder einem vom Hersteller empfohlenem ähnljchen Typ. If you encounter technical problems with the product, contact a qualified service technician or your retailer. Place the product on a stable surface. • If you detect any area where it by the manufacturer. Replace only with the package. • Before using the product, make sure all cables are correctly connected and the power cables are not damaged. Entsorgung gebrauchter Batterien nach Angaben des Herstellers....
Spresso Hardware User Manual
Page 8
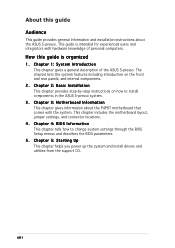
... step-by-step instructions on the front and rear panels, and internal components. 2. Chapter 4: BIOS Information This chapter tells how to install components in the ASUS S-presso system. 3 . Chapter 5: Starting Up This chapter helps you power up the system and install drivers and utilities from the support CD. Chapter 1: System ... 1. How this guide Audience This guide provides general information and installation instructions about the P4P8T motherboard that comes with hardware knowledge of the ASUS S-presso. Chapter 3: Motherboard Information This chapter gives information about the...
... step-by-step instructions on the front and rear panels, and internal components. 2. Chapter 4: BIOS Information This chapter tells how to install components in the ASUS S-presso system. 3 . Chapter 5: Starting Up This chapter helps you power up the system and install drivers and utilities from the support CD. Chapter 1: System ... 1. How this guide Audience This guide provides general information and installation instructions about the P4P8T motherboard that comes with hardware knowledge of the ASUS S-presso. Chapter 3: Motherboard Information This chapter gives information about the...
Spresso Hardware User Manual
Page 9
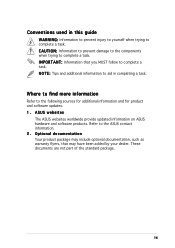
... N O T E : Tips and additional information to the following sources for additional information and for product and software updates. 1. ix ASUS websites The ASUS websites worldwide provide updated information on ASUS hardware and software products. C A U T I M P O R T A N T : Information that may have been added by...Refer to aid in this guide W A R N I N G : Information to prevent injury to yourself when trying to the ASUS contact information. 2. Conventions used in completing a task. Refer to complete a task. Optional documentation Your product package may include optional...
... N O T E : Tips and additional information to the following sources for additional information and for product and software updates. 1. ix ASUS websites The ASUS websites worldwide provide updated information on ASUS hardware and software products. C A U T I M P O R T A N T : Information that may have been added by...Refer to aid in this guide W A R N I N G : Information to prevent injury to yourself when trying to the ASUS contact information. 2. Conventions used in completing a task. Refer to complete a task. Optional documentation Your product package may include optional...
Spresso Hardware User Manual
Page 10
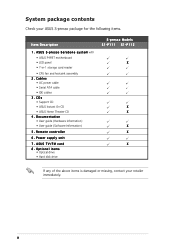
... cable • IDE cables 3. Power supply unit 7 . Optional items • Optical drive • Hard disk drive S-presso Models S1-P111 S1-P112 X X X X X X If any of the above items is damaged or missing, contact your ASUS S-presso package for the following items. Item Description 1 . Documentation • User guide (Hardware Information) • User guide (Software...
... cable • IDE cables 3. Power supply unit 7 . Optional items • Optical drive • Hard disk drive S-presso Models S1-P111 S1-P112 X X X X X X If any of the above items is damaged or missing, contact your ASUS S-presso package for the following items. Item Description 1 . Documentation • User guide (Hardware Information) • User guide (Software...
Spresso Hardware User Manual
Page 11
ASUS S-presso The chapter lists the system features including introduction on the front and rear panels, and internal components. System Introduction Chapter 1 This chapter gives a general description of the ASUS S-presso.
ASUS S-presso The chapter lists the system features including introduction on the front and rear panels, and internal components. System Introduction Chapter 1 This chapter gives a general description of the ASUS S-presso.
Spresso Hardware User Manual
Page 12
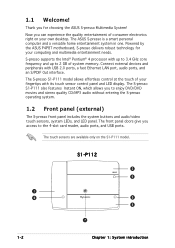
Powered by the ASUS P4P8T motherboard, S-presso delivers robust technology for choosing the ASUS S-presso Multimedia System! The front panel doors give you to enjoy DVD/DVD movies and stereo quality CD/MP3 audio without entering the S-presso operating system. 1.2 Front panel (external) The S-presso front panel includes the system buttons and audio/video ... available only on your own desktop. Now you for your fingertips with its touch sensor control panel and LED display. 1.1 Welcome! The ASUS S-presso is a smart personal computer and a versatile home entertainment system in one.
Powered by the ASUS P4P8T motherboard, S-presso delivers robust technology for choosing the ASUS S-presso Multimedia System! The front panel doors give you to enjoy DVD/DVD movies and stereo quality CD/MP3 audio without entering the S-presso operating system. 1.2 Front panel (external) The S-presso front panel includes the system buttons and audio/video ... available only on your own desktop. Now you for your fingertips with its touch sensor control panel and LED display. 1.1 Welcome! The ASUS S-presso is a smart personal computer and a versatile home entertainment system in one.
Spresso Hardware User Manual
Page 13
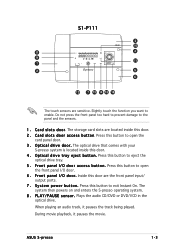
... is located inside this door. 4 . S y s t e m p o w e r b u t t o n . The system then powers on and enters the S-presso operating system. 8 . Plays the audio CD/DVD or DVD/VCD in the optical drive. ASUS S-presso 1-3 F r o n t p a n e l I / O d o o r . Inside this door are located inside this door. 2 . C a r d s l o t s d o o r a c c e s s b u t t o n. P L A Y / P A U S E s e n s o r . When playing an audio track, it pauses the movie. Press this button to open the...
... is located inside this door. 4 . S y s t e m p o w e r b u t t o n . The system then powers on and enters the S-presso operating system. 8 . Plays the audio CD/DVD or DVD/VCD in the optical drive. ASUS S-presso 1-3 F r o n t p a n e l I / O d o o r . Inside this door are located inside this door. 2 . C a r d s l o t s d o o r a c c e s s b u t t o n. P L A Y / P A U S E s e n s o r . When playing an audio track, it pauses the movie. Press this button to open the...
Spresso Hardware User Manual
Page 14
... r e L E D . This LED displays the temperature status of the system and the CPU. F O R W A R D s e n s o r . V o l u m e L E D. Touch this sensor to turn on the S-presso Instant On feature. Touch this sensor to rewind the audio track/ movie. 1 4 . Touch this sensor to another. 1 2 . Green means the temperature is beyond normal range... Touch this sensor to switch from one mode to play DVD/VCD movie, CD audio tracks, or MP3 files without entering the S-presso operating system. 1 1 . 9 . Touch this sensor to decrease the system volume. 1 3 . I n s t a n t O n...
... r e L E D . This LED displays the temperature status of the system and the CPU. F O R W A R D s e n s o r . V o l u m e L E D. Touch this sensor to turn on the S-presso Instant On feature. Touch this sensor to rewind the audio track/ movie. 1 4 . Touch this sensor to another. 1 2 . Green means the temperature is beyond normal range... Touch this sensor to switch from one mode to play DVD/VCD movie, CD audio tracks, or MP3 files without entering the S-presso operating system. 1 1 . 9 . Touch this sensor to decrease the system volume. 1 3 . I n s t a n t O n...
Spresso Hardware User Manual
Page 15
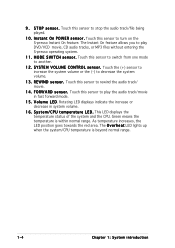
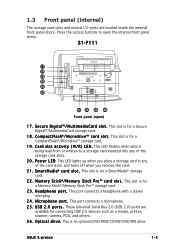
...a storage card inserted into any of the storage card slots. 2 0 . S e c u r e D i g i t a l ™ / M u l t i m e d i a C a r d s l o t . This slot is for a CompactFlash®/Microdrive™ storage card. 1 9 . ASUS S-presso 1-5 S m a r t M e d i a® c a r d s l o t . M e m o r y S t i c k®/ M e m o r y S t i c k P r o ™ c a r d s l o t . C o m p a c t F l a s h®/ M i c r o d r i v e ™ c a r d s l o t . U S B 2 . 0 p o r t s . P o w e r L E D. 1.3 Front panel (internal) The storage card slots and several I/O ports are available for connecting USB...
...a storage card inserted into any of the storage card slots. 2 0 . S e c u r e D i g i t a l ™ / M u l t i m e d i a C a r d s l o t . This slot is for a CompactFlash®/Microdrive™ storage card. 1 9 . ASUS S-presso 1-5 S m a r t M e d i a® c a r d s l o t . M e m o r y S t i c k®/ M e m o r y S t i c k P r o ™ c a r d s l o t . C o m p a c t F l a s h®/ M i c r o d r i v e ™ c a r d s l o t . U S B 2 . 0 p o r t s . P o w e r L E D. 1.3 Front panel (internal) The storage card slots and several I/O ports are available for connecting USB...
Spresso Hardware User Manual
Page 16
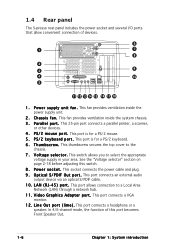
... connects the power cable and plug. 9 . L A N ( R J - 4 5 ) p o r t . L i n e O u t p o r t ( l i m e ) . In 4/6-channel mode, the function of devices. 6 1 7 8 2 3 9 4 10 5 11 12 13 14 15 16 17 18 1 . 1.4 Rear panel The S-presso rear panel includes the power socket and several I F O u t p o r t . This port is for a PS/2 keyboard. 6 . P o w e r s o c k e t . This fan provides ventilation inside the system chassis. 3 .
... connects the power cable and plug. 9 . L A N ( R J - 4 5 ) p o r t . L i n e O u t p o r t ( l i m e ) . In 4/6-channel mode, the function of devices. 6 1 7 8 2 3 9 4 10 5 11 12 13 14 15 16 17 18 1 . 1.4 Rear panel The S-presso rear panel includes the power socket and several I F O u t p o r t . This port is for a PS/2 keyboard. 6 . P o w e r s o c k e t . This fan provides ventilation inside the system chassis. 3 .
Spresso Hardware User Manual
Page 17
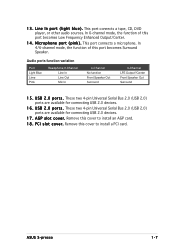
... are available for connecting USB 2.0 devices. 1 7 . Remove this port becomes Surround Speaker. In 6-channel mode, the function of this cover to install an AGP card. 1 8 . A G P s l o t c o v e r . ASUS S-presso 1-7 This port connects a microphone. Remove this port becomes Low Frequency Enhanced Output/Center. 1 4 . L i n e I s l o t c o v e r . Audio ports function variation Port Light Blue Lime Pink Headphone/2-Channel Line...
... are available for connecting USB 2.0 devices. 1 7 . Remove this port becomes Surround Speaker. In 6-channel mode, the function of this cover to install an AGP card. 1 8 . A G P s l o t c o v e r . ASUS S-presso 1-7 This port connects a microphone. Remove this port becomes Low Frequency Enhanced Output/Center. 1 4 . L i n e I s l o t c o v e r . Audio ports function variation Port Light Blue Lime Pink Headphone/2-Channel Line...

Spresso Hardware User Manual
Page 18
Optical drive bay 2. Fan and heatsink assembly 7. AGP card slot 8. PCI card slot 1-8 Chapter 1: System introduction I/O slot 5. DIMM sockets 6. HDD drive bay 3. The installed components are labeled for instructions on installing other system components. 1 2 3 4 5 6 7 8 1. Proceed to Chapter 2 for your reference. Storage card slot 4. 1.5 Internal components The illustration below is the internal view of the system when you remove the top cover.
Optical drive bay 2. Fan and heatsink assembly 7. AGP card slot 8. PCI card slot 1-8 Chapter 1: System introduction I/O slot 5. DIMM sockets 6. HDD drive bay 3. The installed components are labeled for instructions on installing other system components. 1 2 3 4 5 6 7 8 1. Proceed to Chapter 2 for your reference. Storage card slot 4. 1.5 Internal components The illustration below is the internal view of the system when you remove the top cover.
Spresso Hardware User Manual
Page 19
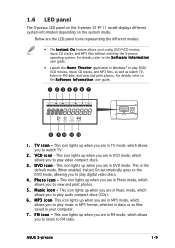
1.6 LED panel The S-presso LED panel on the S-presso S1-P111 model displays different system information depending on the system mode. T V i c o n - This icon lights up when you to play digital video discs. 4 . F M i c o n - For details, ... system. This icon lights up when you are in Music mode, which allows you to view and print photos. 5 . ASUS S-presso 1-9 P h o t o i c o n - M P 3 i c o n- This icon lights up when you are the LED panel icons representing the different modes: • The I n f o r m a t i o n user guide. 1 23 45 6 7 8 9 10 11 12 1. Below ...
1.6 LED panel The S-presso LED panel on the S-presso S1-P111 model displays different system information depending on the system mode. T V i c o n - This icon lights up when you to play digital video discs. 4 . F M i c o n - For details, ... system. This icon lights up when you are in Music mode, which allows you to view and print photos. 5 . ASUS S-presso 1-9 P h o t o i c o n - M P 3 i c o n- This icon lights up when you are the LED panel icons representing the different modes: • The I n f o r m a t i o n user guide. 1 23 45 6 7 8 9 10 11 12 1. Below ...
Spresso Hardware User Manual
Page 20
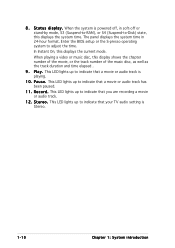
... off, in 24-hour format. This LED lights up to indicate that a movie or audio track has been paused. 1 1 . Enter the BIOS setup or the S-presso operating system to -Disk) state, this displays the system time. In Instant On, this display shows the chapter number of the movie, or the track...
... off, in 24-hour format. This LED lights up to indicate that a movie or audio track has been paused. 1 1 . Enter the BIOS setup or the S-presso operating system to -Disk) state, this displays the system time. In Instant On, this display shows the chapter number of the movie, or the track...
Spresso Hardware User Manual
Page 21
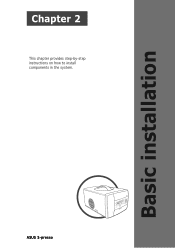
Basic installation Chapter 2 This chapter provides step-by-step instructions on how to install components in the system. ASUS S-presso
Basic installation Chapter 2 This chapter provides step-by-step instructions on how to install components in the system. ASUS S-presso