User Guide
Page 4
... items 3-2 3.2 Rack rails assembly 3-2 3.3 Attaching the rails to the rack 3-3 3.4 Rackmounting the server 3-4 Chapter 4: Motherboard information 4.1 Motherboard layout 4-2 4.2 Jumpers 4-4 4.3 Connectors 4-9 Chapter 5: BIOS setup 5.1 Managing and updating your BIOS 5-2 5.1.1 Creating a bootable floppy disk 5-2 5.1.2 AFUDOS utility 5-3 5.1.3 ASUS CrashFree BIOS 2 utility 5-6 5.1.4 ASUS Update utility 5-8 5.2 BIOS setup program 5-11 5.2.1 BIOS menu screen 5-12 5.2.2 Menu bar 5-12 5.2.3 Navigation keys 5-12 5.2.4 Menu...
... items 3-2 3.2 Rack rails assembly 3-2 3.3 Attaching the rails to the rack 3-3 3.4 Rackmounting the server 3-4 Chapter 4: Motherboard information 4.1 Motherboard layout 4-2 4.2 Jumpers 4-4 4.3 Connectors 4-9 Chapter 5: BIOS setup 5.1 Managing and updating your BIOS 5-2 5.1.1 Creating a bootable floppy disk 5-2 5.1.2 AFUDOS utility 5-3 5.1.3 ASUS CrashFree BIOS 2 utility 5-6 5.1.4 ASUS Update utility 5-8 5.2 BIOS setup program 5-11 5.2.1 BIOS menu screen 5-12 5.2.2 Menu bar 5-12 5.2.3 Navigation keys 5-12 5.2.4 Menu...

User Guide
Page 46
Determine the depth of the rack where you have the rackmount rail kit, it contains two pairs of rails (one short rail to install the system. 2. Bolts on inner side Rear ends 3-2 Front ends Nuts on outer side Chapter 3: Installation options Match one long and one pair ...for each side of the barebone system), and eight (8) pairs of nut-and-bolt type screws. Repeat step 2 to assemble the other rail pair. 3.1 Rackmount rail kit items If you wish to your desired length, and fix them together using four (4) pairs of nuts and bolts. 3. Nuts Bolts Left pair...
Determine the depth of the rack where you have the rackmount rail kit, it contains two pairs of rails (one short rail to install the system. 2. Bolts on inner side Rear ends 3-2 Front ends Nuts on outer side Chapter 3: Installation options Match one long and one pair ...for each side of the barebone system), and eight (8) pairs of nut-and-bolt type screws. Repeat step 2 to assemble the other rail pair. 3.1 Rackmount rail kit items If you wish to your desired length, and fix them together using four (4) pairs of nuts and bolts. 3. Nuts Bolts Left pair...
User Guide
Page 47
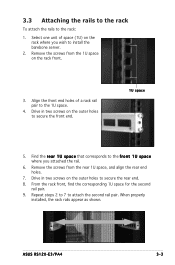
... in two screws on the outer holes to install the barebone server. 2. 3.3 Attaching the rails to the rack To attach the rails to attach the second rail pair. Select one unit of a rack rail pair to secure the front end. 1U space 5. Find the r e a r 1 U s p a c e that corresponds to the f r o n t 1 U s p a c e where...on the outer holes to the 1U space. 4. From the rack front, find the corresponding 1U space for the second rail pair. 9. Remove the screws from the rear 1U space, and align the rear end holes. 7. ASUS RS120-E3/PA4 3-3 Align the front end holes of space (1U) on...
... in two screws on the outer holes to install the barebone server. 2. 3.3 Attaching the rails to the rack To attach the rails to attach the second rail pair. Select one unit of a rack rail pair to secure the front end. 1U space 5. Find the r e a r 1 U s p a c e that corresponds to the f r o n t 1 U s p a c e where...on the outer holes to the 1U space. 4. From the rack front, find the corresponding 1U space for the second rail pair. 9. Remove the screws from the rear 1U space, and align the rear end holes. 7. ASUS RS120-E3/PA4 3-3 Align the front end holes of space (1U) on...
User Guide
Page 48
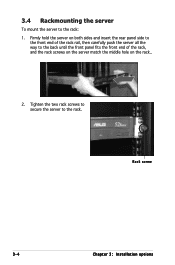
Firmly hold the server on both sides and insert the rear panel side to the front end of the rack rail, then carefully push the server all the way to the rack. Tighten the two rack screws to secure the server to the back until the front panel fits the front end of the rack, and the rack screws on the server match the middle hole on the rack.. 2. Rack screw 3-4 Chapter 3: Installation options 3.4 Rackmounting the server To mount the server to the rack: 1.
Firmly hold the server on both sides and insert the rear panel side to the front end of the rack rail, then carefully push the server all the way to the rack. Tighten the two rack screws to secure the server to the back until the front panel fits the front end of the rack, and the rack screws on the server match the middle hole on the rack.. 2. Rack screw 3-4 Chapter 3: Installation options 3.4 Rackmounting the server To mount the server to the rack: 1.