
Users Manual
Page 3
... disposal...12 Chapter 1: Hardware Setup Getting to know your Notebook PC 14 Top View...14 Bottom...20 Right Side...22 Left Side...23 Chapter 2: Using your Notebook PC Getting started...26 Charge your Notebook PC 26 Lift to open the display panel 28 Press the power button 28 Using the touchpad...29 Using the keyboard...36 Function keys...36 Windows® 10 keys...37 Multimedia control keys 38 Using the numeric keypad 39 Notebook PC E-Manual 3
... disposal...12 Chapter 1: Hardware Setup Getting to know your Notebook PC 14 Top View...14 Bottom...20 Right Side...22 Left Side...23 Chapter 2: Using your Notebook PC Getting started...26 Charge your Notebook PC 26 Lift to open the display panel 28 Press the power button 28 Using the touchpad...29 Using the keyboard...36 Function keys...36 Windows® 10 keys...37 Multimedia control keys 38 Using the numeric keypad 39 Notebook PC E-Manual 3

Users Manual
Page 4
... Connecting to wireless networks 55 Wi-Fi...55 Bluetooth ...56 Airplane mode...57 Connecting to wired networks 58 Configuring a dynamic IP/PPPoE network connection 58 Configuring a static IP network connection 59 Turning your Notebook PC off 60 Putting your Notebook PC to sleep 61 Chapter 4: Power-On Self-Test (POST) The Power-On Self-Test (POST 64 Using POST to access BIOS and Troubleshoot 64 BIOS...64 Accessing BIOS...64 BIOS Settings...65 Recovering your system 72 Performing a recovery option 73 4 Notebook...
... Connecting to wireless networks 55 Wi-Fi...55 Bluetooth ...56 Airplane mode...57 Connecting to wired networks 58 Configuring a dynamic IP/PPPoE network connection 58 Configuring a static IP network connection 59 Turning your Notebook PC off 60 Putting your Notebook PC to sleep 61 Chapter 4: Power-On Self-Test (POST) The Power-On Self-Test (POST 64 Using POST to access BIOS and Troubleshoot 64 BIOS...64 Accessing BIOS...64 BIOS Settings...65 Recovering your system 72 Performing a recovery option 73 4 Notebook...
Users Manual
Page 5
Chapter 5: Upgrading your Notebook PC Preparing for the installation 76 Installing the Hard Disk Drive 80 Installing an M.2 card 85 Tips and FAQs Useful tips for your Notebook PC 88 Hardware FAQs...89 Software FAQs...92 Appendices DVD-ROM Drive Information 96 Blu-ray ROM Drive Information 98 Internal Modem Compliancy 98 Overview...99 Network Compatibility Declaration 99 Non-Voice Equipment 99 Federal Communications Commission Interference Statement 101 FCC Radio Frequency...
Chapter 5: Upgrading your Notebook PC Preparing for the installation 76 Installing the Hard Disk Drive 80 Installing an M.2 card 85 Tips and FAQs Useful tips for your Notebook PC 88 Hardware FAQs...89 Software FAQs...92 Appendices DVD-ROM Drive Information 96 Blu-ray ROM Drive Information 98 Internal Modem Compliancy 98 Overview...99 Network Compatibility Declaration 99 Non-Voice Equipment 99 Federal Communications Commission Interference Statement 101 FCC Radio Frequency...
Users Manual
Page 8
Chapter 5: Upgrading your Notebook PC This chapter guides you can refer to for your Notebook PC. 8 Notebook PC E-Manual Tips and FAQs This section presents some recommended tips, hardware FAQs, and software FAQs you through the process of replacing and upgrading parts of your Notebook PC. Appendices This section includes notices and safety statements for maintaining and fixing common issues with your Notebook PC.
Chapter 5: Upgrading your Notebook PC This chapter guides you can refer to for your Notebook PC. 8 Notebook PC E-Manual Tips and FAQs This section presents some recommended tips, hardware FAQs, and software FAQs you through the process of replacing and upgrading parts of your Notebook PC. Appendices This section includes notices and safety statements for maintaining and fixing common issues with your Notebook PC.

Users Manual
Page 11
... AC power and remove the battery pack (if applicable) before cleaning your Notebook PC to dusty environments. Do not expose your Notebook PC near your Notebook PC using a dry cloth. Do not use strong solvents such as thinners, benzene, or other chemicals on top of warm water. Remove any extra moisture from your Notebook PC. Notebook PC E-Manual 11 Do not use your Notebook...
... AC power and remove the battery pack (if applicable) before cleaning your Notebook PC to dusty environments. Do not expose your Notebook PC near your Notebook PC using a dry cloth. Do not use strong solvents such as thinners, benzene, or other chemicals on top of warm water. Remove any extra moisture from your Notebook PC. Notebook PC E-Manual 11 Do not use your Notebook...

Users Manual
Page 15
Airplane mode indicator This indicator lights up when the capital lock function is enabled. NOTE: When enabled, the Airplane mode disables all wireless connectivity. Notebook PC E-Manual 15 Capital lock indicator This indicator lights up when the Airplane mode in camera allows you to take pictures or record videos using your Notebook PC. Using capital lock allows you to type capitalized letters (such as A, B, C) using your Notebook PC's keyboard. Camera The built-in your Notebook PC. Display panel This high-definition display panel provides excellent viewing...
Airplane mode indicator This indicator lights up when the capital lock function is enabled. NOTE: When enabled, the Airplane mode disables all wireless connectivity. Notebook PC E-Manual 15 Capital lock indicator This indicator lights up when the Airplane mode in camera allows you to take pictures or record videos using your Notebook PC. Using capital lock allows you to type capitalized letters (such as A, B, C) using your Notebook PC's keyboard. Camera The built-in your Notebook PC. Display panel This high-definition display panel provides excellent viewing...

Users Manual
Page 16
... use of a regular mouse. Touchpad The touchpad allows the use the function keys, allows quick access to navigate onscreen, providing an intuitive user experience. NOTE: For more details, refer to hear audio straight from your Notebook PC. It also enables you to the Using the touchpad section in this manual. 16 Notebook PC E-Manual It also simulates the functions of multi-gestures to Windows®, and controls other multimedia functions. NOTE: The keyboard...
... use of a regular mouse. Touchpad The touchpad allows the use the function keys, allows quick access to navigate onscreen, providing an intuitive user experience. NOTE: For more details, refer to hear audio straight from your Notebook PC. It also enables you to the Using the touchpad section in this manual. 16 Notebook PC E-Manual It also simulates the functions of multi-gestures to Windows®, and controls other multimedia functions. NOTE: The keyboard...
Users Manual
Page 21
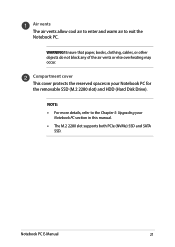
Notebook PC E-Manual 21 Air vents The air vents allow cool air to enter and warm air to the Chapter 5: Upgrading your Notebook PC section in your Notebook PC for the removable SSD (M.2 2280 slot) and HDD (Hard Disk Drive). WARNING! Compartment cover This cover protects the reserved spaces in this manual. • The M.2 2280 slot supports both PCIe (NVMe) SSD and SATA SSD. NOTE: • For more details, refer to exit the Notebook PC. Ensure that paper, books, clothing, cables, or other objects do not block any of the air vents or else overheating may occur.
Notebook PC E-Manual 21 Air vents The air vents allow cool air to enter and warm air to the Chapter 5: Upgrading your Notebook PC section in your Notebook PC for the removable SSD (M.2 2280 slot) and HDD (Hard Disk Drive). WARNING! Compartment cover This cover protects the reserved spaces in this manual. • The M.2 2280 slot supports both PCIe (NVMe) SSD and SATA SSD. NOTE: • For more details, refer to exit the Notebook PC. Ensure that paper, books, clothing, cables, or other objects do not block any of the air vents or else overheating may occur.
Users Manual
Page 27
... the device (for non-removable battery only). • The battery used in fire. • Never attempt to the power adapter before turning it matches the input/output rating information on your power adapter. Some Notebook PC models may present a risk of fire or chemical burn if removed or disassembled. • Follow the warning labels for your personal safety. • Risk of explosion if battery is connected...
... the device (for non-removable battery only). • The battery used in fire. • Never attempt to the power adapter before turning it matches the input/output rating information on your power adapter. Some Notebook PC models may present a risk of fire or chemical burn if removed or disassembled. • Follow the warning labels for your personal safety. • Risk of explosion if battery is connected...

Users Manual
Page 36
Decreases brightness for the backlit keyboard Increases brightness for the backlit keyboard Decreases display brightness Increases display brightness Turns the display panel on or off Toggles the display mode NOTE: Ensure that the second display is connected to your Notebook PC's keyboard can trigger the following commands: Puts the Notebook PC into Sleep mode Turns Airplane mode on or off NOTE: When enabled, the Airplane mode disables all wireless connectivity. Using the keyboard Function keys The function keys on your Notebook PC. 36 Notebook PC E-Manual
Decreases brightness for the backlit keyboard Increases brightness for the backlit keyboard Decreases display brightness Increases display brightness Turns the display panel on or off Toggles the display mode NOTE: Ensure that the second display is connected to your Notebook PC's keyboard can trigger the following commands: Puts the Notebook PC into Sleep mode Turns Airplane mode on or off NOTE: When enabled, the Airplane mode disables all wireless connectivity. Using the keyboard Function keys The function keys on your Notebook PC. 36 Notebook PC E-Manual

Users Manual
Page 43
... Start menu to a different user account Notebook PC E-Manual 43 Change account settings, lock, or sign out from your account Launch an app from the Start screen Launch Taskview Launch an app from Windows or switch to do these common activities: • Start programs or Windows® apps • Open commonly used programs or Windows® apps • Adjust Notebook PC settings • Get help with the Windows operating system • Turn off your Notebook...
... Start menu to a different user account Notebook PC E-Manual 43 Change account settings, lock, or sign out from your account Launch an app from the Start screen Launch Taskview Launch an app from Windows or switch to do these common activities: • Start programs or Windows® apps • Open commonly used programs or Windows® apps • Adjust Notebook PC settings • Get help with the Windows operating system • Turn off your Notebook...

Users Manual
Page 59
Return to the Internet then select Next. 9. Select Connect to the Network and Sharing Center window then select Set up a new connection or network. 8. Select Broadband (PPPoE). 10. Repeat steps 1 to the Internet. Type the IP address, Subnet mask and Default gateway from your User name, Password, and Connection name then select Connect. 11. Select Use the following IP address. 3. Notebook PC E-Manual 59 Type your service provider. 4. Select on the...
Return to the Internet then select Next. 9. Select Connect to the Network and Sharing Center window then select Set up a new connection or network. 8. Select Broadband (PPPoE). 10. Repeat steps 1 to the Internet. Type the IP address, Subnet mask and Default gateway from your User name, Password, and Connection name then select Connect. 11. Select Use the following IP address. 3. Notebook PC E-Manual 59 Type your service provider. 4. Select on the...
Users Manual
Page 64
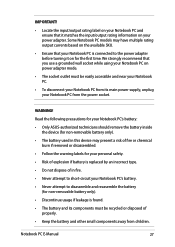
... run when you to system instability or boot failure. The software that controls the POST is a series of software-controlled diagnostic tests that run the BIOS Setup. • You have installed a new system component that requires further BIOS settings or updates. Accessing BIOS Enter the BIOS settings by using the function keys of your Notebook PC. The Power-On Self-Test (POST) The POST (Power-On Self-Test) is installed as a permanent part of a trained service personnel.
... run when you to system instability or boot failure. The software that controls the POST is a series of software-controlled diagnostic tests that run the BIOS Setup. • You have installed a new system component that requires further BIOS settings or updates. Accessing BIOS Enter the BIOS settings by using the function keys of your Notebook PC. The Power-On Self-Test (POST) The POST (Power-On Self-Test) is installed as a permanent part of a trained service personnel.
Users Manual
Page 65
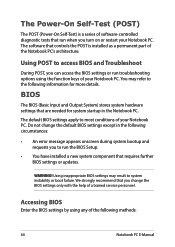
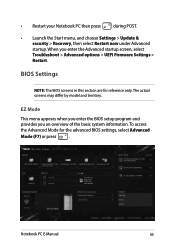
EZ Mode This menu appears when you enter the BIOS setup program and provides you enter the Advanced startup screen, select Troubleshoot > Advanced options > UEFI Firmware Settings > Restart. Notebook PC E-Manual 65 The actual screens may differ by model and territory. BIOS Settings NOTE: The BIOS screens in this section are for the advanced BIOS settings, select Advanced Mode (F7) or press . To access the Advanced Mode for reference only. When you an overview of the...
EZ Mode This menu appears when you enter the BIOS setup program and provides you enter the Advanced startup screen, select Troubleshoot > Advanced options > UEFI Firmware Settings > Restart. Notebook PC E-Manual 65 The actual screens may differ by model and territory. BIOS Settings NOTE: The BIOS screens in this section are for the advanced BIOS settings, select Advanced Mode (F7) or press . To access the Advanced Mode for reference only. When you an overview of the...

Users Manual
Page 67
Security This menu allows you to set up the administrator and user password of your Notebook PC's hard disk drive, input/output (I/O) interface, and USB interface. Notebook PC E-Manual 67 It also allows you will be prompted to input this before entering the operating system. • If you install an Administrator Password, you to control the access to input this before entering BIOS. NOTE: • If you install a User Password, you will be prompted to your Notebook PC.
Security This menu allows you to set up the administrator and user password of your Notebook PC's hard disk drive, input/output (I/O) interface, and USB interface. Notebook PC E-Manual 67 It also allows you will be prompted to input this before entering the operating system. • If you install an Administrator Password, you to control the access to input this before entering BIOS. NOTE: • If you install a User Password, you will be prompted to your Notebook PC.
Users Manual
Page 70
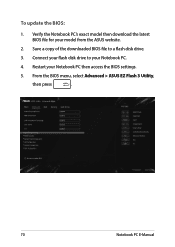
Save a copy of the downloaded BIOS file to your flash disk drive to a flash disk drive. 3. Connect your Notebook PC. 4. To update the BIOS: 1. Restart your model from the ASUS website. 2. Verify the Notebook PC's exact model then download the latest BIOS file for your Notebook PC then access the BIOS settings. 5. From the BIOS menu, select Advanced > ASUS EZ Flash 3 Utility, then press . 70 Notebook PC E-Manual
Save a copy of the downloaded BIOS file to your flash disk drive to a flash disk drive. 3. Connect your Notebook PC. 4. To update the BIOS: 1. Restart your model from the ASUS website. 2. Verify the Notebook PC's exact model then download the latest BIOS file for your Notebook PC then access the BIOS settings. 5. From the BIOS menu, select Advanced > ASUS EZ Flash 3 Utility, then press . 70 Notebook PC E-Manual

Users Manual
Page 88
... battery if the battery is removable. • Disconnect all external devices and ensure you have the latest security settings. • Use an anti-virus software to protect your data and keep this updated too. • Unless absolutely necessary, refrain from using force shutdown to turn off your Notebook PC. • Always backup your data and make it a point to resetting your Notebook PC: - Internet connection information 88 Notebook PC E-Manual...
... battery if the battery is removable. • Disconnect all external devices and ensure you have the latest security settings. • Use an anti-virus software to protect your data and keep this updated too. • Unless absolutely necessary, refrain from using force shutdown to turn off your Notebook PC. • Always backup your data and make it a point to resetting your Notebook PC: - Internet connection information 88 Notebook PC E-Manual...
Users Manual
Page 89
... your Notebook PC. A black dot, or sometimes a colored dot, appears onscreen when I do? The color and brightness of your display panel may also vary per model. How can I maximize my Notebook PC 's battery life? Hardware FAQs 1. How can I fix this? You may use the function keys or the display settings in your operating system to adjust the display brightness. • If you are not using any Wi-Fi connection, switch your Notebook PC...
... your Notebook PC. A black dot, or sometimes a colored dot, appears onscreen when I do? The color and brightness of your display panel may also vary per model. How can I maximize my Notebook PC 's battery life? Hardware FAQs 1. How can I fix this? You may use the function keys or the display settings in your operating system to adjust the display brightness. • If you are not using any Wi-Fi connection, switch your Notebook PC...
Users Manual
Page 90
... battery charge indicator does not light up the speaker volume. • Check if your speakers were set to mute. • Check if a headphone jack is connected to enable your Notebook PC and remove it. 7. What's wrong? • Check whether the power adapter or battery pack is my touchpad not working ? Why is attached correctly. When I play audio and video files, why can try doing any sound from my Notebook PC's audio...
... battery charge indicator does not light up the speaker volume. • Check if your speakers were set to mute. • Check if a headphone jack is connected to enable your Notebook PC and remove it. 7. What's wrong? • Check whether the power adapter or battery pack is my touchpad not working ? Why is attached correctly. When I play audio and video files, why can try doing any sound from my Notebook PC's audio...
Users Manual
Page 92
... my screen displays this message: "Remove disks or other media. Check if the power adapter and battery pack are left inside the optical drive then restart. • If the problem still exists, your local ASUS service center for assistance. 3. Press any optical discs that are inserted correctly then turn on my Notebook PC, the power indicator lights up but nothing appears on your Notebook PC. • If the problem still...
... my screen displays this message: "Remove disks or other media. Check if the power adapter and battery pack are left inside the optical drive then restart. • If the problem still exists, your local ASUS service center for assistance. 3. Press any optical discs that are inserted correctly then turn on my Notebook PC, the power indicator lights up but nothing appears on your Notebook PC. • If the problem still...


