

User Guide
Page 3
... guide...vi STRIX B250H GAMING specifications summary viii Package contents...xii Installation tools and components xiii Chapter 1: Product Introduction 1.1 Motherboard overview 1-1 1.1.1 Before you proceed 1-1 1.1.2 Motherboard layout 1-2 1.1.3 Central Processing Unit (CPU 1-4 1.1.4...Internal connectors 1-10 Chapter 2: Basic Installation 2.1 Building your PC system 2-1 2.1.1 Motherboard installation 2-1 2.1.2 CPU installation 2-3 2.1.3 CPU heatsink and fan assembly installation 2-5 2.1.4 DIMM installation 2-7 2.1.5 ATX power connection 2-8 2.1.6 SATA device ...
... guide...vi STRIX B250H GAMING specifications summary viii Package contents...xii Installation tools and components xiii Chapter 1: Product Introduction 1.1 Motherboard overview 1-1 1.1.1 Before you proceed 1-1 1.1.2 Motherboard layout 1-2 1.1.3 Central Processing Unit (CPU 1-4 1.1.4...Internal connectors 1-10 Chapter 2: Basic Installation 2.1 Building your PC system 2-1 2.1.1 Motherboard installation 2-1 2.1.2 CPU installation 2-3 2.1.3 CPU heatsink and fan assembly installation 2-5 2.1.4 DIMM installation 2-7 2.1.5 ATX power connection 2-8 2.1.6 SATA device ...
User Guide
Page 8
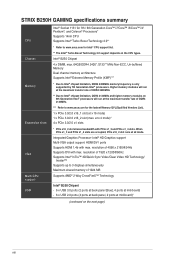
... channel memory architecture Supports Intel® Extreme Memory Profile (XMP)*** * Due to www.asus.com for Intel® CPU support list. ** The Intel® Turbo Boost Technology 2.0 support depends on the CPU types. Higher memory modules will run at the maximum transfer rate of DDR4 2133MHz. ...Supports DVI with max. Intel® HD Graphics support Multi-VGA output support: HDMI/DVI ports Supports HDMI 1.4b with max. STRIX B250H GAMING specifications summary CPU Chipset Memory Expansion slots VGA Multi-GPU support USB Intel® Socket 1151 for 7th / 6th Generation Core™ i7/Core&#...
... channel memory architecture Supports Intel® Extreme Memory Profile (XMP)*** * Due to www.asus.com for Intel® CPU support list. ** The Intel® Turbo Boost Technology 2.0 support depends on the CPU types. Higher memory modules will run at the maximum transfer rate of DDR4 2133MHz. ...Supports DVI with max. Intel® HD Graphics support Multi-VGA output support: HDMI/DVI ports Supports HDMI 1.4b with max. STRIX B250H GAMING specifications summary CPU Chipset Memory Expansion slots VGA Multi-GPU support USB Intel® Socket 1151 for 7th / 6th Generation Core™ i7/Core&#...

User Guide
Page 10
STRIX B250H GAMING specifications summary ROG Exclusive Features ROG RAMCache II ROG GameFirst IV* ROG Overwolf ROG CPU-Z ROG CloneDrive ASUS Special Features Internal I /O ASUS EZ DIY - GPU Boost - SafeSlot - DRAM Overcurrent Protection - ESD Guards on the next page) x Stainless Steel Back I /O connectors * ROG GameFirst IV is only available for Windows® 10/8.1 64-bit. ASUS EZ Flash 3 ASUS Q-Design - AI Suite 3 Gamer's Guardian - ASUS CrashFree BIOS...
STRIX B250H GAMING specifications summary ROG Exclusive Features ROG RAMCache II ROG GameFirst IV* ROG Overwolf ROG CPU-Z ROG CloneDrive ASUS Special Features Internal I /O ASUS EZ DIY - GPU Boost - SafeSlot - DRAM Overcurrent Protection - ESD Guards on the next page) x Stainless Steel Back I /O connectors * ROG GameFirst IV is only available for Windows® 10/8.1 64-bit. ASUS EZ Flash 3 ASUS Q-Design - AI Suite 3 Gamer's Guardian - ASUS CrashFree BIOS...

User Guide
Page 13
xiii Installation tools and components Intel® 1151 compatible CPU Fan Intel® 1151 CPU PC chassis SATA hard disk drive Phillips (cross) screwdriver Power supply unit 1 bag of screws DIMM SATA optical disc drive (optional) Graphics card The tools and components listed above are not included in the motherboard package.
xiii Installation tools and components Intel® 1151 compatible CPU Fan Intel® 1151 CPU PC chassis SATA hard disk drive Phillips (cross) screwdriver Power supply unit 1 bag of screws DIMM SATA optical disc drive (optional) Graphics card The tools and components listed above are not included in the motherboard package.
User Guide
Page 17
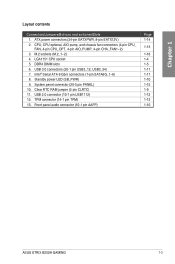
... audio connector (10-1 pin AAFP) Page 1-14 1-13 1-16 1-4 1-5 1-11 1-11 1-10 1-15 1-9 1-12 1-12 1-10 ASUS STRIX B250H GAMING 1-3 ATX power connectors (24-pin EATXPWR, 8-pin EATX12V) 2. Chapter 1 Layout contents Connectors/Jumpers/Buttons and switches/Slots 1. LGA1151 CPU socket 5. TPM connector (14-1 pin TPM) 13. System panel connector (20-5 pin PANEL) 10, Clear RTC...
... audio connector (10-1 pin AAFP) Page 1-14 1-13 1-16 1-4 1-5 1-11 1-11 1-10 1-15 1-9 1-12 1-12 1-10 ASUS STRIX B250H GAMING 1-3 ATX power connectors (24-pin EATXPWR, 8-pin EATX12V) 2. Chapter 1 Layout contents Connectors/Jumpers/Buttons and switches/Slots 1. LGA1151 CPU socket 5. TPM connector (14-1 pin TPM) 13. System panel connector (20-5 pin PANEL) 10, Clear RTC...
User Guide
Page 18
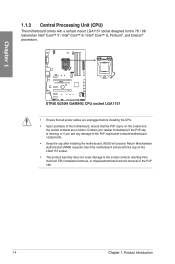
...ASUS will process Return Merchandise Authorization (RMA) requests only if the motherboard comes with a surface mount LGA1151 socket designed for the 7th / 6th Generation Intel® Core™ i7 / Intel® Core™ i5 / Intel® Core™ i3, Pentium®, and Celeron® processors. STRIX B250H GAMING CPU... socket LGA1151 • Ensure that the PnP cap is missing, or if you see any damage to the socket contacts resulting from incorrect CPU installation/removal, or misplacement/loss/incorrect removal of...
...ASUS will process Return Merchandise Authorization (RMA) requests only if the motherboard comes with a surface mount LGA1151 socket designed for the 7th / 6th Generation Intel® Core™ i7 / Intel® Core™ i5 / Intel® Core™ i3, Pentium®, and Celeron® processors. STRIX B250H GAMING CPU... socket LGA1151 • Ensure that the PnP cap is missing, or if you see any damage to the socket contacts resulting from incorrect CPU installation/removal, or misplacement/loss/incorrect removal of...

User Guide
Page 20
.... b) Install a 64-bit Windows® OS when you want to install 4 GB or more details, refer to get the correct memory modules. • ASUS exclusively provides hyper DIMM support function. • Hyper DIMM support is the standard way of 3GB system memory if you install memory modules of the... same version or data code (D/C) from the same vendor. c) For more on the CPU's capabilities and other installed devices. • Always install the DIMMS with the vendor to the Microsoft® support site at a lower frequency than...
.... b) Install a 64-bit Windows® OS when you want to install 4 GB or more details, refer to get the correct memory modules. • ASUS exclusively provides hyper DIMM support function. • Hyper DIMM support is the standard way of 3GB system memory if you install memory modules of the... same version or data code (D/C) from the same vendor. c) For more on the CPU's capabilities and other installed devices. • Always install the DIMMS with the vendor to the Microsoft® support site at a lower frequency than...

User Guide
Page 27
... black wire of each cable matches the ground pin of your water cooling kit to the CPU_FAN connector. ASUS STRIX B250H GAMING 1-13 Do not place jumper caps on the motherboard, ensuring that the CPU fan cable is securely installed to the CPU fan connector. Insufficient air flow inside the system may damage the motherboard components.
... black wire of each cable matches the ground pin of your water cooling kit to the CPU_FAN connector. ASUS STRIX B250H GAMING 1-13 Do not place jumper caps on the motherboard, ensuring that the CPU fan cable is securely installed to the CPU fan connector. Insufficient air flow inside the system may damage the motherboard components.
User Guide
Page 33
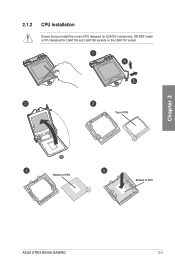
2.1.2 CPU installation Ensure that you install the correct CPU designed for LGA1155 and LGA1156 sockets on the LGA1151 socket. DO NOT install a CPU designed for LGA1151 socket only. Chapter 2 Top of CPU Bottom of CPU Bottom of CPU ASUS STRIX B250H GAMING 2-3
2.1.2 CPU installation Ensure that you install the correct CPU designed for LGA1155 and LGA1156 sockets on the LGA1151 socket. DO NOT install a CPU designed for LGA1151 socket only. Chapter 2 Top of CPU Bottom of CPU Bottom of CPU ASUS STRIX B250H GAMING 2-3

User Guide
Page 34
... Tool when installing, removing, or picking up the CPU Installation Tool. • Ensure to use a soft stable surface when installing the CPU to the CPU Installation Tool to prevent CPU damage. • ASUS will not cover damages resulting from incorrect CPU installation/removal, incorrect CPU orientation/placement, or other damages resulting from negligence by the user. 2-4 Chapter...
... Tool when installing, removing, or picking up the CPU Installation Tool. • Ensure to use a soft stable surface when installing the CPU to the CPU Installation Tool to prevent CPU damage. • ASUS will not cover damages resulting from incorrect CPU installation/removal, incorrect CPU orientation/placement, or other damages resulting from negligence by the user. 2-4 Chapter...
User Guide
Page 35
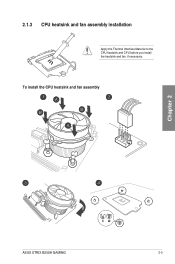
To install the CPU heatsink and fan assembly Chapter 2 ASUS STRIX B250H GAMING 2-5 2.1.3 CPU heatsink and fan assembly installation Apply the Thermal Interface Material to the CPU heatsink and CPU before you install the heatsink and fan, if necessary.
To install the CPU heatsink and fan assembly Chapter 2 ASUS STRIX B250H GAMING 2-5 2.1.3 CPU heatsink and fan assembly installation Apply the Thermal Interface Material to the CPU heatsink and CPU before you install the heatsink and fan, if necessary.

User Guide
Page 36
To uninstall the CPU heatsink and fan assembly Chapter 2 2-6 Chapter 2: Basic Installation
To uninstall the CPU heatsink and fan assembly Chapter 2 2-6 Chapter 2: Basic Installation

User Guide
Page 51
ASUS STRIX B250H GAMING 3-3 The default screen for details. The EZ Mode provides you to switch EZ System Tuning modes Selects the display language of the BIOS setup program Chapter 3 Displays the CPU Fan's speed. Displays the CPU/motherboard temperature, CPU voltage output, CPU/chassis/power fan speed, and SATA information Displays the system properties of the basic system...
ASUS STRIX B250H GAMING 3-3 The default screen for details. The EZ Mode provides you to switch EZ System Tuning modes Selects the display language of the BIOS setup program Chapter 3 Displays the CPU Fan's speed. Displays the CPU/motherboard temperature, CPU voltage output, CPU/chassis/power fan speed, and SATA information Displays the system properties of the basic system...

User Guide
Page 52
... to Advanced Mode, click Advanced Mode(F7) or press the hotkey. To switch from EZ Mode to EZ Mode Search on the FAQ Displays the CPU temperature, CPU, and memory voltage output 3-4 Chapter 3: BIOS Setup The figure below shows an example of the Advanced Mode.
... to Advanced Mode, click Advanced Mode(F7) or press the hotkey. To switch from EZ Mode to EZ Mode Search on the FAQ Displays the CPU temperature, CPU, and memory voltage output 3-4 Chapter 3: BIOS Setup The figure below shows an example of the Advanced Mode.

User Guide
Page 55
3.2.3 QFan Control The QFan Control allows you to manually configure your CPU and chassis fans. Click to select a fan to be configured Click to activate PWM Mode Click to activate DC Mode Select a profile to apply to your fans Click to apply the fan setting Click to undo the changes Click to go back to main menu Select to set a fan profile or manually configure the operating speed of your fans Chapter 3 ASUS STRIX B250H GAMING 3-7
3.2.3 QFan Control The QFan Control allows you to manually configure your CPU and chassis fans. Click to select a fan to be configured Click to activate PWM Mode Click to activate DC Mode Select a profile to apply to your fans Click to apply the fan setting Click to undo the changes Click to go back to main menu Select to set a fan profile or manually configure the operating speed of your fans Chapter 3 ASUS STRIX B250H GAMING 3-7

User Guide
Page 59
...to clear the BIOS password. If this menu allow you to change the system security settings. • If you to set the CPU ratio and their features. Intel(R) SpeedStep(tm) [Enabled] This item allows the operating system to dynamically adjust the processor voltage and ...clock) frequency setting. Internal CPU Power Management The subitems in this happens, revert to erase the RTC RAM via the Clear CMOS button. • The Administrator or User Password items on how to the default setting. Configuration options: [Disabled] [Enabled] Chapter 3 ASUS STRIX B250H GAMING 3-11 After you set...
...to clear the BIOS password. If this menu allow you to change the system security settings. • If you to set the CPU ratio and their features. Intel(R) SpeedStep(tm) [Enabled] This item allows the operating system to dynamically adjust the processor voltage and ...clock) frequency setting. Internal CPU Power Management The subitems in this happens, revert to erase the RTC RAM via the Clear CMOS button. • The Administrator or User Password items on how to the default setting. Configuration options: [Disabled] [Enabled] Chapter 3 ASUS STRIX B250H GAMING 3-11 After you set...

User Guide
Page 60
... 3.6 Advanced menu The Advanced menu items allow you to configure the platform-related features. 3.6.2 CPU Configuration The items in seconds. Use the or keys to manage and configure the CPU's power. CPU Power Management Control This item allows you to adjust the value. Configuration options: [Auto] [...Enabled] Chapter 3 3-12 Chapter 3: BIOS Setup Package Power Time Window [Auto] Also known as Power Limit 1, this menu show the CPU-related information that exceeds the TDP (Thermal Design Power) for maximum performance. The values range from 1 to 127 in this item allows...
... 3.6 Advanced menu The Advanced menu items allow you to configure the platform-related features. 3.6.2 CPU Configuration The items in seconds. Use the or keys to manage and configure the CPU's power. CPU Power Management Control This item allows you to adjust the value. Configuration options: [Auto] [...Enabled] Chapter 3 3-12 Chapter 3: BIOS Setup Package Power Time Window [Auto] Also known as Power Limit 1, this menu show the CPU-related information that exceeds the TDP (Thermal Design Power) for maximum performance. The values range from 1 to 127 in this item allows...


