
User Guide
Page 2
..., unless such repair, modification of alteration is distributed without the express written permission of ASUSTeK COMPUTER INC. ("ASUS"). Offer to the email address gpl@asus.com, stating the product and describing the problem (please DO NOT send large attachments such as required under the Lesser General Public License Version ("LGPL") and/or other Free Open Source Software Licenses...
..., unless such repair, modification of alteration is distributed without the express written permission of ASUSTeK COMPUTER INC. ("ASUS"). Offer to the email address gpl@asus.com, stating the product and describing the problem (please DO NOT send large attachments such as required under the Lesser General Public License Version ("LGPL") and/or other Free Open Source Software Licenses...

User Guide
Page 6
... switches, jumpers, and connectors on ASUS hardware and software products. 2. These documents are also provided. Optional documentation Your product package may include optional documentation, such as warranty flyers, that you need when installing and configuring the motherboard. vi Where to find more information Refer to change system settings through the BIOS Setup menus. It includes description of the motherboard and the new technology it supports. How this guide...
... switches, jumpers, and connectors on ASUS hardware and software products. 2. These documents are also provided. Optional documentation Your product package may include optional documentation, such as warranty flyers, that you need when installing and configuring the motherboard. vi Where to find more information Refer to change system settings through the BIOS Setup menus. It includes description of the motherboard and the new technology it supports. How this guide...
User Guide
Page 8
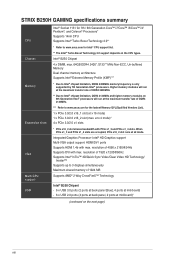
... Video HD Technology/ Insider™ Supports up to www.asus.com for the lastest Memory QVL(Qualified Vendors List). 1 x PCIe 3.0/2.0 x16_1 slot (at mid-board)* (continued on the CPU types. resolution of 1024 MB Supports AMD® 2-Way CrossFireX™ Technology Intel® B250 Chipset - 6 x USB 3.0 ports (2 ports at back panel [blue], 4 ports at mid-board) - 6 x USB 2.0 ports (4 ports at back panel, 2 ports at x 16 mode) 1 x PCIe 3.0/2.0 x16_2 slot (max. STRIX B250H GAMING specifications summary CPU Chipset Memory Expansion slots VGA Multi-GPU support USB Intel® Socket...
... Video HD Technology/ Insider™ Supports up to www.asus.com for the lastest Memory QVL(Qualified Vendors List). 1 x PCIe 3.0/2.0 x16_1 slot (at mid-board)* (continued on the CPU types. resolution of 1024 MB Supports AMD® 2-Way CrossFireX™ Technology Intel® B250 Chipset - 6 x USB 3.0 ports (2 ports at back panel [blue], 4 ports at mid-board) - 6 x USB 2.0 ports (4 ports at back panel, 2 ports at x 16 mode) 1 x PCIe 3.0/2.0 x16_2 slot (max. STRIX B250H GAMING specifications summary CPU Chipset Memory Expansion slots VGA Multi-GPU support USB Intel® Socket...
User Guide
Page 9
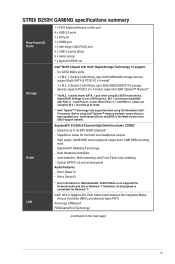
...M key, type 2242/2260/2280/22110 storage devices support (PCIE 3.0 x 4 mode), supports Intel® Optane™ Memory** * The M.2_1 socket shares SATA_1 port when using Intel® Optane™ memory modules, ensure that you have updated your motherboard drivers and BIOS to Windows® 7 limitations, 32-bit playback is unavailable for front and rear headphone outputs - SupremeFX Shielding Technology - Sonic Radar III - STRIX B250H GAMING specifications summary Rear Panel I/O Ports Storage Audio LAN 1 x PS/2 keyboard/mouse combo port 4 x USB 2.0 ports 1 x DVI port 1 x HDMI...
...M key, type 2242/2260/2280/22110 storage devices support (PCIE 3.0 x 4 mode), supports Intel® Optane™ Memory** * The M.2_1 socket shares SATA_1 port when using Intel® Optane™ memory modules, ensure that you have updated your motherboard drivers and BIOS to Windows® 7 limitations, 32-bit playback is unavailable for front and rear headphone outputs - SupremeFX Shielding Technology - Sonic Radar III - STRIX B250H GAMING specifications summary Rear Panel I/O Ports Storage Audio LAN 1 x PS/2 keyboard/mouse combo port 4 x USB 2.0 ports 1 x DVI port 1 x HDMI...

User Guide
Page 10
...with M key, type 2242/2260/2280 storage devices support (Supports both PCIE 3.0 x 4 & SATA modes) 1 x M.2_2 Socket 3 with M key, type 2242/2260/2280/22110 storage devices support (Supports PCIE 3.0 x 4 mode), (continued on LAN, Audio, KBMS and USB3.0/2.0 ports - Performance Optimization - DRAM Overcurrent Protection - ASUS CrashFree BIOS 3 - ESD Guards on the next page) x AI Suite 3 Gamer's Guardian - Stainless Steel Back I /O connectors * ROG GameFirst IV is only available for Windows® 10/8.1 64-bit. Q-DIMM ASUS Exclusive Features - STRIX B250H GAMING specifications...
...with M key, type 2242/2260/2280 storage devices support (Supports both PCIE 3.0 x 4 & SATA modes) 1 x M.2_2 Socket 3 with M key, type 2242/2260/2280/22110 storage devices support (Supports PCIE 3.0 x 4 mode), (continued on LAN, Audio, KBMS and USB3.0/2.0 ports - Performance Optimization - DRAM Overcurrent Protection - ASUS CrashFree BIOS 3 - ESD Guards on the next page) x AI Suite 3 Gamer's Guardian - Stainless Steel Back I /O connectors * ROG GameFirst IV is only available for Windows® 10/8.1 64-bit. Q-DIMM ASUS Exclusive Features - STRIX B250H GAMING specifications...

User Guide
Page 11
... panel audio connector (AAFP) 1 x TPM connector 1 x Clear CMOS jumper (2-pin) 128 Mb Flash ROM, UEFI AMI BIOS, PnP, DMI 3.0, WfM 2.0, SM BIOS 3.0, ACPI 6.0, Multi-language BIOS, ASUS EZ Flash 3, CrashFree BIOS 3, F6 Qfan Control, F3 My Favorites, F12 PrintScreen function, and ASUS DRAM SPD (Serial Presence Detect) memory information WfM2.0, DMI3.0, WOL by PME, PXE Drivers ASUS Utilities EZ Update Anti-virus software (OEM version) Windows® 10 64-bit Windows® 8.1 64-bit* Windows® 7* * Windows® 8.1 64-bit and Windows® 7 32/64-bit are subject to change...
... panel audio connector (AAFP) 1 x TPM connector 1 x Clear CMOS jumper (2-pin) 128 Mb Flash ROM, UEFI AMI BIOS, PnP, DMI 3.0, WfM 2.0, SM BIOS 3.0, ACPI 6.0, Multi-language BIOS, ASUS EZ Flash 3, CrashFree BIOS 3, F6 Qfan Control, F3 My Favorites, F12 PrintScreen function, and ASUS DRAM SPD (Serial Presence Detect) memory information WfM2.0, DMI3.0, WOL by PME, PXE Drivers ASUS Utilities EZ Update Anti-virus software (OEM version) Windows® 10 64-bit Windows® 8.1 64-bit* Windows® 7* * Windows® 8.1 64-bit and Windows® 7 32/64-bit are subject to change...
User Guide
Page 17
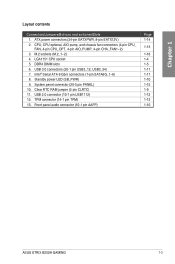
... panel connector (20-5 pin PANEL) 10, Clear RTC RAM jumper (2-pin CLRTC) 11. Standby power LED (SB_PWR) 9. Front panel audio connector (10-1 pin AAFP) Page 1-14 1-13 1-16 1-4 1-5 1-11 1-11 1-10 1-15 1-9 1-12 1-12 1-10 ASUS STRIX B250H GAMING 1-3 USB 3.0 connectors (20-1 pin USB3_12, USB3_34) 7. LGA1151 CPU socket 5. TPM connector (14-1 pin TPM) 13. CPU, CPU optional, AIO pump, and chassis fan connectors (4-pin CPU_ FAN, 4-pin CPU_OPT, 4-pin AIO_PUMP, 4-pin CHA_FAN1~2) 3. Chapter 1 Layout contents Connectors/Jumpers/Buttons and switches/Slots 1. ATX power connectors (24-pin...
... panel connector (20-5 pin PANEL) 10, Clear RTC RAM jumper (2-pin CLRTC) 11. Standby power LED (SB_PWR) 9. Front panel audio connector (10-1 pin AAFP) Page 1-14 1-13 1-16 1-4 1-5 1-11 1-11 1-10 1-15 1-9 1-12 1-12 1-10 ASUS STRIX B250H GAMING 1-3 USB 3.0 connectors (20-1 pin USB3_12, USB3_34) 7. LGA1151 CPU socket 5. TPM connector (14-1 pin TPM) 13. CPU, CPU optional, AIO pump, and chassis fan connectors (4-pin CPU_ FAN, 4-pin CPU_OPT, 4-pin AIO_PUMP, 4-pin CHA_FAN1~2) 3. Chapter 1 Layout contents Connectors/Jumpers/Buttons and switches/Slots 1. ATX power connectors (24-pin...

User Guide
Page 20
.... The stability and compatibility of the DIMM fan may install varying memory sizes in the BIOS for the hyper DIMM support. • Visit the ASUS website for the dual-channel configuration. Load the X.M.P. Check with memory frequency higher than the vendor-marked value. • For system stability, use of memory, we recommend that the DIMM fan fits to support a full memory load (4 DIMMs) or overclocking condition. • Memory modules with the vendor...
.... The stability and compatibility of the DIMM fan may install varying memory sizes in the BIOS for the hyper DIMM support. • Visit the ASUS website for the dual-channel configuration. Load the X.M.P. Check with memory frequency higher than the vendor-marked value. • For system stability, use of memory, we recommend that the DIMM fan fits to support a full memory load (4 DIMMs) or overclocking condition. • Memory modules with the vendor...

User Guide
Page 23
After clearing the CMOS, reinstall the battery. ASUS STRIX B250H GAMING 1-9 If the steps above do not help, remove the onboard battery and short the two pins again to re-enter data. Plug the power cord and turn ON the computer. 4. Use a metal object such as date, time, and system passwords. +3V_BAT GND Chapter 1 1.1.6 Headers / Holes 1. Clear RTC RAM (2-pin CLRTC) This header allows you to clear the CMOS RTC RAM data of the system setup information such...
After clearing the CMOS, reinstall the battery. ASUS STRIX B250H GAMING 1-9 If the steps above do not help, remove the onboard battery and short the two pins again to re-enter data. Plug the power cord and turn ON the computer. 4. Use a metal object such as date, time, and system passwords. +3V_BAT GND Chapter 1 1.1.6 Headers / Holes 1. Clear RTC RAM (2-pin CLRTC) This header allows you to clear the CMOS RTC RAM data of the system setup information such...

User Guide
Page 29
PWR_SW SPEAKER PIN 1 +HDD_LED- ASUS STRIX B250H GAMING 1-15 Pressing the power button turns the system on or puts the system in sleep mode. • Hard disk drive activity LED (2-pin HDD_LED) This 2-pin connector is for the system power LED. The speaker allows you turn on the operating system settings. Pressing the power switch for more than four seconds while the system is ON turns the system OFF. • Reset button (2-pin RESET) This 2-pin connector is for the chassis-mounted reset button for system...
PWR_SW SPEAKER PIN 1 +HDD_LED- ASUS STRIX B250H GAMING 1-15 Pressing the power button turns the system on or puts the system in sleep mode. • Hard disk drive activity LED (2-pin HDD_LED) This 2-pin connector is for the system power LED. The speaker allows you turn on the operating system settings. Pressing the power switch for more than four seconds while the system is ON turns the system OFF. • Reset button (2-pin RESET) This 2-pin connector is for the chassis-mounted reset button for system...

User Guide
Page 58
... your keyboard or click Setup Tree Map screen. from the submenu panel and click or press on your keyboard. You cannot add the following items to view the saved BIOS items. Chapter 3 3-10 Chapter 3: BIOS Setup Go to My Favorites menu to My Favorite items: • Items with submenu options • User-managed items such as language and boot order • Configuration items...
... your keyboard or click Setup Tree Map screen. from the submenu panel and click or press on your keyboard. You cannot add the following items to view the saved BIOS items. Chapter 3 3-10 Chapter 3: BIOS Setup Go to My Favorites menu to My Favorite items: • Items with submenu options • User-managed items such as language and boot order • Configuration items...

User Guide
Page 59
.... Configuration options: [Disabled] [Enabled] Chapter 3 ASUS STRIX B250H GAMING 3-11 Configuration options: [Auto] [Sync All Cores] [Per Core] DRAM Frequency [Auto] This item allows you to set the memory operating frequency. Intel(R) SpeedStep(tm) [Enabled] This item allows the operating system to dynamically adjust the processor voltage and cores frequency, resulting to all cores. CPU Core Ratio This item allows you to become unstable! Select the auto mode to erase the RTC RAM via the Clear CMOS button. • The Administrator or User Password items...
.... Configuration options: [Disabled] [Enabled] Chapter 3 ASUS STRIX B250H GAMING 3-11 Configuration options: [Auto] [Sync All Cores] [Per Core] DRAM Frequency [Auto] This item allows you to set the memory operating frequency. Intel(R) SpeedStep(tm) [Enabled] This item allows the operating system to dynamically adjust the processor voltage and cores frequency, resulting to all cores. CPU Core Ratio This item allows you to become unstable! Select the auto mode to erase the RTC RAM via the Clear CMOS button. • The Administrator or User Password items...

User Guide
Page 61
...firmware TPM. 3.6.7 Onboard Devices Configuration HD Audio Controller [Enabled] This item allows you to the corresponding SATA port. The SATA Port items show Empty if no SATA device is a monitoring system that shows a warning message during POST (Power-on Self Test) when an error occurs in this menu allow you to [Gen1], the PCI-E port runs at PCI-E 2.0 speed. Configuration options: [Disabled] [Enabled] Chapter 3 ASUS STRIX B250H GAMING 3-13 Configuration options: [Disabled] [Enabled] 3.6.3 System Agent (SA) Configuration The items in the hard disks. When set to enable/disable SATA...
...firmware TPM. 3.6.7 Onboard Devices Configuration HD Audio Controller [Enabled] This item allows you to the corresponding SATA port. The SATA Port items show Empty if no SATA device is a monitoring system that shows a warning message during POST (Power-on Self Test) when an error occurs in this menu allow you to [Gen1], the PCI-E port runs at PCI-E 2.0 speed. Configuration options: [Disabled] [Enabled] Chapter 3 ASUS STRIX B250H GAMING 3-13 Configuration options: [Disabled] [Enabled] 3.6.3 System Agent (SA) Configuration The items in the hard disks. When set to enable/disable SATA...

User Guide
Page 62
... location of the connected devices. 3.6.11 USB Configuration The items in X4 Mode. The USB Devices item shows the auto-detected values. USB Single Port Control This item allows you to [Enabled], all other PME options will be switched off some power at S5 to change the USB-related features. Configuration options: [Enable(S4+S5)] [Enable(S5)] [Disabled] 3.6.9 Network Stack Configuration The items in this menu allow you to configure Ipv4 / Ipv6 PXE support. 3.6.10 HDD/SSD SMART Information This menu displays...
... location of the connected devices. 3.6.11 USB Configuration The items in X4 Mode. The USB Devices item shows the auto-detected values. USB Single Port Control This item allows you to [Enabled], all other PME options will be switched off some power at S5 to change the USB-related features. Configuration options: [Enable(S4+S5)] [Enable(S5)] [Disabled] 3.6.9 Network Stack Configuration The items in this menu allow you to configure Ipv4 / Ipv6 PXE support. 3.6.10 HDD/SSD SMART Information This menu displays...

User Guide
Page 63
... AC power loss. Boot Device Control [UEFI and Legacy OPROM] Allows you to select the type of network devices that you to change the system boot options. CSM (Compatibility Support Module) Allows you to configure the CSM (Compatibility Support Module) items to fully support the various VGA, bootable devices and add-on devices for each fan. 3.8 Boot menu The Boot menu items allow you to boot up. 3.7 Monitor menu The Monitor menu displays the system temperature/power status, and allows you to configure the Q-Fan features. Q-Fan Configuration...
... AC power loss. Boot Device Control [UEFI and Legacy OPROM] Allows you to select the type of network devices that you to change the system boot options. CSM (Compatibility Support Module) Allows you to configure the CSM (Compatibility Support Module) items to fully support the various VGA, bootable devices and add-on devices for each fan. 3.8 Boot menu The Boot menu items allow you to boot up. 3.7 Monitor menu The Monitor menu displays the system temperature/power status, and allows you to configure the Q-Fan features. Q-Fan Configuration...

User Guide
Page 64
... SSD speeds may become unstable if you want to launch. Configuration options: [Legacy only] [UEFI driver first] Secure Boot Allows you to launch. Use the left/right arrow key to select between [Yes] or [No], then press to confirm your SSD, restoring it to protect the system from the available devices. Select an item then press to display the submenu. 3.9.1 ASUS EZ Flash 3 Utility...
... SSD speeds may become unstable if you want to launch. Configuration options: [Legacy only] [UEFI driver first] Secure Boot Allows you to launch. Use the left/right arrow key to select between [Yes] or [No], then press to confirm your SSD, restoring it to protect the system from the available devices. Select an item then press to display the submenu. 3.9.1 ASUS EZ Flash 3 Utility...

User Guide
Page 65
... SATA port. If the drive is frozen, a power off the system during the process. • Secure Erase is only supported on selected ASUS graphics cards. Configuration options: [Disabled] [Enabled] 3.9.4 ASUS SPD Information This item allows you to enable or disable the Setup animator. You have password protection by ASUS. GPU Post This item displays the information and recommended configuration for the PCIE slots that do not have to unlock the SSD in the software...
... SATA port. If the drive is frozen, a power off the system during the process. • Secure Erase is only supported on selected ASUS graphics cards. Configuration options: [Disabled] [Enabled] 3.9.4 ASUS SPD Information This item allows you to enable or disable the Setup animator. You have password protection by ASUS. GPU Post This item displays the information and recommended configuration for the PCIE slots that do not have to unlock the SSD in the software...

User Guide
Page 66
... the instructions in Windows® environment. 2. Visit http://www.asus.com to the BIOS items. You can access the EZ Mode from the Exit menu to select the bus interface. Select OK to discard changes and exit. Select OK to boot. ASUS EZ Flash 3: Updates the BIOS using a USB flash drive. 3. Discard Changes and Exit This option allows you to exit the Setup program without saving your selections, choose this motherboard. Configuration options: [PCIEX16_1...
... the instructions in Windows® environment. 2. Visit http://www.asus.com to the BIOS items. You can access the EZ Mode from the Exit menu to select the bus interface. Select OK to discard changes and exit. Select OK to boot. ASUS EZ Flash 3: Updates the BIOS using a USB flash drive. 3. Discard Changes and Exit This option allows you to exit the Setup program without saving your selections, choose this motherboard. Configuration options: [PCIEX16_1...

User Guide
Page 67
... the motherboard package. 3.11.2 ASUS EZ Flash 3 ASUS EZ Flash 3 allows you to download and update to perform the BIOS update process. Go to the Tool menu to the Drive field. 5. Select via Storage Devices. Press the Up/Down arrow keys to find the BIOS file, and then press to the latest BIOS through the Internet varies per region and Internet conditions. ASUS STRIX B250H GAMING 3-19 Enter the Advanced Mode of the BIOS setup...
... the motherboard package. 3.11.2 ASUS EZ Flash 3 ASUS EZ Flash 3 allows you to download and update to perform the BIOS update process. Go to the Tool menu to the Drive field. 5. Select via Storage Devices. Press the Up/Down arrow keys to find the BIOS file, and then press to the latest BIOS through the Internet varies per region and Internet conditions. ASUS STRIX B250H GAMING 3-19 Enter the Advanced Mode of the BIOS setup...

User Guide
Page 69
... ASUS official website. When found, the utility reads the BIOS file and enters ASUS EZ Flash 3 automatically. 4. You can cause system boot failure! To ensure system compatibility and stability, we recommend that allows you want to a USB flash drive. Select the Load Optimized Defaults item under the Exit menu. The system requires you press to recover the BIOS setting. Press the Left/Right arrow keys to complete the update. 5. Chapter 3 4. ASUS STRIX B250H GAMING...
... ASUS official website. When found, the utility reads the BIOS file and enters ASUS EZ Flash 3 automatically. 4. You can cause system boot failure! To ensure system compatibility and stability, we recommend that allows you want to a USB flash drive. Select the Load Optimized Defaults item under the Exit menu. The system requires you press to recover the BIOS setting. Press the Left/Right arrow keys to complete the update. 5. Chapter 3 4. ASUS STRIX B250H GAMING...


