User Guide
Page 4
... 3.6.6 PCH-FW Configuration 3-18 3.6.7 ROG Effects 3-18 3.6.8 Onboard Devices Configuration 3-18 3.6.9 APM Configuration 3-19 3.6.10 Network Stack Configuration 3-19 3.6.11 HDD/SSD SMART Information 3-19 3.6.12 USB Configuration 3-20 3.7 Monitor menu 3-20 3.8 Boot menu 3-20 3.9 Tool menu 3-22 3.9.1 ASUS EZ Flash 3 Utility 3-22 3.9.2 Secure Erase 3-22 3.9.3 ASUS Overclocking Profile 3-24 3.9.4 ASUS SPD Information 3-24 3.9.5 Graphics...
... 3.6.6 PCH-FW Configuration 3-18 3.6.7 ROG Effects 3-18 3.6.8 Onboard Devices Configuration 3-18 3.6.9 APM Configuration 3-19 3.6.10 Network Stack Configuration 3-19 3.6.11 HDD/SSD SMART Information 3-19 3.6.12 USB Configuration 3-20 3.7 Monitor menu 3-20 3.8 Boot menu 3-20 3.9 Tool menu 3-22 3.9.1 ASUS EZ Flash 3 Utility 3-22 3.9.2 Secure Erase 3-22 3.9.3 ASUS Overclocking Profile 3-24 3.9.4 ASUS SPD Information 3-24 3.9.5 Graphics...
User Guide
Page 22
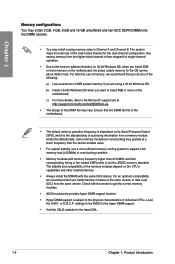
...state, some memory modules for overclocking may operate at http://support.... memory sizes in the BIOS for the hyper DIMM support. • Visit the ASUS website for the OS can be about 3GB or less. For an optimum compatibility,...Presence Detect (SPD), which is subject to support a full memory load (4 DIMMs) or overclocking condition. • Memory modules with the same CAS latency. b) Install a 64-bit Windows...bit Windows OS, when you want to get the correct memory modules. • ASUS exclusively provides hyper DIMM support function. • Hyper DIMM support is the standard way...
...state, some memory modules for overclocking may operate at http://support.... memory sizes in the BIOS for the hyper DIMM support. • Visit the ASUS website for the OS can be about 3GB or less. For an optimum compatibility,...Presence Detect (SPD), which is subject to support a full memory load (4 DIMMs) or overclocking condition. • Memory modules with the same CAS latency. b) Install a 64-bit Windows...bit Windows OS, when you want to get the correct memory modules. • ASUS exclusively provides hyper DIMM support function. • Hyper DIMM support is the standard way...

User Guide
Page 25
The LED near the button also lights up the system. ROG MAXIMUS X CODE 1-9 RESET button (RESET) Press the reset button to enhance system performance. 1. This is plugged to a power source indicating that you to fine-tune performance when ...-on button (START) The motherboard comes with a power-on button that allows you to power up or wake up when the system is ideal for overclockers and gamers who continually change settings to reboot the system.
The LED near the button also lights up the system. ROG MAXIMUS X CODE 1-9 RESET button (RESET) Press the reset button to enhance system performance. 1. This is plugged to a power source indicating that you to fine-tune performance when ...-on button (START) The motherboard comes with a power-on button that allows you to power up or wake up when the system is ideal for overclockers and gamers who continually change settings to reboot the system.
User Guide
Page 26
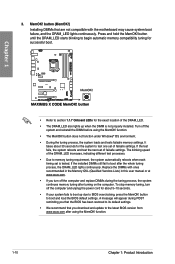
...about 5-10 seconds. • If your system fails to boot up when the DIMM is tested. If the installed DIMMs still fail to BIOS overclocking, press the MemOK! Press and hold the MemOK! Turn off the computer and unplug the power cord for about 30 seconds for successful boot. ... and reinstall the DIMM before using the MemOK! MemOK! function. • The MemOK! Chapter 1 • Refer to the latest BIOS version from www.asus.com after the whole tuning process, the DRAM_LED lights continuously. If the test fails, the system reboots and test the next set is not properly...
...about 5-10 seconds. • If your system fails to boot up when the DIMM is tested. If the installed DIMMs still fail to BIOS overclocking, press the MemOK! Press and hold the MemOK! Turn off the computer and unplug the power cord for about 30 seconds for successful boot. ... and reinstall the DIMM before using the MemOK! MemOK! function. • The MemOK! Chapter 1 • Refer to the latest BIOS version from www.asus.com after the whole tuning process, the DRAM_LED lights continuously. If the test fails, the system reboots and test the next set is not properly...
User Guide
Page 27
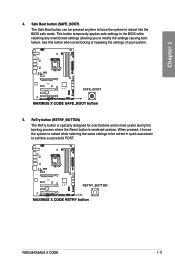
... the same settings to be pressed anytime to force the system to reboot into the BIOS safe mode. Chapter 1 4. ROG MAXIMUS X CODE 1-11 This button temporarily applies safe settings to the BIOS while retaining any overclocked settings allowing you to achieve a successful POST. Safe Boot button (SAFE_BOOT) The Safe Boot button can be retried...
... the same settings to be pressed anytime to force the system to reboot into the BIOS safe mode. Chapter 1 4. ROG MAXIMUS X CODE 1-11 This button temporarily applies safe settings to the BIOS while retaining any overclocked settings allowing you to achieve a successful POST. Safe Boot button (SAFE_BOOT) The Safe Boot button can be retried...
User Guide
Page 28
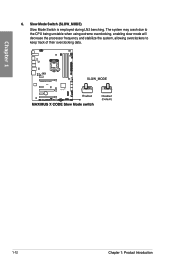
6. The system may crash due to the CPU being unstable when using extreme overclocking, enabling slow mode will decrease the processor frequency and stabilize the system, allowing overclockers to keep track of their overclocking data. Slow Mode Switch (SLOW_MODE) Slow Mode Switch is employed during LN2 benching. Chapter 1 1-12 Chapter 1: Product Introduction
6. The system may crash due to the CPU being unstable when using extreme overclocking, enabling slow mode will decrease the processor frequency and stabilize the system, allowing overclockers to keep track of their overclocking data. Slow Mode Switch (SLOW_MODE) Slow Mode Switch is employed during LN2 benching. Chapter 1 1-12 Chapter 1: Product Introduction
User Guide
Page 55
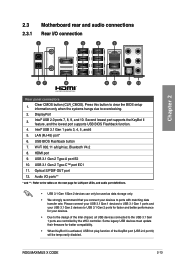
... 3.1 Gen 2 devices to overclocking. 2. Clear CMOS button (CLR_CMOS). LAN (RJ-45) port* 6. Some legacy USB devices must update their firmware for better compatibility. • When KeyBot II is activated, USB hot plug function of the Intel chipset, all USB devices connected to ports with matching data transfer rate. ROG MAXIMUS X CODE 2-13 Wi-Fi...
... 3.1 Gen 2 devices to overclocking. 2. Clear CMOS button (CLR_CMOS). LAN (RJ-45) port* 6. Some legacy USB devices must update their firmware for better compatibility. • When KeyBot II is activated, USB hot plug function of the Intel chipset, all USB devices connected to ports with matching data transfer rate. ROG MAXIMUS X CODE 2-13 Wi-Fi...
User Guide
Page 61
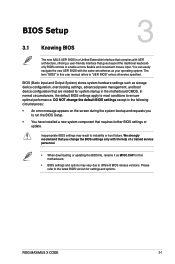
... navigate the new UEFI BIOS with the same smoothness as storage device configuration, overclocking settings, advanced power management, and boot device configuration that are needed for settings...or boot failure. Chapter 3: BIOS Setup BIOS Setup 3.1 Knowing BIOS 3 The new ASUS UEFI BIOS is a Unified Extensible Interface that complies with UEFI architecture, offering a user-... have installed a new system component that you to different BIOS release versions. Chapter 3 ROG MAXIMUS X CODE 3-1 We strongly recommend that requires further BIOS settings or update. BIOS (Basic Input and...
... navigate the new UEFI BIOS with the same smoothness as storage device configuration, overclocking settings, advanced power management, and boot device configuration that are needed for settings...or boot failure. Chapter 3: BIOS Setup BIOS Setup 3.1 Knowing BIOS 3 The new ASUS UEFI BIOS is a Unified Extensible Interface that complies with UEFI architecture, offering a user-... have installed a new system component that you to different BIOS release versions. Chapter 3 ROG MAXIMUS X CODE 3-1 We strongly recommend that requires further BIOS settings or update. BIOS (Basic Input and...
User Guide
Page 64
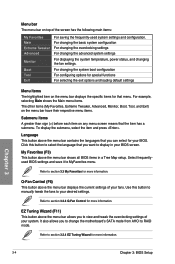
... button to manually tweak the fans to section 3.3 My Favorites for more information. For changing the basic system configuration For changing the overclocking settings For changing the advanced system settings For displaying the system temperature, power status, and changing the fan settings. For changing the system... and loading default settings Menu items The highlighted item on any menu screen means that you want to view and tweak the overclocking settings of the screen has the following main items: My Favorites Main Extreme Tweaker Advanced Monitor Boot Tool Exit For saving the...
... button to manually tweak the fans to section 3.3 My Favorites for more information. For changing the basic system configuration For changing the overclocking settings For changing the advanced system settings For displaying the system temperature, power status, and changing the fan settings. For changing the system... and loading default settings Menu items The highlighted item on any menu screen means that you want to view and tweak the overclocking settings of the screen has the following main items: My Favorites Main Extreme Tweaker Advanced Monitor Boot Tool Exit For saving the...
User Guide
Page 66
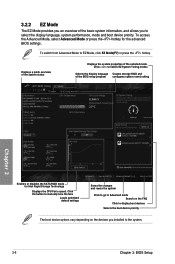
... on the devices you to switch EZ System Tuning modes Selects the display language Creates storage RAID and of the BIOS setup program configures system overclocking Chapter 3 Enables or disables the SATA RAID mode for the advanced BIOS settings. Click < or > to select the display language, system performance, mode and boot...
... on the devices you to switch EZ System Tuning modes Selects the display language Creates storage RAID and of the BIOS setup program configures system overclocking Chapter 3 Enables or disables the SATA RAID mode for the advanced BIOS settings. Click < or > to select the display language, system performance, mode and boot...
User Guide
Page 69
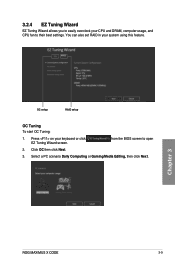
You can also set RAID in your CPU and DRAM, computer usage, and CPU fan to their best settings. Select a PC scenario Daily Computing or Gaming/Media Editing, then click Next. from the BIOS screen to open 2. 3.2.4 EZ Tuning Wizard EZ Tuning Wizard allows you to easily overclock your system using this feature. Press on your keyboard or click EZ Tuning Wizard screen. Click OC then click Next. 3. OC setup RAID setup OC Tuning To start OC Tuning: 1. Chapter 3 ROG MAXIMUS X CODE 3-9
You can also set RAID in your CPU and DRAM, computer usage, and CPU fan to their best settings. Select a PC scenario Daily Computing or Gaming/Media Editing, then click Next. from the BIOS screen to open 2. 3.2.4 EZ Tuning Wizard EZ Tuning Wizard allows you to easily overclock your system using this feature. Press on your keyboard or click EZ Tuning Wizard screen. Click OC then click Next. 3. OC setup RAID setup OC Tuning To start OC Tuning: 1. Chapter 3 ROG MAXIMUS X CODE 3-9
User Guide
Page 74
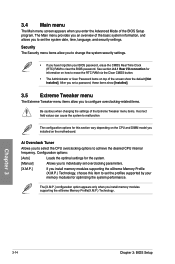
...items on the motherboard. Configuration options: [Auto] Loads the optimal settings for the system. [Manual] Allows you to individually set overclocking parameters. [X.M.P.] If you install memory modules supporting the eXtreme Memory Profile (X.M.P.) Technology, choose this section vary depending on the CPU ... achieve the desired CPU internal frequency. The [X.M.P.] configuration option appears only when you to select the CPU overclocking options to malfunction The configuration options for this item to clear the BIOS password. Security The Security menu items allow you...
...items on the motherboard. Configuration options: [Auto] Loads the optimal settings for the system. [Manual] Allows you to individually set overclocking parameters. [X.M.P.] If you install memory modules supporting the eXtreme Memory Profile (X.M.P.) Technology, choose this section vary depending on the CPU ... achieve the desired CPU internal frequency. The [X.M.P.] configuration option appears only when you to select the CPU overclocking options to malfunction The configuration options for this item to clear the BIOS password. Security The Security menu items allow you...
User Guide
Page 75
...default core ratio settings. Chapter 3 ROG MAXIMUS X CODE 3-15 Select the auto mode to adjust the value. Configuration options: [Auto] [Sync All Cores] [Per Core] DRAM Frequency This item allows you to set the Ai Overclocking Tuner to set the value based on... Keep the current settings without changing anything. [TPU I] Applies air cooling overclocking conditions. [TPU II] Applies water cooling overclocking conditions. We recommend you to enhance the system performance. ASUS MultiCore Enhancement [Auto] This item allows you to maximize the oveclocking performance optimized...
...default core ratio settings. Chapter 3 ROG MAXIMUS X CODE 3-15 Select the auto mode to adjust the value. Configuration options: [Auto] [Sync All Cores] [Per Core] DRAM Frequency This item allows you to set the Ai Overclocking Tuner to set the value based on... Keep the current settings without changing anything. [TPU I] Applies air cooling overclocking conditions. [TPU II] Applies water cooling overclocking conditions. We recommend you to enhance the system performance. ASUS MultiCore Enhancement [Auto] This item allows you to maximize the oveclocking performance optimized...
User Guide
Page 84
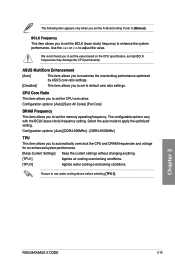
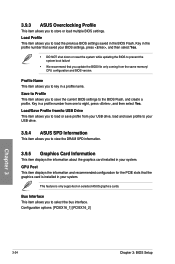
... updating the BIOS to prevent the system boot failure! • We recommend that the graphics card is only supported on selected ASUS graphics cards. Load/Save Profile from/to USB Drive This item allows you to key in the BIOS Flash. GPU Post This... This item allows you to save profile to your USB drive. 3.9.4 ASUS SPD Information This item allows you to store or load multiple BIOS settings. Configuration options: [PCIEX16_1] [PCIEX16_2] Chapter 3 3-24 Chapter 3: BIOS Setup 3.9.3 ASUS Overclocking Profile This item allows you to view the DRAM SPD information. 3.9.5 ...
... updating the BIOS to prevent the system boot failure! • We recommend that the graphics card is only supported on selected ASUS graphics cards. Load/Save Profile from/to USB Drive This item allows you to key in the BIOS Flash. GPU Post This... This item allows you to save profile to your USB drive. 3.9.4 ASUS SPD Information This item allows you to store or load multiple BIOS settings. Configuration options: [PCIEX16_1] [PCIEX16_2] Chapter 3 3-24 Chapter 3: BIOS Setup 3.9.3 ASUS Overclocking Profile This item allows you to view the DRAM SPD information. 3.9.5 ...


