MAXIMUS IX EXTREME Users ManualEnglish
Page 3
... MAXIMUS IX EXTREME specifications summary ix Package contents...xiv Installation tools and components xv Chapter 1: Product Introduction 1.1 Motherboard overview 1-1 1.1.1 Before you proceed 1-1 1.1.2 Motherboard layout 1-2 1.1.3 Central Processing Unit (CPU 1-4 1.1.4 System memory 1-5 1.1.5 Expansion slots 1-7 1.1.6 Onboard buttons and switches 1-9 1.1.7 Onboard LEDs 1-14 1.1.8 Jumper 1-22 1.1.9 Internal connectors 1-23 1.2.10 ProbeIt 1-35 Chapter 2: Basic Installation 2.1 Building your PC system 2-1 2.1.1 CPU installation 2-1 2.1.2 ROG...
... MAXIMUS IX EXTREME specifications summary ix Package contents...xiv Installation tools and components xv Chapter 1: Product Introduction 1.1 Motherboard overview 1-1 1.1.1 Before you proceed 1-1 1.1.2 Motherboard layout 1-2 1.1.3 Central Processing Unit (CPU 1-4 1.1.4 System memory 1-5 1.1.5 Expansion slots 1-7 1.1.6 Onboard buttons and switches 1-9 1.1.7 Onboard LEDs 1-14 1.1.8 Jumper 1-22 1.1.9 Internal connectors 1-23 1.2.10 ProbeIt 1-35 Chapter 2: Basic Installation 2.1 Building your PC system 2-1 2.1.1 CPU installation 2-1 2.1.2 ROG...
MAXIMUS IX EXTREME Users ManualEnglish
Page 17
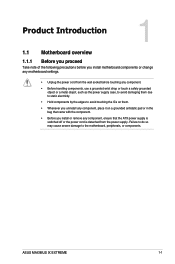
ASUS MAXIMUS IX EXTREME 1-1 Chapter 1 Chapter 1: Product Introduction Product Introduction 1 1.1 Motherboard overview 1.1.1 Before you proceed Take note of the following precautions before you install motherboard components or change any motherboard settings. • Unplug the power cord from the wall socket before touching any component. • Before handling components, use a grounded ...or in the bag that came with the component. • Before you install or remove any component, ensure that the ATX power supply is switched off or the power cord is detached from the power supply.
ASUS MAXIMUS IX EXTREME 1-1 Chapter 1 Chapter 1: Product Introduction Product Introduction 1 1.1 Motherboard overview 1.1.1 Before you proceed Take note of the following precautions before you install motherboard components or change any motherboard settings. • Unplug the power cord from the wall socket before touching any component. • Before handling components, use a grounded ...or in the bag that came with the component. • Before you install or remove any component, ensure that the ATX power supply is switched off or the power cord is detached from the power supply.
MAXIMUS IX EXTREME Users ManualEnglish
Page 48
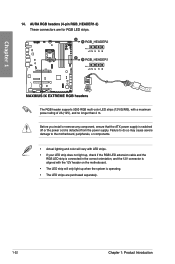
... connected in the correct orientation, and the 12V connector is detached from the power supply. Before you install or remove any component, ensure that the ATX power supply is switched off or the power cord is aligned with a maximum power rating of 2A (12V), and no longer than 2 m. 14. ...Failure to do so may cause severe damage to the motherboard, peripherals, or components. • Actual lighting and color will vary with LED strips. • If your LED strip does not light up when the system...
... connected in the correct orientation, and the 12V connector is detached from the power supply. Before you install or remove any component, ensure that the ATX power supply is switched off or the power cord is aligned with a maximum power rating of 2A (12V), and no longer than 2 m. 14. ...Failure to do so may cause severe damage to the motherboard, peripherals, or components. • Actual lighting and color will vary with LED strips. • If your LED strip does not light up when the system...
MAXIMUS IX EXTREME Users ManualEnglish
Page 61
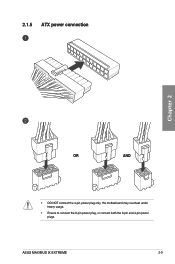
ASUS MAXIMUS IX EXTREME 2-9 2.1.5 ATX power connection Chapter 2 OR AND • DO NOT connect the 4-pin power plug only, the motherboard may overheat under heavy usage. • Ensure to connect the 8-pin power plug, or connect both the 8-pin and 4-pin power plugs.
ASUS MAXIMUS IX EXTREME 2-9 2.1.5 ATX power connection Chapter 2 OR AND • DO NOT connect the 4-pin power plug only, the motherboard may overheat under heavy usage. • Ensure to connect the 8-pin power plug, or connect both the 8-pin and 4-pin power plugs.

