
Users Manual for English Edition
Page 5
Chapter 4: Power-On Self-Test (POST) The Power-On Self-Test (POST 78 Using POST to access BIOS and Troubleshoot 78 BIOS...78 Accessing BIOS...78 BIOS Settings...79 Recovering your system 89 Enabling a recovery option 91 Chapter 5: Upgrading your Notebook PC Installing the Hard Disk Drive 94 Installing a Random-access Memory module 102 Tips and FAQs Useful tips for your Notebook PC 108 Hardware FAQs...109 Software FAQs...112 Notebook PC E-Manual 5
Chapter 4: Power-On Self-Test (POST) The Power-On Self-Test (POST 78 Using POST to access BIOS and Troubleshoot 78 BIOS...78 Accessing BIOS...78 BIOS Settings...79 Recovering your system 89 Enabling a recovery option 91 Chapter 5: Upgrading your Notebook PC Installing the Hard Disk Drive 94 Installing a Random-access Memory module 102 Tips and FAQs Useful tips for your Notebook PC 108 Hardware FAQs...109 Software FAQs...112 Notebook PC E-Manual 5

Users Manual for English Edition
Page 8
Appendices This section includes notices and safety statements for maintaining and fixing common issues with your Notebook PC. Chapter 5: Upgrading your Notebook PC This chapter guides you can refer to for your Notebook PC. Tips and FAQs This section presents some recommended tips, hardware FAQs, and software FAQs you through the process of replacing and upgrading parts of your Notebook PC. 8 Notebook PC E-Manual
Appendices This section includes notices and safety statements for maintaining and fixing common issues with your Notebook PC. Chapter 5: Upgrading your Notebook PC This chapter guides you can refer to for your Notebook PC. Tips and FAQs This section presents some recommended tips, hardware FAQs, and software FAQs you through the process of replacing and upgrading parts of your Notebook PC. 8 Notebook PC E-Manual

Users Manual for English Edition
Page 11
...with a solution of nonabrasive detergent and a few drops of your Notebook PC. Do not use your Notebook PC. Caring for your Notebook PC Disconnect the AC power and remove the battery pack (if applicable) before cleaning your Notebook PC using a dry cloth. Do not place objects on or near liquids,...Do not use or expose your Notebook PC near your Notebook PC near gas leaks. Do not use strong solvents such as thinners, benzene, or other chemicals on top of warm water. Notebook PC E-Manual 11 Remove any extra moisture from your Notebook PC. Do not expose your Notebook PC ...
...with a solution of nonabrasive detergent and a few drops of your Notebook PC. Do not use your Notebook PC. Caring for your Notebook PC Disconnect the AC power and remove the battery pack (if applicable) before cleaning your Notebook PC using a dry cloth. Do not place objects on or near liquids,...Do not use or expose your Notebook PC near your Notebook PC near gas leaks. Do not use strong solvents such as thinners, benzene, or other chemicals on top of warm water. Notebook PC E-Manual 11 Remove any extra moisture from your Notebook PC. Do not expose your Notebook PC ...

Users Manual for English Edition
Page 16
... use the function keys, allows quick access to Windows®, and controls other multimedia functions. Touchpad The touchpad allows the use the power button to put your Notebook PC to sleep or hibernate mode and wake it up from sleep or hibernate mode. NOTE: For more details, refer to record games while playing. Status indicators The status indicators help identify the current hardware status of multi-gestures to turn your Notebook PC. Keyboard The keyboard...
... use the function keys, allows quick access to Windows®, and controls other multimedia functions. Touchpad The touchpad allows the use the power button to put your Notebook PC to sleep or hibernate mode and wake it up from sleep or hibernate mode. NOTE: For more details, refer to record games while playing. Status indicators The status indicators help identify the current hardware status of multi-gestures to turn your Notebook PC. Keyboard The keyboard...

Users Manual for English Edition
Page 19
... bass sounds suited for the removable hard disk drives (HDD) and random-access memory (RAM) modules. Ensure that paper, books, clothing, cables, or other objects do not block any of your Notebook PC, refer to exit the Notebook PC. Notebook PC E-Manual 19 NOTE: For more details on your Notebook PC. WARNING! Air vents The air vents allow cool air to enter and warm air to Chapter 5: Upgrading your Notebook...
... bass sounds suited for the removable hard disk drives (HDD) and random-access memory (RAM) modules. Ensure that paper, books, clothing, cables, or other objects do not block any of your Notebook PC, refer to exit the Notebook PC. Notebook PC E-Manual 19 NOTE: For more details on your Notebook PC. WARNING! Air vents The air vents allow cool air to enter and warm air to Chapter 5: Upgrading your Notebook...

Users Manual for English Edition
Page 21
... port (varies by model) Use a Thunderbolt adapter to connect your Notebook PC. LAN port Insert the network cable into this port to connect to a DisplayPort, VGA, DVI, or HDMI external display and experience high-resolution display features via Intel® Thunderbolt™ technology. Use only the bundled power adapter to charge the battery pack and supply power to your Notebook PC to a local area network (LAN). Power (DC) input port Insert the bundled power adapter into this port to charge the battery...
... port (varies by model) Use a Thunderbolt adapter to connect your Notebook PC. LAN port Insert the network cable into this port to connect to a DisplayPort, VGA, DVI, or HDMI external display and experience high-resolution display features via Intel® Thunderbolt™ technology. Use only the bundled power adapter to charge the battery pack and supply power to your Notebook PC to a local area network (LAN). Power (DC) input port Insert the bundled power adapter into this port to charge the battery...

Users Manual for English Edition
Page 31
... following precautions for your Notebook PC's battery. • Only ASUS-authorized technicians should remove the battery inside the device. • The battery used in this device may have multiple rating output currents based on power adapter mode. • The socket outlet must be easily accessible and near your Notebook PC. • To disconnect your Notebook PC from its main power supply, unplug your Notebook PC on the...
... following precautions for your Notebook PC's battery. • Only ASUS-authorized technicians should remove the battery inside the device. • The battery used in this device may have multiple rating output currents based on power adapter mode. • The socket outlet must be easily accessible and near your Notebook PC. • To disconnect your Notebook PC from its main power supply, unplug your Notebook PC on the...

Users Manual for English Edition
Page 40
Decreases display brightness Increases display brightness Turns the display panel off NOTE: When enabled, the Airplane mode disables all wireless connectivity. Using the keyboard Function keys The function keys on your Notebook PC's keyboard can trigger the following commands: Puts the Notebook PC into Sleep mode Turns Airplane mode on or off Toggles the display mode NOTE: Ensure that the second display is connected to your Notebook PC. 40 Notebook PC E-Manual
Decreases display brightness Increases display brightness Turns the display panel off NOTE: When enabled, the Airplane mode disables all wireless connectivity. Using the keyboard Function keys The function keys on your Notebook PC's keyboard can trigger the following commands: Puts the Notebook PC into Sleep mode Turns Airplane mode on or off Toggles the display mode NOTE: Ensure that the second display is connected to your Notebook PC. 40 Notebook PC E-Manual

Users Manual for English Edition
Page 41
Press this key to the Start screen. Notebook PC E-Manual 41 Enables or disables the touchpad Turns the speaker on or off Turns the speaker volume down Turns the speaker volume up Windows® 8.1 keys There are already in the Start screen, press this key to go back to simulate the right-click functions. If you are two special Windows® keys on your Notebook PC's keyboard used as below: Press this key to go back to the last app you opened.
Press this key to the Start screen. Notebook PC E-Manual 41 Enables or disables the touchpad Turns the speaker on or off Turns the speaker volume down Turns the speaker volume up Windows® 8.1 keys There are already in the Start screen, press this key to go back to simulate the right-click functions. If you are two special Windows® keys on your Notebook PC's keyboard used as below: Press this key to go back to the last app you opened.

Users Manual for English Edition
Page 53
Notebook PC E-Manual 53 Start button Windows® 8.1 features the Start button which allows you to call out the Start button. The Start button may be accessed from the Start screen, while on Desktop mode, and on the display settings you opened app to switch between the two most recent apps that is currently open onscreen. Hover your mouse pointer over the left corner of your Start screen or any app that you chose for your Start screen. Start button on the Start screen NOTE: The actual color of your Start button varies depending on any opened .
Notebook PC E-Manual 53 Start button Windows® 8.1 features the Start button which allows you to call out the Start button. The Start button may be accessed from the Start screen, while on Desktop mode, and on the display settings you opened app to switch between the two most recent apps that is currently open onscreen. Hover your mouse pointer over the left corner of your Start screen or any app that you chose for your Start screen. Start button on the Start screen NOTE: The actual color of your Start button varies depending on any opened .
Users Manual for English Edition
Page 78
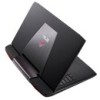
... run troubleshooting options using the function keys of your Notebook PC. The Power-On Self-Test (POST) The Power-On Self-Test (POST) is installed as a permanent part of your Notebook PC. WARNING: Using inappropriate BIOS settings may refer to run the BIOS Setup. • You have installed a new system component that you turn on or restart your Notebook PC. The software that controls the POST is a series of software-controlled diagnostic tests that are needed...
... run troubleshooting options using the function keys of your Notebook PC. The Power-On Self-Test (POST) The Power-On Self-Test (POST) is installed as a permanent part of your Notebook PC. WARNING: Using inappropriate BIOS settings may refer to run the BIOS Setup. • You have installed a new system component that you turn on or restart your Notebook PC. The software that controls the POST is a series of software-controlled diagnostic tests that are needed...
Users Manual for English Edition
Page 79
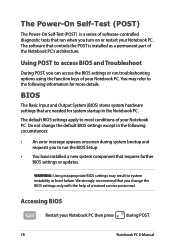
BIOS Settings NOTE: The BIOS screens in this section are for reference only. The actual screens may refer to set your boot priority. 1. Aptio Setup Utility - Main Advanced Boot Security Save & Exit Boot Configuration Fast Boot [Enabled] Sets the system boot order Launch CSM [Disabled] Driver Option Priorities Boot Option Priorities Boot Option #1 Add New Boot Option Delete Boot Option [Windows Boot Manager] →← : Select Screen ↑↓ : Select Item Enter: Select +/- : Change Opt. Notebook PC E-Manual 79 You may differ by model and territory. Copyright (C) ...
BIOS Settings NOTE: The BIOS screens in this section are for reference only. The actual screens may refer to set your boot priority. 1. Aptio Setup Utility - Main Advanced Boot Security Save & Exit Boot Configuration Fast Boot [Enabled] Sets the system boot order Launch CSM [Disabled] Driver Option Priorities Boot Option Priorities Boot Option #1 Add New Boot Option Delete Boot Option [Windows Boot Manager] →← : Select Screen ↑↓ : Select Item Enter: Select +/- : Change Opt. Notebook PC E-Manual 79 You may differ by model and territory. Copyright (C) ...

Users Manual for English Edition
Page 80
Press and select a device as the Boot Option #1. Aptio Setup Utility - Main Advanced Boot Security Save & Exit Boot Configuration Fast Boot [Enabled] Sets the system boot order Launch CSM [Disabled] Driver Option Priorities Boot Option Priorities Boot Option #1 Boot Option #1 [WWiinnddoowwss BBoooott MMaannaaggeerr] Disabled Add New Boot Option Delete Boot Option →← : Select Screen ↑↓ : Select Item Enter: Select +/- : Change Opt. Copyright (C) 2012 American Megatrends, Inc. 80 Notebook PC E-Manual Copyright (C) 2012 American Megatrends, Inc. ...
Press and select a device as the Boot Option #1. Aptio Setup Utility - Main Advanced Boot Security Save & Exit Boot Configuration Fast Boot [Enabled] Sets the system boot order Launch CSM [Disabled] Driver Option Priorities Boot Option Priorities Boot Option #1 Boot Option #1 [WWiinnddoowwss BBoooott MMaannaaggeerr] Disabled Add New Boot Option Delete Boot Option →← : Select Screen ↑↓ : Select Item Enter: Select +/- : Change Opt. Copyright (C) 2012 American Megatrends, Inc. 80 Notebook PC E-Manual Copyright (C) 2012 American Megatrends, Inc. ...

Users Manual for English Edition
Page 81
...Maximum length 20 User Password Status NOT INSTALLED Administrator Password User Password HDD Password Status : Set Master Password Set User Password I /O) interface, and USB interface. Copyright (C) 2012 American Megatrends, Inc. Security This menu allows you to control the access to your Notebook PC's hard disk drive, input/output (I /O Interface Security System Mode state Secure Boot state Secure Boot Control Key Management NOT INSTALLED User Enabled [Enabled] →← : Select Screen ↑↓ : Select Item Enter: Select +/- : Change Opt. Notebook PC E-Manual 81
...Maximum length 20 User Password Status NOT INSTALLED Administrator Password User Password HDD Password Status : Set Master Password Set User Password I /O) interface, and USB interface. Copyright (C) 2012 American Megatrends, Inc. Security This menu allows you to control the access to your Notebook PC's hard disk drive, input/output (I /O Interface Security System Mode state Secure Boot state Secure Boot Control Key Management NOT INSTALLED User Enabled [Enabled] →← : Select Screen ↑↓ : Select Item Enter: Select +/- : Change Opt. Notebook PC E-Manual 81

Users Manual for English Edition
Page 84
...Security screen, select I /O Interface Security menu, you would like to lock then select Lock. Select an interface that you can also access USB Interface Security to Lock also locks and hides the External Ports and other devices included under USB Interface Security. 84 Notebook PC E-Manual USB Interface Security Through the I /O Interface Security > USB Interface Security. 2. Security USB Interface Security USB Interface [UnLock] If Locked, all USB device will be disabled External Ports [UnLock] CMOS Camera [UnLock] Card Reader Lock [UnLock] USB Interface UnLock →...
...Security screen, select I /O Interface Security menu, you would like to lock then select Lock. Select an interface that you can also access USB Interface Security to Lock also locks and hides the External Ports and other devices included under USB Interface Security. 84 Notebook PC E-Manual USB Interface Security Through the I /O Interface Security > USB Interface Security. 2. Security USB Interface Security USB Interface [UnLock] If Locked, all USB device will be disabled External Ports [UnLock] CMOS Camera [UnLock] Card Reader Lock [UnLock] USB Interface UnLock →...

Users Manual for English Edition
Page 85
... hard disk drive. Aptio Setup Utility - AMpatiino SeAtduvpanUcteidlityBo-otCopSyerciugrhitty(C) S2a0v1e1 &AmEexriitcan Megatrends, Inc. To set the HDD password: 1. Copyright (C) 2012 American Megatrends, Inc. On the Security screen, select Set Master Password. 2. Notebook PC E-Manual 85 Copyright (C) 2012 American Megatrends, Inc. Password Description If ONLY the Administrator's password is set,then this is only asked for when entering Setup. Re-type to Power Cycle System after Setting Hard Disk Passwords*** Administrator Password Status NOT INSTALLED User Password...
... hard disk drive. Aptio Setup Utility - AMpatiino SeAtduvpanUcteidlityBo-otCopSyerciugrhitty(C) S2a0v1e1 &AmEexriitcan Megatrends, Inc. To set the HDD password: 1. Copyright (C) 2012 American Megatrends, Inc. On the Security screen, select Set Master Password. 2. Notebook PC E-Manual 85 Copyright (C) 2012 American Megatrends, Inc. Password Description If ONLY the Administrator's password is set,then this is only asked for when entering Setup. Re-type to Power Cycle System after Setting Hard Disk Passwords*** Administrator Password Status NOT INSTALLED User Password...

Users Manual for English Edition
Page 87
.... 5. Aptio Setup Utility - From the BIOS menu, Select Advanced > Start Easy Flash, then press . Start Easy Flash Internal Pointing Device [Enabled] Wake on Lid Open [Enabled] Power Off Energy Saving [Enabled] SATA Configuration Graphics Configuration Intel (R) Anti-Theft Technology Corporation USB Configuration Network Stack Press Enter to run the utility to a flash disk drive. 3. Notebook PC E-Manual 87 Save a copy of the downloaded BIOS file to select and update BIOS. →← : Select Screen ↑↓ : Select Item Enter: Select +/- : Change Opt...
.... 5. Aptio Setup Utility - From the BIOS menu, Select Advanced > Start Easy Flash, then press . Start Easy Flash Internal Pointing Device [Enabled] Wake on Lid Open [Enabled] Power Off Energy Saving [Enabled] SATA Configuration Graphics Configuration Intel (R) Anti-Theft Technology Corporation USB Configuration Network Stack Press Enter to run the utility to a flash disk drive. 3. Notebook PC E-Manual 87 Save a copy of the downloaded BIOS file to select and update BIOS. →← : Select Screen ↑↓ : Select Item Enter: Select +/- : Change Opt...

Users Manual for English Edition
Page 108
... shutdown to turn off your Notebook PC. • Always backup your data and make it a point to create a backup data in an external storage drive. • Refrain from using the Notebook PC at least a month), we recommend that your applications have the following items prior to resetting your Notebook PC: - Product key for your operating systems and other installed applications - Internet connection information 108 Notebook PC E-Manual Log in...
... shutdown to turn off your Notebook PC. • Always backup your data and make it a point to create a backup data in an external storage drive. • Refrain from using the Notebook PC at least a month), we recommend that your applications have the following items prior to resetting your Notebook PC: - Product key for your operating systems and other installed applications - Internet connection information 108 Notebook PC E-Manual Log in...
Users Manual for English Edition
Page 110
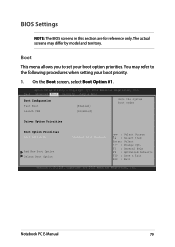
... any of the following suggestions: • Press to disable the touchpad when connecting an external pointing device. 6. Why is attached correctly. Contact your Notebook PC and remove it. 7. My battery charge indicator does not light up the speaker volume. • Check if your local ASUS service center for assistance. 110 Notebook PC E-Manual You may also disconnect the power adapter or battery pack, wait for a minute, then reconnect them...
... any of the following suggestions: • Press to disable the touchpad when connecting an external pointing device. 6. Why is attached correctly. Contact your Notebook PC and remove it. 7. My battery charge indicator does not light up the speaker volume. • Check if your local ASUS service center for assistance. 110 Notebook PC E-Manual You may also disconnect the power adapter or battery pack, wait for a minute, then reconnect them...

Users Manual for English Edition
Page 111
... models) on my keyboard displays numbers. Go to Control Panel > Hardware and Sound then access Audio Manager to turn off this feature and use the said keys for about two (2) seconds until the power button's LED indicator blinks five times and the camera LED indicator blinks once. My Notebook PC cannot do ? Press and hold the power button for inputting letters. 12. What should I do keystrokes correctly because my cursor keeps on the keyboard. You can also disable...
... models) on my keyboard displays numbers. Go to Control Panel > Hardware and Sound then access Audio Manager to turn off this feature and use the said keys for about two (2) seconds until the power button's LED indicator blinks five times and the camera LED indicator blinks once. My Notebook PC cannot do ? Press and hold the power button for inputting letters. 12. What should I do keystrokes correctly because my cursor keeps on the keyboard. You can also disable...


