User Guide
Page 2
... corresponding source code and your contact details so that is distributed without any means, except documentation kept by the applicable law. ASUS PROVIDES THIS MANUAL "AS IS" WITHOUT WARRANTY OF ANY KIND, EITHER EXPRESS OR IMPLIED, INCLUDING BUT NOT LIMITED TO THE IMPLIED WARRANTIES OR... CONDITIONS OF MERCHANTABILITY OR FITNESS FOR A PARTICULAR PURPOSE. ASUS ASSUMES NO RESPONSIBILITY OR LIABILITY FOR ANY ERRORS OR INACCURACIES THAT MAY APPEAR IN THIS MANUAL, INCLUDING THE PRODUCTS AND SOFTWARE DESCRIBED IN IT. The source code will not be registered...
... corresponding source code and your contact details so that is distributed without any means, except documentation kept by the applicable law. ASUS PROVIDES THIS MANUAL "AS IS" WITHOUT WARRANTY OF ANY KIND, EITHER EXPRESS OR IMPLIED, INCLUDING BUT NOT LIMITED TO THE IMPLIED WARRANTIES OR... CONDITIONS OF MERCHANTABILITY OR FITNESS FOR A PARTICULAR PURPOSE. ASUS ASSUMES NO RESPONSIBILITY OR LIABILITY FOR ANY ERRORS OR INACCURACIES THAT MAY APPEAR IN THIS MANUAL, INCLUDING THE PRODUCTS AND SOFTWARE DESCRIBED IN IT. The source code will not be registered...
User Guide
Page 5
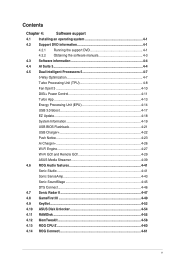
...43 Sonic SoundStage 4-45 DTS Connect 4-46 4.7 Sonic Radar II 4-47 4.8 GameFirst III 4-49 4.9 KeyBot...4-52 4.10 ASUS Disk Unlocker 4-54 4.11 RAMDisk...4-55 4.12 MemTweakIt 4-58 4.13 ROG CPU-Z 4-60 4.14 ROG Connect 4-61 ...v Contents Chapter 4: Software support 4.1 Installing an operating system 4-1 4.2 Support DVD information 4-1 4.2.1 Running the support DVD 4-1 4.2.2 Obtaining the software manuals 4-3 4.3 Software information 4-4 4.4 AI Suite 3...4-4 4.5 Dual Intelligent Processors 5 4-7 5-Way Optimization 4-7 Turbo Processing Unit (TPU 4-8 Fan Xpert 3 ...
...43 Sonic SoundStage 4-45 DTS Connect 4-46 4.7 Sonic Radar II 4-47 4.8 GameFirst III 4-49 4.9 KeyBot...4-52 4.10 ASUS Disk Unlocker 4-54 4.11 RAMDisk...4-55 4.12 MemTweakIt 4-58 4.13 ROG CPU-Z 4-60 4.14 ROG Connect 4-61 ...v Contents Chapter 4: Software support 4.1 Installing an operating system 4-1 4.2 Support DVD information 4-1 4.2.1 Running the support DVD 4-1 4.2.2 Obtaining the software manuals 4-3 4.3 Software information 4-4 4.4 AI Suite 3...4-4 4.5 Dual Intelligent Processors 5 4-7 5-Way Optimization 4-7 Turbo Processing Unit (TPU 4-8 Fan Xpert 3 ...
User Guide
Page 7
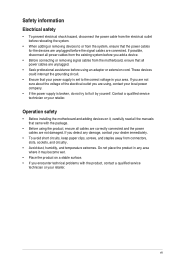
...cables are not damaged. If you encounter technical problems with the package. • Before using the product, ensure all the manuals that came with the product, contact a qualified service technician or your retailer. vii Contact a qualified service technician or your dealer... keep paper clips, screws, and staples away from connectors, slots, sockets, and circuitry. • Avoid dust, humidity, and temperature extremes. Safety information Electrical safety • To prevent electrical shock hazard, disconnect the power cable from the electrical outlet before relocating the system....
...cables are not damaged. If you encounter technical problems with the package. • Before using the product, ensure all the manuals that came with the product, contact a qualified service technician or your retailer. vii Contact a qualified service technician or your dealer... keep paper clips, screws, and staples away from connectors, slots, sockets, and circuitry. • Avoid dust, humidity, and temperature extremes. Safety information Electrical safety • To prevent electrical shock hazard, disconnect the power cable from the electrical outlet before relocating the system....
User Guide
Page 9
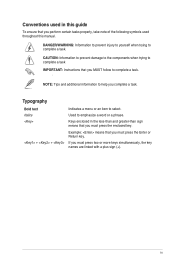
... sign means that you MUST follow to complete a task. Keys enclosed in this guide To ensure that you complete a task. ix Conventions used throughout this manual.
... sign means that you MUST follow to complete a task. Keys enclosed in this guide To ensure that you complete a task. ix Conventions used throughout this manual.
User Guide
Page 15
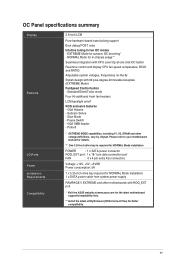
...Intuitive tuning in -chassis usage** Seamless integration with CPU Level Up at www.asus.com for the latest motherboard support/compatibility lists. ** Install the latest utility/... better compatibility. VGA Hotwire - Slow Mode - VGA SMB header - Please refer to your motherboard manual for details. ** One 5.25-inch drive bay is required for NORMAL Mode installation POWER : 1... SATA power cable from system power supply RAMPAGE V EXTREME and other voltage definitions, vary by chipset. EXTREME Mode for in two OC modes - ProbeIt * EXTREME MODE capabilities, including V1, V2, DRAM ...
...Intuitive tuning in -chassis usage** Seamless integration with CPU Level Up at www.asus.com for the latest motherboard support/compatibility lists. ** Install the latest utility/... better compatibility. VGA Hotwire - Slow Mode - VGA SMB header - Please refer to your motherboard manual for details. ** One 5.25-inch drive bay is required for NORMAL Mode installation POWER : 1... SATA power cable from system power supply RAMPAGE V EXTREME and other voltage definitions, vary by chipset. EXTREME Mode for in two OC modes - ProbeIt * EXTREME MODE capabilities, including V1, V2, DRAM ...
User Guide
Page 20
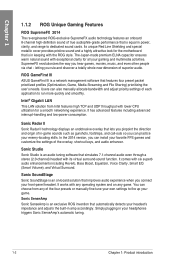
...the built-in amp accordingly. SupremeFX revolutionizes the way you rule and discover a totally whole new dimension of superior audio. ROG GameFirst III ASUS GameFirst III is in your gaming and multimedia activities. Users can choose from Intel features high TCP and UDP throughput with lower CPU utilization... that lets you pinpoint the direction and origin of in power, clarity, and range to fire up your game. You can also manually allocate bandwidth and adjust priority settings of each application to run more quickly and smoothly. It works with any of the four presets or...
...the built-in amp accordingly. SupremeFX revolutionizes the way you rule and discover a totally whole new dimension of superior audio. ROG GameFirst III ASUS GameFirst III is in your gaming and multimedia activities. Users can choose from Intel features high TCP and UDP throughput with lower CPU utilization... that lets you pinpoint the direction and origin of in power, clarity, and range to fire up your game. You can also manually allocate bandwidth and adjust priority settings of each application to run more quickly and smoothly. It works with any of the four presets or...
User Guide
Page 30
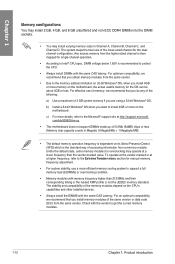
... Windows® OS, when you install 4GB or more details, refer to the Microsoft® support site at a higher frequency, refer to the Extreme Tweaker menu section for manual memory frequency adjustment. • For system stability, use of memory, we recommend that you do any of the following: a) Use a maximum of 3 GB...
... Windows® OS, when you install 4GB or more details, refer to the Microsoft® support site at a higher frequency, refer to the Extreme Tweaker menu section for manual memory frequency adjustment. • For system stability, use of memory, we recommend that you do any of the following: a) Use a maximum of 3 GB...
User Guide
Page 40
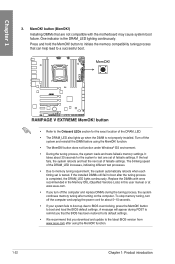
...different test processes. • Due to BIOS overclocking, press the MemOK! If the installed DIMMs still fail to the latest BIOS version from www.asus.com after the tuning process is tested. function. • The MemOK! The blinking speed of failsafe settings. To stop memory tuning, turn off ...initiate the memory compatibility tuning process that are not compatible with ones recommended in the Memory QVL (Qualified Vendors Lists) in this user manual or at www.asus.com. • If you download and update to boot after using the MemOK! button to the Onboard LEDs section for the ...
...different test processes. • Due to BIOS overclocking, press the MemOK! If the installed DIMMs still fail to the latest BIOS version from www.asus.com after the tuning process is tested. function. • The MemOK! The blinking speed of failsafe settings. To stop memory tuning, turn off ...initiate the memory compatibility tuning process that are not compatible with ones recommended in the Memory QVL (Qualified Vendors Lists) in this user manual or at www.asus.com. • If you download and update to boot after using the MemOK! button to the Onboard LEDs section for the ...
User Guide
Page 53
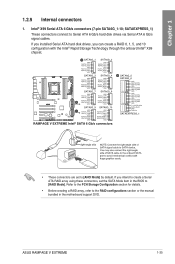
...-10; ASUS RAMPAGE V EXTREME 1-35 If you installed Serial ATA hard disk drives, you intend to create a Serial ATA RAID array using these connectors, set to [AHCI Mode] by default. Refer to the PCH Storage Configuration section for details. • Before creating a RAID array, refer to the RAID configurations section or the manual bundled...
...-10; ASUS RAMPAGE V EXTREME 1-35 If you installed Serial ATA hard disk drives, you intend to create a Serial ATA RAID array using these connectors, set to [AHCI Mode] by default. Refer to the PCH Storage Configuration section for details. • Before creating a RAID array, refer to the RAID configurations section or the manual bundled...
User Guide
Page 84
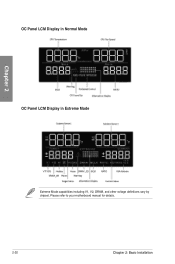
Chapter 2 OC Panel LCM Display in Normal Mode OC Panel LCM Display in Extreme Mode Extreme Mode capabilities including V1, V2, DRAM, and other voltage definitions vary by chipset. Please refer to your motherboard manual for details. 2-20 Chapter 2: Basic Installation
Chapter 2 OC Panel LCM Display in Normal Mode OC Panel LCM Display in Extreme Mode Extreme Mode capabilities including V1, V2, DRAM, and other voltage definitions vary by chipset. Please refer to your motherboard manual for details. 2-20 Chapter 2: Basic Installation
User Guide
Page 87
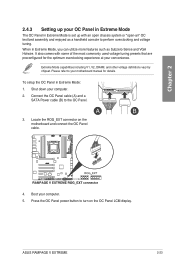
...the ROG_EXT connector on the OC Panel LCM display. ASUS RAMPAGE V EXTREME 2-23 Please refer to perform overclocking and voltage tuning. To setup the OC Panel in Extreme Mode: 1. Press the OC Panel power button to the OC Panel. 3. Boot your motherboard manual for the optimum overclocking experience at your computer. 2....the OC Panel cable (A) and a SATA Power cable (B) to turn on the motherboard and connect the OC Panel cable. 4. When in Extreme Mode, you can utilize more features such as a handheld console to your computer. 5. Chapter 2 2.4.3 Setting up your OC Panel in...
...the ROG_EXT connector on the OC Panel LCM display. ASUS RAMPAGE V EXTREME 2-23 Please refer to perform overclocking and voltage tuning. To setup the OC Panel in Extreme Mode: 1. Press the OC Panel power button to the OC Panel. 3. Boot your motherboard manual for the optimum overclocking experience at your computer. 2....the OC Panel cable (A) and a SATA Power cable (B) to turn on the motherboard and connect the OC Panel cable. 4. When in Extreme Mode, you can utilize more features such as a handheld console to your computer. 5. Chapter 2 2.4.3 Setting up your OC Panel in...
User Guide
Page 89
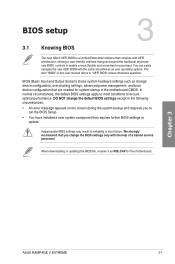
...3 The new ASUS UEFI BIOS is a Unified Extensible Interface that complies with the same smoothness as your operating system. You can easily navigate the new UEFI BIOS with UEFI architecture, offering a user-friendly interface that are needed for this user manual refers to "...or boot failure. The term "BIOS" in this motherboard. We strongly recommend that requires further BIOS settings or update. Chapter 3 ASUS RAMPAGE V EXTREME 3-1 When downloading or updating the BIOS file, rename it as storage device configuration, overclocking settings, advanced power management, and boot ...
...3 The new ASUS UEFI BIOS is a Unified Extensible Interface that complies with the same smoothness as your operating system. You can easily navigate the new UEFI BIOS with UEFI architecture, offering a user-friendly interface that are needed for this user manual refers to "...or boot failure. The term "BIOS" in this motherboard. We strongly recommend that requires further BIOS settings or update. Chapter 3 ASUS RAMPAGE V EXTREME 3-1 When downloading or updating the BIOS file, rename it as storage device configuration, overclocking settings, advanced power management, and boot ...
User Guide
Page 91
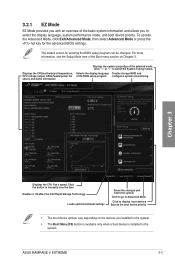
... more information, see the Setup Mode item of the BIOS setup program configures system overclocking Chapter 3 Displays the CPU Fan's speed. Click the button to manually tune the fans Enables or disables the Intel Rapid Storage Technology Loads optimized default settings Saves the changes and resets the system Click to go... the Advanced Mode, click Exit/Advanced Mode, then select Advanced Mode or press the hot key for entering the BIOS setup program can be changed. ASUS RAMPAGE V EXTREME 3-3
... more information, see the Setup Mode item of the BIOS setup program configures system overclocking Chapter 3 Displays the CPU Fan's speed. Click the button to manually tune the fans Enables or disables the Intel Rapid Storage Technology Loads optimized default settings Saves the changes and resets the system Click to go... the Advanced Mode, click Exit/Advanced Mode, then select Advanced Mode or press the hot key for entering the BIOS setup program can be changed. ASUS RAMPAGE V EXTREME 3-3
User Guide
Page 98
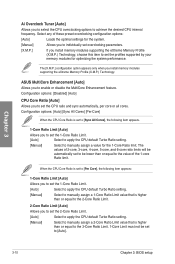
...set to [Per Core], the following item appears. 1-Core Ratio Limit [Auto] Allows you install memory modules supporting the eXtreme Memory Profile (X.M.P.) Technology, choose this item to set the CPU ratio and sync automatically, per core or all cores....manually assign a value for the 1-Core Ratio limit. Configuration options: [Disabled] [Auto] CPU Core Ratio [Auto] Allows you to select the CPU overclocking options to achieve the desired CPU internal frequency. The values of the 1-core Ratio limit. ASUS MultiCore Enhancement [Auto] Allows you install memory modules supporting the eXtreme...
...set to [Per Core], the following item appears. 1-Core Ratio Limit [Auto] Allows you install memory modules supporting the eXtreme Memory Profile (X.M.P.) Technology, choose this item to set the CPU ratio and sync automatically, per core or all cores....manually assign a value for the 1-Core Ratio limit. Configuration options: [Disabled] [Auto] CPU Core Ratio [Auto] Allows you to select the CPU overclocking options to achieve the desired CPU internal frequency. The values of the 1-core Ratio limit. ASUS MultiCore Enhancement [Auto] Allows you install memory modules supporting the eXtreme...
User Guide
Page 99
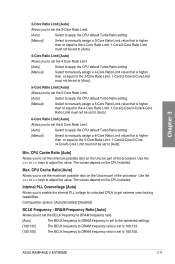
...Limit [Auto] Select to apply the CPU default Turbo Ratio setting [Manual] Select to manually assign a 6-Core Ratio Limit value that is set the minimum possible ratio on the Uncore part of the processor. ASUS RAMPAGE V EXTREME 3-11 Min. CPU Cache Ratio [Auto] Allows you to set ...to get extreme overclocking capabilities. Configuration options: [Auto] [Enabled] [Disabled] BCLK Frequency : ...
...Limit [Auto] Select to apply the CPU default Turbo Ratio setting [Manual] Select to manually assign a 6-Core Ratio Limit value that is set the minimum possible ratio on the Uncore part of the processor. ASUS RAMPAGE V EXTREME 3-11 Min. CPU Cache Ratio [Auto] Allows you to set ...to get extreme overclocking capabilities. Configuration options: [Auto] [Enabled] [Disabled] BCLK Frequency : ...
User Guide
Page 108
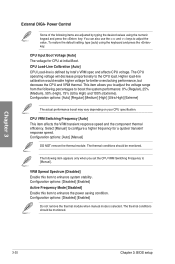
... to enhance the power saving condition. CPU Input Boot Voltage [Auto] The voltage for a quicker transient response speed. Select [Manual] to enhance system stability. The following item appears only when you to adjust the voltage range from the following percentages to adjust... the system performance: 0% (Regular), 25% (Medium), 50% (High), 75% (Ultra High) and 100% (Extreme). Configuration options: [Auto] [Regular] [Medium] [High] [Ultra High] [Extreme] The actual performance boost may vary depending on your CPU specification. The thermal conditions should be monitored. 3-20 Chapter...
... to enhance the power saving condition. CPU Input Boot Voltage [Auto] The voltage for a quicker transient response speed. Select [Manual] to enhance system stability. The following item appears only when you to adjust the voltage range from the following percentages to adjust... the system performance: 0% (Regular), 25% (Medium), 50% (High), 75% (Ultra High) and 100% (Extreme). Configuration options: [Auto] [Regular] [Medium] [High] [Ultra High] [Extreme] The actual performance boost may vary depending on your CPU specification. The thermal conditions should be monitored. 3-20 Chapter...
User Guide
Page 109
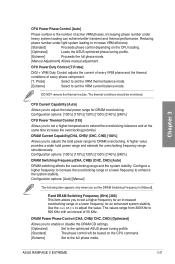
...Allows you to adjust the total power range for DRAM overclocking. ASUS RAMPAGE V EXTREME 3-21 CPU Current Capability [Auto] Allows you to increase VRM efficiency [Standard] Proceeds phase control depending on the CPU command. [Extreme] Set to [Manual]. Configuration options: [100%] [110%] [120%] [130%] ...thermal conditions should be based on the CPU loading. [Optimized] Loads the ASUS optimized phase tuning profile. [Extreme] Proceeds the full phase mode. [Manual Adjustment] Allows manual adjustment. A higher value provides a wider total power range and extends the...
...Allows you to adjust the total power range for DRAM overclocking. ASUS RAMPAGE V EXTREME 3-21 CPU Current Capability [Auto] Allows you to increase VRM efficiency [Standard] Proceeds phase control depending on the CPU command. [Extreme] Set to [Manual]. Configuration options: [100%] [110%] [120%] [130%] ...thermal conditions should be based on the CPU loading. [Optimized] Loads the ASUS optimized phase tuning profile. [Extreme] Proceeds the full phase mode. [Manual Adjustment] Allows manual adjustment. A higher value provides a wider total power range and extends the...
User Guide
Page 110
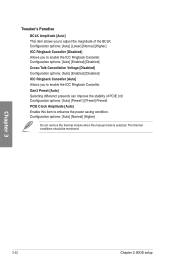
Configuration options: [Auto] [Normal] [Higher] Do not remove the thermal module when the manual mode is selected. Gen3 Preset [Auto] Selecting differenct presents can improve the stability of the BCLK. The thermal conditions should be monitored. Tweaker's Paradise BCLK ...
Configuration options: [Auto] [Normal] [Higher] Do not remove the thermal module when the manual mode is selected. Gen3 Preset [Auto] Selecting differenct presents can improve the stability of the BCLK. The thermal conditions should be monitored. Tweaker's Paradise BCLK ...
User Guide
Page 112
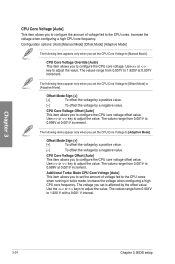
... values range from 0.001V to the CPU cores. Increase the voltage when configuring a high CPU core frequency. The values range from 0.001V to [Manual Mode]. Configuration options: [Auto] [Manual Mode] [Offset Mode] [Adaptive Mode] The following items appear only when you to set the CPU Core Voltage to 1.920 V with a 0.001 V interval...
... values range from 0.001V to the CPU cores. Increase the voltage when configuring a high CPU core frequency. The values range from 0.001V to [Manual Mode]. Configuration options: [Auto] [Manual Mode] [Offset Mode] [Adaptive Mode] The following items appear only when you to set the CPU Core Voltage to 1.920 V with a 0.001 V interval...
User Guide
Page 113
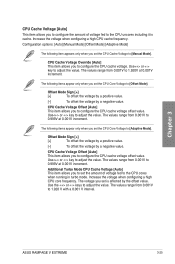
.... CPU Cache Voltage Override [Auto] This item allows you to adjust the value. CPU Cache Voltage Offset [Auto] This item allows you to [Manual Mode]. Configuration options: [Auto] [Manual Mode] [Offset Mode] [Adaptive Mode] The following items appear only when you set is cache. The following item appears only when you set... by the offset value. Additional Turbo Mode CPU Cache Voltage [Auto] This item allows you set the CPU Core Voltage to adjust the value. Chapter 3 ASUS RAMPAGE V EXTREME 3-25
.... CPU Cache Voltage Override [Auto] This item allows you to adjust the value. CPU Cache Voltage Offset [Auto] This item allows you to [Manual Mode]. Configuration options: [Auto] [Manual Mode] [Offset Mode] [Adaptive Mode] The following items appear only when you set is cache. The following item appears only when you set... by the offset value. Additional Turbo Mode CPU Cache Voltage [Auto] This item allows you set the CPU Core Voltage to adjust the value. Chapter 3 ASUS RAMPAGE V EXTREME 3-25


