
User's Manual for English Edition
Page 3
... Devices 58 Optical Drive (on selected models 58 Memory Card Reader 62 Hard Disk Drive 63 Memory (RAM 66 Network Connections 69 Wired Network Connections 69 Wireless Network Connections 71 Bluetooth Wireless Connection (on selected models 75 USB Charger+...77 Instant On...77 Appendix Optional Accessories A-2 Optional Connections A-2 Operating System and Software A-3 System BIOS Settings A-4 Troubleshooting A-10 Recovery options for your Notebook PC A-15 Using Recovery Partition A-15 Using DVD Recovery (on selected models A-16 DVD-ROM Drive Information A-18 Blu-ray ROM Drive...
... Devices 58 Optical Drive (on selected models 58 Memory Card Reader 62 Hard Disk Drive 63 Memory (RAM 66 Network Connections 69 Wired Network Connections 69 Wireless Network Connections 71 Bluetooth Wireless Connection (on selected models 75 USB Charger+...77 Instant On...77 Appendix Optional Accessories A-2 Optional Connections A-2 Operating System and Software A-3 System BIOS Settings A-4 Troubleshooting A-10 Recovery options for your Notebook PC A-15 Using Recovery Partition A-15 Using DVD Recovery (on selected models A-16 DVD-ROM Drive Information A-18 Blu-ray ROM Drive...
User's Manual for English Edition
Page 6
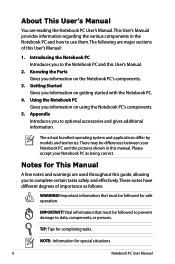
... of this guide, allowing you to use them. Notes for safe operation. NOTE: Information for completing tasks. About This User's Manual You are reading the Notebook PC User's Manual.This User's Manual provides information regarding the various components in this User's Manual. 2. The following are major sections of importance as being correct. Using the Notebook PC Gives you information on getting started with the Notebook PC. 4. Important...
... of this guide, allowing you to use them. Notes for safe operation. NOTE: Information for completing tasks. About This User's Manual You are reading the Notebook PC User's Manual.This User's Manual provides information regarding the various components in this User's Manual. 2. The following are major sections of importance as being correct. Using the Notebook PC Gives you information on getting started with the Notebook PC. 4. Important...

User's Manual for English Edition
Page 7
Wipe the Notebook PC using a clean cellulose sponge or chamois cloth dampened with a solution of nonabrasive detergent and a few drops of warm water and remove any part of the Notebook PC. DO NOT press or touch the display panel. DO NOT expose to qualified personnel. Battery safety warning: DO NOT throw the battery in this manual, refer all precautions and instructions. DO NOT...
Wipe the Notebook PC using a clean cellulose sponge or chamois cloth dampened with a solution of nonabrasive detergent and a few drops of warm water and remove any part of the Notebook PC. DO NOT press or touch the display panel. DO NOT expose to qualified personnel. Battery safety warning: DO NOT throw the battery in this manual, refer all precautions and instructions. DO NOT...
User's Manual for English Edition
Page 21
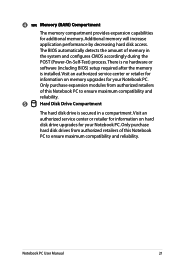
... hardware or software (including BIOS) setup required after the memory is secured in the system and configures CMOS accordingly during the POST (Power-On-Self-Test) process. The BIOS automatically detects the amount of this Notebook PC to ensure maximum compatibility and reliability. 5 Hard Disk Drive Compartment The hard disk drive is installed. Visit an authorized service center or retailer for information on memory upgrades for your Notebook PC. Only purchase hard disk drives...
... hardware or software (including BIOS) setup required after the memory is secured in the system and configures CMOS accordingly during the POST (Power-On-Self-Test) process. The BIOS automatically detects the amount of this Notebook PC to ensure maximum compatibility and reliability. 5 Hard Disk Drive Compartment The hard disk drive is installed. Visit an authorized service center or retailer for information on memory upgrades for your Notebook PC. Only purchase hard disk drives...
User's Manual for English Edition
Page 22
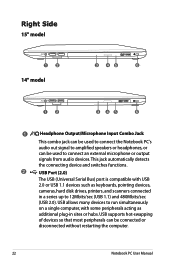
This jack automatically detects the connecting device and switches functions. 2 USB Port (2.0) The USB (Universal Serial Bus) port is compatible with some peripherals acting as keyboards, pointing devices, cameras, hard disk drives, printers, and scanners connected in sites or hubs. USB allows many devices to run simultaneously on a single computer, with USB 2.0 or USB 1.1 devices such as additional plug-in a series up to 12Mbits/sec (USB 1.1) and 480Mbits/sec (USB 2.0). USB supports hot-swapping of devices so that most peripherals...
This jack automatically detects the connecting device and switches functions. 2 USB Port (2.0) The USB (Universal Serial Bus) port is compatible with some peripherals acting as keyboards, pointing devices, cameras, hard disk drives, printers, and scanners connected in sites or hubs. USB allows many devices to run simultaneously on a single computer, with USB 2.0 or USB 1.1 devices such as additional plug-in a series up to 12Mbits/sec (USB 1.1) and 480Mbits/sec (USB 2.0). USB supports hot-swapping of devices so that most peripherals...

User's Manual for English Edition
Page 25
... D-sub monitor port supports a standard VGA-compatible device such as keyboards, pointing devices, cameras, hard disk drives, printers, and scanners connected in connector allows convenient use without restarting the computer. USB supports hot-swapping of devices so that most peripherals can be connected or disconnected without additional adapters. 6 USB Port 3.0 The USB (Universal Serial Bus) port is larger than the RJ-11 modem port and supports a standard Ethernet cable for connection to quick charge your mobile device via your ASUS Notebook PC's USB charge port...
... D-sub monitor port supports a standard VGA-compatible device such as keyboards, pointing devices, cameras, hard disk drives, printers, and scanners connected in connector allows convenient use without restarting the computer. USB supports hot-swapping of devices so that most peripherals can be connected or disconnected without additional adapters. 6 USB Port 3.0 The USB (Universal Serial Bus) port is larger than the RJ-11 modem port and supports a standard Ethernet cable for connection to quick charge your mobile device via your ASUS Notebook PC's USB charge port...
User's Manual for English Edition
Page 34
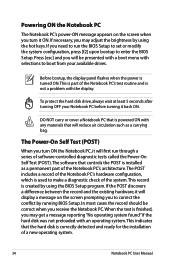
... display panel flashes when the power is turned ON.This is part of a new operating system. 34 Notebook PC User Manual To protect the hard disk drive, always wait at least 5 seconds after turning OFF your available drives. This indicates that is created by using the hot keys. If the POST discovers a difference between the record and the existing hardware, it back ON. If necessary, you to correct the conflict by using the BIOS Setup...
... display panel flashes when the power is turned ON.This is part of a new operating system. 34 Notebook PC User Manual To protect the hard disk drive, always wait at least 5 seconds after turning OFF your available drives. This indicates that is created by using the hot keys. If the POST discovers a difference between the record and the existing hardware, it back ON. If necessary, you to correct the conflict by using the BIOS Setup...

User's Manual for English Edition
Page 41
... use the keyboard shortcut [fn f1] to remain powered. This function stores your current data and status on the hard disk drive. Recover by pressing the power button. (NOTE: The power indicator will blink while in RAM while many components are turned OFF. Click the Windows button and the arrowhead next to the lock icon to keep (refresh) the data. Because RAM is the same as Suspend-toRAM (STR). Sleep...
... use the keyboard shortcut [fn f1] to remain powered. This function stores your current data and status on the hard disk drive. Recover by pressing the power button. (NOTE: The power indicator will blink while in RAM while many components are turned OFF. Click the Windows button and the arrowhead next to the lock icon to keep (refresh) the data. Because RAM is the same as Suspend-toRAM (STR). Sleep...
User's Manual for English Edition
Page 43
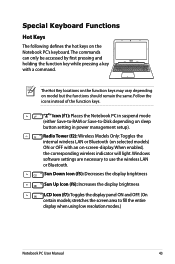
... enabled, the corresponding wireless indicator will light. Special Keyboard Functions Hot Keys The following defines the hot keys on model but the functions should remain the same. Follow the icons instead of the function keys. "ZZ" Icon (f1): Places the Notebook PC in power management setup). The Hot Key locations on the function keys may vary depending on the Notebook PC's keyboard. Windows software settings are necessary to use the wireless LAN or Bluetooth. Radio Tower (f2): Wireless Models Only:Toggles the internal wireless LAN or Bluetooth (on -screen-display...
... enabled, the corresponding wireless indicator will light. Special Keyboard Functions Hot Keys The following defines the hot keys on model but the functions should remain the same. Follow the icons instead of the function keys. "ZZ" Icon (f1): Places the Notebook PC in power management setup). The Hot Key locations on the function keys may vary depending on the Notebook PC's keyboard. Windows software settings are necessary to use the wireless LAN or Bluetooth. Radio Tower (f2): Wireless Models Only:Toggles the internal wireless LAN or Bluetooth (on -screen-display...

User's Manual for English Edition
Page 44
... volume (only in this function is available only when you enable the camera. 44 Notebook PC User Manual Locking the touchpad will light when the touchpad is UNLOCKED (enabled) and not light when the touchpad is best used with an external pointing device such as a mouse. NOTE: Selected models have an indicator between the touchpad buttons will prevent you can switch between the Notebook PC's LCD display and an external monitor in Windows OS) fn+C: Toggles the "Splendid Video Intelligent Technology" function...
... volume (only in this function is available only when you enable the camera. 44 Notebook PC User Manual Locking the touchpad will light when the touchpad is UNLOCKED (enabled) and not light when the touchpad is best used with an external pointing device such as a mouse. NOTE: Selected models have an indicator between the touchpad buttons will prevent you can switch between the Notebook PC's LCD display and an external monitor in Windows OS) fn+C: Toggles the "Splendid Video Intelligent Technology" function...

User's Manual for English Edition
Page 62
Memory card specifications constantly change without warning. To prevent data loss, use the Safely Remove Hardware and Eject Media in memory card reader slot that supports SD card formats, and utilizes the internal high-bandwidth PCI bus. SD Never remove cards while or immediately after reading, copying, formatting, or deleting data on Notebook PC model and memory card specifications. Memory Card Reader This Notebook PC has a single built-in the Windows® notification area before removing the memory card. 62 Notebook PC User Manual Memory card compatibility varies depending on...
Memory card specifications constantly change without warning. To prevent data loss, use the Safely Remove Hardware and Eject Media in memory card reader slot that supports SD card formats, and utilizes the internal high-bandwidth PCI bus. SD Never remove cards while or immediately after reading, copying, formatting, or deleting data on Notebook PC model and memory card specifications. Memory Card Reader This Notebook PC has a single built-in the Windows® notification area before removing the memory card. 62 Notebook PC User Manual Memory card compatibility varies depending on...
User's Manual for English Edition
Page 77
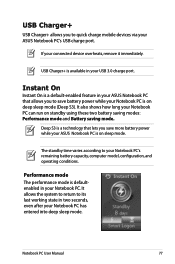
... your Notebook PC's remaining battery capacity, computer model, configuration, and operating conditions. Notebook PC User Manual 77 Instant On Instant On is a default-enabled feature in two seconds, even after your Notebook PC has entered into deep sleep mode. The standby time varies according to your connected device overheats, remove it immediately. It also shows how long your ASUS Notebook PC is a technology that allows you to save more battery power...
... your Notebook PC's remaining battery capacity, computer model, configuration, and operating conditions. Notebook PC User Manual 77 Instant On Instant On is a default-enabled feature in two seconds, even after your Notebook PC has entered into deep sleep mode. The standby time varies according to your connected device overheats, remove it immediately. It also shows how long your ASUS Notebook PC is a technology that allows you to save more battery power...
User's Manual for English Edition
Page 81
... if your Notebook PC came pre-configured in good working state provided that have been preinstalled.The support disc does not include the operating system itself.The support disc is optional and includes an image of the original operating system installed on the hard drive at the factory.The recovery disc provides a comprehensive recovery solution that provides BIOS, drivers and applications to download individual software drivers and utilities. Contact your hard disk drive is in order to...
... if your Notebook PC came pre-configured in good working state provided that have been preinstalled.The support disc does not include the operating system itself.The support disc is optional and includes an image of the original operating system installed on the hard drive at the factory.The recovery disc provides a comprehensive recovery solution that provides BIOS, drivers and applications to download individual software drivers and utilities. Contact your hard disk drive is in order to...
User's Manual for English Edition
Page 83
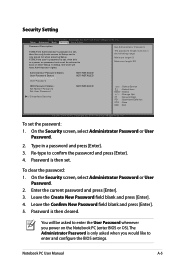
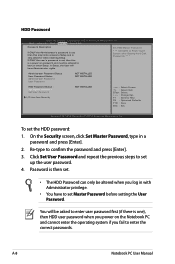
... INSTALLED NOT INSTALLED HDD Password Status : Set Master Password Set User Password I/O Interface Security NOT INSTALLED →← : Select Screen ↑↓ : Select Item Enter : Select +/- : Change Opt. Leave the Confirm New Password field blank and press [Enter]. 5. Copyright (C) 2011 American Megatrends, Inc. �M�a��in a password and press [Enter]. 3. If ONLY the user's password is set, then this only limits access to enter and configure the BIOS settings. To set . Password is a power on the Notebook PC (enter BIOS...
... INSTALLED NOT INSTALLED HDD Password Status : Set Master Password Set User Password I/O Interface Security NOT INSTALLED →← : Select Screen ↑↓ : Select Item Enter : Select +/- : Change Opt. Leave the Confirm New Password field blank and press [Enter]. 5. Copyright (C) 2011 American Megatrends, Inc. �M�a��in a password and press [Enter]. 3. If ONLY the user's password is set, then this only limits access to enter and configure the BIOS settings. To set . Password is a power on the Notebook PC (enter BIOS...
User's Manual for English Edition
Page 86
... asked for when entering Setup. Click Set User Password and repeat the previous steps to Power Cycle System after Setting Hard Disk Passwords *** Administrator Password Status User Password Status Administrator Password User Password NOT INSTALLED NOT INSTALLED HDD Password Status : Set Master Password Set User Password I/O Interface Security NOT INSTALLED →← : Select Screen ↑↓ : Select Item Enter : Select +/- : Change Opt. Password is only asked to enter user password first (if there is a power on the Notebook PC and cannot enter the operating system if you...
... asked for when entering Setup. Click Set User Password and repeat the previous steps to Power Cycle System after Setting Hard Disk Passwords *** Administrator Password Status User Password Status Administrator Password User Password NOT INSTALLED NOT INSTALLED HDD Password Status : Set Master Password Set User Password I/O Interface Security NOT INSTALLED →← : Select Screen ↑↓ : Select Item Enter : Select +/- : Change Opt. Password is only asked to enter user password first (if there is a power on the Notebook PC and cannot enter the operating system if you...
User's Manual for English Edition
Page 88
... driver CD or download it from sleep or hibernate mode. • Remove upgraded parts such as RAM, hard disk drive (HDD), WLAN/Bluetooth module if they were installed after purchase. • Run System Restore to restore the system to another location before starting any recovery process. • If the problem still exists, contact your system using the system recovery partition function or the recovery DVD. A-10 Notebook PC User Manual The system cannot wake up all your data to its factory default setting...
... driver CD or download it from sleep or hibernate mode. • Remove upgraded parts such as RAM, hard disk drive (HDD), WLAN/Bluetooth module if they were installed after purchase. • Run System Restore to restore the system to another location before starting any recovery process. • If the problem still exists, contact your system using the system recovery partition function or the recovery DVD. A-10 Notebook PC User Manual The system cannot wake up all your data to its factory default setting...
User's Manual for English Edition
Page 90
... incompatible memory. • Remove software applications. These utilities and BIOS files can download from the ASUS website. If you can be compatible with your system.Try to delete them in Windows Safe Mode. • Check your system for viruses. • Try restoring your system using the system recovery partition or the recovery DVD. When I turn the power ON, my Notebook PC displays this message:"Open policy file error". If an additional memory was installed...
... incompatible memory. • Remove software applications. These utilities and BIOS files can download from the ASUS website. If you can be compatible with your system.Try to delete them in Windows Safe Mode. • Check your system for viruses. • Try restoring your system using the system recovery partition or the recovery DVD. When I turn the power ON, my Notebook PC displays this message:"Open policy file error". If an additional memory was installed...
User's Manual for English Edition
Page 92
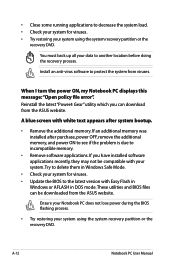
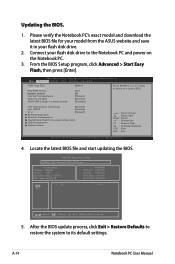
... flash disk drive to its default settings. Aptio Setup Utility - Copyright (C) 2011 American Megatrends, Inc. �M���a��i�n� Advanced Chipset Boot Security Save & Exit POST Logo Type Start Easy Flash Play POST Sound Speaker Volume Internal Pointing Device Wake On Lid Open ASUS USB Charger+ in your model from the ASUS website and save it in battery mode [Static] [No] [4] [Enabled] [Enabled] [Disabled] Press ENTER to run the utility to select and update BIOS...
... flash disk drive to its default settings. Aptio Setup Utility - Copyright (C) 2011 American Megatrends, Inc. �M���a��i�n� Advanced Chipset Boot Security Save & Exit POST Logo Type Start Easy Flash Play POST Sound Speaker Volume Internal Pointing Device Wake On Lid Open ASUS USB Charger+ in your model from the ASUS website and save it in battery mode [Static] [No] [4] [Enabled] [Enabled] [Disabled] Press ENTER to run the utility to select and update BIOS...
User's Manual for English Edition
Page 94
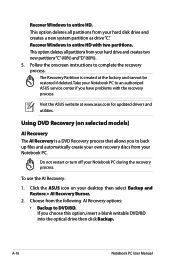
Follow the onscreen instructions to entire HD with the recovery process. Click the ASUS icon on selected models) AI Recovery The AI Recovery is created at www.asus.com for updated drivers and utilities. A-16 Notebook PC User Manual This option deletes all partitions from the following AI Recovery options: • Backup to entire HD. Visit the ASUS website at the factory and cannot be restored if deleted. The Recovery Partition is a DVD Recovery process that allows...
Follow the onscreen instructions to entire HD with the recovery process. Click the ASUS icon on selected models) AI Recovery The AI Recovery is created at www.asus.com for updated drivers and utilities. A-16 Notebook PC User Manual This option deletes all partitions from the following AI Recovery options: • Backup to entire HD. Visit the ASUS website at the factory and cannot be restored if deleted. The Recovery Partition is a DVD Recovery process that allows...
User's Manual for English Edition
Page 95
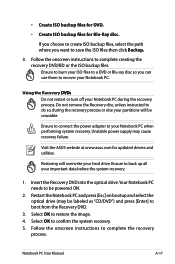
... system recovery. Select OK to be powered ON. 2. Ensure to connect the power adapter to boot from the Recovery DVD. 3. Restoring will be labeled as "CD/DVD") and press [Enter] to your hard drive. Unstable power supply may be unusable. Insert the Recovery DVD into the optical drive.Your Notebook PC needs to restore the image. 4. Notebook PC User Manual A-17 Do not remove the Recovery disc, unless instructed to complete creating the recovery DVD/BD or the ISO backup files...
... system recovery. Select OK to be powered ON. 2. Ensure to connect the power adapter to boot from the Recovery DVD. 3. Restoring will be labeled as "CD/DVD") and press [Enter] to your hard drive. Unstable power supply may be unusable. Insert the Recovery DVD into the optical drive.Your Notebook PC needs to restore the image. 4. Notebook PC User Manual A-17 Do not remove the Recovery disc, unless instructed to complete creating the recovery DVD/BD or the ISO backup files...


