
User Guide
Page 1
Motherboard Q87T Q87T/CSM
Motherboard Q87T Q87T/CSM
User Guide
Page 3
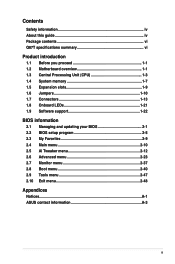
Contents Safety information iv About this guide iv Package contents vi Q87T specifications summary vi Product introduction 1.1 Before you proceed 1-1 1.2 Motherboard overview 1-1 1.3 Central Processing Unit (CPU 1-3 1.4 System memory 1-7 1.5 Expansion slots 1-9 1.6 Jumpers 1-10 1.7 Connectors 1-13 1.8 Onboard LEDs 1-21 1.9 Software support 1-22 BIOS information 2.1 Managing and... menu 2-10 2.5 Ai Tweaker menu 2-12 2.6 Advanced menu 2-23 2.7 Monitor menu 2-37 2.8 Boot menu 2-40 2.9 Tools menu 2-47 2.10 Exit menu 2-48 Appendices Notices...A-1 ASUS contact information A-3 iii
Contents Safety information iv About this guide iv Package contents vi Q87T specifications summary vi Product introduction 1.1 Before you proceed 1-1 1.2 Motherboard overview 1-1 1.3 Central Processing Unit (CPU 1-3 1.4 System memory 1-7 1.5 Expansion slots 1-9 1.6 Jumpers 1-10 1.7 Connectors 1-13 1.8 Onboard LEDs 1-21 1.9 Software support 1-22 BIOS information 2.1 Managing and... menu 2-10 2.5 Ai Tweaker menu 2-12 2.6 Advanced menu 2-23 2.7 Monitor menu 2-37 2.8 Boot menu 2-40 2.9 Tools menu 2-47 2.10 Exit menu 2-48 Appendices Notices...A-1 ASUS contact information A-3 iii
User Guide
Page 4
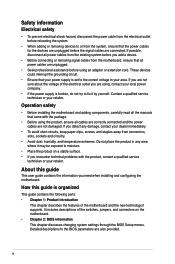
... circuit. • Ensure that your retailer. If you add a device. • Before connecting or removing signal cables from the motherboard, ensure that all the manuals that came with the product, contact a qualified service technician or your power supply is organized This guide...: • Chapter 1: Product introduction This chapter describes the features of the electrical outlet you need when installing and configuring the motherboard. How this guide This user guide contains the information you are using, contact your retailer. Detailed descriptions fo the BIOS parameters ...
... circuit. • Ensure that your retailer. If you add a device. • Before connecting or removing signal cables from the motherboard, ensure that all the manuals that came with the product, contact a qualified service technician or your power supply is organized This guide...: • Chapter 1: Product introduction This chapter describes the features of the electrical outlet you need when installing and configuring the motherboard. How this guide This user guide contains the information you are using, contact your retailer. Detailed descriptions fo the BIOS parameters ...
User Guide
Page 6
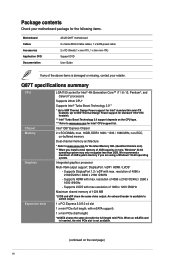
... 4GB capacity or more, Windows® 32-bit operating system may only recognize less than 3GB. Package contents Check your motherboard package for the following items. Motherboard Cables Accessories Application DVD Documentation ASUS Q87T motherboard 2 x Serial ATA 6.0 Gb/s cables, 1 x SATA power cable 2 x I/O Shield (1 x mini-ITX, 1 x thin mini-ITX) Support DVD User Guide If any of...
... 4GB capacity or more, Windows® 32-bit operating system may only recognize less than 3GB. Package contents Check your motherboard package for the following items. Motherboard Cables Accessories Application DVD Documentation ASUS Q87T motherboard 2 x Serial ATA 6.0 Gb/s cables, 1 x SATA power cable 2 x I/O Shield (1 x mini-ITX, 1 x thin mini-ITX) Support DVD User Guide If any of...
User Guide
Page 9
... off or the power cord is detached from the wall socket before installing or removing the motherboard. ASUS Q87T 1-1 Failure to do so can cause you physical injury and damage to motherboard components. 1.2.1 Placement direction When installing the motherboard, place it on them. • Whenever you uninstall any component, place it into the chassis in...
... off or the power cord is detached from the wall socket before installing or removing the motherboard. ASUS Q87T 1-1 Failure to do so can cause you physical injury and damage to motherboard components. 1.2.1 Placement direction When installing the motherboard, place it on them. • Whenever you uninstall any component, place it into the chassis in...

User Guide
Page 10
... this side towards the rear of the chassis Q87T 1.2.3 Motherboard layout 12 3 43 5 6 7 8 94 17cm(6.7in) DC_PWR ATX19V1 USB3_56 CHA_FAN SATA_PWRCON 25 24 23 22 HDMI ASM 1442K DP LAN2 LAN1 128Mb BIOS BATT_CON RTL ... USB14 MSATA_MPCIE LVDS USB3_12 SATA6G_3 SATA6G_1 Super I/O COM1 F_PANEL MON_SW_PANEL CPU_FAN EDP DDR3 DIMM_A1 (64bit, 204-pin module) DDR3 DIMM_B1 (64bit, 204-pin module) VCC_PWR_SEL Q87T FPD_SEL USB910 BLKT_PWR_SEL USB78 LPC_DEBUG LGA1150 CLRTC CHASSIS 21 20 14 19 18 LCD_BLKT_PANEL 17cm(6.7in) 10 11 12 13 14 15 16 14 17...
... this side towards the rear of the chassis Q87T 1.2.3 Motherboard layout 12 3 43 5 6 7 8 94 17cm(6.7in) DC_PWR ATX19V1 USB3_56 CHA_FAN SATA_PWRCON 25 24 23 22 HDMI ASM 1442K DP LAN2 LAN1 128Mb BIOS BATT_CON RTL ... USB14 MSATA_MPCIE LVDS USB3_12 SATA6G_3 SATA6G_1 Super I/O COM1 F_PANEL MON_SW_PANEL CPU_FAN EDP DDR3 DIMM_A1 (64bit, 204-pin module) DDR3 DIMM_B1 (64bit, 204-pin module) VCC_PWR_SEL Q87T FPD_SEL USB910 BLKT_PWR_SEL USB78 LPC_DEBUG LGA1150 CLRTC CHASSIS 21 20 14 19 18 LCD_BLKT_PANEL 17cm(6.7in) 10 11 12 13 14 15 16 14 17...
User Guide
Page 11
.... DMIC connectors (5-1 pin DMIC) 21. Front panel audio connector (10-1 pin AAFP) 23. Custom header (14-1 pin CUSTOM) 25. Q87T Q87T CPU socket LGA1150 ASUS Q87T 1-3 Embedded DisplayPort (30-pin eDP) 11. Intel® ME jumper (3-pin DIS_ME) 22. Display panel VCC power selector (6-pin VCC_PWR_SEL) ...1-19 1-19 1-20 1-12 1-17 1-12 1-12 1-10 1-11 1-3 1-20 1-11 1-16 1-20 1-20 1-19 1.3 Central Processing Unit (CPU) This motherboard comes with a surface mount LGA1150 socket designed for the Intel 4th generation Core™ i7 / Core™ i5 / Core™ i3, Pentium® , Celeron...
.... DMIC connectors (5-1 pin DMIC) 21. Front panel audio connector (10-1 pin AAFP) 23. Custom header (14-1 pin CUSTOM) 25. Q87T Q87T CPU socket LGA1150 ASUS Q87T 1-3 Embedded DisplayPort (30-pin eDP) 11. Intel® ME jumper (3-pin DIS_ME) 22. Display panel VCC power selector (6-pin VCC_PWR_SEL) ...1-19 1-19 1-20 1-12 1-17 1-12 1-12 1-10 1-11 1-3 1-20 1-11 1-16 1-20 1-20 1-19 1.3 Central Processing Unit (CPU) This motherboard comes with a surface mount LGA1150 socket designed for the Intel 4th generation Core™ i7 / Core™ i5 / Core™ i3, Pentium® , Celeron...

User Guide
Page 12
... 2 3 1-4 Chapter 1: Product introduction Contact your retailer immediately if the PnP cap is shipment/ transit-related. • Keep the cap after installing the motherboard. ASUS will shoulder the cost of repair only if the damage is missing, or if you see any damage to the socket contacts resulting from incorrect... CPU installation/removal, or misplacement/loss/incorrect removal of the motherboard, ensure that the PnP cap is on the LGA1150 socket. • The product warranty does not cover damage to the PnP...
... 2 3 1-4 Chapter 1: Product introduction Contact your retailer immediately if the PnP cap is shipment/ transit-related. • Keep the cap after installing the motherboard. ASUS will shoulder the cost of repair only if the damage is missing, or if you see any damage to the socket contacts resulting from incorrect... CPU installation/removal, or misplacement/loss/incorrect removal of the motherboard, ensure that the PnP cap is on the LGA1150 socket. • The product warranty does not cover damage to the PnP...

User Guide
Page 15
...the loaded X.M.P. For optimal compatibility, we recommend that you install memory modules of these memory modules depend on the motherboard. • This motherboard does not support DIMMs made up of the following: - Profile is then mapped for single-channel operation. •...two Double Data Rate 3 (DDR3) Small Outline Dual Inline Memory Module (SO-DIMM) sockets. ASUS Q87T 1-7 The system maps the total size of the DDR3 SODIMM sockets: Q87T DIMM_A1 DIMM_B1 Q87T 204-pin DDR3 DIMM sockets Channel Channel A Channel B Sockets DIMM_A1 DIMM_B1 1.4.2 Memory configurations You ...
...the loaded X.M.P. For optimal compatibility, we recommend that you install memory modules of these memory modules depend on the motherboard. • This motherboard does not support DIMMs made up of the following: - Profile is then mapped for single-channel operation. •...two Double Data Rate 3 (DDR3) Small Outline Dual Inline Memory Module (SO-DIMM) sockets. ASUS Q87T 1-7 The system maps the total size of the DDR3 SODIMM sockets: Q87T DIMM_A1 DIMM_B1 Q87T 204-pin DDR3 DIMM sockets Channel Channel A Channel B Sockets DIMM_A1 DIMM_B1 1.4.2 Memory configurations You ...
User Guide
Page 17
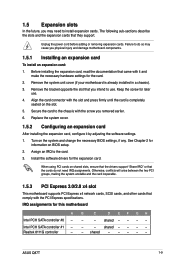
...1. Replace the system cover. 1.5.2 Configuring an expansion card After installing the expansion card, configure it and make the necessary hardware settings for this motherboard A Intel PCH SATA controller #0 - Install the software drivers for information on shared slots, ensure that the drivers support "Share IRQ" or ...the expansion cards that the cards do so may need IRQ assignments. Remove the system unit cover (if your motherboard is completely seated on the system and change the necessary BIOS settings, if any. ASUS Q87T 1-9 B C D EF GH - - Realtek 8111G controller -
...1. Replace the system cover. 1.5.2 Configuring an expansion card After installing the expansion card, configure it and make the necessary hardware settings for this motherboard A Intel PCH SATA controller #0 - Install the software drivers for information on shared slots, ensure that the drivers support "Share IRQ" or ...the expansion cards that the cards do so may need IRQ assignments. Remove the system unit cover (if your motherboard is completely seated on the system and change the necessary BIOS settings, if any. ASUS Q87T 1-9 B C D EF GH - - Realtek 8111G controller -
User Guide
Page 22
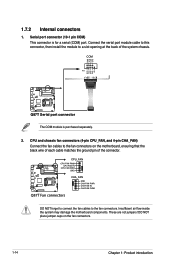
... to this connector, then install the module to the fan connectors. Insufficient air flow inside the system may damage the motherboard components. DO NOT place jumper caps on the motherboard, ensuring that the black wire of each cable matches the ground pin of the system chassis. 1.7.2 Internal connectors 1.... COM PIN 1 RXD DTR DSR CTS DCD TXD GND RTS RI Q87T Q87T Serial port connector The COM module is for a serial (COM...
... to this connector, then install the module to the fan connectors. Insufficient air flow inside the system may damage the motherboard components. DO NOT place jumper caps on the motherboard, ensuring that the black wire of each cable matches the ground pin of the system chassis. 1.7.2 Internal connectors 1.... COM PIN 1 RXD DTR DSR CTS DCD TXD GND RTS RI Q87T Q87T Serial port connector The COM module is for a serial (COM...
User Guide
Page 24
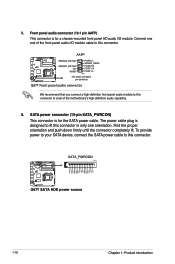
...orientation and push down firmly until the connector completely fit. AAFP SENSE2_RETUR PORT2 L SENSE_SEND SENSE1_RETUR PORT2 R Q87T NC PORT1 R AGND PORT1 L PIN 1 HD-audio-compliant pin definition Q87T Front panel audio connector We recommend that you connect a high-definition front panel audio module to this ...to this connector. +12V +12V +12V GND GND GND +5V +5V +5V GND GND GND +3V +3V +3V SATA_PWRCON PIN 1 Q87T Q87T SATA HDD power source 1-16 Chapter 1: Product introduction Connect one orientation. To provide power to your SATA device, connect the SATA power cable...
...orientation and push down firmly until the connector completely fit. AAFP SENSE2_RETUR PORT2 L SENSE_SEND SENSE1_RETUR PORT2 R Q87T NC PORT1 R AGND PORT1 L PIN 1 HD-audio-compliant pin definition Q87T Front panel audio connector We recommend that you connect a high-definition front panel audio module to this ...to this connector. +12V +12V +12V GND GND GND +5V +5V +5V GND GND GND +3V +3V +3V SATA_PWRCON PIN 1 Q87T Q87T SATA HDD power source 1-16 Chapter 1: Product introduction Connect one orientation. To provide power to your SATA device, connect the SATA power cable...
User Guide
Page 25
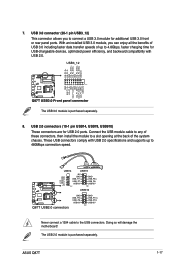
GND IntA_P1_SSTX+ GND IntA_P1_SSTXIntA_P1_SSRX+ IntA_P1_SSRX- ASUS Q87T 1-17 USB3_12 IntA_P2_D+ IntA_P2_DGND IntA_P2_SSTX+ IntA_P2_SSTXGND IntA_P2_SSRX+ IntA_P2_SSRXUSB3+5V Q87T PIN 1 GND IntA_P1_D+ IntA_P1_D- Doing so will damage the motherboard! USB 3.0 connector (20-1 pin USB3_12) This connector allows you can enjoy all the benefits of USB 3.0 including faster data transfer speeds of up to 480Mbps ...
GND IntA_P1_SSTX+ GND IntA_P1_SSTXIntA_P1_SSRX+ IntA_P1_SSRX- ASUS Q87T 1-17 USB3_12 IntA_P2_D+ IntA_P2_DGND IntA_P2_SSTX+ IntA_P2_SSTXGND IntA_P2_SSRX+ IntA_P2_SSRXUSB3+5V Q87T PIN 1 GND IntA_P1_D+ IntA_P1_D- Doing so will damage the motherboard! USB 3.0 connector (20-1 pin USB3_12) This connector allows you can enjoy all the benefits of USB 3.0 including faster data transfer speeds of up to 480Mbps ...
User Guide
Page 29
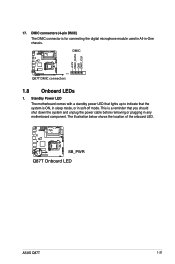
...off mode. Standby Power LED The motherboard comes with a standby power LED that lights up to indicate that you should shut down the system and unplug the power cable before removing or plugging in -One chassis. Q87T SB_PWR Q87T Onboard LED ASUS Q87T 1-21 This is a reminder that ...the system is for connecting the digital microphone module used in All-in any motherboard component. The illustration below shows the location of the onboard LED....
...off mode. Standby Power LED The motherboard comes with a standby power LED that lights up to indicate that you should shut down the system and unplug the power cable before removing or plugging in -One chassis. Q87T SB_PWR Q87T Onboard LED ASUS Q87T 1-21 This is a reminder that ...the system is for connecting the digital microphone module used in All-in any motherboard component. The illustration below shows the location of the onboard LED....
User Guide
Page 30
... the DVD automatically displays the Specials screen which lists the unique features of the Support DVD are subject to avail all motherboard features. If Autorun is NOT enabled in your hardware. Click Drivers, Utilities, AHCI/RAID Driver, Manual, Contact, and...Support DVD information The Support DVD that comes with the motherboard package contains the drivers, software applications, and utilities that you can install to change at www.asus.com for reference only. Refer to your ASUS motherboard. Motherboard settings and hardware options vary. 1.9 Software support 1.9.1 Installing...
... the DVD automatically displays the Specials screen which lists the unique features of the Support DVD are subject to avail all motherboard features. If Autorun is NOT enabled in your hardware. Click Drivers, Utilities, AHCI/RAID Driver, Manual, Contact, and...Support DVD information The Support DVD that comes with the motherboard package contains the drivers, software applications, and utilities that you can install to change at www.asus.com for reference only. Refer to your ASUS motherboard. Motherboard settings and hardware options vary. 1.9 Software support 1.9.1 Installing...
User Guide
Page 33
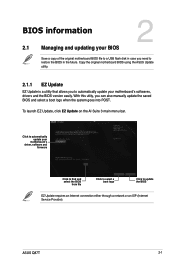
BIOS information 2.1 Managing and updating your BIOS 2 Save a copy of the original motherboard BIOS file to a USB flash disk in the future. With this utlity, you need to restore the BIOS in case you can also manually update ..., software and firmware Click to find and select the BIOS from file Click to select a boot logo Click to automatically update your motherboard's softwares, drivers and the BIOS version easily. ASUS Q87T 2-1 To launch EZ Update, click EZ Update on the AI Suite 3 main menu bar. Click to update the BIOS EZ Update...
BIOS information 2.1 Managing and updating your BIOS 2 Save a copy of the original motherboard BIOS file to a USB flash disk in the future. With this utlity, you need to restore the BIOS in case you can also manually update ..., software and firmware Click to find and select the BIOS from file Click to select a boot logo Click to automatically update your motherboard's softwares, drivers and the BIOS version easily. ASUS Q87T 2-1 To launch EZ Update, click EZ Update on the AI Suite 3 main menu bar. Click to update the BIOS EZ Update...
User Guide
Page 35
... or gets corrupted during the updating process. The succeeding utility screens are for the BIOS file. Doing so can use as shown. Before updating BIOS 1. ASUS Q87T 2-3 Prepare the motherboard support DVD and a USB flash drive formatted using this utility, rename the BIOS file in the removable device into...
... or gets corrupted during the updating process. The succeeding utility screens are for the BIOS file. Doing so can use as shown. Before updating BIOS 1. ASUS Q87T 2-3 Prepare the motherboard support DVD and a USB flash drive formatted using this utility, rename the BIOS file in the removable device into...
User Guide
Page 38
... 2.8 Boot menu for the advanced BIOS settings. • The BIOS setup screens shown in this motherboard. • Ensure that a USB mouse is connected to your screen. • Visit the ASUS website at www.asus.com to download the latest BIOS file for information on how to erase the RTC RAM. Select... and Advanced Mode. See section 1.6 Jumpers for this section are for reference purposes only, and may not exactly match what you see on your motherboard if you want to use the mouse to control the BIOS setup program. • If the system becomes unstable after changing any BIOS setting,...
... 2.8 Boot menu for the advanced BIOS settings. • The BIOS setup screens shown in this motherboard. • Ensure that a USB mouse is connected to your screen. • Visit the ASUS website at www.asus.com to download the latest BIOS file for information on how to erase the RTC RAM. Select... and Advanced Mode. See section 1.6 Jumpers for this section are for reference purposes only, and may not exactly match what you see on your motherboard if you want to use the mouse to control the BIOS setup program. • If the system becomes unstable after changing any BIOS setting,...
User Guide
Page 39
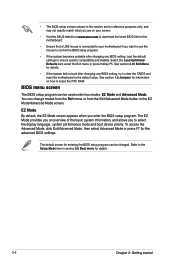
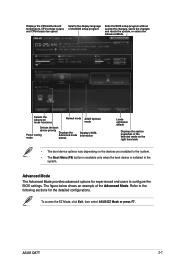
To access the EZ Mode, click Exit, then select ASUS EZ Mode or press F7. ASUS Q87T 2-7 Advanced Mode The Advanced Mode provides advanced options for... settings. Refer to the following sections for experienced end-users to the system. Displays the CPU/motherboard temperature, CPU voltage output, and CPU/chassis fan speed Selects the display language of the BIOS ... and resets the system, or enters the Advanced Mode Selects the Advanced mode functions Normal mode ASUS Optimal mode Selects the boot device priority Displays the Power saving Advanced mode mode menus Displays SATA...
To access the EZ Mode, click Exit, then select ASUS EZ Mode or press F7. ASUS Q87T 2-7 Advanced Mode The Advanced Mode provides advanced options for... settings. Refer to the following sections for experienced end-users to the system. Displays the CPU/motherboard temperature, CPU voltage output, and CPU/chassis fan speed Selects the display language of the BIOS ... and resets the system, or enters the Advanced Mode Selects the Advanced mode functions Normal mode ASUS Optimal mode Selects the boot device priority Displays the Power saving Advanced mode mode menus Displays SATA...
User Guide
Page 44
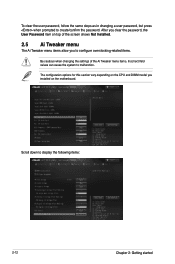
... steps as in changing a user password, but press when prompted to create/confirm the password. The configuration options for this section vary depending on the motherboard.
... steps as in changing a user password, but press when prompted to create/confirm the password. The configuration options for this section vary depending on the motherboard.


