PA279Q Series User Guide
Page 2
... Notices...iii Safety information iv Care & Cleaning v Chapter 1: Product introduction 1.1 Welcome 1-1 1.2 Package contents 1-1 1.3 Monitor introduction 1-2 1.3.1 Front view 1-2 1.3.2 Back view 1-4 1.3.3 QuickFit Function 1-5 Chapter 2: Setup 2.1 Detaching the arm/base (for VESA wall mount 2-1 2.2 Adjusting the monitor 2-2 2.3 Connecting the cables 2-3 2.4 Turning on the monitor 2-3 Chapter 3: General instructions 3.1 OSD (On-Screen Display) menu 3-1 3.1.1 How to reconfigure 3-1 3.1.2 OSD...
... Notices...iii Safety information iv Care & Cleaning v Chapter 1: Product introduction 1.1 Welcome 1-1 1.2 Package contents 1-1 1.3 Monitor introduction 1-2 1.3.1 Front view 1-2 1.3.2 Back view 1-4 1.3.3 QuickFit Function 1-5 Chapter 2: Setup 2.1 Detaching the arm/base (for VESA wall mount 2-1 2.2 Adjusting the monitor 2-2 2.3 Connecting the cables 2-3 2.4 Turning on the monitor 2-3 Chapter 3: General instructions 3.1 OSD (On-Screen Display) menu 3-1 3.1.1 How to reconfigure 3-1 3.1.2 OSD...
PA279Q Series User Guide
Page 3
... in accordance with the limits for compliance could void the user's authority to operate this unit not expressly approved by one or more of the monitor to assure compliance with FCC regulations. Changes or modifications to this equipment. Cet appareil numérique de la classe B respecte toutes les exigences du...
... in accordance with the limits for compliance could void the user's authority to operate this unit not expressly approved by one or more of the monitor to assure compliance with FCC regulations. Changes or modifications to this equipment. Cet appareil numérique de la classe B respecte toutes les exigences du...
PA279Q Series User Guide
Page 4
...immediately. • Slots and openings on the label. Safety information • Before setting up the monitor, carefully read all cables are correctly connected and the power cables are not damaged. If you ...bin indicates that came with the package. • To prevent fire or shock hazard, never expose the monitor to rain or moisture. • Never try to other settings than the center position may result in...spill liquid of the volume control as well as the equalizer to fix it will protect the monitor from the type of power source indicated on the back or top of the cabinet are ...
...immediately. • Slots and openings on the label. Safety information • Before setting up the monitor, carefully read all cables are correctly connected and the power cables are not damaged. If you ...bin indicates that came with the package. • To prevent fire or shock hazard, never expose the monitor to rain or moisture. • Never try to other settings than the center position may result in...spill liquid of the volume control as well as the equalizer to fix it will protect the monitor from the type of power source indicated on the back or top of the cabinet are ...
PA279Q Series User Guide
Page 5
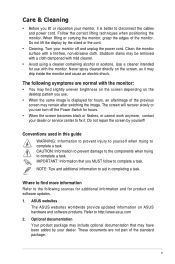
...a task. Use a cleaner intended for hours, an afterimage of the previous screen may drip inside the monitor and cause an electric shock. ASUS websites The ASUS websites worldwide provide updated information on the screen, as it . Do not lift the display by yourself!.... Refer to complete a task. Optional documentation Your product package may include optional documentation that you use with the monitor. Never spray cleaner directly on ASUS hardware and software products. IMPORTANT: Information that may find more information Refer to complete a task. Turn your dealer...
...a task. Use a cleaner intended for hours, an afterimage of the previous screen may drip inside the monitor and cause an electric shock. ASUS websites The ASUS websites worldwide provide updated information on the screen, as it . Do not lift the display by yourself!.... Refer to complete a task. Optional documentation Your product package may include optional documentation that you use with the monitor. Never spray cleaner directly on ASUS hardware and software products. IMPORTANT: Information that may find more information Refer to complete a task. Turn your dealer...
PA279Q Series User Guide
Page 7
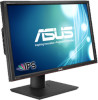
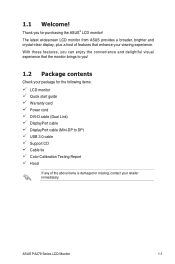
... purchasing the ASUS® LCD monitor! ASUS PA279 Series LCD Monitor 1-1 The latest widescreen LCD monitor from ASUS provides a broader, brighter and crystal-clear display, plus a host of the above items is damaged or missing, contact your viewing experience. Thank you for the following items: LCD monitor Quick start ...to DP) USB 3.0 cable Support CD Cable tie Color Calibration Testing Report Hood If any of features that the monitor brings to you can enjoy the convenience and delightful visual experience that enhance your retailer immediately. 1.1 Welcome!
... purchasing the ASUS® LCD monitor! ASUS PA279 Series LCD Monitor 1-1 The latest widescreen LCD monitor from ASUS provides a broader, brighter and crystal-clear display, plus a host of the above items is damaged or missing, contact your viewing experience. Thank you for the following items: LCD monitor Quick start ...to DP) USB 3.0 cable Support CD Cable tie Color Calibration Testing Report Hood If any of features that the monitor brings to you can enjoy the convenience and delightful visual experience that enhance your retailer immediately. 1.1 Welcome!

PA279Q Series User Guide
Page 8
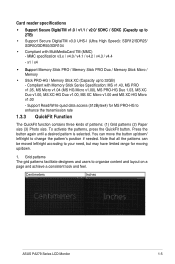
... of common grid patterns and paper and photo sizes. (Please refer to the previous menu when the OSD menu is in use. 1-2 Chapter 1: Product introduction 1.3 Monitor introduction 1.3.1 Front view 1 2 3 4 5 6 7 1.
... of common grid patterns and paper and photo sizes. (Please refer to the previous menu when the OSD menu is in use. 1-2 Chapter 1: Product introduction 1.3 Monitor introduction 1.3.1 Front view 1 2 3 4 5 6 7 1.

PA279Q Series User Guide
Page 9
... preset mode. 6. Status White Amber Off Description On Standby mode Off ASUS PA279 Series LCD Monitor 1-3 Shortcut • Default: Contrast hotkey • To change the hotkey function, go to the Shortcut > Shortcut 2 menu. 5. Power button/power indicator • Turns the monitor on/off. • The color definition of the power indicator is as.... Shortcut • Default: Brightness hotkey • To change the hotkey function, go to display HDMI/DisplayPort signals after you connect HDMI/DisplayPort cable with the monitor. 7. 3.
... preset mode. 6. Status White Amber Off Description On Standby mode Off ASUS PA279 Series LCD Monitor 1-3 Shortcut • Default: Contrast hotkey • To change the hotkey function, go to the Shortcut > Shortcut 2 menu. 5. Power button/power indicator • Turns the monitor on/off. • The color definition of the power indicator is as.... Shortcut • Default: Brightness hotkey • To change the hotkey function, go to display HDMI/DisplayPort signals after you connect HDMI/DisplayPort cable with the monitor. 7. 3.

PA279Q Series User Guide
Page 10
...port connects the power cord. 4. HDMI port. icon is Super-Speed USB 3.0 compatible. AC-IN port. DVI port. USB 3.0 downstream ports. This monitor is 12. Audio-in . Port with USB devices, such as USB keyboard/mouse, USB flash drive, etc. These ports are for connection with your ...computer. 7. 1.3.2 Back view 1 2 3 4 5 6 7 8 9 10 11 11 12 11 Rear connectors 1. This port allows you to turn on the monitor. 11. Kensington lock slot. 2. This port is for more information about the card reader specifications. 1-4 Chapter 1: Product introduction
...port connects the power cord. 4. HDMI port. icon is Super-Speed USB 3.0 compatible. AC-IN port. DVI port. USB 3.0 downstream ports. This monitor is 12. Audio-in . Port with USB devices, such as USB keyboard/mouse, USB flash drive, etc. These ports are for connection with your ...computer. 7. 1.3.2 Back view 1 2 3 4 5 6 7 8 9 10 11 11 12 11 Rear connectors 1. This port allows you to turn on the monitor. 11. Kensington lock slot. 2. This port is for more information about the card reader specifications. 1-4 Chapter 1: Product introduction
PA279Q Series User Guide
Page 11
Compliant with MultiMediaCard TM (MMC) - You can be moved left /right to change the pattern's position if needed. Centimeters Inches ASUS PA279 Series LCD Monitor 1-5 x1 / x4 • Support Memory Stick PRO / Memory Stick PRO Duo / Memory Stick Micro / Memory • Stick PRO-HG / Memory Stick XC (Capacity up to ...
Compliant with MultiMediaCard TM (MMC) - You can be moved left /right to change the pattern's position if needed. Centimeters Inches ASUS PA279 Series LCD Monitor 1-5 x1 / x4 • Support Memory Stick PRO / Memory Stick PRO Duo / Memory Stick Micro / Memory • Stick PRO-HG / Memory Stick XC (Capacity up to ...
PA279Q Series User Guide
Page 13
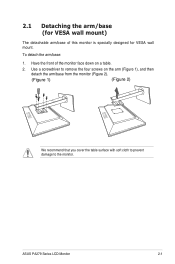
To detach the arm/base: 1. Use a screwdriver to the monitor. ASUS PA279 Series LCD Monitor 2-1 2.1 Detaching the arm/base (for VESA wall mount) The detachable arm/base of the monitor face down on the arm (Figure 1), and then detach the arm/base from the monitor (Figure 2). (Figure 1) (Figure 2) We recommend that you cover the table surface with soft cloth to prevent damage to remove the four screws on a table. 2. Have the front of this monitor is specially designed for VESA wall mount.
To detach the arm/base: 1. Use a screwdriver to the monitor. ASUS PA279 Series LCD Monitor 2-1 2.1 Detaching the arm/base (for VESA wall mount) The detachable arm/base of the monitor face down on the arm (Figure 1), and then detach the arm/base from the monitor (Figure 2). (Figure 1) (Figure 2) We recommend that you cover the table surface with soft cloth to prevent damage to remove the four screws on a table. 2. Have the front of this monitor is specially designed for VESA wall mount.
PA279Q Series User Guide
Page 14
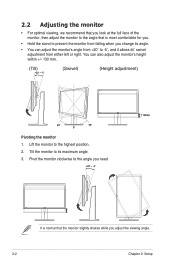
...you look at the full face of the monitor, then adjust the monitor to the angle that is normal that the monitor slightly shakes while you adjust the viewing angle. 2-2 Chapter 2: Setup Tilt the monitor to its angle. • You can also adjust the monitor's height within +/- 130 mm. (Tilt...) +20° ~ -5° (Swivel) (Height adjustment) 60° 60° 0° Pivoting the monitor 1. Lift the monitor to -5˚, and it allows 60˚...
...you look at the full face of the monitor, then adjust the monitor to the angle that is normal that the monitor slightly shakes while you adjust the viewing angle. 2-2 Chapter 2: Setup Tilt the monitor to its angle. • You can also adjust the monitor's height within +/- 130 mm. (Tilt...) +20° ~ -5° (Swivel) (Height adjustment) 60° 60° 0° Pivoting the monitor 1. Lift the monitor to -5˚, and it allows 60˚...

PA279Q Series User Guide
Page 15
... can choose the desired signal from the Input Select item in white to show that the monitor is installed with plug type to the monitor's HDMI/ DVI/DisplayPort jack. ASUS PA279 Series LCD Monitor 2-3 Connect the cables as the following instructions: • To connect the power cord: ...connect one end of the power cord securely to the monitor's AC input port, the other end of the...
... can choose the desired signal from the Input Select item in white to show that the monitor is installed with plug type to the monitor's HDMI/ DVI/DisplayPort jack. ASUS PA279 Series LCD Monitor 2-3 Connect the cables as the following instructions: • To connect the power cord: ...connect one end of the power cord securely to the monitor's AC input port, the other end of the...
PA279Q Series User Guide
Page 17
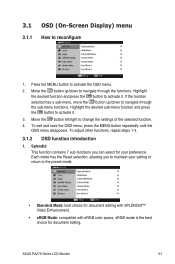
...: compatible with sRGB color space, sRGB mode is the best choice for document editing. To adjust other functions, repeat steps 1-3. 3.1.2 OSD function introduction 1. ASUS PA279 Series LCD Monitor 3-1 Each mode has the Reset selection, allowing you can select for your setting or return to activate it . Splendid This function contains 7 sub-functions...
...: compatible with sRGB color space, sRGB mode is the best choice for document editing. To adjust other functions, repeat steps 1-3. 3.1.2 OSD function introduction 1. ASUS PA279 Series LCD Monitor 3-1 Each mode has the Reset selection, allowing you can select for your setting or return to activate it . Splendid This function contains 7 sub-functions...
PA279Q Series User Guide
Page 19
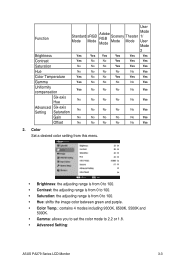
... Temp.: contains 4 modes including 9300K, 6500K, 5500K and 5000K. • Gamma: allows you to set the color mode to 2.2 or 1.8. • Advanced Setting: ASUS PA279 Series LCD Monitor 3-3 User Function Standard sRGB Mode Mode Adobe RGB Mode Scenery Mode Theater Mode Mode 1/ User Mode 2 Brightness Yes Yes Yes Yes Yes Yes Contrast...
... Temp.: contains 4 modes including 9300K, 6500K, 5500K and 5000K. • Gamma: allows you to set the color mode to 2.2 or 1.8. • Advanced Setting: ASUS PA279 Series LCD Monitor 3-3 User Function Standard sRGB Mode Mode Adobe RGB Mode Scenery Mode Theater Mode Mode 1/ User Mode 2 Brightness Yes Yes Yes Yes Yes Yes Contrast...
PA279Q Series User Guide
Page 21
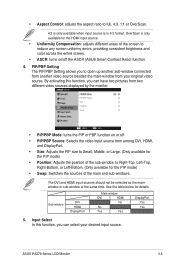
... sub-window to open up another sub-window connected from another video source besides the main-window from two different video sources displayed by the monitor. • PIP/PBP Mode: turns the PIP or PBP function on /off . • PIP/PBP Source: Selects the video input source from ...(Only available for details. The DVI and HDMI input sources should not be selected as the mainwindow or sub-window at the same time. ASUS PA279 Series LCD Monitor 3-5 By activating this function, you can select your original video source. OverScan is in 4:3 format. Input Select In this function, you ...
... sub-window to open up another sub-window connected from another video source besides the main-window from two different video sources displayed by the monitor. • PIP/PBP Mode: turns the PIP or PBP function on /off . • PIP/PBP Source: Selects the video input source from ...(Only available for details. The DVI and HDMI input sources should not be selected as the mainwindow or sub-window at the same time. ASUS PA279 Series LCD Monitor 3-5 By activating this function, you can select your original video source. OverScan is in 4:3 format. Input Select In this function, you ...
PA279Q Series User Guide
Page 22
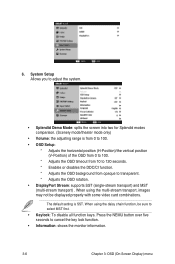
... to select MST first. • Keylock: To disable all function keys. System Setup Allows you to cancel the key lock function. • Information: shows the monitor information. 3-6 Chapter 3: OSD (On-Screen Display) menu 6. Press the NEMU button over five seconds to adjust the system. • Splendid Demo Mode: splits the screen...
... to select MST first. • Keylock: To disable all function keys. System Setup Allows you to cancel the key lock function. • Information: shows the monitor information. 3-6 Chapter 3: OSD (On-Screen Display) menu 6. Press the NEMU button over five seconds to adjust the system. • Splendid Demo Mode: splits the screen...
PA279Q Series User Guide
Page 23
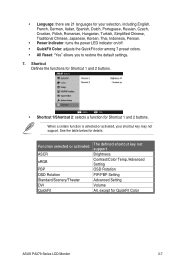
... Reset: "Yes" allows you to restore the default settings. 7. Shortcut Defines the functions for Shortcut 1 and 2 buttons. • Shortcut 1/Shortcut 2: selects a function for QuickFit Color ASUS PA279 Series LCD Monitor 3-7
... Reset: "Yes" allows you to restore the default settings. 7. Shortcut Defines the functions for Shortcut 1 and 2 buttons. • Shortcut 1/Shortcut 2: selects a function for QuickFit Color ASUS PA279 Series LCD Monitor 3-7
PA279Q Series User Guide
Page 25
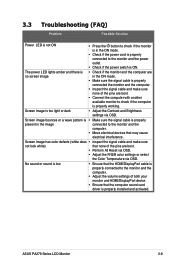
...ASUS PA279 Series LCD Monitor 3-9 Screen image is properly installed and activated. No sound or sound is low • Ensure that the HDMI/DisplayPort cable is properly connected to the monitor and the computer. • Adjust the volume settings of the pins are bent. • Connect the computer with another available monitor...in the ON mode. • Check if the power cord is properly connected to the monitor and the computer. • Move electrical devices that none of both your monitor and HDMI/DisplayPort device. • Ensure that the computer sound card driver is too light...
...ASUS PA279 Series LCD Monitor 3-9 Screen image is properly installed and activated. No sound or sound is low • Ensure that the HDMI/DisplayPort cable is properly connected to the monitor and the computer. • Adjust the volume settings of the pins are bent. • Connect the computer with another available monitor...in the ON mode. • Check if the power cord is properly connected to the monitor and the computer. • Move electrical devices that none of both your monitor and HDMI/DisplayPort device. • Ensure that the computer sound card driver is too light...

PA279Q Series User Guide
Page 26
... 85.5 106.5 162 146.25 60.00(P) 148.5 59.95(N) 154 59.885(P) 59.978(N) 59.951(N) 193.25 181.25 241.50 When the monitor is operating in the video mode (ie, not displaying data) using the HDMI connector, the following high definition modes shall be supported in addition to...
... 85.5 106.5 162 146.25 60.00(P) 148.5 59.95(N) 154 59.885(P) 59.978(N) 59.951(N) 193.25 181.25 241.50 When the monitor is operating in the video mode (ie, not displaying data) using the HDMI connector, the following high definition modes shall be supported in addition to...


