PA24A Series User Guide
Page 3
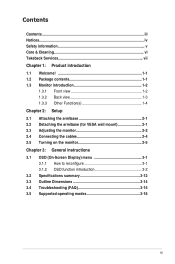
... 1-2 1.3.1 Front view 1-2 1.3.2 Back view 1-3 1.3.3 Other Function(s 1-4 Chapter 2: Setup 2.1 Attaching the arm/base 2-1 2.2 Detaching the arm/base (for VESA wall mount 2-1 2.3 Adjusting the monitor 2-2 2.4 Connecting the cables 2-4 2.5 Turning on the monitor 2-5 Chapter 3: General instructions 3.1 OSD (On-Screen Display) menu 3-1 3.1.1 How to reconfigure 3-1 3.1.2 OSD function introduction 3-2 3.2 Specifications summary 3-12 3.3 Outline Dimensions 3-14 3.4 Troubleshooting (FAQ...
... 1-2 1.3.1 Front view 1-2 1.3.2 Back view 1-3 1.3.3 Other Function(s 1-4 Chapter 2: Setup 2.1 Attaching the arm/base 2-1 2.2 Detaching the arm/base (for VESA wall mount 2-1 2.3 Adjusting the monitor 2-2 2.4 Connecting the cables 2-4 2.5 Turning on the monitor 2-5 Chapter 3: General instructions 3.1 OSD (On-Screen Display) menu 3-1 3.1.1 How to reconfigure 3-1 3.1.2 OSD function introduction 3-2 3.2 Specifications summary 3-12 3.3 Outline Dimensions 3-14 3.4 Troubleshooting (FAQ...

PA24A Series User Guide
Page 4
... with the instructions, may not cause harmful interference, and • This device must accept any interference received including interference that to Part 15 of the monitor to the graphics card is subject to the following measures: • Reorient or relocate the receiving antenna. • Increase the separation between the equipment and...
... with the instructions, may not cause harmful interference, and • This device must accept any interference received including interference that to Part 15 of the monitor to the graphics card is subject to the following measures: • Reorient or relocate the receiving antenna. • Increase the separation between the equipment and...

PA24A Series User Guide
Page 5
... if it by yourself. This will not be placed in serious physical injury. • If the power supply is provided. • The monitor should not be used for ventilation. Do not block these slots. Contact a qualified service technician or your retailer. • Before using the ...technician or your local power standard. • Do not overload power strips and extention cords. Safety information • Before setting up the monitor, carefully read all cables are correctly connected and the power cables are not damaged. If you encounter technical problems with the package. &#...
... if it by yourself. This will not be placed in serious physical injury. • If the power supply is provided. • The monitor should not be used for ventilation. Do not block these slots. Contact a qualified service technician or your retailer. • Before using the ...technician or your local power standard. • Do not overload power strips and extention cords. Safety information • Before setting up the monitor, carefully read all cables are correctly connected and the power cables are not damaged. If you encounter technical problems with the package. &#...

PA24A Series User Guide
Page 6
... cause an electric shock. IMPORTANT: Information that you can turn off and unplug the power cord. When lifting or carrying the monitor, grasp the edges of the previous screen may find slightly uneven brightness on the screen depending on the screen, as it may be removed with ...a cloth dampened with the monitor: • You may remain after switching the image. NOTE: Tips and additional information to aid in this guide WARNING: Information to prevent injury to...
... cause an electric shock. IMPORTANT: Information that you can turn off and unplug the power cord. When lifting or carrying the monitor, grasp the edges of the previous screen may find slightly uneven brightness on the screen depending on the screen, as it may be removed with ...a cloth dampened with the monitor: • You may remain after switching the image. NOTE: Tips and additional information to aid in this guide WARNING: Information to prevent injury to...

PA24A Series User Guide
Page 9
... Type-C to Type-C cable USB Type-C to you for PA24AC-K only) If any of the above items is damaged or missing, contact your viewing experience. ASUS PA24A Series LCD Monitor 1-1 The latest widescreen LCD monitor from ASUS provides a broader, brighter and crystal-clear display, plus a... host of features that the monitor brings to Type-A cable DisplayPort cable Cable clip Color Calibration...
... Type-C to Type-C cable USB Type-C to you for PA24AC-K only) If any of the above items is damaged or missing, contact your viewing experience. ASUS PA24A Series LCD Monitor 1-1 The latest widescreen LCD monitor from ASUS provides a broader, brighter and crystal-clear display, plus a... host of features that the monitor brings to Type-A cable DisplayPort cable Cable clip Color Calibration...

PA24A Series User Guide
Page 10
...table. 1-2 Chapter 1: Product introduction Close button: • Exits the OSD menu. • Toggles the Key Lock function between on /off with the monitor. 4. Menu (5-way) button: • Press this button to the Shortcut > Shortcut menu. 5. Press button (Input Select button) to display HDMI-1, ... Enacts the selected OSD menu items. • Increases/Decreases values or moves your selection up/down/left/right. 2. 1.3 Monitor introduction 1.3.1 Front view Menu Close Input Select Brightness 1 2 3 4 5 1. Input select button: • Selects an available input source.
...table. 1-2 Chapter 1: Product introduction Close button: • Exits the OSD menu. • Toggles the Key Lock function between on /off with the monitor. 4. Menu (5-way) button: • Press this button to the Shortcut > Shortcut menu. 5. Press button (Input Select button) to display HDMI-1, ... Enacts the selected OSD menu items. • Increases/Decreases values or moves your selection up/down/left/right. 2. 1.3 Monitor introduction 1.3.1 Front view Menu Close Input Select Brightness 1 2 3 4 5 1. Input select button: • Selects an available input source.
PA24A Series User Guide
Page 11
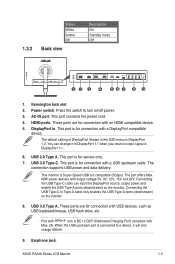
...enable the USB Type-A ports (downstream) on /off power. 3. The port offers Max. 60W power delivery with Max. 2A. ASUS PA24A Series LCD Monitor 1-3 Press the switch to DisplayPort 1.1 when your device output signal is for connection with a DisplayPort compatible device. This port is DisplayPort... setting of DisplayPort Stream in . Connecting the USB Type-C to a device, it to turn on the monitor. Port with icon is for connection with a USB upstream cable. This monitor is for connection with an HDMI compatible device. 5. USB 3.0 Type A. 1.3.2 Status White Amber Off Back...
...enable the USB Type-A ports (downstream) on /off power. 3. The port offers Max. 60W power delivery with Max. 2A. ASUS PA24A Series LCD Monitor 1-3 Press the switch to DisplayPort 1.1 when your device output signal is for connection with a DisplayPort compatible device. This port is DisplayPort... setting of DisplayPort Stream in . Connecting the USB Type-C to a device, it to turn on the monitor. Port with icon is for connection with a USB upstream cable. This monitor is for connection with an HDMI compatible device. 5. USB 3.0 Type A. 1.3.2 Status White Amber Off Back...
PA24A Series User Guide
Page 12
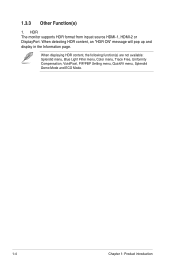
When displaying HDR content, the following function(s) are not available: Splendid menu, Blue Light Filter menu, Color menu, Trace Free, Uniformity Compensation, VividPixel, PIP/PBP Setting menu, QuickFit menu, Splendid Demo Mode and ECO Mode. 1-4 Chapter 1: Product introduction HDR The monitor supports HDR format from inpust source HDMI-1, HDMI-2 or DisplayPort. 1.3.3 Other Function(s) 1. When detecting HDR content, an "HDR ON" message will pop up and display in the Information page.
When displaying HDR content, the following function(s) are not available: Splendid menu, Blue Light Filter menu, Color menu, Trace Free, Uniformity Compensation, VividPixel, PIP/PBP Setting menu, QuickFit menu, Splendid Demo Mode and ECO Mode. 1-4 Chapter 1: Product introduction HDR The monitor supports HDR format from inpust source HDMI-1, HDMI-2 or DisplayPort. 1.3.3 Other Function(s) 1. When detecting HDR content, an "HDR ON" message will pop up and display in the Information page.

PA24A Series User Guide
Page 13
... detach the arm/base: 1. Have the front of this monitor is specially designed for VESA wall mount) The detachable arm/base of the monitor face down on a table. 2. Remove the input/output port cover (Figure 1). 3. ASUS PA24A Series LCD Monitor 2-1 Remove the input/output port cover (Figure 1). 3. 2.1 Attaching the arm/base To assemble the...
... detach the arm/base: 1. Have the front of this monitor is specially designed for VESA wall mount) The detachable arm/base of the monitor face down on a table. 2. Remove the input/output port cover (Figure 1). 3. ASUS PA24A Series LCD Monitor 2-1 Remove the input/output port cover (Figure 1). 3. 2.1 Attaching the arm/base To assemble the...

PA24A Series User Guide
Page 14
...Bracket with minimum weight/load 22.7kg (Screw size: M4 x 10 mm). 2.3 Adjusting the monitor • For optimal viewing, we recommend that you look at the full face of the monitor, then adjust the monitor to the angle that is most comfortable for you. • Hold the stand to -5˚,... and it allows 45˚ swivel adjustment from falling when you change its angle. • You can also adjust the monitor's height within +/- 110 mm. (Tilt) (Swivel) (Height adjustment) +23° ~ -5° 45° 45° 0° 110mm 2-2 Chapter 2: Setup You...
...Bracket with minimum weight/load 22.7kg (Screw size: M4 x 10 mm). 2.3 Adjusting the monitor • For optimal viewing, we recommend that you look at the full face of the monitor, then adjust the monitor to the angle that is most comfortable for you. • Hold the stand to -5˚,... and it allows 45˚ swivel adjustment from falling when you change its angle. • You can also adjust the monitor's height within +/- 110 mm. (Tilt) (Swivel) (Height adjustment) +23° ~ -5° 45° 45° 0° 110mm 2-2 Chapter 2: Setup You...

PA24A Series User Guide
Page 15
Pivoting the monitor 1. The OSD menu item will automatically rotate when the monitor rotates. Menu Close Input Select Brightness Menu Close Input Select Brightness ASUS PA24A Series LCD Monitor 2-3 Tilt the monitor to the highest position. 2. Lift the monitor to its maximum angle. 3. Pivot the monitor to the angle you need. +23° ~ -5° It is normal that the monitor slightly shakes while you adjust the viewing angle. 4.
Pivoting the monitor 1. The OSD menu item will automatically rotate when the monitor rotates. Menu Close Input Select Brightness Menu Close Input Select Brightness ASUS PA24A Series LCD Monitor 2-3 Tilt the monitor to the highest position. 2. Lift the monitor to its maximum angle. 3. Pivot the monitor to the angle you need. +23° ~ -5° It is normal that the monitor slightly shakes while you adjust the viewing angle. 4.

PA24A Series User Guide
Page 16
... cables 1. When these cables are connected, you can be used for Color Calibrator. b. Connect the other end of the power cord securely to the monitor's AC input port, the other end to a power outlet. • To connect the HDMI/DisplayPort cable: a. Make sure your computer is fed. •...DisplayPort jack. • To use the USB 3.0 ports: »» Upstream: Use the supplied USB Type-C to Type-C or USB Type-C to the monitor's earphone jack when an HDMI/DisplayPort/USB Type-C (DisplayPort Alternate Mode) signal is installed with plug type to Type-A cable. Plug one end of the...
... cables 1. When these cables are connected, you can be used for Color Calibrator. b. Connect the other end of the power cord securely to the monitor's AC input port, the other end to a power outlet. • To connect the HDMI/DisplayPort cable: a. Make sure your computer is fed. •...DisplayPort jack. • To use the USB 3.0 ports: »» Upstream: Use the supplied USB Type-C to Type-C or USB Type-C to the monitor's earphone jack when an HDMI/DisplayPort/USB Type-C (DisplayPort Alternate Mode) signal is installed with plug type to Type-A cable. Plug one end of the...

PA24A Series User Guide
Page 17
ASUS PA24A Series LCD Monitor 2-5 The power indicator lights up in white to show that the monitor is ON. 2. Attach the input/output port cover and/or cable clip if needed. 2.5 Turning on the monitor Press the power button . See page 1-2 for the location of the power button.
ASUS PA24A Series LCD Monitor 2-5 The power indicator lights up in white to show that the monitor is ON. 2. Attach the input/output port cover and/or cable clip if needed. 2.5 Turning on the monitor Press the power button . See page 1-2 for the location of the power button.
PA24A Series User Guide
Page 19
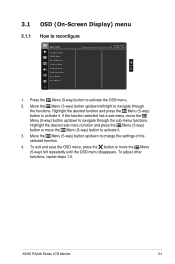
... 3. Highlight the desired function and press the Menu (5-way) button to change the settings of the selected function. 4. ASUS PA24A Series LCD Monitor 3-1 3.1 3.1.1 OSD (On-Screen Display) menu How to activate it . Highlight the desired sub-menu function and press... the Menu (5-way) button or move the Menu (5-way) button to reconfigure Splendid Standard Mode sRGB Mode Rec.709 Mode Scenery Mode Reading Mode Darkroom Mode User Mode 1 User Mode 2 ASUS PA24AC...
... 3. Highlight the desired function and press the Menu (5-way) button to change the settings of the selected function. 4. ASUS PA24A Series LCD Monitor 3-1 3.1 3.1.1 OSD (On-Screen Display) menu How to activate it . Highlight the desired sub-menu function and press... the Menu (5-way) button or move the Menu (5-way) button to reconfigure Splendid Standard Mode sRGB Mode Rec.709 Mode Scenery Mode Reading Mode Darkroom Mode User Mode 1 User Mode 2 ASUS PA24AC...
PA24A Series User Guide
Page 21
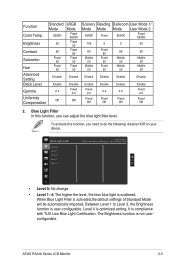
Blue Light Filter Level 0 Level 1 Level 2 Level 3 Level 4 ASUS PA24AC Standard Mode DisplayPort 1920 x 1200@ 60Hz • Level 0: No change. • Level 1~4: The higher the level, the less blue light is activated,the default ... Standard Mode will be automatically imported. When Blue Light Filter is scattered. Between Level 1 to do the following: disable HDR on your device. ASUS PA24A Series LCD Monitor 3-3 Level 4 is user-configurable. The Brightness function is compliance with TUV Low Blue Light Certification. It is not userconfigurable. Function Standard sRGB Mode...
Blue Light Filter Level 0 Level 1 Level 2 Level 3 Level 4 ASUS PA24AC Standard Mode DisplayPort 1920 x 1200@ 60Hz • Level 0: No change. • Level 1~4: The higher the level, the less blue light is activated,the default ... Standard Mode will be automatically imported. When Blue Light Filter is scattered. Between Level 1 to do the following: disable HDR on your device. ASUS PA24A Series LCD Monitor 3-3 Level 4 is user-configurable. The Brightness function is compliance with TUV Low Blue Light Certification. It is not userconfigurable. Function Standard sRGB Mode...
PA24A Series User Guide
Page 23
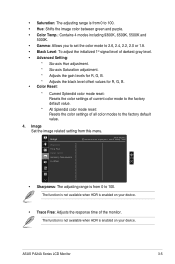
... settings of current color mode to the factory default value. * All Splendid color mode reset: Resets the color settings of the monitor. Image Sharpness Trace Free Aspect Control Uniformity Compensation VividPixel ASUS PA24AC Standard Mode DisplayPort 1920 x 1200@ 60Hz • Sharpness: The adjusting range is enabled on your device. • Trace Free: Adjusts...
... settings of current color mode to the factory default value. * All Splendid color mode reset: Resets the color settings of the monitor. Image Sharpness Trace Free Aspect Control Uniformity Compensation VividPixel ASUS PA24AC Standard Mode DisplayPort 1920 x 1200@ 60Hz • Sharpness: The adjusting range is enabled on your device. • Trace Free: Adjusts...
PA24A Series User Guide
Page 24
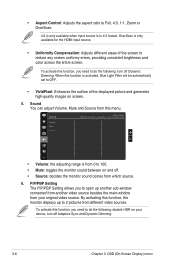
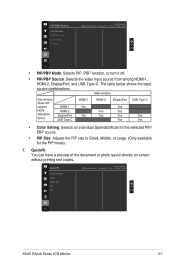
... Source ASUS PA24AC Standard Mode DisplayPort 1920 x 1200@ 60Hz • Volume: the adjusting range is in 4:3 format. Sound You can adjust Volume, Mute and Source from which source. 6. PIP/PBP Setting The PIP/PBP Setting allows you need to 100. • Mute: toggles the monitor sound ... when input source is from 0 to do the following : turn off . • Source: decides the monitor sound comes from this menu. When this function, the monitor displays up another sub-window connected from another video source besides the main-window from different video sources. By ...
... Source ASUS PA24AC Standard Mode DisplayPort 1920 x 1200@ 60Hz • Volume: the adjusting range is in 4:3 format. Sound You can adjust Volume, Mute and Source from which source. 6. PIP/PBP Setting The PIP/PBP Setting allows you need to 100. • Mute: toggles the monitor sound ... when input source is from 0 to do the following : turn off . • Source: decides the monitor sound comes from this menu. When this function, the monitor displays up another sub-window connected from another video source besides the main-window from different video sources. By ...
PA24A Series User Guide
Page 25
QuickFit Customization Ruler Alignment A4 B5 ASUS PA24AC Standard Mode DisplayPort 1920 x 1200@ 60Hz ASUS PA24A Series LCD Monitor 3-7 QuickFit You can have a preview of the document or photo layout directly on screen without printing test copies. Main-window Sub-window (does not support ... size to Small, Middle, or Large. (Only available for the PIP mode). 7. PIP/PBP Setting PIP/PBP Mode PIP/PBP Source Color Setting PIP Size ASUS PA24AC Standard Mode DisplayPort 1920 x 1200@ 60Hz • PIP/PBP Mode: Selects PIP, PBP function, or turn it off. • PIP/PBP Source: Selects the ...
QuickFit Customization Ruler Alignment A4 B5 ASUS PA24AC Standard Mode DisplayPort 1920 x 1200@ 60Hz ASUS PA24A Series LCD Monitor 3-7 QuickFit You can have a preview of the document or photo layout directly on screen without printing test copies. Main-window Sub-window (does not support ... size to Small, Middle, or Large. (Only available for the PIP mode). 7. PIP/PBP Setting PIP/PBP Mode PIP/PBP Source Color Setting PIP Size ASUS PA24AC Standard Mode DisplayPort 1920 x 1200@ 60Hz • PIP/PBP Mode: Selects PIP, PBP function, or turn it off. • PIP/PBP Source: Selects the ...
PA24A Series User Guide
Page 27
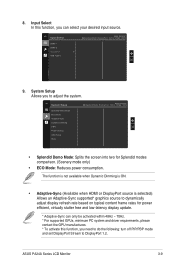
System Setup Splendid Demo Mode ECO Mode Adaptive-Sync Dynamic Dimming HDR Power Saving OSD Setup More ASUS PA24AC Standard Mode DisplayPort 1920 x 1200@ 60Hz • Splendid Demo Mode: Splits the screen into two for power efficient, virtually stutter... power consumption. Input Select In this function, you to DisplayPort 1.2. Input Select HDMI-1 HDMI-2 DisplayPort USB Type-C ASUS PA24AC Standard Mode DisplayPort 1920 x 1200@ 60Hz 9. 8. ASUS PA24A Series LCD Monitor 3-9 System Setup Allows you need to do the following: turn off PIP/PBP mode and set DisplayPort Stream to ...
System Setup Splendid Demo Mode ECO Mode Adaptive-Sync Dynamic Dimming HDR Power Saving OSD Setup More ASUS PA24AC Standard Mode DisplayPort 1920 x 1200@ 60Hz • Splendid Demo Mode: Splits the screen into two for power efficient, virtually stutter... power consumption. Input Select In this function, you to DisplayPort 1.2. Input Select HDMI-1 HDMI-2 DisplayPort USB Type-C ASUS PA24AC Standard Mode DisplayPort 1920 x 1200@ 60Hz 9. 8. ASUS PA24A Series LCD Monitor 3-9 System Setup Allows you need to do the following: turn off PIP/PBP mode and set DisplayPort Stream to ...
PA24A Series User Guide
Page 28
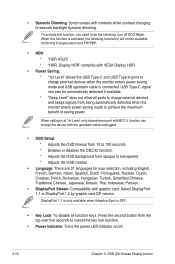
... HDR. • Power Saving: * "1st Level" allows the USB Type-C and USB Type-A ports to charge external devices when the monitor enters power saving mode and USB upstream cable is connected. DisplayPort 1.1 is only available when Adaptive-Sync is at 1st Level, only downstream port... with BC1.2 function can also be available: Uniformity Compensation and PIP/PBP. • HDR: * "HDR ASUS" . * "HDR_Display HDR" complies with contents while contrast changing to transparent. * Adjusts the OSD rotation. • Language: There are 21 languages for ...
... HDR. • Power Saving: * "1st Level" allows the USB Type-C and USB Type-A ports to charge external devices when the monitor enters power saving mode and USB upstream cable is connected. DisplayPort 1.1 is only available when Adaptive-Sync is at 1st Level, only downstream port... with BC1.2 function can also be available: Uniformity Compensation and PIP/PBP. • HDR: * "HDR ASUS" . * "HDR_Display HDR" complies with contents while contrast changing to transparent. * Adjusts the OSD rotation. • Language: There are 21 languages for ...


