
User Manual
Page 7
... slightly uneven brightness on the screen depending on the screen, as it may remain after switching the image. The following symptoms are normal with the LCD. C A U T I N G : Information to prevent injury to yourself when trying to complete a task. N O T E : Tips and additional information to aid in this guide W A R N I O N : Information to prevent damage to...
... slightly uneven brightness on the screen depending on the screen, as it may remain after switching the image. The following symptoms are normal with the LCD. C A U T I N G : Information to prevent injury to yourself when trying to complete a task. N O T E : Tips and additional information to aid in this guide W A R N I O N : Information to prevent damage to...
User Manual
Page 9
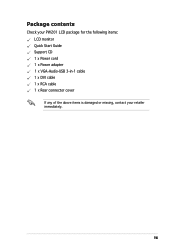
ix Package contents Check your PW201 LCD package for the following items: LCD monitor Quick Start Guide Support CD 1 x Power cord 1 x Power adapter 1 x VGA-Audio-USB 3-in-1 cable 1 x DVI cable 1 x RCA cable 1 x Rear connector cover If any of the above items is damaged or missing, contact your retailer immediately.
ix Package contents Check your PW201 LCD package for the following items: LCD monitor Quick Start Guide Support CD 1 x Power cord 1 x Power adapter 1 x VGA-Audio-USB 3-in-1 cable 1 x DVI cable 1 x RCA cable 1 x Rear connector cover If any of the above items is damaged or missing, contact your retailer immediately.

User Manual
Page 11
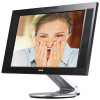
The chapter lists the monitor features including introduction on the front and rear panels as well as the side view. Product introduction Chapter 1 This chapter gives a general description of the ASUS LCD monitor PW201.
The chapter lists the monitor features including introduction on the front and rear panels as well as the side view. Product introduction Chapter 1 This chapter gives a general description of the ASUS LCD monitor PW201.
User Manual
Page 12
... buttons on top of features that provides clearer and more vivid visual experience. With these features, you can turn the ASUS® PW201 LCD monitor counterclockwise for portrait orientation, giving you a full view of documents and web pages, and saving you read or ...the monitor. Adding to be a multi-function monitor ready for purchasing the ASUS® PW201 LCD monitor! 1.1 Welcome! The latest widescreen LCD monitor from ASUS provides a crisper, broader, and brighter display, plus a host of the LCD panel has both video recording and snapshot functions, allowing you for all ...
... buttons on top of features that provides clearer and more vivid visual experience. With these features, you can turn the ASUS® PW201 LCD monitor counterclockwise for portrait orientation, giving you a full view of documents and web pages, and saving you read or ...the monitor. Adding to be a multi-function monitor ready for purchasing the ASUS® PW201 LCD monitor! 1.1 Welcome! The latest widescreen LCD monitor from ASUS provides a crisper, broader, and brighter display, plus a host of the LCD panel has both video recording and snapshot functions, allowing you for all ...

User Manual
Page 13
... are sensitive. Sensor: • Touch this sensor to select the input source you want to enable. Touch this sensor to the panel and the sensors. 1. ASUS LCD Monitor PW201 1-3
... are sensitive. Sensor: • Touch this sensor to select the input source you want to enable. Touch this sensor to the panel and the sensors. 1. ASUS LCD Monitor PW201 1-3

User Manual
Page 15
... plugs. 5. V i d e o p o r t . This port connects to any kind of video source. 7. These ports connect the left and right audio input cable plugs to activate the webcam. U S B p o r t . ASUS LCD Monitor PW201 1-5 i n p o r t . L / R A u d i o p o r t s . Rear view Kensington lock 1 2 3 4 5 6 789 1. i n p o r t .
... plugs. 5. V i d e o p o r t . This port connects to any kind of video source. 7. These ports connect the left and right audio input cable plugs to activate the webcam. U S B p o r t . ASUS LCD Monitor PW201 1-5 i n p o r t . L / R A u d i o p o r t s . Rear view Kensington lock 1 2 3 4 5 6 789 1. i n p o r t .

User Manual
Page 17
Chapter 2 This chapter provides instructions on how to correctly connect cables, properly adjust the LCD monitor, and install the VESA wall mount. Setup
Chapter 2 This chapter provides instructions on how to correctly connect cables, properly adjust the LCD monitor, and install the VESA wall mount. Setup
User Manual
Page 19
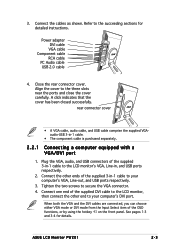
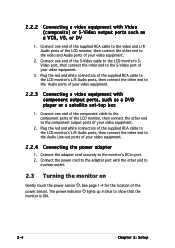
... shown. Close the rear connector cover. Connect one end of the supplied DVI cable to the succeeding sections for details. 3. Refer to the LCD monitor, then connect the other ends of the supplied 3-in , and USB ports respectively. 2. Align the cover to secure the VGA connector....adapter DVI cable VGA cable Component cable RCA cable PC Audio cable USB 2.0 cable 4. Connect the other end to your computer's DVI port. ASUS LCD Monitor PW201 2-3 A click indicates that the cover has been closed successfully. Plug the VGA, audio, and USB connectors of the OSD functions, or by...
... shown. Close the rear connector cover. Connect one end of the supplied DVI cable to the succeeding sections for details. 3. Refer to the LCD monitor, then connect the other ends of the supplied 3-in , and USB ports respectively. 2. Align the cover to secure the VGA connector....adapter DVI cable VGA cable Component cable RCA cable PC Audio cable USB 2.0 cable 4. Connect the other end to your computer's DVI port. ASUS LCD Monitor PW201 2-3 A click indicates that the cover has been closed successfully. Plug the VGA, audio, and USB connectors of the OSD functions, or by...
User Manual
Page 20
... the other end to the component output ports of your video equipment. 2. Plug the red and white connectors of the supplied RCA cable to the LCD monitor's L/R Audio ports, then connect the other end to the Audio Line-out ports of your video equipment. 2.2.4 Connecting the power adapter 1. The... power indicator lights up in port. 2. Connect one end of the S-Video cable to the LCD monitor's SVideo port, then connect the other end to the S-Video port of your video equipment. 3. Connect one end of the supplied RCA cable to...
... the other end to the component output ports of your video equipment. 2. Plug the red and white connectors of the supplied RCA cable to the LCD monitor's L/R Audio ports, then connect the other end to the Audio Line-out ports of your video equipment. 2.2.4 Connecting the power adapter 1. The... power indicator lights up in port. 2. Connect one end of the S-Video cable to the LCD monitor's SVideo port, then connect the other end to the S-Video port of your video equipment. 3. Connect one end of the supplied RCA cable to...

User Manual
Page 21
2.4 Adjusting the monitor You can adjust the monitor to several directions as shown below. • For optimal viewing, we recommend that you look at the monitor, then adjust the monitor to the angle that is most comfortable for you. • Hold the stand to prevent the monitor from falling when you change its angle. • You can adjust the monitor's angle from -5º to 25º. -5º~25º • You can also turn the monitor 90º counterclockwise. 90º ASUS LCD Monitor PW201 2-5
2.4 Adjusting the monitor You can adjust the monitor to several directions as shown below. • For optimal viewing, we recommend that you look at the monitor, then adjust the monitor to the angle that is most comfortable for you. • Hold the stand to prevent the monitor from falling when you change its angle. • You can adjust the monitor's angle from -5º to 25º. -5º~25º • You can also turn the monitor 90º counterclockwise. 90º ASUS LCD Monitor PW201 2-5

User Manual
Page 23
The VESA wall mount (100 mm x 100 mm) is purchased separately. 3. ASUS LCD Monitor PW201 2-7 Use a screwdriver to remove the four screws on the monitor stand.
The VESA wall mount (100 mm x 100 mm) is purchased separately. 3. ASUS LCD Monitor PW201 2-7 Use a screwdriver to remove the four screws on the monitor stand.

User Manual
Page 27
... phase of pixels scanned by adjusting (Phase) and (Clock) separately. Contains five color modes including Cool, Normal, Warm, sRGB, and User mode. • Skin Tone. ASUS LCD Monitor PW201 3-3
... phase of pixels scanned by adjusting (Phase) and (Clock) separately. Contains five color modes including Cool, Normal, Warm, sRGB, and User mode. • Skin Tone. ASUS LCD Monitor PW201 3-3

User Manual
Page 28
... S-Video Main VGA o o o DVI o o o Video o o x S-Video o o x Component x o o o Component x o o o o: Supported x: Not supported 3-4 Chapter 3: General Instruction 4. PIP Setup • This Picture-in-Picture (PIP) function allows the LCD monitor to display two pictures at the same time.
... S-Video Main VGA o o o DVI o o o Video o o x S-Video o o x Component x o o o Component x o o o o: Supported x: Not supported 3-4 Chapter 3: General Instruction 4. PIP Setup • This Picture-in-Picture (PIP) function allows the LCD monitor to display two pictures at the same time.
User Manual
Page 29
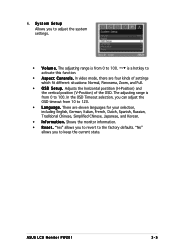
..., there are eleven languages for your selection, including English, German, Italian, French, Dutch, Spanish, Russian, Traditional Chinese, Simplified Chinese, Japanese, and Korean. • Information. ASUS LCD Monitor PW201 3-5 The adjusting range is from 0 to 100. Adjusts the horizontal postition (H-Position) and the vertical position (V-Position) of settings which fit different situations: Normal, Panorama...
..., there are eleven languages for your selection, including English, German, Italian, French, Dutch, Spanish, Russian, Traditional Chinese, Simplified Chinese, Japanese, and Korean. • Information. ASUS LCD Monitor PW201 3-5 The adjusting range is from 0 to 100. Adjusts the horizontal postition (H-Position) and the vertical position (V-Position) of settings which fit different situations: Normal, Panorama...

User Manual
Page 31
... and run the A S U S U S B 2 . 0 W e b c a m program. Insert the support CD into your PC through the USB ports. while talking to friends via all other applications first. 2. ASUS LCD Monitor PW201 3-7 Therefore, make videos; Close all kinds of the supplied 3-in-1 cable before you to take photos and make sure that you have connected the USB...
... and run the A S U S U S B 2 . 0 W e b c a m program. Insert the support CD into your PC through the USB ports. while talking to friends via all other applications first. 2. ASUS LCD Monitor PW201 3-7 Therefore, make videos; Close all kinds of the supplied 3-in-1 cable before you to take photos and make sure that you have connected the USB...
User Manual
Page 32
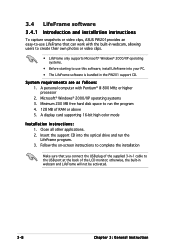
...Installation instructions: 1. Close all other applications. 2. otherwise, the built-in the PW201 support CD. Minimum 200 MB free hard disk space to run the LifeFrame ...processor 2. 3.4 LifeFrame software 3.4.1 Introduction and installation instructions To capture snapshots or video clips, ASUS PW201provides an easy-to-use LifeFrame that you connect the USB plug of the supplied 3-...use this software, install LifeFrame into the optical drive and run the program 4. 128 MB of the LCD monitor; Microsoft® Windows® 2000/XP operating systems 3. System requirements are as follows: 1....
...Installation instructions: 1. Close all other applications. 2. otherwise, the built-in the PW201 support CD. Minimum 200 MB free hard disk space to run the LifeFrame ...processor 2. 3.4 LifeFrame software 3.4.1 Introduction and installation instructions To capture snapshots or video clips, ASUS PW201provides an easy-to-use LifeFrame that you connect the USB plug of the supplied 3-...use this software, install LifeFrame into the optical drive and run the program 4. 128 MB of the LCD monitor; Microsoft® Windows® 2000/XP operating systems 3. System requirements are as follows: 1....
User Manual
Page 33
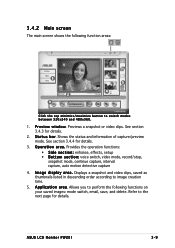
.../maximize button to the next page for details. A p p l i c a t i o n a r e a. O p e r a t i o n a r e a . I m a g e d i s p l a y a r e a . Previews a snapshot or video clips. Refer to switch modes between 320x240 and 480x360. 1. See section 3.4.3 for details. 3. ASUS LCD Monitor PW201 3-9 S t a t u s b a r. 3.4.2 Main screen The main screen shows the following functions on your saved images: mode switch, email, save, and delete.
.../maximize button to the next page for details. A p p l i c a t i o n a r e a. O p e r a t i o n a r e a . I m a g e d i s p l a y a r e a . Previews a snapshot or video clips. Refer to switch modes between 320x240 and 480x360. 1. See section 3.4.3 for details. 3. ASUS LCD Monitor PW201 3-9 S t a t u s b a r. 3.4.2 Main screen The main screen shows the following functions on your saved images: mode switch, email, save, and delete.
User Manual
Page 35
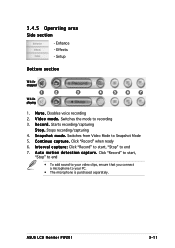
... "Record" to start , "Stop" to your PC. • The microphone is purchased separately. Effects - Disables voice recording 2. R e c o r d . Stops recording/capturing 4. C o n t i n u e c a p t u r e . V i d e o m o d e . Click "Record" when ready 6. ASUS LCD Monitor PW201 3-11 Enhance - I n t e r v a l c a p t u r e : Click "Record" to start , "Stop" to end • To add sound to your video clips, ensure that you connect a microphone to end 7. A u t o m o t i o n d e t e c t i o n c a p t u r e . Switches...
... "Record" to start , "Stop" to your PC. • The microphone is purchased separately. Effects - Disables voice recording 2. R e c o r d . Stops recording/capturing 4. C o n t i n u e c a p t u r e . V i d e o m o d e . Click "Record" when ready 6. ASUS LCD Monitor PW201 3-11 Enhance - I n t e r v a l c a p t u r e : Click "Record" to start , "Stop" to end • To add sound to your video clips, ensure that you connect a microphone to end 7. A u t o m o t i o n d e t e c t i o n c a p t u r e . Switches...

User Manual
Page 37
Negative. Snow. Spotlight. Click OK to cancel the chosen effects. Sepia. Fisheye. ASUS LCD Monitor PW201 3-13 Click "No Effect" to save settings. BlackWhite. 3.4.7 Effects Enrich your images with special effects. Emboss. N o E f f e c t . PhotoFrame.
Negative. Snow. Spotlight. Click OK to cancel the chosen effects. Sepia. Fisheye. ASUS LCD Monitor PW201 3-13 Click "No Effect" to save settings. BlackWhite. 3.4.7 Effects Enrich your images with special effects. Emboss. N o E f f e c t . PhotoFrame.
User Manual
Page 39
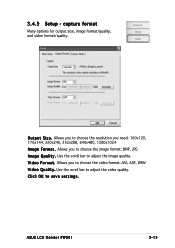
Allows you to choose the resolution you need: 160x120, 176x144, 320x240, 352x288, 640x480, 1280x1024 I m a g e Q u a l i t y . V i d e o F o r m a t . ASUS LCD Monitor PW201 3-15 Allows you to save settings. Allows you to choose the image format: BMP, JPG I m a g e F o r m a t . O u t p u t S i z e . Click OK to choose the video format: AVI, ASF, WMV V i d e o Q u a l i t y . ...
Allows you to choose the resolution you need: 160x120, 176x144, 320x240, 352x288, 640x480, 1280x1024 I m a g e Q u a l i t y . V i d e o F o r m a t . ASUS LCD Monitor PW201 3-15 Allows you to save settings. Allows you to choose the image format: BMP, JPG I m a g e F o r m a t . O u t p u t S i z e . Click OK to choose the video format: AVI, ASF, WMV V i d e o Q u a l i t y . ...


