
User Manual
Page 3
... introduction 1-3 Chapter 2: Setup 2.1 Unfolding the monitor 2-2 2.2 Connecting the cables 2-2 2.3 Turning on the monitor 2-4 2.4 Adjusting the tilt 2-5 2.5 Detaching the stand (for VESA wall mount 2-6 Chapter 3: General Instruction 3.1 OSD (On-Screen Display) menu 3-2 3.1.1 Configuring the OSD 3-2 3.1.2 OSD function introduction 3-2 3.2 Pivot® Pro software 3-6 3.3 Using the built-in webcam 3-7 3.3.1 Hardware 3-7 3.3.2 Software 3-7 3.4 LifeFrame software 3-8 3.4.1 Introduction and installation instruction 3-8 3.4.2 Main screen 3-9 3.4.3 Preview mode 3-10 3.4.4 Status bar...
... introduction 1-3 Chapter 2: Setup 2.1 Unfolding the monitor 2-2 2.2 Connecting the cables 2-2 2.3 Turning on the monitor 2-4 2.4 Adjusting the tilt 2-5 2.5 Detaching the stand (for VESA wall mount 2-6 Chapter 3: General Instruction 3.1 OSD (On-Screen Display) menu 3-2 3.1.1 Configuring the OSD 3-2 3.1.2 OSD function introduction 3-2 3.2 Pivot® Pro software 3-6 3.3 Using the built-in webcam 3-7 3.3.1 Hardware 3-7 3.3.2 Software 3-7 3.4 LifeFrame software 3-8 3.4.1 Introduction and installation instruction 3-8 3.4.2 Main screen 3-9 3.4.3 Preview mode 3-10 3.4.4 Status bar...

User Manual
Page 5
.... • Connect the equipment to an outlet on , the user is encouraged to try to Part 15 of Communications. Canadian Department of Communications Statement This digital apparatus does not exceed the Class B limits for a Class B digital device, pursuant to correct the interference by turning the equipment off and on a circuit different from digital apparatus set out in a residential installation.
.... • Connect the equipment to an outlet on , the user is encouraged to try to Part 15 of Communications. Canadian Department of Communications Statement This digital apparatus does not exceed the Class B limits for a Class B digital device, pursuant to correct the interference by turning the equipment off and on a circuit different from digital apparatus set out in a residential installation.
User Manual
Page 6
... your local power standard. • Do not overload power strips and extention cords. Safety information • Before setting up the monitor, carefully read all cables are correctly connected and the power cables are not damaged. Contact a qualified service technician or your retailer. If you encounter technical problems with the monitor, contact a qualified service technician or your retailer. • Before using the product, make sure all...
... your local power standard. • Do not overload power strips and extention cords. Safety information • Before setting up the monitor, carefully read all cables are correctly connected and the power cables are not damaged. Contact a qualified service technician or your retailer. If you encounter technical problems with the monitor, contact a qualified service technician or your retailer. • Before using the product, make sure all...

User Manual
Page 7
... carrying the monitor, grasp the edges of the fluorescent light. Turn your monitor off the Power Switch for hours. • When the screen becomes black or flashes, or cannot work anymore, contact your monitor, it may be removed with a cloth dampened with the monitor: • The screen may flicker during the initial use . • When the same image is better to disconnect the cables and power cord. Clean the monitor surface with...
... carrying the monitor, grasp the edges of the fluorescent light. Turn your monitor off the Power Switch for hours. • When the screen becomes black or flashes, or cannot work anymore, contact your monitor, it may be removed with a cloth dampened with the monitor: • The screen may flicker during the initial use . • When the same image is better to disconnect the cables and power cord. Clean the monitor surface with...
User Manual
Page 12
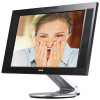
... USB ports on top of having to capture images, create videos, or hold a video conference! You can enjoy the convenience and delightful visual experience that the PW201 brings you touch them. With these features, you can turn the ASUS® PW201 LCD monitor counterclockwise for portrait orientation, giving you a full view of documents and web pages, and saving you the trouble of the LCD panel has both video...
... USB ports on top of having to capture images, create videos, or hold a video conference! You can enjoy the convenience and delightful visual experience that the PW201 brings you touch them. With these features, you can turn the ASUS® PW201 LCD monitor counterclockwise for portrait orientation, giving you a full view of documents and web pages, and saving you the trouble of the LCD panel has both video...

User Manual
Page 14
... to switch from five video preset modes (Game Mode, Night View Mode, Scenery Mode, Standard Mode, Theater Mode) with SPLENDID™ Video Intelligence Technology. • Touch this sensor exit the OSD menu or go back to the previous menu as the OSD menu is active. • Touch this sensor to its optimized position, clock, and phase. 6. Power sensor/indicator • Touch this sensor for 2 to 4 seconds to automatically adjust the image to turn the monitor...
... to switch from five video preset modes (Game Mode, Night View Mode, Scenery Mode, Standard Mode, Theater Mode) with SPLENDID™ Video Intelligence Technology. • Touch this sensor exit the OSD menu or go back to the previous menu as the OSD menu is active. • Touch this sensor to its optimized position, clock, and phase. 6. Power sensor/indicator • Touch this sensor for 2 to 4 seconds to automatically adjust the image to turn the monitor...

User Manual
Page 15
... audio input cable plugs to activate the webcam. ASUS LCD Monitor PW201 1-5 D C - This port connects the power connector from the supplied power adapter. 2. The component cable (YPbPr) and the S-Video cable are purchased separately. V G A p o r t . This 24-pin port is for a personal computer (PC) DVI-D digital signal connection. 3. P C L i n e - This port connects a PC audio source using the supplied 3-in -1 cable to any kind of the 3-in -1 cable. 9. This port connects to an S-video cable. 6. U S B p o r t . S - V i d e o p o r t . Rear view Kensington lock...
... audio input cable plugs to activate the webcam. ASUS LCD Monitor PW201 1-5 D C - This port connects the power connector from the supplied power adapter. 2. The component cable (YPbPr) and the S-Video cable are purchased separately. V G A p o r t . This 24-pin port is for a personal computer (PC) DVI-D digital signal connection. 3. P C L i n e - This port connects a PC audio source using the supplied 3-in -1 cable to any kind of the 3-in -1 cable. 9. This port connects to an S-video cable. 6. U S B p o r t . S - V i d e o p o r t . Rear view Kensington lock...

User Manual
Page 17
Chapter 2 This chapter provides instructions on how to correctly connect cables, properly adjust the LCD monitor, and install the VESA wall mount. Setup
Chapter 2 This chapter provides instructions on how to correctly connect cables, properly adjust the LCD monitor, and install the VESA wall mount. Setup
User Manual
Page 19
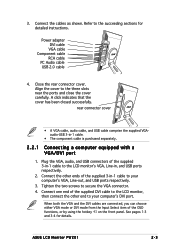
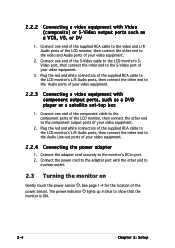
Power adapter DVI cable VGA cable Component cable RCA cable PC Audio cable USB 2.0 cable 4. rear connector cover • A VGA cable, audio cable, and USB cable comprise the supplied VGAaudio-USB 3-in -1 cable to your computer's VGA, Line-out, and USB ports respectively. 3. When both the VGA and the DVI cables are connected, you can choose either VGA mode or DVI mode from the Input Select item of the supplied 3-in , and USB ports respectively. 2. ASUS LCD Monitor PW201 2-3 Refer to the LCD monitor's VGA, Line-in -1 cable to the succeeding sections for details. Close the rear...
Power adapter DVI cable VGA cable Component cable RCA cable PC Audio cable USB 2.0 cable 4. rear connector cover • A VGA cable, audio cable, and USB cable comprise the supplied VGAaudio-USB 3-in -1 cable to your computer's VGA, Line-out, and USB ports respectively. 3. When both the VGA and the DVI cables are connected, you can choose either VGA mode or DVI mode from the Input Select item of the supplied 3-in , and USB ports respectively. 2. ASUS LCD Monitor PW201 2-3 Refer to the LCD monitor's VGA, Line-in -1 cable to the succeeding sections for details. Close the rear...
User Manual
Page 20
... L/R Audio ports of the LCD monitor, then connect the other end to show that the monitor is ON. 2-4 Chapter 2: Setup Connect the adapter cord securely to the monitor's DC-in blue to the S-Video port of your video equipment. 2. Connect one end of the S-Video cable to the LCD monitor's SVideo port, then connect the other end to a power outlet. 2.3 Turning the monitor on Gently touch the power sensor . Plug the red and white connectors of the supplied RCA cable to the LCD monitor's L/R Audio ports, then connect...
... L/R Audio ports of the LCD monitor, then connect the other end to show that the monitor is ON. 2-4 Chapter 2: Setup Connect the adapter cord securely to the monitor's DC-in blue to the S-Video port of your video equipment. 2. Connect one end of the S-Video cable to the LCD monitor's SVideo port, then connect the other end to a power outlet. 2.3 Turning the monitor on Gently touch the power sensor . Plug the red and white connectors of the supplied RCA cable to the LCD monitor's L/R Audio ports, then connect...

User Manual
Page 27
... correct, the screen shows vertical stripes and the image is from 0 to 100. • Phase adjusts the phase of the image. the adjusting range is not proportional. 3. With a wrong phase adjustment, the screen shows horizontal disturbances. • Clock (pixel frequency) controls the number of R (Red), G (Green), and B (Bluee) are userconfigurable; I m a g e You can adjust brightness, contrast, sharpness, saturation, position (VGA only), and focus (VGA only) from this function. • Brightness. The adjusting range is from 0 to...
... correct, the screen shows vertical stripes and the image is from 0 to 100. • Phase adjusts the phase of the image. the adjusting range is not proportional. 3. With a wrong phase adjustment, the screen shows horizontal disturbances. • Clock (pixel frequency) controls the number of R (Red), G (Green), and B (Bluee) are userconfigurable; I m a g e You can adjust brightness, contrast, sharpness, saturation, position (VGA only), and focus (VGA only) from this function. • Brightness. The adjusting range is from 0 to...

User Manual
Page 28
... touching the sensor on the front bezel. 5. PIP Setup • This Picture-in-Picture (PIP) function allows the LCD monitor to display two pictures at the same time. The table below shows the combination of Main PC modes and PIP inputs. • Select the PIP input and adjust the size as needed. 4. Main and PIP input combination matrix PIP VGA DVI Video S-Video Main VGA o o o DVI o o o Video o o x S-Video o o x Component x o o o Component x o o o o: Supported x: Not supported 3-4 Chapter 3: General Instruction...
... touching the sensor on the front bezel. 5. PIP Setup • This Picture-in-Picture (PIP) function allows the LCD monitor to display two pictures at the same time. The table below shows the combination of Main PC modes and PIP inputs. • Select the PIP input and adjust the size as needed. 4. Main and PIP input combination matrix PIP VGA DVI Video S-Video Main VGA o o o DVI o o o Video o o x S-Video o o x Component x o o o Component x o o o o: Supported x: Not supported 3-4 Chapter 3: General Instruction...
User Manual
Page 29
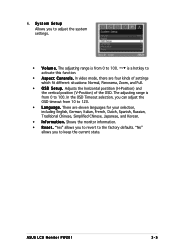
.... ASUS LCD Monitor PW201 3-5 The adjusting range is from 10 to 120. • Language. Adjusts the horizontal postition (H-Position) and the vertical position (V-Position) of settings which fit different situations: Normal, Panorama, Zoom, and Full. • OSD Setup. S y s t e m S e t u p Allows you can adjust the OSD timeout from 0 to the factory defaults. activate this function. In the OSD Timeout selection, you to keep the current state. There are four kinds of the OSD. In video mode, there...
.... ASUS LCD Monitor PW201 3-5 The adjusting range is from 10 to 120. • Language. Adjusts the horizontal postition (H-Position) and the vertical position (V-Position) of settings which fit different situations: Normal, Panorama, Zoom, and Full. • OSD Setup. S y s t e m S e t u p Allows you can adjust the OSD timeout from 0 to the factory defaults. activate this function. In the OSD Timeout selection, you to keep the current state. There are four kinds of the OSD. In video mode, there...

User Manual
Page 30
... meet the orientation of the monitor. • Before starting to www.portrait.com. • This software only supports Windows® 98SE, ME, NT 4.0, 2000, and XP operating systems. 3-6 Chapter 3: General Instruction The default hotkeys for each degree are installed before you can set up hotkeys for rotatable monitors. 3.2 Pivot®Pro software Pivot®Pro is a software that is bundled in the...
... meet the orientation of the monitor. • Before starting to www.portrait.com. • This software only supports Windows® 98SE, ME, NT 4.0, 2000, and XP operating systems. 3-6 Chapter 3: General Instruction The default hotkeys for each degree are installed before you can set up hotkeys for rotatable monitors. 3.2 Pivot®Pro software Pivot®Pro is a software that is bundled in the...

User Manual
Page 31
.... Therefore, make videos; The default webcam resolution is adjustable upward and downward as shown. -30º ~ 30º Do not turn the webcam upward or downward over 30º; ASUS LCD Monitor PW201 3-7 If you want to change the default resolution to meet different kinds of application programs, go to C : \ W I N D O W S \ A S U S U S B 2 . 0 W e b c a m and activate the program named LifeCam to modify the settings based on your needs. • The...
.... Therefore, make videos; The default webcam resolution is adjustable upward and downward as shown. -30º ~ 30º Do not turn the webcam upward or downward over 30º; ASUS LCD Monitor PW201 3-7 If you want to change the default resolution to meet different kinds of application programs, go to C : \ W I N D O W S \ A S U S U S B 2 . 0 W e b c a m and activate the program named LifeCam to modify the settings based on your needs. • The...
User Manual
Page 32
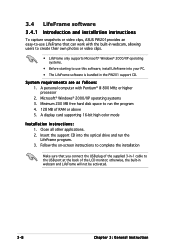
... operating systems 3. A display card supporting 16-bit high color mode Installation instructions: 1. Follow the on-screen instructions to complete the installation Make sure that can work with Pentium® III 800 MHz or higher processor 2. otherwise, the built-in -1 cable to the USB port at the back of the LCD monitor; 3.4 LifeFrame software 3.4.1 Introduction and installation instructions To capture snapshots or video clips, ASUS PW201provides an easy-to-use this software, install LifeFrame into the...
... operating systems 3. A display card supporting 16-bit high color mode Installation instructions: 1. Follow the on-screen instructions to complete the installation Make sure that can work with Pentium® III 800 MHz or higher processor 2. otherwise, the built-in -1 cable to the USB port at the back of the LCD monitor; 3.4 LifeFrame software 3.4.1 Introduction and installation instructions To capture snapshots or video clips, ASUS PW201provides an easy-to-use this software, install LifeFrame into the...

User Manual
Page 40
... you to save settings. 3-16 Chapter 3: General Instruction the default value is 30 seconds. 3.4.10 Setup - R e c o r d i n g T i m e L i m i t e d . A u t o C a p t u r e . Click OK to adjust the capture interval; Use the scroll bar to adjust the sensitivity of motion detect. capture mode You can adjust the capture mode with the following three items: recording time limited, auto capture sensitivity, and capture interval setting. One single file size should not be...
... you to save settings. 3-16 Chapter 3: General Instruction the default value is 30 seconds. 3.4.10 Setup - R e c o r d i n g T i m e L i m i t e d . A u t o C a p t u r e . Click OK to adjust the capture interval; Use the scroll bar to adjust the sensitivity of motion detect. capture mode You can adjust the capture mode with the following three items: recording time limited, auto capture sensitivity, and capture interval setting. One single file size should not be...
User Manual
Page 41
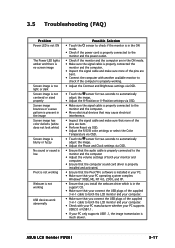
... and Clock settings via OSD. • Ensure that the audio cable is properly connected to the monitor and the computer • Adjust the volume settings of both your monitor and computer. • Ensure that the computer sound card driver is properly installed and activated. • Ensure that the Pivot®Pro software is installed in your PC. • Make sure that your PC operating system complies Windows®...
... and Clock settings via OSD. • Ensure that the audio cable is properly connected to the monitor and the computer • Adjust the volume settings of both your monitor and computer. • Ensure that the computer sound card driver is properly installed and activated. • Ensure that the Pivot®Pro software is installed in your PC. • Make sure that your PC operating system complies Windows®...
User Manual
Page 42
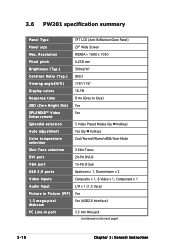
3.6 PW201 specification summary Panel Type TFT LCD (Anti-Reflection Glare Panel) Panel size 20" Wide Screen Max. Resolution WSXGA + 1680 x 1050 Piixel pitch 0.258 mm Brightness (Typ.) 300cd/m2 C o n t r a s t R a t i o ( T y p . ) 800:1 Viewing angle(H/V) 176º/176º Display colors 16.7M Response time 8 ms (Grey to Grey) Z B D ( Z e r o B r i g h t D o t ) Yes SPLENDID™ Video Yes Enhancement Splendid selection 5 Video Preset Modes (by hotkey) Auto adjustment Yes (by hotkey) Color temperature selection Cool/Normal/Warm/sRGB/User Mode Skin...
3.6 PW201 specification summary Panel Type TFT LCD (Anti-Reflection Glare Panel) Panel size 20" Wide Screen Max. Resolution WSXGA + 1680 x 1050 Piixel pitch 0.258 mm Brightness (Typ.) 300cd/m2 C o n t r a s t R a t i o ( T y p . ) 800:1 Viewing angle(H/V) 176º/176º Display colors 16.7M Response time 8 ms (Grey to Grey) Z B D ( Z e r o B r i g h t D o t ) Yes SPLENDID™ Video Yes Enhancement Splendid selection 5 Video Preset Modes (by hotkey) Auto adjustment Yes (by hotkey) Color temperature selection Cool/Normal/Warm/sRGB/User Mode Skin...
User Manual
Page 43
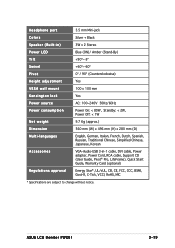
...-languages Accessories Regulations approval 9.7 Kg (approx.) 560 mm (W) x 496 mm (H) x 280 mm (D) English, German, Italian, French, Dutch, Spanish, Russian, Traditional Chinese, Simplified Chinese, Japanese, Korean VGA-Audio-USB 3-in-1 cable, DVI cable, Power adapter, Power Cord, RCA cable, Support CD (User Guide, Pivot® Pro, LifeFrame), Quick Start Guide, Warranty Card (optional) Energy Star®, UL/cUL, CB, CE, FCC, CCC, BSMI, Gost-R, C-Tick, VCCI, RoHS, MIC * Specifications are subject to change...
...-languages Accessories Regulations approval 9.7 Kg (approx.) 560 mm (W) x 496 mm (H) x 280 mm (D) English, German, Italian, French, Dutch, Spanish, Russian, Traditional Chinese, Simplified Chinese, Japanese, Korean VGA-Audio-USB 3-in-1 cable, DVI cable, Power adapter, Power Cord, RCA cable, Support CD (User Guide, Pivot® Pro, LifeFrame), Quick Start Guide, Warranty Card (optional) Energy Star®, UL/cUL, CB, CE, FCC, CCC, BSMI, Gost-R, C-Tick, VCCI, RoHS, MIC * Specifications are subject to change...


