

User Guide
Page 6
... acetone. Conventions used in completing a task. N O T E : Tips and additional information to complete a task. Do not lift the display by yourself! Clean the monitor surface with the LCD. Turn off and unplug the power cord. The screen will recover slowly or you can turn off the Power Switch for hours. • When... the screen becomes black or flashes, or cannot work anymore, contact your monitor off the Power Switch and turn it on again to ...
... acetone. Conventions used in completing a task. N O T E : Tips and additional information to complete a task. Do not lift the display by yourself! Clean the monitor surface with the LCD. Turn off and unplug the power cord. The screen will recover slowly or you can turn off the Power Switch for hours. • When... the screen becomes black or flashes, or cannot work anymore, contact your monitor off the Power Switch and turn it on again to ...

User Guide
Page 8
Package contents Check your PW191 Series LCD package for the following items: LCD monitor Quick Start Guide Support CD 1 x Power cord 1 x Power adapter 1 x VGA cable 1 x DVI cable (PW191/PW191A) 1 x Audio cable 1 x Rear connector cover If any of the above items is damaged or missing, contact your retailer immediately. viii
Package contents Check your PW191 Series LCD package for the following items: LCD monitor Quick Start Guide Support CD 1 x Power cord 1 x Power adapter 1 x VGA cable 1 x DVI cable (PW191/PW191A) 1 x Audio cable 1 x Rear connector cover If any of the above items is damaged or missing, contact your retailer immediately. viii

User Guide
Page 9
The chapter lists the monitor features including introduction on the front and rear panels. Product introduction Chapter 1 This chapter gives a general description of the ASUS LCD monitor PW191 Series.
The chapter lists the monitor features including introduction on the front and rear panels. Product introduction Chapter 1 This chapter gives a general description of the ASUS LCD monitor PW191 Series.

User Guide
Page 10
...1.1 Welcome! The PW191 Series also features a rotating swivels, adjustable tilt and height, and an anti-reflection glare type panel (PW191 only) that enhance your monitor easy to scroll the bar while you ! 1.2 Features • 19" Widescreen LCD Monitor • Recommended ...; Touch sensor buttons • Both VGA and DVI-D Inputs (PW191/PW191A) • 2W x 2 Stereo speakers and earphone output • RoHS compliance 1-2 Chapter 1: Product introduction You can turn the ASUS® PW191 Series LCD monitor counterclockwise for purchasing the ASUS® PW191 Series LCD monitor!
...1.1 Welcome! The PW191 Series also features a rotating swivels, adjustable tilt and height, and an anti-reflection glare type panel (PW191 only) that enhance your monitor easy to scroll the bar while you ! 1.2 Features • 19" Widescreen LCD Monitor • Recommended ...; Touch sensor buttons • Both VGA and DVI-D Inputs (PW191/PW191A) • 2W x 2 Stereo speakers and earphone output • RoHS compliance 1-2 Chapter 1: Product introduction You can turn the ASUS® PW191 Series LCD monitor counterclockwise for purchasing the ASUS® PW191 Series LCD monitor!

User Guide
Page 11
...icon (function) highlighted while the OSD menu is also a hotkey for Volume adjustment. 3. ASUS LCD Monitor PW191 Series 1-3 Sensor: • Touch this sensor to increase the value of the LCD monitor Stereo Speaker Base 3 1 22 3 44 55 The touch sensors are sensitive. Sensor: ...• Touch this sensor to the next function. • This is activated. 2. 1.3 Monitor introduction Front of the function selected or move...
...icon (function) highlighted while the OSD menu is also a hotkey for Volume adjustment. 3. ASUS LCD Monitor PW191 Series 1-3 Sensor: • Touch this sensor to increase the value of the LCD monitor Stereo Speaker Base 3 1 22 3 44 55 The touch sensors are sensitive. Sensor: ...• Touch this sensor to the next function. • This is activated. 2. 1.3 Monitor introduction Front of the function selected or move...

User Guide
Page 13
... for PC VGA connection. 4. This port connects PC audio source by the bundled audio cable . 5. ASUS LCD Monitor PW191 Series 1-5 This port connects the power connector from the bundled power adapter. 2. This 24-pin port is purchased separately. A u d i o - D V I p o r t . Rear of the LCD monitor 1 2 3 4 5 1. D C - This 15-pin port is for PC (Personal Computer) DVI-D digital signal connection...
... for PC VGA connection. 4. This port connects PC audio source by the bundled audio cable . 5. ASUS LCD Monitor PW191 Series 1-5 This port connects the power connector from the bundled power adapter. 2. This 24-pin port is purchased separately. A u d i o - D V I p o r t . Rear of the LCD monitor 1 2 3 4 5 1. D C - This 15-pin port is for PC (Personal Computer) DVI-D digital signal connection...

User Guide
Page 15
Setup Chapter 2 This chapter provides instructions on how to correctly connect cables and properly adjust the tilt of the LCD monitor.
Setup Chapter 2 This chapter provides instructions on how to correctly connect cables and properly adjust the tilt of the LCD monitor.
User Guide
Page 17
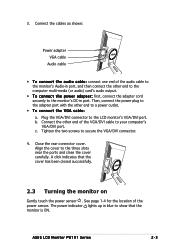
...and close the cover carefully. Align the cover to secure the VGA/DVI connector. 4. ASUS LCD Monitor PW191 Series 2-3 Close the rear connector cover. See page 1-4 for the location of the audio cable to the monitor's Audio-in port, and then connect the other end to the computer multi-media ...; To connect the VGA cable: a. c. The power indicator lights up in port. b. Connect the other end to the LCD monitor's VGA/DVI port. 3. A click indicates that the monitor is ON. Connect the cables as shown: Power adapter VGA cable Audio cable • To connect the audio cable: connect ...
...and close the cover carefully. Align the cover to secure the VGA/DVI connector. 4. ASUS LCD Monitor PW191 Series 2-3 Close the rear connector cover. See page 1-4 for the location of the audio cable to the monitor's Audio-in port, and then connect the other end to the computer multi-media ...; To connect the VGA cable: a. c. The power indicator lights up in port. b. Connect the other end to the LCD monitor's VGA/DVI port. 3. A click indicates that the monitor is ON. Connect the cables as shown: Power adapter VGA cable Audio cable • To connect the audio cable: connect ...

User Guide
Page 19
• The stand allows you cover the surface with soft cloth to prevent damage to the monitor. Turn the VESA cover counterclockwise to make the detachment safer and easier. We recommend that you to turn the monitor left/right up to 120º. 120º 2.5 Detaching the stand (for VESA wall mount. Have the front of the PW191 monitor is specially designed for VESA wall mount) The detachable stand of the monitor face down to open it. 2. ASUS LCD Monitor PW191 Series 2-5 To detach the stand: 1. Remove the VESA cover from the stand.
• The stand allows you cover the surface with soft cloth to prevent damage to the monitor. Turn the VESA cover counterclockwise to make the detachment safer and easier. We recommend that you to turn the monitor left/right up to 120º. 120º 2.5 Detaching the stand (for VESA wall mount. Have the front of the PW191 monitor is specially designed for VESA wall mount) The detachable stand of the monitor face down to open it. 2. ASUS LCD Monitor PW191 Series 2-5 To detach the stand: 1. Remove the VESA cover from the stand.

User Guide
Page 23
... range is from 0 to 100. • Phase adjusts the phase of pixels scanned by adjusting (Phase) and (Clock) separately. the adjusting range is not proportional. 3. ASUS LCD Monitor PW191 Series 3-3 In the User mode, colors of the image. is a hotkey to activate this function. • Contrast: the adjusting range is from 0 to 100. •...
... range is from 0 to 100. • Phase adjusts the phase of pixels scanned by adjusting (Phase) and (Clock) separately. the adjusting range is not proportional. 3. ASUS LCD Monitor PW191 Series 3-3 In the User mode, colors of the image. is a hotkey to activate this function. • Contrast: the adjusting range is from 0 to 100. •...

User Guide
Page 25
... can rotate the image by 90º, 180º, and 270º to meet the orientation of the monitor. • Before starting to www.portrait.com. Ctrl + Shift + 9 180º - Ctrl + Shift + R 0º - ASUS LCD Monitor PW191 Series 3-5 Make sure your PC. • The Pivot®Pro software is designed for each degree are installed...
... can rotate the image by 90º, 180º, and 270º to meet the orientation of the monitor. • Before starting to www.portrait.com. Ctrl + Shift + 9 180º - Ctrl + Shift + R 0º - ASUS LCD Monitor PW191 Series 3-5 Make sure your PC. • The Pivot®Pro software is designed for each degree are installed...

User Guide
Page 27
... temperature selection Skin-Tone selection DVI port VGA port Audio-in port Headphone port Colors Speaker (Built-in) Power LED Tilt Swivel TFT LCD (Anti-Reflection Glare Panel) 19" Wide Screen WXGA + 1440 x 900 0.285mm 300cd/m2 500:1 150º/130º 16.2M 8ms (Tr+Tf) Yes Yes 5 Video Preset Modes...-jack 3.5mm Mini-jack Silver + Black 2W x 2 Stereo Blue (ON)/ Amber (Stand-By) +90º ~ -5º +60º ~ -60º (continued on the next page) ASUS LCD Monitor PW191 Series 3-7 3.4 Specification summary (PW191) Panel Type Panel size Max.
... temperature selection Skin-Tone selection DVI port VGA port Audio-in port Headphone port Colors Speaker (Built-in) Power LED Tilt Swivel TFT LCD (Anti-Reflection Glare Panel) 19" Wide Screen WXGA + 1440 x 900 0.285mm 300cd/m2 500:1 150º/130º 16.2M 8ms (Tr+Tf) Yes Yes 5 Video Preset Modes...-jack 3.5mm Mini-jack Silver + Black 2W x 2 Stereo Blue (ON)/ Amber (Stand-By) +90º ~ -5º +60º ~ -60º (continued on the next page) ASUS LCD Monitor PW191 Series 3-7 3.4 Specification summary (PW191) Panel Type Panel size Max.

User Guide
Page 29
... Color temperature selection Skin-Tone selection DVI port VGA port Audio-in port Headphone port Colors Speaker (Built-in) Power LED Tilt Swivel TFT LCD (Non-Glare Panel) 19" Wide Screen WXGA + 1440 x 900 0.285mm 300cd/m2 700:1 160º/160º 16.2M 5ms (Tr+Tf) Yes Yes 5 Video Preset Modes...-jack 3.5mm Mini-jack Silver + Black 2W x 2 Stereo Blue (ON)/ Amber (Stand-By) +90º ~ -5º +60º ~ -60º (continued on the next page) ASUS LCD Monitor PW191 Series 3-9
... Color temperature selection Skin-Tone selection DVI port VGA port Audio-in port Headphone port Colors Speaker (Built-in) Power LED Tilt Swivel TFT LCD (Non-Glare Panel) 19" Wide Screen WXGA + 1440 x 900 0.285mm 300cd/m2 700:1 160º/160º 16.2M 5ms (Tr+Tf) Yes Yes 5 Video Preset Modes...-jack 3.5mm Mini-jack Silver + Black 2W x 2 Stereo Blue (ON)/ Amber (Stand-By) +90º ~ -5º +60º ~ -60º (continued on the next page) ASUS LCD Monitor PW191 Series 3-9

User Guide
Page 31
... Auto adjustment Color temperature selection Skin-Tone selection VGA port Audio-in port Headphone port Colors Speaker (Built-in) Power LED Tilt Swivel TFT LCD (Non-Glare Panel) 19" Wide Screen WXGA + 1440 x 900 0.285mm 300cd/m2 700:1 160º/160º 16.2M 5ms (Tr+Tf) Yes Yes 5 Video Preset Modes...-jack 3.5mm Mini-jack Silver + Black 2W x 2 Stereo Blue (ON)/ Amber (Stand-By) +90º ~ -5º +60º ~ -60º (continued on the next page) ASUS LCD Monitor PW191 Series 3-11 Specification summary (PW191S) Panel Type Panel size Max.
... Auto adjustment Color temperature selection Skin-Tone selection VGA port Audio-in port Headphone port Colors Speaker (Built-in) Power LED Tilt Swivel TFT LCD (Non-Glare Panel) 19" Wide Screen WXGA + 1440 x 900 0.285mm 300cd/m2 700:1 160º/160º 16.2M 5ms (Tr+Tf) Yes Yes 5 Video Preset Modes...-jack 3.5mm Mini-jack Silver + Black 2W x 2 Stereo Blue (ON)/ Amber (Stand-By) +90º ~ -5º +60º ~ -60º (continued on the next page) ASUS LCD Monitor PW191 Series 3-11 Specification summary (PW191S) Panel Type Panel size Max.

User Guide
Page 33
For optimal resolution, we recommend that you choose a mode listed in the table may not be supported. ASUS LCD Monitor PW191 Series 3-13 3.5 Supported operating modes Standard Resolution Horizontal Frequency Vertical Frequency Pixel Frequency DOS VGA SVGA XGA SXGA VESA VESA (Primary) 720 x 400 640 x 480 ...
For optimal resolution, we recommend that you choose a mode listed in the table may not be supported. ASUS LCD Monitor PW191 Series 3-13 3.5 Supported operating modes Standard Resolution Horizontal Frequency Vertical Frequency Pixel Frequency DOS VGA SVGA XGA SXGA VESA VESA (Primary) 720 x 400 640 x 480 ...


